Floodplain Modeling Using Hec-ras
This document was uploaded by user and they confirmed that they have the permission to share it. If you are author or own the copyright of this book, please report to us by using this DMCA report form. Report DMCA
Overview
Download & View Floodplain Modeling Using Hec-ras as PDF for free.
More details
- Words: 256,698
- Pages: 772
Loading documents preview...
FLOODPLAIN MODELING USING HEC-RAS First Edition Authors Bentley Systems Gary Dyhouse Jennifer Hatchett Jeremy Benn Managing Editor Colleen Totz Editors David Klotz, Adam Strafaci, Annaleis Hogan, and Kristen Dietrich Contributing Authors David Ford Consulting, Houjong Rhee
Exton, Pennsylvania USA
FLOODPLAIN MODELING USING HEC-RAS First Edition Copyright © 2007 by Bentley Institute Press Bentley Systems, Incorporated. 685 Stockton Drive Exton, Pennsylvania 19341 www.bentley.com Copyright © 2003 by Haestad Press Haestad Methods, Incorporated 27 Siemon Company Drive, Suite 200W Watertown, Connecticut 06795 www.haestad.com
All rights reserved. Printed in the United States of America. No part of this publication may be reproduced, stored in a retrieval system, or transmitted, in any form or by any means, electronic, mechanical, photocopying, recording, or otherwise, without the prior written permission of the publisher.
Indexer: Beaver Wood Associates Proofreading: Beaver Wood Associates
Special thanks to The New Yorker magazine for the cartoons throughout the book. © The New Yorker Collection from cartoonbank.com. All rights reserved. Page 33 – (1999) Robert Mankoff
Page 369 – (1991) Roz Chast
Page 79 – (1996) Arnie Levin
Page 384 – (1999) Warren Miller
Page 91 – (2003) David Sipress
Page 416 – (1970) Robert Day
Page 102 – (1989) Edward Koren
Page 453 – (1990) Robert Mankoff
Page 129 – (1989) Gahan Wilson
Page 471 – (1996) P.C. Vey
Page 150 – (1987) Robert Mankoff
Page 483 – (1999) Danny Shanahan
Page 160 – (2002) John Caldwell
Page 523 – (1997) Michael Maslin
Page 188 – (1991) Henry Martin
Page 543 – (1992) Bruce Eric Kaplan
Page 225 – (1988) Warren Miller
Page 555 – (1997) Arnie Levin
Page 243 – (1988) Mischa Richter
Page 577 – (1976) Stan Hunt
Page 293 – (1999) Edward Koren
Page 620 – (2000) J.C. Duffy
Page 312 – (2000) John Caldwell
Page 604 – (2002) Peter Steiner
Page 326 – (1993) Donald Reilly
Page 640 – (1998) Robert Mankoff
Page 339 – (1997) J.B. Handelsman
Page 656 – (2003) C. Covert Darbyshire
Page 350 – (1988) Gahan Wilson Graphical HEC-1 is a trademark of Bentley Systems, Inc. All other trademarks, brands, company or product names not owned by Bentley Systems or its subsidiaries are the property of their respective owners, who may or may not be affiliated with, connected to, or sponsored by Haestad Methods or its subsidiaries. Haestad Methods is a registered trade name of Bentley Systems, Inc. Library of Congress Control Number: 2007925245 ISBN: 978-1-934493-02-1
Bentley Systems, Inc. 685 Stockton Drive Exton, PA 19341, USA
Phone (US): 800-225-2613 Phone (International): 203-805-1100 Internet: www.bentley.com/books
This book reflects my four decades of experience with the U.S. Army Corps of Engineers. I will always be grateful for the opportunities to learn and grow during my career with the Corps and particularly through my long association with the Corps’ Hydrologic Engineering Center. I greatly appreciate the time and assistance rendered to me by engineers throughout the world who freely provided information, review comments, guidance and data which have so greatly enhanced this book. Finally, I would like to thank my family, and especially my wife Diane, for their encouragement and understanding of the amount of my time devoted to preparing this book. I hope that Floodplain Modeling Using HEC-RAS will be a valuable and helpful aid for engineers everywhere to successfully complete open channel hydraulics analyses and designs. Gary R. Dyhouse
Preface
As evidenced by the development of tools that enable proper analysis of river systems, floodplain modeling is more important than ever before. Current federal, state/provincial, and local regulations often require a hydraulic analysis prior to development or construction in a floodplain. The hydraulic analysis predicts the effects of the development on existing water surface elevations and identifies potential adverse effects of the proposed work. To aid in accurate floodplain modeling, engineers use computer models such as the Hydrologic Engineering Center-River Analysis System (HEC-RAS). HEC-RAS is one of the most widely used programs for floodplain modeling. The program, available since 1995, has been continuously improved and expanded since its initial release. HEC-RAS is considered the standard by most engineers routinely involved in river hydraulics modeling. Floodplain modeling is not an easy task, even with the assistance of a computer program such as HEC-RAS. Although a hydraulic-modeling program may be easy to run, the engineer needs to assess whether the program is giving valid answers. This book helps the working engineer or the senior- or graduate-level engineering student use hydraulic models effectively; it helps them develop the data required by the models and interpret the output. Written and reviewed by highly experienced hydraulic engineers with decades of academic and consulting engineering experience on a wide variety of realworld hydraulic modeling problems, Floodplain Modeling Using HEC-RAS is intended to take the modeler from start to finish in planning and analyzing a floodplain hydraulic-modeling situation, including: • Determining which type of model is appropriate • Planning the hydraulic study • Determining data needs and sources • General modeling guidance • Specific guidance for difficult modeling problems • Critically evaluating program output • Effectively managing files and documenting the model
xiv
Preface
Overview Each chapter in this book covers certain aspects of floodplain hydraulic modeling. The intent is to walk the modeler through the complete steps of a hydraulic study. Although not every hydraulic study requires the level of detail presented in each chapter, most studies require the general information, methods, and techniques given in much of the book. Discussion topics and sample problems are included in most of the chapters to allow the engineer or student to apply the knowledge gained in the chapter. Chapter 1, “Introduction to Floodplain Modeling and Management.” This chapter provides an overview and brief history of floodplain modeling. It introduces the HEC-RAS program and describes the major types of studies and projects that use floodplain hydraulic modeling. Chapter 2, “Introduction to Open Channel Hydraulics.” This chapter reviews the terminology, equations, and concepts of open-channel flow. It provides an overview of the four main equations comprising the typical hydraulic analysis—the continuity, energy, momentum, and Manning equation. Example problems using the key equations are incorporated throughout the chapter. The direct-step method for computing a water-surface profile and the standard-step method, used by essentially all steady, gradually varied-flow hydraulics programs, are presented, as well. Chapter 3, “Hydraulic Modeling Tools.” This chapter describes the general hydraulic simulation procedures, which vary from simple uniform-flow assumptions to multidimensional, unsteady flow models. The more popular computer programs used for each situation are presented and overviewed. Coverage includes data needs, strengths and weaknesses of the programs, and descriptions of when different modeling methods are most appropriate. Chapter 4, “Planning for Floodplain Modeling Studies.” This chapter steps through a typical floodplain hydraulic study using gradually varied, steadyflow assumptions. The chapter discusses the objectives of the study, applicable programs, data needs, modeling procedures, data checking, calibration, production runs, project impact evaluation, and report preparation. Chapter 5, “Data Needs, Availability, and Development.” This chapter describes the data required for a floodplain hydraulic study, including data sources, study reaches and boundaries, geometric data, the locations along the stream to define the geometric data, discharge data, and selection of Manningʹs n values. The chapter introduces the reader to the data needed for calibration and verification of the models. These critical steps ensure that the hydraulic model properly simulates the flood levels that will occur in the river system during flood events. Chapter 6, “Bridge Modeling.” This chapter describes how to model bridge effects on flood levels, including the contraction and expansion of flow through the bridge opening and adjacent floodplain, pier effects, and road-
xv
way overtopping. It outlines procedures for locating the start of flow contraction and end of flow expansion at bridges, as well as methods for determining expansion and contraction coefficients at bridges. The chapter emphasizes the correct application of ineffective flow areas to properly model flow contraction and expansion at bridges. It also describes procedures to model unusual bridge situations. The chapter discusses the computational procedures of the Federal Highway Administrationʹs WSPRO program, now available in HECRAS. Chapter 7, “Culvert Modeling.” This chapter covers the proper techniques for culvert modeling, including culvert analysis for either inlet or outlet control. The different methods for culvert modeling under inlet or outlet control are presented, along with the culvert data necessary to properly compute the culvert effect on flood elevations. The chapter also addresses unusual culvertmodeling situations. Chapter 8, “Data Review, Calibration, and Results Analysis.” This chapter focuses on properly evaluating the initial modeling effort for the study stream to correct errors and inconsistent results in the first operation of the model. The chapter explains the warnings, notes, and error messages common in HEC-RAS. It describes the most commonly used methods for improving the quality of the model output, including how to use HEC-RAS for mixed-flow analysis and cross-section interpolation, as well as how to critically evaluate the program’s output by using its graphical and tabular features. The chapter presents the development of hydrologic routing data from HEC-RAS for use with hydrologic models. It covers how to calibrate the model to available river data. The chapter also describes how to evaluate the output to determine whether the river model is adequately simulating water-surface profiles of important flood events. Chapter 9, “The U.S. National Flood Insurance Program.” In the United States, HEC-RAS is widely used to perform floodplain hydraulic analyses for FEMA Flood Insurance Studies. This chapter provides an overview of the history of the flood insurance program, defines important terminology used for the analysis, and explains the pertinent regulations. The hydrology and hydraulic studies associated with flood insurance reports are presented. Requested changes to existing floodplain or floodway mapping require a LOMR and/or CLOMR. The chapter describes the process by which the engineer performs this work. Computer software used by the reviewing agency is also presented. Chapter 10, “Floodway Modeling.” This chapter describes the encroachment methods available in HEC-RAS and advises the user on the development of an acceptable floodway. Floodway modeling is an iterative process and can incorporate multiple encroachment techniques. The chapter describes methods of handling the presence of levees along the floodway and how to make changes to an existing floodway for flood insurance studies. Chapter 11, “Channel Modification.” Channelization is often used to reduce the risk of flood damage to property near a stream. This chapter gives the
xvi
Preface
reader insights into the various types of channel modifications and the effects of each. The chapter focuses on channel enlargements. It describes the effect of channelization on a riverʹs sediment regime. In addition to channel modeling, the chapter addresses special concerns for supercritical flow channels and describes the need for additional features for a channel, including the use of junctions, drop structures, low-flow channels, channel protection and linings, and freeboard. Chapter 12, “Advanced Floodplain Modeling.” This chapter describes design and analysis considerations and the hydraulic modeling of many common floodplain features, including levees, diversions, in-line weirs, drop structures, gated structures, buildings, split-flow situations, and ice cover (or ice jams). Chapter 13, “Mobile Boundary Situations and Bridge Scour.” Most steady- or unsteady-flow analyses assume rigid boundary conditions (cross-section geometry does not change with time). However, there are situations for which the evaluation of scour and deposition is necessary for an accurate analysis of flood levels and for the proper analysis of the performance of flood-reduction structures. The types of flood-reduction solutions and the scour, or sedimentation, analyses needed for each are discussed. The chapter emphasizes bridge-scour analysis, with procedures given to evaluate general scour through a bridge opening. Contraction, pier, and abutment scour are defined, and computation procedures are illustrated with several examples. Chapter 14, “Unsteady Flow Modeling.” This chapter describes and defines unsteady-flow concerns and concepts. It presents the theory of unsteady flow analysis using the full St. Venant equations, as well as popular unsteady flow models and hydrologic routing models. Guidance is given in selecting a routing model and the situations when a full unsteady-flow (hydraulic) model is necessary. Readers even learn how to troubleshoot an unsteady-flow model. Chapter 15, “Importing/Exporting Files with HEC-RAS.” This chapter presents methods for importing and exporting files between HEC-RAS and other programs. It describes how to use HEC-DSS (Data Storage System) and provides an overview of the HEC-GeoRAS program. The chapter focuses primarily on importing HEC-2 models to HEC-RAS because many datasets using the original HEC-2 program have been developed since the first issue of that software. The chapter discusses use of these HEC-2 datasets and the modifications that are necessary when importing them into HEC-RAS. Computational differences between the two programs are also described, and methods to check the HEC-2 data to be used in HEC-RAS are covered.
Continuing Education and Problem Sets Also included in this text are problems to give students and professionals the opportunity to apply the material covered in each chapter. Some of these problems have short answers, while others require more thought and may have more than one solution. The accompanying CD in the back of the
xvii
book contains a full version of HEC-Pack, including HEC-RAS, which can be used to solve many of the problems, as well as data files with much of the information given in the problems pre-entered. Bentley Systems also publishes a solutions guide that is available to instructors and professionals. We hope that you find this culmination of our efforts and experience to be a core resource in your engineering library, and wish you the b e s t w i t h y o u r modeling endeavors.
Foreword
My first exposure to an instructional “manual” was when I was about 12 years old. My father bought a complicated dollhouse for my sister, and we put it together for her on Christmas Eve. The instructions were not well written, and the illustrations were grainy and not well referenced in the text. Needless to say, we struggled with the dollhouse and got it together just before my sister got up. We accomplished the task more by trial and error than by using the manual. I learned some new choice words from my father in the process and acquired a few leftover pieces of the dollhouse. I started to develop my appreciation for a well-written and well-illustrated reference document on that Christmas Eve. In over 30 years as a hydraulician (yes, there is such a word even though the spell-checker does not recognize it) and hydrology engineer, I have encountered many manuals and reference documents. My first job out of college was with the California Water Quality Control Board where I read “how to” manuals regarding measurement and chemical analysis of effluent—again, many were not well written and were more in the vein of the mechanics of doing things rather than in understanding the process. I then joined the U.S. Army as a combat engineer attached to the 7th Special Forces Group (my draft number was 4). There, the manuals were dry but concise. However, there was no effort to give insight into why things were done as described in the manual—but then I could understand the need for expediency. After my military stint, I worked at the Hydrologic Engineering Center (HEC) in Davis, California, where I was exposed to not just well-written training manuals and reference documents, but to the people who wrote them. I found that tapping the expertise of these people as well as their writings made the learning process enjoyable, and the content stuck with me. I also got a taste of writing such documents and assisted in teaching HEC-2 and HEC-6. The situation continued when I went to the Waterways Experiment Station (WES), Hydraulic Laboratory (now combined with the Coastal group and known as the Coastal and Hydraulic Laboratory) in Vicksburg, Mississippi. There, I was involved in writing more manuals and in instruction using those manuals. Instructing professionals from beginners to knowledgeable engineers taught me the fine art (and it is an art, something that engineers are
notoriously lacking) of commanding the interest of the experienced engineer, while not leaving behind the novice. After leaving WES, I had over 15 years of private practice, teaching professional license reviews, sprinkled with teaching at various academic institutions; all of which has reinforced this approach. I have never found, in any reference document, a combination of breadth, depth, concise direction, presentation of nuances, representative example problems, interesting and relevant historical examples, and a readable text without excessive use of technical jargon. This book comes the closest to that combination. I will not belabor you with the contents of each chapter—that is well presented in the Preface and opening chapter. What I will tell you is that the neophyte engineer will appreciate the “back to basics” chapters on open channel hydraulics, a quick review of how civil engineering water resources planning is done, and how to conduct a hydraulic/hydrologic study. For those of you that are more experienced and read these same chapters, you will nod your head in agreement, as the cobwebs of your mind are swept away. For both, the mechanics of using HEC-RAS, which is the main theme of this book, are well presented and important. The most important aspect of the book, however, is the continual presentation of when each option should be used in HEC-RAS and why. For instance, you may flawlessly input a large triple box culvert using the culvert option, but it may be better modeled as a bridge with two piers. Such thinking is vitally important. Nuances such as this example are throughout the book and are beneficial to all, regardless of the level of experience. The reader will also find numerous example problems that fully illustrate the points presented. The book reads in a narrative way, flows smoothly and does not get hung up on minute details as books of this type are prone to do. Although the 700 odd pages may initially seem daunting, you will appreciate the level of detail and the breadth of coverage. I canʹt promise that it is as riveting as a suspense novel, but for the career hydraulic engineer or hydrologist who is interested in using the most widely used hydraulic program in the world, this book will bring a quickening of the heart as you read about unsteady flow modeling, a flush to the face as you get to the bridge portion, and a sweating of the palms when you turn to the FEMA floodway optimization. Enjoy! I did. David T. Williams, Ph.D., P.E., P.H. President, WEST Consultants, Inc.
Table of Contents
Chapter 1
Preface
xiii
About the Software
xix
Introduction to Floodplain Modeling and Management
1
1.1
A Brief History of Floodplain Management
1
1.2
Floodplain Modeling
6
1.3
Types of Floodplain Studies 7 Floodplain Studies ......................................................................... 7 Transportation Facilities ............................................................... 9 Floodways/Encroachments .......................................................... 9 Structural Measures..................................................................... 10
1.4
Chapter Summary
Chapter 2
Introduction to Open Channel Hydraulics
11
13
2.1
Terminology 13 Depth of Flow............................................................................... 16 Channel Top Width and Wetted Perimeter ............................. 17 Hydraulic Depth and Hydraulic Radius. ................................. 18 Discharge....................................................................................... 18 Velocity.......................................................................................... 19 Slopes............................................................................................. 22
2.2
Flow Classification 23 Steady and Unsteady Flow......................................................... 23 Uniform and Varied Flow .......................................................... 23 Gradually and Rapidly Varied Flow......................................... 25 Subcritical and Supercritical Flow............................................. 26
ii
Table of Contents
2.3
Fundamental Equations 29 The Continuity Equation.............................................................29 The Energy Equation ...................................................................29 The Momentum Equation ...........................................................30 The Chézy and Manning Equations ..........................................35
2.4
Energy and Momentum Concepts 37 Specific Energy and Alternate Depths ......................................38 Critical Depth................................................................................40 Normal Depth...............................................................................42 The Hydraulic Jump ....................................................................43
2.5
Profile Shapes 45 Governing Equations...................................................................45 Profile Classification ....................................................................46
2.6
Computational Methods 52 Direct Step Method ......................................................................52 Standard Step Method.................................................................56
2.7
Chapter Summary
Chapter 3
Hydraulic Modeling Tools
69
75
3.1
Uniform Flow
76
3.2
Gradually Varied, Steady Flow 76 HEC-2.............................................................................................77 HEC-RAS for Steady Flow..........................................................78 WSP-2.............................................................................................79 WSPRO (HY-7) .............................................................................80
3.3
Quasi-Unsteady Flow 80 HEC-1/HEC-HMS ........................................................................80 TR20................................................................................................81 PondPack .......................................................................................81
3.4
Gradually Varied, Unsteady Flow (One-Dimensional) 81 HEC-UNET ...................................................................................83 HEC-RAS, Unsteady Flow ..........................................................84 FLDWAV .......................................................................................85 FEQ.................................................................................................87
3.5
Gradually Varied, Unsteady Flow (Two-Dimensional) 87 RMA2 .............................................................................................88 FESWMS-2DH ..............................................................................90
3.6
Gradually Varied, Unsteady Flow (Three-Dimensional) 90 RMA10 ...........................................................................................90
3.7
Sediment Models 90 HEC-6.............................................................................................92 SED2D ............................................................................................92
iii
3.8
Physical Models
93
3.9
Selecting a Simulation Program
94
Chapter Summary
95
3.10
Chapter 4
Planning for Floodplain Modeling Studies
97
4.1
Ten Steps of Floodplain Modeling 98 Step 1: Setting Project and Study Objectives............................ 99 Step 2: Study Phases .................................................................. 100 Step 3: Field Reconnaissance.................................................... 101 Step 4: Determining the Type of Hydrologic/Hydraulic Simulation Needed ................................................................ 103 Step 5: Determining Data Needs ............................................. 104 Step 6: Defining Hydrologic Modeling Procedures.............. 106 Step 7: Performing Data Input and Calibration .................... 107 Step 8: Performing Production Runs for Base Conditions... 107 Step 9: Performing Project Evaluations .................................. 107 Step 10: Preparing the Report .................................................. 108
4.2
Chapter Summary
Chapter 5
Data Needs, Availability, and Development
109
111
5.1
Data Sources 111 Stream Gage Data ...................................................................... 111 Previous Studies......................................................................... 112 Mapping and Aerial Photos ..................................................... 113
5.2
Study Limits and Boundary Determinations 114 Hydraulic Boundaries ............................................................... 114 Sediment Boundaries ................................................................ 120
5.3
Geometric Data 121 Assessing Existing Topographic Data .................................... 121 Aerial Photographs and Site Visits.......................................... 121 Locating and Modeling Cross Sections .................................. 122 Cross-Section Modeling Information...................................... 126 Geometric Data for Obstructions............................................. 129 Reach Length Information........................................................ 130 Survey Data Accuracy............................................................... 130
5.4
Discharge Data 135 Previous Study Information..................................................... 136 Gage Data.................................................................................... 136 Statistical Analysis ..................................................................... 138
iv
Table of Contents
Regional Analysis.......................................................................139 Watershed Modeling .................................................................142 5.5
Roughness Data 144 Estimation of Manning’s n........................................................144 Other Techniques to Estimate n ...............................................155
5.6
Other Data 156 Contraction/Expansion Coefficients........................................156 Sediment Data.............................................................................157 Future Changes...........................................................................158
5.7
Routing Data
5.8
Calibration and Verification Needs 159 Calibration Data .........................................................................159
5.9
Chapter Summary
Chapter 6
Bridge Modeling
158
163
167
6.1
The Effects of a Bridge on Water Flow
167
6.2
Low Flow Through Bridges 170 Equations for Low Flow ............................................................170 Class A Low Flow ......................................................................175 Class B Low Flow .......................................................................175 Class C Low Flow.......................................................................176
6.3
High Flow Through Bridges 176 The Bridge as a Sluice Gate.......................................................177 The Bridge as an Orifice ............................................................178 The Bridge as a Weir..................................................................179 Combination Flow......................................................................182
6.4
Defining Bridge Cross Sections and Coefficients 183 Cross-Section Location Techniques .........................................183 Loss Coefficients for Flow Through Bridges..........................194
6.5
Ineffective Flow Areas 199 Ineffective Flow Area Elevations .............................................202 Ineffective Flow Area Locations...............................................204
6.6
Modeling the Bridge Structure with HEC-RAS 206 Bridge Superstructure................................................................208 Bridge Piers .................................................................................209 Sloping Bridge Abutments........................................................211 Use of the Bridge Design Editor...............................................211 Bridge Computation Methods..................................................213
6.7
Special Situations 215 Multiple Openings .....................................................................215
v
Parallel Bridges .......................................................................... 217 Perched Bridges ......................................................................... 217 Low Water Bridges .................................................................... 218 Bridges on Skew......................................................................... 220 The Bridge as a Dam ................................................................. 221 6.8
WSPRO Bridge Modeling 223 WSPRO Modeling Procedures................................................. 223 WSPRO Computation Procedures .......................................... 226
6.9
Chapter Summary
Chapter 7
Culvert Modeling
228
233
7.1
Terminology
233
7.2
Effects of a Culvert
236
7.3
Culvert Hydraulics – Inlet/Outlet Control 237 Inlet Control................................................................................ 237 Outlet Control ............................................................................ 240
7.4
Inlet Control Computations
245
7.5
Outlet Control Computations
248
7.6
Defining Cross-Section Locations and Coefficients 253 Section Location ......................................................................... 253 Coefficients ................................................................................. 255 Adjustments to Bounding Cross Sections 2 and 3 ................ 256
7.7
Culvert Modeling Using HEC-RAS 257 Roadway Geometry................................................................... 258 Inlet Control Data ...................................................................... 260 Outlet Control Data ................................................................... 261
7.8
Special Culvert Modeling Issues 261 Flow Attenuation ....................................................................... 261 Sediment and Debris ................................................................. 265 Scour at Culvert Outlets............................................................ 269 Changing Culvert Shape........................................................... 271 Changing Discharge within a Culvert .................................... 272 Changing Materials within a Culvert ..................................... 273 Drop Culvert............................................................................... 274 Fish Passage ................................................................................ 274 Replacing Bridges with Culverts ............................................. 276
7.9
Chapter Summary
277
vi
Table of Contents
Chapter 8
Data Review, Calibration, and Results Analysis
283
8.1
Input Data Checking 283 Checks Performed by the Modeler ..........................................284 Checks Performed by HEC-RAS..............................................284
8.2
Analyzing HEC-RAS Output 285 Program Checks .........................................................................285 Graphical Output Review .........................................................288 Tabular Output Review.............................................................291 Mixed Flow Analysis .................................................................294
8.3
Adjusting HEC-RAS Input 295 Changing Station ID ..................................................................295 Cross Section Points Filter ........................................................296 Reverse Stationing......................................................................296 Cross-Section Interpolation ......................................................296
8.4
Calibration Procedures 297 Adopting the Working Model..................................................298 Comparing Model Output to Actual Data .............................298 Adjustments to Model Parameters ..........................................298 Verification ..................................................................................300 Sensitivity Tests ..........................................................................301
8.5
Production Runs 301 Large Changes of Key Parameters...........................................302 Constraint Elevations and Ineffective Flow Areas ................302
8.6
Developing Hydrologic Routing Data 303 Routing Reaches .........................................................................303 Storage-Outflow Values ............................................................304 Wave Travel Time ......................................................................308 Reach Routing Steps ..................................................................310 Modifications to Routing Data .................................................310
8.7
Chapter Summary
Chapter 9
The U.S. National Flood Insurance Program
311
317
9.1
The U.S. National Flood Insurance Program
317
9.2
Terminology and Concepts 319 Special Flood Hazard Area .......................................................319 Floodway .....................................................................................319 Flood Surcharge..........................................................................319 Floodway Fringe.........................................................................321
vii
9.3
Publications Used in the NFIP 322 Flood Hazard Boundary Map (FHBM) .................................. 322 Flood Insurance Rate Map (FIRM) .......................................... 322 Flood Insurance Study (FIS)..................................................... 326
9.4
Criteria for Land Management and Use
9.5
Revising Flood Studies and Maps 331 Identification and Mapping of Special Flood Hazard Areas ........................................................................................ 331 Revisions and Amendments .................................................... 332 CLOMRs – Review of Proposed Projects ............................... 339
9.6
Revision Submittal Steps 341 Step 1 – Obtain FIS, FIRMs, and Backup Data....................... 341 Step 2 – Revise Hydraulic Models........................................... 341 Step 3 – Annotation of FIRMs, FIS, and Topographic Map .......................................................................................... 343 Step 4 – Fill Out MT-2 Forms ................................................... 343 Step 5 – Submit to FEMA.......................................................... 343 Step 6 – Wait for a Response .................................................... 344 Step 7 – Receive Letter or Request for Additional Data....... 344
9.7
FEMA Review Software 345 CHECK-2..................................................................................... 345 CHECK-RAS............................................................................... 345
9.8
Chapter Summary
Chapter 10
Floodway Modeling
330
346
349
10.1
Methods of Performing an Encroachment Analysis 350 Method 1: Specify Encroachment Stations............................. 351 Method 2: Specify Floodway Top Width ............................... 351 Method 3: Specify Percent Conveyance Reduction .............. 352 Method 4: Specify Target Surcharge with Equal Conveyance Reduction.......................................................... 353 Method 5: Optimization with Two Targets ........................... 354
10.2
Developing a Floodway in HEC-RAS 354 Establishing Base Conditions ................................................... 355 Creating a Steady Flow Data File ............................................ 355 Downstream Boundary Conditions ........................................ 355 Global Options ........................................................................... 356 Reach Options ............................................................................ 357 River Station Options ................................................................ 357 Computing the Floodway Plan................................................ 358
10.3
Reviewing the Results 358 Additional Runs/Methods ........................................................ 359 Finalizing the Floodway with Method 1 ................................ 360
viii
Table of Contents
Guidance for Correcting Excessive or Negative Surcharge .................................................................................361 10.4
Reviewing and Modifying Encroachment Output 362 Encroachment Tables.................................................................362 Graphics.......................................................................................363 Key Considerations....................................................................363 Levee Requirements for FEMA Certification.........................365
10.5
Adopting the Floodway 367 Satisfying Community Needs ..................................................369 Mapping the Floodway .............................................................369 Enforcing the Floodway ............................................................371
10.6
Working With an Existing Floodway 372 Placing Obstructions in the Floodway ....................................372 Changes to a Floodway .............................................................373
10.7
Chapter Summary
Chapter 11
Channel Modification
373
377
11.1
Channel Stability 377 A Stream in Equilibrium ...........................................................378 A Nonequilibrium Condition—Urbanization .......................381 A Nonequilibrium Condition—Channelization....................381 Developing a Stable Channel Modification............................384 Environmental Issues ................................................................385 Positive Effects of Channelization ...........................................386
11.2
Channel Modification Methods 387 Levees...........................................................................................387 High-Flow Diversion Channel and Weir................................387 High-Flow Cutoff/Diversion Channel ....................................389 Clearing and Snagging ..............................................................390 Compound Channels.................................................................391 Clearing and Enlarging One Side of the Channel .................393 Widening the Upper Channel and Using the Original Channel for Low Flow ...........................................................393 Realigning the Channel .............................................................394 Constructing a Paved Channel.................................................394 New Channel ..............................................................................394 Channel Rehabilitation ..............................................................396 Permitting Requirements ..........................................................399
11.3
Channel Design Considerations 400 Flow Regime/Mixed Flow.........................................................400 Air Entrainment..........................................................................401 Linings .........................................................................................402 Freeboard.....................................................................................403
ix
Channel Transitions .................................................................. 404 Junctions...................................................................................... 405 Channel Protection .................................................................... 406 Low Flow Channel..................................................................... 408 Superelevation............................................................................ 408 Curved Channels ....................................................................... 410 Drop Structures/Stabilizers ...................................................... 410 Debris Basins .............................................................................. 412 Bridge Piers................................................................................. 413 11.4
HEC-RAS Input Data for Channel Modifications 414 Study Watershed/Channel Boundaries .................................. 414 Channel Modification Features................................................ 414 HEC-RAS Channel Improvement Template.......................... 414
11.5
Stable Channel Design Using HEC-RAS 417 Uniform Flow Analysis............................................................. 417 Stable Channel Design .............................................................. 421 Design Parameters ..................................................................... 428
11.6
Analyzing Results 429 Velocity........................................................................................ 430 Energy Grade Line Slope .......................................................... 430 Top Width ................................................................................... 430 Sensitivity of Manning’s n........................................................ 430 Sensitivity of Scour/Sediment Deposition on the Design Profile ......................................................................... 430 Channel Effects Outside of a Modified Reach....................... 431 Effects on Hydrographs ............................................................ 431 Plan Comparisons...................................................................... 431
11.7
Channel Maintenance Requirements
433
11.8
Chapter Summary
433
Chapter 12
Advanced Floodplain Modeling
437
12.1
Levees 437 Levee Characteristics................................................................. 437 Modeling Procedures ................................................................ 444
12.2
Modeling Obstructions 451 Without Storage Considerations ............................................. 452 With Storage Considerations ................................................... 453
12.3
Modeling Tributaries and Junctions 456 Cross-Section Locations ............................................................ 457 Computing Losses and Water Surface Elevations through a Junction ................................................................. 457
x
Table of Contents
12.4
Inline Gates and Weirs 459 Types of Weirs and Gated Openings ......................................460 Governing Equations.................................................................461 Modeling Procedures.................................................................465 Output Analysis .........................................................................469
12.5
Drop Structures 470 Modeling of Drop Structure as an Inline Weir ......................471 Modeling of Drop Structure Using Cross Sections ...............471
12.6
Split Flow 473 Split Flow Situations ..................................................................473 Computational Procedures .......................................................476 Modeling Procedures for Separate Channel Splits................476 Modeling Procedures for Lateral Weirs..................................477
12.7
Ice Cover and Ice Jam Flood Modeling 483 Effects on Water Surface Elevations ........................................483 Data Requirements for Ice Analysis ........................................484 Ice Modeling Procedures with HEC-RAS...............................487 Output Review ...........................................................................488 Ice Modeling Assistance............................................................488
12.8
Chapter Summary
Chapter 13
Mobile Boundary Situations and Bridge Scour
489
501
13.1
Mobile Boundary Analysis
501
13.2
Types of Mobile Boundary Analyses 502 Base Conditions ..........................................................................502 Reservoir Projects .......................................................................503 Channel Modification Projects .................................................506 Levee Projects .............................................................................506 Diversion Projects.......................................................................507 Channel Stability and Protection .............................................509
13.3
Bridge Scour 509 Key References............................................................................510 Types of Scour ............................................................................511
13.4
Bridge Scour Computational Procedures 519 Initial Preparation ......................................................................519 General Bridge Scour Analysis Procedures............................520 Contraction Scour.......................................................................522 Pier Scour.....................................................................................527 Abutment Scour..........................................................................538
xi
13.5
Computing Scour with HEC-RAS 545 Applying the Flow Distribution Option................................. 545 Bridge Scour Data ...................................................................... 546 Total Scour .................................................................................. 548
13.6
Cautions and Concerns for Bridge Scour
13.7
Sediment Discharge Relationships 551 Sediment Transport Equations ................................................ 554 Cautions in Applying Sediment Transport Equations......... 556 Applying the Equations with HEC-RAS ................................ 558
13.8
Chapter Summary
Chapter 14
Unsteady Flow Modeling
550
560
563
14.1
Why Use an Unsteady Flow Model? 564 Attenuation ................................................................................. 564 Flow restrictions......................................................................... 568 Looped ratings ........................................................................... 568 Flow Splits................................................................................... 569 Time-Based (Transient) Effects ................................................ 570
14.2
Unsteady Flow Theory 570 St. Venant Equations ................................................................. 571 Steady-State Approximation .................................................... 576 Level-Pool Routing .................................................................... 577 Kinematic Wave Approximation............................................. 578 Diffusion Wave Approximation .............................................. 578 Theoretical Applicability of Various Approximations......... 579
14.3
Solution of Equations 580 Solving the Diffusion Wave Equation .................................... 580 Solving the Full St. Venant Equations .................................... 587
14.4
Practical Choice of Unsteady Modeling Approach 590 Routing Models.......................................................................... 590 Hydrodynamic Modeling......................................................... 593 Hybrid Approach....................................................................... 602 Troubleshooting Models........................................................... 603
14.5
Unsteady Flow Modeling Using HEC-RAS 604 Geometric Data Entry and Preprocessor................................ 604 Modeling Floodplain Geometry .............................................. 610 Unsteady Flow Data Editor...................................................... 612 Unsteady Flow Analysis ........................................................... 617 Unsteady Flow Simulation Results ......................................... 620 Other Features in HEC-RAS Unsteady Flow Simulation .... 626
14.6
Chapter Summary
632
xii
Table of Contents
Chapter 15
Importing and Exporting Files with HEC-RAS
639
15.1
Imported File Types 639 HEC-2 Files..................................................................................640 HEC-RAS Files............................................................................640 UNET Files ..................................................................................640 Corps Survey Data Files ............................................................641 GIS/CADD Files..........................................................................641 DSS Files ......................................................................................642 Spreadsheet and Text Files .......................................................644
15.2
Exporting Files 645 DSS Files ......................................................................................645 GIS/CADD Files..........................................................................648
15.3
Using HEC-2 Files with HEC-RAS 649 Importing HEC-2 Files...............................................................649 Data Not Imported.....................................................................650
15.4
Program Differences and Review of Imported Data 651 Program Differences ..................................................................651 Comparing HEC-RAS and HEC-2 Output .............................657
15.5
Chapter Summary
658
Bibliography
659
CHAPTER
1 Introduction to Floodplain Modeling and Management
Floodplain modeling is a comparatively recent engineering discipline, with the current procedures evolving out of engineering and scientific experiments that were conducted in the eighteenth and nineteenth centuries. Only since the end of World War II, however, has significant engineering effort been devoted to the subject of floodplain modeling. Yet, without floodplain modeling, the design of much of the worldʹs infrastructure would be haphazard at best and dangerous at worst. Engineers use floodplain modeling for basic urban planning to consider the effect of potential flood levels on the community, even if no flood protection is planned. Modeling can estimate the water surface elevations during selected flood events, thereby preventing unwise land use in floodprone areas. The design of bridge and culvert openings for roadway crossings of streams is predicated on proper floodplain hydraulic analysis as well as flood reduction measures, such as dams, levees, and channel modifications. The principles of floodplain modeling can also be applied on a small scale; for example, to design drainage ditches and storm sewers. This chapter begins with an introduction to floodplain studies from a historical perspective, proceeding through to modern-day floodplain modeling using HEC-RAS. The general modeling techniques are then presented, highlighting the key benefits of each. The chapter concludes with a discussion of the major application areas of floodplain models.
1.1
A Brief History of Floodplain Management For millennia, people have attempted to protect inhabited areas from flooding and to deliver water to areas that lacked sufficient supply. There is evidence that the first major hydraulic structure, a masonry dam across the Nile River, located about 14
2
Chapter 1
miles (23 km) south of present-day Cairo, Egypt, was built around 4000 B.C. (Rouse and Ince, 1963). The increased water levels upstream of this structure enabled the diversion of flows through excavated canals to irrigate the arid lands near the Nile. Major dams across the other great rivers in the Middle East are known to have been built earlier than 3000 B.C. by the Egyptians and Babylonians and dams and irrigation works were being constructed in China earlier than 1000 B.C. (Rouse and Ince, 1963). The Marib Dam in present-day Yemen operated for more than 1,400 years before failing in 550 A.D. (Morris and Wiggert, 1972), due to lack of maintenance. What was truly incredible about these structures and those built for several thousand years thereafter was that their designs were based solely on trial and error and the practical experiences of the builders. No hydraulic analysis was ever performed. These structures most likely lasted as long as they did, without any engineering analysis, because they were grossly overdesigned. Today, engineers try to avoid overdesigning structures because of the unnecessary costs and land use involved. The Roman aqueducts built in approximately 100 A.D. are often cited as outstanding examples of hydraulic structures; and yet, the Romans had no insights into the relationships between slope, velocity, and discharge (Herschel, 1913). In fact, their writings indicate that they believed cross-sectional area was the main variable that determined the discharge; increasing or decreasing the slope was apparently not understood as affecting the discharge capacity of the aqueduct. Figure 1.1 shows one of the few intact remains of the Roman aqueducts. Some of these aqueducts were still in service long after the fall of the Roman Empire.
Figure 1.1 Roman aqueduct.
The first uniform flow formula for calculating channel design velocity was formulated in 1768 by the French engineer Antoine Chézy and was used for the design of a watersupply canal for Paris, France (Rouse and Ince, 1963). More than 100 years later, an Irishman, Robert Manning, modified the Chezy equation, and the four main equa-
Section 1.1
A Brief History of Floodplain Management
3
tions (continuity, energy, momentum, and Manning) for floodplain hydraulic analysis were then established. These same equations are still used today. However, even into the beginning of the twentieth century, hydraulic-structure design generally continued to reflect practical engineering experience rather than hard computations using the four fundamental equations. The first 30 years of the twentieth century saw significant progress in floodplain hydraulic analysis. In addition to channel design computations with Manning’s equation, laboratory model studies in Europe demonstrated the applicability of physical models in riverine studies. Research with physical models was often performed in direct response to hydraulic problems encountered in the field and their use also became more common for addressing hydraulic questions that were analytically indeterminate. Following the disastrous flood on the Lower Mississippi in 1927, the U.S. Army Corps of Engineers (USACE) founded the Waterways Experiment Station (WES) in Vicksburg, Mississippi to support hydraulic studies for the Lower Mississippi and, later, around the country. In the United States, floodplain hydraulic analysis with physical modeling was pioneered by WES, with a physical model of most of the Mississippi River Basin constructed on a 200 acre (81 ha) site near Clinton, Mississippi, shown in Figure 1.2. Much of the levee construction along the Mississippi River was based on the results of the design water levels simulated with the Mississippi Basin Model (MBM) during the 1950s and 1960s. By World War II, analytical hand computations to calculate water surface profiles routinely used the continuity, energy, momentum, and Manningʹs equations. However, hand computations were time-consuming and engineers often spent days or weeks completing a water surface profile analysis for a reach of river. By the 1960s, the first simple, automated procedures were developed to make water surface profile computations less painful to the hydraulic engineer. Early programs used geometric data for selected cross sections of the river and floodplain and required analysis of bridge effects to be performed by hand outside the program. A great improvement was the development and initial release of a FORTRAN version of the USACEʹs Hydrologic Engineering Center (HEC) program “Backwater, Any Cross Section” in 1966. This program was revised, expanded, and rereleased in 1968 as HEC-2, Water Surface Profiles. With the release of HEC-2, subcritical and supercritical flow profiles incorporating bridge and levee effects and other modeling concerns could now be analyzed in a straightforward manner within one program. Similar programs were developed in the 1970s and 1980s by different U.S. agencies, including WSP2 by the Natural Resources Conservation Service (formerly the Soil Conservation Service), WSPRO by the U.S. Geological Survey (USGS), and E431/J635 by the USGS. Of all the river hydraulics models, HEC-2 was the most widely applied. HEC-2 was one of the very first open channel hydraulics programs available and could incorporate bridge and culvert analyses and other hydraulics modeling components. Even more important, the program was well documented and supported by the USACEʹs Hydrologic Engineering Center. By the 1980s, certain methods and procedures in HEC-2 did not use the most-accepted routines for some computations, especially for bridge and culvert calculations. When the 1990s arrived, the program was still largely based on the mainframe computers of
4
Chapter 1
Figure 1.2 A physical model of the Mississippi Basin, looking downstream from south of St. Louis, Missouri. The end of the model (Baton Rouge, LA) is near the water tower in the background.
the 1970s and, although HEC-2 had been converted to run on personal computers by 1984, the data input and output were still based on punch card format. HEC-2 did not incorporate easy-to-use templates for input, as is common today with personal computers. The HEC began the development of a replacement program in 1991, with the maiden release of HEC-RAS (River Analysis System) Version 1.0 in 1995. Updates to HEC-RAS have been periodically released and the product is still being actively developed. Among the many improvements since the initial version of HECRAS are channel modification analysis, mixed-flow capabilities, bridge scour analysis, WSPRO bridge analysis procedures, ice jam hydraulics, lateral and inline weir analysis, hydraulic simulation of gated structures, modeling of changes in Manning’s n in the vertical direction, and geographic information system (GIS) integration capabilities. HEC-RAS will likely be the prime computational tool used over the next few decades for river hydraulics work, especially with the inclusion of full unsteady flow analysis capabilities in 2001. Future additions to the program will include greatly improved hydraulic-design features, such as the computation of riprap (rock revetment) requirements and sediment transport, scour, and deposition analysis.
Section 1.1
A Brief History of Floodplain Management
5
Development of the Mississippi Basin Model Throughout the 1800s and early 1900s, levee construction took place along the Lower Mississippi River and its tributaries between the mouth of the Ohio and the Gulf of Mexico. However, little engineering effort went into this construction. The levees were typically built or raised to be somewhat higher than an earlier, historic flood. The lack of hydraulic engineering hit home in the 1927 flood, which exceeded all previous known flood events along the Lower Mississippi River. The vast majority of the great Mississippi Delta was underwater when most of the levees were overtopped or breached during the flood. The Great Flood of 1927 brought tremendous change to the United States, which is still felt today (Barry, 1997). One of these changes was the direction by the U.S. Congress to the U.S. Army Corps of Engineers to add flood control for the Lower Mississippi River to the USACE's mission statement. The Flood Control Act of 1928 authorized a comprehensive plan of levees, tributary reservoirs, diversions, and bypasses to be built along the Lower Mississippi River to prevent a recurrence of the catastrophic 1927 flood. To aid in the engineering analysis of this system, the Waterways Experiment Station (WES) was founded at Vicksburg, Mississippi in 1929 to perform hydraulic physical modeling of levees, dams, and diversions, leading to design improvements and a better understanding of the effects of these structures. However, WES personnel envisioned an even grander modeling goal:
a physical model of the entire Mississippi-Missouri-Ohio River Basin. A systemwide model could analyze the effects of structures throughout the Mississippi Basin, determining both positive and adverse effects of proposed flood-reduction components. A physical model of a 600 mi (965 km) reach of the Mississippi was constructed and successfully tested in the 1930s, proving that a large-scale physical model was feasible (Robinson, 1984). The area around Vicksburg was inspected to locate an appropriate site for construction of the model. A 200 ac (81 ha) tract near Clinton, Mississippi (about 35 miles or 56 km east of Vicksburg) was selected as the site of the model. However, the onset of World War II delayed the immediate construction of the Mississippi Basin Model (MBM). Late in the war, however, construction began by using German prisoners of war from Rommel’s Afrika Korps. The prisoners handled the earthwork activities required to modify the site to better resemble the topography of the Mississippi Basin and to install surface and subsurface drainage facilities. More than one million cubic yards of earth were moved by the prisoners before their repatriation to Germany in 1946 (Foster, 1971). Following the end of earthwork, skilled craftsman began to build the MBM in segments, excavating the simulated channel and floodplain and constructing the modeled river and its floodplain with concrete to match the geographic contours.
HEC-RAS is the most widely used floodplain hydraulics model in the world (Wurbs and James, 2002) and is emphasized in this book as the primary tool for performing floodplain modeling. HEC-RAS and most other floodplain hydraulic programs use steady, gradually varied flow computation procedures, which are also featured in this book. While most floodplain modeling studies can be adequately addressed with steady-flow techniques, HEC-RAS can also simulate unsteady flow situations (covered in Chapter 14). Chapter 3 discusses steady versus unsteady flow simulations and the types of situations they are appropriate for.
6
1.2
Chapter 1
Floodplain Modeling Suppose that an engineer is directed to determine the 100-year flood elevation at a certain location, or to determine the adverse effect on flood levels from placing fill in the floodplain. How does he or she go about this task? Until the last third of the twentieth century, the answer might very well have been “with great difficulty.” Three methods are available for the engineer to address a floodplain hydraulics problem: • Engineering experience – As explained in the preceding section, until about 100 years ago the design of nearly all hydraulic structures was based on an engineerʹs experience and judgment, with minimal consideration of hydraulic computations. Highwater marks from a “flood of record” were commonly used to size a levee or to determine the necessary height of a roadway embankment. Today, even engineers with years of floodplain modeling background would not rely on their experience for floodplain solutions without using hydraulic modeling to confirm their assumptions and suspicions. • Physical modeling – Physical modeling was first used in the late 1800s and early 1900s, but was largely confined to flume studies at university hydraulic laboratories. The physical modeling performed then was not directly applicable to floodplain modeling. Today, physical modeling is mostly performed at large hydraulics laboratories and is not often applied when numerical models will suffice. Physical models are expensive to construct and operate, require a special engineering expertise, and are typically only practical for major river systems or large river structures. • Numerical modeling – Analytical procedures for floodplain hydraulics were handled with hand computations in the first two-thirds of the twentieth century. These procedures were transferred to computer programs that have been consistently improved and expanded, and made progressively more userfriendly. Today, many programs are available for modeling a variety of floodplain problems. With rare exceptions, numerical modeling with a computer program is the most appropriate method to perform floodplain hydraulic studies. The application of a standard riverine numerical model, such as HEC-RAS, enables the engineer to simulate the hydraulics of the floodplain, evaluate existing conditions, determine proper design of hydraulic structures, and assess the effects of the structures. Performed by a competent engineer, floodplain modeling is an objective and defensible method to determine river hydraulic information. Using a numerical model to determine river hydraulics has many advantages, including: • Calculating flood elevations with a properly written and documented program (one that is accepted by an oversight agency, such as the Federal Emergency Management Agency for flood insurance studies or the USACE for permits and flood reduction analysis) is a scientific and defensible analytical technique. A numerical model also gives solutions that are reproducible by other engineers. • With a hydraulic model, floods can be analyzed without waiting for the events to actually occur. Designing a structure for a flood of record without evaluating other larger or smaller events seldom yields the optimal solution. In many instances, the flood of record does not represent a very rare event, which could
Section 1.3
Types of Floodplain Studies
7
result in an unsafe project. Conversely, the flood of record can represent the “once-in-a-million” event that could lead to a greatly overdesigned structure, possibly resulting in no projectʹs being built due to the high costs. • Before the design of major hydraulic structures is begun, an economic analysis is often required to determine project feasibility. A key component of this type of analysis is the determination of the net benefits and the benefit–cost ratio of the project. A hydraulic model is used to determine the water surface elevation versus frequency relationship, which is then linked with the elevation–damage data collected by the economist. The combined relationship (damage versus frequency) may be integrated to obtain average annual damage without the project. The elevation-versus-frequency relationship is then established with the project in place and the average annual damage with the project is computed. The difference between average annual damage without and with the project represents the reduced flood damages, or average annual project benefits from reduced flooding. These benefits must exceed the average annual cost of the project for the project to be economically viable. • Modelers can perform a wide variety of “what if” scenarios to determine the most appropriate solution to a flood problem, based on project performance, cost, and benefits. A hydraulic model allows for quick modification of key variables, such as Manningʹs n, to perform sensitivity tests, thereby assessing the importance of each variable in determining the final water surface elevations.
1.3
Types of Floodplain Studies Floodplain modeling can focus on several different areas, including preparation of comprehensive floodplain studies, design of transportation features (such as roads and bridges) or other facilities, floodway development, and structural and nonstructural solutions to flood problems.
Floodplain Studies Floodplain studies provide water surface profiles and floodplain maps for land-use planning for floodprone areas. Some examples of floodplain studies are flood hazard reports prepared by the USACE; flood insurance studies performed under the direction of the Federal Emergency Management Agency (FEMA); and similar reports prepared by other federal, state, provincial, and local agencies, as well as private engineering firms. Figure 1.3 is an example of a flood insurance rate map. Floodplain studies often include the analysis of historic floods, which are used in model calibration to make sure the model can reproduce historic water surface elevations recorded during actual flood events. Floodplain studies also generally feature the computation of the water surface profile for at least the one-percent annual chance (100-year average return interval) flood. The 100-year flood elevations from this profile are then transferred to a topographic map, illustrating the portions of the floodplain that will be inundated by the 100-year flood. Structural solutions to flood problems are seldom, if ever, investigated as part of a floodplain study giving general flood information for a community. However, the reports do include the effects of any existing levees, reservoirs, bridges, culverts, and channelization in the study area.
8
Figure 1.3 Example of flood insurance rate map.
Chapter 1
Section 1.3
Types of Floodplain Studies
9
Chapters 1 through 8 address the floodplain hydraulic modeling procedures needed to prepare water surface profiles for floodplain reports.
Transportation Facilities A numerical program such as HEC-RAS can facilitate the design of new watercourse crossings or the replacement of aging existing ones, as illustrated in Figure 1.4. It can be used to assess the effects of different road-embankment heights and alignments and to quickly simulate various bridge and culvert openings. Based on the results from the hydraulic model, the most economical bridge or culvert opening can easily be designed so that it doesnʹt increase upstream flood heights more than an allowable amount. Chapters 6 and 7 describe bridge and culvert modeling procedures, respectively, in detail. Chapter 13 presents methods for analyzing scour at bridges.
Figure 1.4 Cross-sectional view of a bridge opening modeled in HEC-RAS.
Floodways/Encroachments A floodway consists of the main channel and the portions of the adjacent floodplain that must be kept free to pass the base discharge (100-year average return-period flood) without resulting in more than a designated increase in flood levels. The floodway is numerically computed with HEC-RAS and its boundaries are indicated on a flood insurance rate map. In the United States, a 1-ft (0.3-m) maximum increase in water surface elevation between the 100-year base flood and the 100-year floodway is the federal requirement, although many states have an allowable increase that is much less than the federally mandated maximum. Floodway development is normally a part of a flood insurance study. Chapter 9 describes the key activities in a flood insurance study. Similarly, a floodplain modeling effort may seek to evaluate the effect on flood levels from a floodplain encroachment, such as a landfill located outside of the floodway. Encroachment analysis is typically performed using the floodway tools that are addressed in Chapter 10.
10
Chapter 1
Structural Measures Structural solutions to flood problems change the hydrology or hydraulics for a portion of the watershed under study. Some examples include dams and reservoirs, detention ponds, channel modifications, diversions, and levees. Diversions of flow, such as by dams, reservoirs, and detention ponds, change the downstream hydrology by diverting or storing some of the floodwater during a flood, thereby reducing the downstream peak discharge and delaying the time of peak discharge. Channel modifications, such as levees, result in a change to the water surface elevations. A floodplain model is first developed to determine the base conditions for the stream or watershed. Structural measures are then incorporated into the model and analyzed to determine their effect on flood levels. Dams, Reservoirs, and Detention Ponds. For studies of dams, reservoirs, and detention ponds, hydraulic floodplain modeling determines the water surface elevation–discharge relationship (a tailwater rating curve) just downstream of the structure. This relationship is used for a separate hydraulic analysis and design of the structure, often including physical model tests for the final design of a large dam. The spillway and low-flow conduit capacity at the dam may also be evaluated with HECRAS, computing pool elevations for selected values of discharge. The effects of the reservoir pool can be determined with the program by computing water surface profiles upstream of the dam and reservoir. The program is also useful for developing the reservoir storage versus outflow relationship that is used in routing the inflow hydrograph through the reservoir. Chapter 8 presents routing operation usage with HEC-RAS, and Chapter 12 further discusses dams and reservoirs. Channel Modifications. Increasing the size, slope, or depth of the channel or decreasing its roughness can lead to a reduction in flood levels because of the additional channel capacity provided by the project. This can easily be simulated using a hydraulic model. Channel modifications can also have negative effects, which can be demonstrated with a model. One example is increased flood discharges downstream of the project due to the increased velocity in the more efficient, modified length of channel. Additional effects can include erosion and/or deposition in the modified channel, upstream migration of the erosion (a headcut) due to increased velocities, and sediment deposition downstream of the modified channel. Chapter 11 addresses these issues in detail. Diversions/Split Flow. Redirecting all or a portion of flood flows to a different flow path or to detention facilities has become a fairly common flood reduction solution. The diversion structure may go into operation after a certain river level has been reached, with progressively higher flows diverted through gate openings or via spillway overflow. Analyzing flow around a large island or other obstruction may also require a type of diversion analysis, usually referred to as split flow modeling or divided flow analysis. Few numerical programs allow the engineer to properly evaluate split flow and diversions. HEC-RAS incorporates a looped network to analyze split flow around an island or other obstruction, and has lateral weir and lateral rating-curve options to perform the diversion analysis. Split flow and diversion analysis can be performed for either steady or unsteady flow simulations. Chapter 12 presents information on split flow and diversion modeling.
Section 1.4
Chapter Summary
11
Levees. Levees are earthen barriers that prevent floodwaters from flowing onto a protected floodplain, as illustrated in Figure 1.5. Concrete floodwalls are also included in this category. The required height of the levee and the effect of the levee on flood events can be determined by a numerical model. By preventing the flood from occupying the floodplain, a levee can cause increased flood heights for a certain distance along and upstream of the levee. This increase is obviously quite important and must be properly analyzed to determine the extent of any adverse effects. Similarly, the loss of floodplain storage behind the levee can result in an increased downstream peak discharge. These effects on flood levels may require hydraulic and hydrologic analysis to ascertain the magnitude of any changes, possibly including the use of unsteady flow modeling. Chapters 11 and 12 address levee effects and appropriate modeling procedures.
Figure 1.5 Levee with discharge pipes along the Mississippi River.
1.4
Chapter Summary Floodplain hydraulic analysis is a relatively recent engineering effort. Physical modeling and hand computations used in the middle of the twentieth century have given way to complex computer programs run on powerful desktop computers. With the availability of todayʹs faster and more sophisticated hydraulic analysis programs, one engineer can do the work not only better but more quickly than three or four engineers could just a few decades ago. The use of modern hydraulic programs and geographic information systems (GIS) or computer-aided design and drafting (CADD) techniques can yield far more data for the model and a more-accurate hydraulic analysis than was dreamed possible in the 1970s. The increased availability of computer programs for floodplain modeling has allowed detailed analyses of a wide range of structures, including bridges, culverts, road embankments, dams, levees, channel modifications, and diversions. Only a skilled and knowledgeable hydraulic engineer can construct the model, analyze the data, and ensure that the flood simulations are reasonable and representative of the floods occurring on the study watercourse. The engineer must be well trained in hydraulics and understand the basic concepts, equations, and computation procedures inherent in the numerical calculations. Chapter 2 starts the student or new engineer on the road to understanding the governing equations and computation processes.
CHAPTER
2 Introduction to Open Channel Hydraulics
This chapter discusses open channel flow and defines the many variables used in an open channel flow analysis. As is presented in this chapter, it is possible to classify the flow occurring in an open channel on the basis of many criteria, including time, depth, space, and regime (subcritical or supercritical). The governing equations for open channel flow are discussed, along with the classification of profile shapes. Finally, the chapter outlines the common procedure for open channel flow analysis: the standard step method.
2.1
Terminology An open channel is any flow path with a free surface, which means that the flow path is open to the atmosphere. Open channels can be classified as prismatic or nonprismatic. A prismatic channel has a constant cross section and often has a constant bed slope for long lengths of the channel. Man-made channels (such as storm sewers, drainage ditches, and irrigation canals) are typically assumed to be prismatic, although they do have occasional changes in cross sections or slope to accommodate topographic conditions or changes in their discharge rate, as illustrated in Figure 2.1a. A nonprismatic channel varies in both the cross-sectional shape and bed slope between any two selected points along the channel length. Natural channels (rivers and creeks, such as the one shown in Figure 2.1b) are nonprismatic. Unless indicated otherwise, prismatic channels are assumed for examples in this book. Figure 2.2 shows cross sections of several classifications of channels that are operating under open channel flow. The theory and procedures of open channel hydraulic analysis were originally developed from experiments on fluid flow in pipes or conduits. Flow in a pressurized pipe, however, is not representative of open channel hydraulics. In open channel flow,
14
Introduction to Open Channel Hydraulics
(a)
Chapter 2
(b)
Figure 2.1 (a) Prismatic and (b) nonprismatic channels.
Figure 2.2 Cross sections for open channel flow.
atmospheric pressure acts continuously and constantly on the water surface and, unlike in a pressurized pipe, there is no constant internal pressure on the fluid boundaries. Consequently, a depth term, rather than a pressure term, is used in open channel analysis. Figure 2.3 compares the pressure head terms in open channel and pressure flow. Atmospheric pressure is neglected because it acts on the water surface at every location. As shown in the figure, the pressure head term in open channel flow is the depth of flow (y). The same term in pressure flow analysis is indicated by the internal pressure of the pipe (p in lb/in2 or kg/cm2) divided by the unit weight of water (γ in lb/ft3 or kg/m3). The pressure head term (p/γ) is equal to the height to which the water would rise in a vertical tube attached to the pressurized system. In open channel
Section 2.1
Terminology
15
hydraulics, a common assumption is that the pressure in the fluid is hydrostatic, meaning that pressure varies linearly with depth (p = γy). Thus, the pressure at any point in a column of water in open channel flow is equal to the vertical height above the selected location multiplied by the unit weight of water. Only under certain conditions, such as rapidly varying flow (see Section 2.2), is the assumption of hydrostatic pressure inappropriate.
Figure 2.3 Comparison of pressure heads between open channel and pressure flow.
Because of the presence of a free surface, open channel flow problems can be more challenging than closed conduit flow problems. In pressure conduits, the conduit flows full and the water exerts a pressure on the containerʹs walls in all directions. The amount of discharge through the pipe is a function of the pressure differential over the length of the pipe. If the discharge doubles, the pipe cross-sectional area does not change, but the upstream pressure head must greatly increase to force this additional flow through the same pipe area. In open channel flow, boundaries are not fixed by the physical boundaries of a closed conduit; the free surface adjusts itself to accommodate the geometry of the channel. When the free surface adjusts itself, other geometric properties, such as the cross-sectional area, wetted perimeter, and top width, adjust accordingly. In addition, the physical properties of open channels can vary widely, especially for natural channels. Cross-sectional geometry, roughness, and longitudinal slopes can change greatly even over short distances. Moreover, roughness can be difficult to quantify and, in fact, can vary vertically and horizontally over the depth of flow. Open channel hydraulic computations require several iterations to solve for flow depth or water surface elevation at a desired location. In pressure conduit analysis, however, the friction coefficient may be assumed constant, which leads to a direct solution. If the pressure conduit computations are adjusted for changing friction coefficient with the changes in other pressure conduit parameters, a successful solution is often obtained with only a single iteration. Typically, open channel flow computations for a natural channel cross section may require three or more iterations. Consequently, open channel hydraulic analysis is more data intensive and empirical than closed conduit flow. In fact, much experimental effort has been invested in devel-
16
Introduction to Open Channel Hydraulics
Chapter 2
oping mathematical relationships that describe various open channel flow scenarios with sufficient accuracy. In terms of the geometry, cross sections for modeling purposes are described as a series of x and y coordinates of ground points, where x is the distance or stationing (in feet or meters) from the beginning of the cross section and y is the elevation (in feet or meters) above a datum. The datum is normally referenced to sea level and is expressed as National Geodetic Vertical Datum or NGVD in the United States. A cross section is typically taken from left to right looking downstream and describes the geometry of the channel and the left and right overbank (floodplain) areas, as shown in Figure 2.4. A characteristic that is important in modeling is the channel bank stations, which represent the breakpoints between the channel and overbank portions of the cross section. A cross section is oriented on a topographic map and surveyed in the field at right angles to the estimated flow path. Determining the cross-sectional geometry for every location for which a water surface elevation is desired is generally a required part of developing open channel hydraulic information, although HECRAS does have cross-section interpolation tools that can be helpful. Cross-section data are further discussed in Chapter 5.
Figure 2.4 A typical cross section consisting of a natural channel and floodplain.
Depth of Flow Perhaps the key variable in floodplain modeling is the depth of flow, the elevation difference between the water-surface elevation and the deepest part of the channel. Depth is typically expressed by the variable y and represents the maximum vertical depth. However, to determine the cross-sectional area of flow (A) below the water surface, the area must be determined perpendicular to the channel-bottom slope (so). Consequently, depth perpendicular to the slope, and not in the vertical direction, must be determined. Depth perpendicular to the channel bottom slope is shown by the variable d, as shown in Figure 2.5. In most applications, y and d are used interchangeably, since the difference between the two values is negligibly small. A third term for depth (h) in the vertical is included for those infrequent situations in which d and y cannot be considered equal. The relationships among y, d, and h are as follows: d = y cos θ
(2.1)
Section 2.1
Terminology
h = d cos θ 2
h = ycos θ where
y d h θ
17
(2.2) (2.3)
= the maximum depth in the vertical direction (ft, m) = the depth perpendicular to the slope of the channel invert (ft, m) = the depth in the vertical direction when d ≠ y (ft, m) = the angle of the channel invert slope to the horizontal plane (degrees)
Figure 2.5 Channel depths and relations among variables.
Note: All three values of depth are essentially equal until the slope of the channel bottom becomes quite steep. A slope is considered steep when there is at least a onepercent difference between y and h. This difference occurs at an angle θ of 5.7 degrees, which represents a 1 vertical to 10 horizontal (10-percent) slope.
Channel Top Width and Wetted Perimeter The top width (T) of a channel is the horizontal width of the channel section at the water surface. The wetted perimeter (P) is the length of the channel boundary, typically the sides and bottom, that is in contact with the fluid; it is always larger than the top width, as shown in Figure 2.6. Both variables are used with the channel area term to develop two other variables that are important to open channel hydraulics: hydraulic depth and hydraulic radius.
18
Introduction to Open Channel Hydraulics
Chapter 2
Figure 2.6 Cross-section geometry.
Hydraulic Depth and Hydraulic Radius. The hydraulic depth can be visualized as the average depth across the channel, whereas the depth (y) is the maximum depth at a cross-section location for the channel shapes shown in Figure 2.2. The equation for hydraulic depth is
D = A ---T
(2.4)
where D = the hydraulic depth (ft, m) A = the cross-sectional flow area (ft2, m2) T = the top width (ft, m) Another term that is critical in open channel flow problems is the hydraulic radius, given by
A R = ---P
(2.5)
where R = the hydraulic radius (ft, m) P = the wetted perimeter (ft, m) The hydraulic radius can also be thought of as a different measure of average channel depth. The two terms give values that are similar when the top-width-to-depth ratio for the flow area of any channel is greater than approximately 5. Hydraulic depth is most often used to determine the appropriate flow regime (subcritical or supercritical), while the hydraulic radius is most often applied in estimating channel velocity or discharge. Expressions for A, P, R, T, and D for the channel shapes shown in Figure 2.2 are given in Table 2.1.
Discharge The amount of water moving in a channel or stream system is characterized by the discharge (Q) or flow rate. The unit of discharge used in open channel flow is ft3/s for U.S. Standard units and m3/s for the SI system.
Section 2.1
Terminology
19
Table 2.1 Parameter definitions for various channel shapes. Channel Shape
Area, A
Wetted Perimeter, P
Hydraulic Radius, R
Top Width, T
Hydraulic Depth, D
Rectangular
By
B + 2y
By --------------B + 2y
B
y
By + zy ----------------------------------2 B + 2y 1 + z
B + 2zy
By + zy --------------------B + 2zy
zy ---------------------2 2 1+z
2zy
y--2
D sin φ- ---- 1 – ---------4 φ
D sin φ --2
D φ – sin φ- ---- ------------------ 8 sin φ --- 2
2
2
Trapezoidal
By + zy
Triangular
zy
Circulara
D ( φ – sin φ ) ------------------------------8
2
2
B + 2y 1 + z
2y 1 + z
Dφ------2
2
2
2
a. φ measured in radians.
Velocity The velocity is the speed at which the water moves in an open channel. The units for velocity are feet (meters) per second. Water movement adds kinetic energy to the system, which is computed using the stream velocity. The kinetic energy term is added to the water surface elevation to calculate the total energy head at a cross section. If the total energy head at several cross sections is connected by an imaginary line, the line is referred to as the energy grade line. These terms are further discussed in Section 2.3 and Section 2.4. The equation for average velocity at any location is V = Q ---A
(2.6)
where V = the average channel velocity (ft/s, m/s) Q = the flow rate (ft3/s, m3/s) Even though working with average velocities is convenient, the channel velocity is not constant at any location, regardless of whether the channel is prismatic or nonprismatic. An example is a small stream, where one can easily observe that the velocity near the channel bank is less than the velocity in the center of the channel. In fact, the velocity varies both horizontally and vertically for any given channel cross section. Figure 2.7 illustrates this phenomenon for different channel shapes. The difficulty of applying an average velocity is evident in the simple channel and floodplain section of Figure 2.8. The kinetic energy term is represented by the velocity head (V2/2g), where g is the gravitational constant (32.2 ft/s2 for English units, 9.81 m/s2 for SI). Analysis of open channel hydraulics problems typically requires the assumption that the water surface elevation and total energy elevation each have a constant value from one side of the cross section to the other side (defined as onedimensional flow). Figure 2.8 shows different energy grade lines (elevation of the total energy head) for each of the three segments of the cross section having different average velocities.
20
Introduction to Open Channel Hydraulics
Chapter 2
Chow, 1959
Figure 2.7 Typical lines of equal velocity in various channel cross sections.
Figure 2.8 Variation in velocity head at a cross section.
For the assumption of a constant energy grade line elevation for a section to be valid, a weighted velocity head must be developed that essentially collapses the three different values of the velocity head term for the channel and left and right floodplain areas into a single value. This modification incorporates a velocity distribution coefficient (α), thus making the kinetic energy head at a section equal to αV2/2g. The velocity distribution coefficient is given by 2
2
2
Q1 V1 + Q2 V2 + Q3 V3 α = -----------------------------------------------------2 Q TOT V
(2.7)
Section 2.1
Terminology
21
where α = the velocity distribution coefficient (dimensionless) Q1,2,3 = the discharges in the appropriate segments of the cross section of Figure 2.8 (ft3/s, m3/s) V1,2,3 = the average velocities in the appropriate segments of the cross section (ft/s, m/s) QTOT = the total discharge of the cross section (ft3/s, m3/s) V = the average velocity in the full cross section (ft/s, m/s) Alpha (α) is always greater than or equal to one and generally ranges from 1.0 to 2.5. It is typically small for flows within the channel (1.0 < α < 1.5), but can be higher for floods occupying the channel and overbank areas or during the presence of ice jams (1.5 < α < 2.5).
Example 2.1 Computing the velocity distribution coefficient. A certain discharge occurs in the complex channel for the dimensions and velocities shown in the figure. Compute the total discharge for the section and the velocity distribution coefficient.
The channel segment is separated from the left and right overbank segments by the imaginary vertical dashed line shown in the figure. This line is for illustration only and would not be included in hydraulic computations for the wetted perimeter. Solution The parameters for the left overbank area are Left overbank area = 5 × 50 = 250 ft2 Velocity = 2.29 ft/s Therefore, the flow rate is left overbank discharge = AV = 250 × 2.29 = 572.5 ft3/s Similarly, the area and discharge in the channel and right overbank area are Channel area = 50 × 15 = 750 ft2 Channel discharge = 750 × 6.36 = 4770 ft3/s Right overbank area = 50 × 3 = 150 ft2 Right overbank discharge = 150 × 1.33 = 199.5 ft3/s Total discharge = 572.5 + 4770 + 199.5 = 5542 ft3/s Average velocity = Q/A = 5542/(250 + 750 + 150) = 4.82 ft/s
22
Introduction to Open Channel Hydraulics
Chapter 2
The velocity distribution coefficient is computed with Equation 2.7 for the distribution of discharge and velocity in the section. As seen, the computed α results in a greater than 50-percent increase to the velocity head found using the average cross-section velocity: 2
2
2
Q LOB V LOB + Q CH V CH + Q ROB V ROB α = ---------------------------------------------------------------------------------------------2 Q TOT V AVE 2
2
2
572.5 ( 2.29 ) + 4770 ( 6.36 ) + 199.5 ( 1.33 ) - = 1.52 = --------------------------------------------------------------------------------------------------------2 5542 ( 4.82 )
Slopes Two slopes are important in the solution of open channel hydraulics problems: the channel invert, or bottom slope (so), and the friction, or energy grade line, slope (sf ). Calculations proceed from location to location along a stream based on the channel and friction slopes between each pair of locations. Figure 2.9 illustrates the important variables in the computation process. The channel invert slope is the difference in the channel invert elevation between two locations divided by the distance between the two locations. The distance between the two points is measured along the sloping channel invert, rather than the horizontal distance. However, as long as the channel slope is hydraulically small (less than 10 percent), the horizontal distance is essentially equal to the distance along the channel slope.
Figure 2.9 Key variables used in open channel hydraulics.
In prismatic channels, the channel slope is often constant over a significant channel distance. In nonprismatic channels, the slope usually varies between every pair of locations along the stream. The friction slope is represented by the slope of the dotted line (energy grade line) in Figure 2.9. The equation is h s f = -----L x
(2.8)
Section 2.2
Flow Classification
23
where sf = the friction slope (ft/ft, m/m) hL = the energy loss between two points (ft, m) x = the distance between the two points (ft, m) The energy loss consists of a friction loss and either an expansion or contraction loss, sometimes referred to as an eddy loss. The computation of these losses is further discussed in Section 2.6.
2.2
Flow Classification With the basic terminology defined, important classifications of flow can be reviewed. Flow can be classified in the following ways: • Steady versus unsteady • Uniform versus varied • Gradually varied versus rapidly varied • Subcritical versus supercritical
Steady and Unsteady Flow Flow is classified as steady or unsteady based on changes with respect to time. If depth and velocity do not vary with time, the flow regime is considered to be steady. If depth and velocity at a point vary with time, the flow regime is classified as unsteady. Obviously, the real-world situation is unsteady flow; observations from the bank of a small stream for a significant time show that the depth and velocity vary. However, changes in depth and velocity at a given point normally occur very slowly, even during a flood event. The slow change in these variables often allows satisfactory solution of open channel hydraulic problems with the assumption of steady flow. Where depth and velocity change slowly with time but are significantly affected by floodplain or reservoir storage, hydrologic modeling is often used to assess these effects. Hydrologic routing is sometimes referred to as quasi-unsteady or simplified unsteady flow analysis. For simplified unsteady flow, a hydrology program such as HEC-1, or its successor HEC-HMS, is used to develop the peak discharges throughout the watershed, often with input from an open channel hydraulics program such as HEC-RAS. Chapters 5, 6, 7, and 8 further discuss the use of simplified unsteady flow and the development of the necessary parameters to apply this method. Chapter 14 also covers simplified unsteady flow analysis, as well as full unsteady flow. Full unsteady flow analysis, also referred to as hydrodynamic modeling, involves the solution of the full equations of motion. Throughout this book, any discussion of HEC-RAS in steady flow analysis mode can include both steady flow and simplified unsteady flow analysis. References to unsteady flow analysis include only hydrodynamic hydraulic modeling. Figure 2.10 illustrates the difference between steady and unsteady flow.
Uniform and Varied Flow Flow is classified as uniform or varied based on changes with respect to distance. A flow is uniform if flow velocity and depth at a given moment do not change with
24
Introduction to Open Channel Hydraulics
Chapter 2
Figure 2.10 Steady vs. unsteady flow.
Figure 2.11 Uniform vs. varied flow.
distance. In uniform flow, the channel invert profile, the water surface profile, and the energy grade line (friction slope) profile are all parallel. Varied flow means that the flow depth can change along the channel reach. These three profiles have different slopes and are nonparallel. Figure 2.11 illustrates the difference between these two types of flow classifications. Walking upstream or downstream along a channel of a small stream, one can observe that depth and velocity vary with distance (varied flow). Uniform and varied flow can be either steady or unsteady. However, unsteady uniform flow is nearly impossible to demonstrate outside of a laboratory, so steady uniform flow is the normal assumption used in this book and for actual hydraulic analysis problems for which steady uniform flow is applicable. Although uniform flow seldom actually occurs in either man-made or natural channels, the assumption of uniform flow is often adequate, since it gives a reasonable estimate of the discharge conveyed for a given set of channel geometry and roughness conditions. However, it does not result in as precise or defensible a solution as the assumption of varied steady flow. Most small, relatively inexpensive structures, such as storm sewers and highway drainage channels, may be adequately designed with uniform flow assumptions. Larger, more expensive structures, such as the San Luis Canal in California, shown in Figure 2.12, require the assumption of gradually varied flow to design an adequate structure at a minimum cost. A uniform depth assumption would result in reaches of the canal that would be too large or too small, depending on if the actual depth was less than or more than normal depth, respectively. Although this canal carries a steady flow in a man-made channel, variations in the canal slope will cause the actual depth to vary about normal depth.
Section 2.2
Flow Classification
25
Figure 2.12 The San Luis Canal.
Gradually and Rapidly Varied Flow Depending on the rate of variation with respect to distance, flows can be classified as gradually varied or rapidly varied. For gradually varied flow, depth and velocity changes are small and gradual with distance; for rapidly varied flow, they are large and abrupt (Figure 2.13). Most situations are well represented by the assumption of gradually varied flow. Figure 2.14 shows a length of stream under gradually varied flow conditions where the water surface elevation decreases and the velocity increases as the flow encounters a small in-channel weir.
Figure 2.13 Gradually vs. rapidly varied flow.
Rapidly varied flow typically occurs at hydraulic structures such as dam spillways, where flow depth and velocity change abruptly over relatively short distances. Bridge openings that severely constrict flow may also cause rapidly varied flow through the bridge opening. The occurrence of a hydraulic jump, where the flow abruptly changes from high velocity and relatively shallow flow to low velocity and large depth, is perhaps the most notable example of rapidly varied flow, as illustrated in Figure 2.13. Figure 2.15a shows flow passing over a small in-channel weir, with the depth
26
Introduction to Open Channel Hydraulics
Chapter 2
becoming very shallow and the velocity increasing greatly. Figure 2.15b shows a hydraulic jump occurring a short distance downstream of the weir. Note the velocity variation from one side of the channel to the other in Figure 2.15b. Velocities are much smaller at the boundaries than in the middle of the channel. Flow upstream of the weir and downstream of the bridge in Figure 2.15b would be gradually varied, with rapidly varied flow occurring over the weir and in the hydraulic jump.
Figure 2.14 Gradually varied flow in a man-made channel.
(a)
(b)
Figure 2.15 Rapidly varied flow (a) over a low weir and (b) in a hydraulic jump.
Subcritical and Supercritical Flow A flow can be classified as subcritical or supercritical by comparing the ratio of inertial and gravitational forces at a stream location. The inertial forces are characterized by the velocity term (V2), and the gravitational forces are represented by the term gD. The ratio of the inertial forces to the gravitational forces is called the Froude number:
Section 2.2
Flow Classification
V Fr = -----------gD where Fr V g D
27
(2.9)
= the Froude Number (dimensionless) = the average velocity (ft/s, m/s) = the gravitational constant (32.2 ft/s2, 9.81 m/s2) = the hydraulic depth (ft, m)
When Fr > 1, the flow is supercritical and inertial forces dominate. As a result, the channel velocity is high and the depth is low, with the flow described as rapid or shooting. Supercritical flow is generally associated with steeper slopes. Flow in a street gutter is often supercritical, due to the usual shallow depths of a few tenths of a ft (several cm) combined with a velocity of 1–2 ft/s (0.3–0.6 m/s). For Fr < 1, the flow is said to be subcritical, with gravitational forces dominant. Consequently, the flow has a relatively low velocity and high depth, and it may be described as calm or tranquil. This type of flow is generally associated with small channel slopes and is the most common type of flow in natural channels. However, a stream may have an average velocity of 10 ft/sec (3 m/s) and the flow would be subcritical if the hydraulic depth were 3.3 ft (1 m) or more. For Fr = 1, both the depth and the flow are said to be critical. Critical flow is a transitional condition, where neither inertial nor gravitational forces dominate. Only a small change in velocity or depth causes the flow to change to subcritical or supercritical. Critical depth is further addressed in Section 2.4. The realworld condition is normally one of subcritical flow, and most river systems have Froude numbers less than 0.5, even during major floods. Similarly, man-made channels normally have subcritical flow. Supercritical flow occurs most often in man-made channels; however, steep mountain streams can be supercritical, especially during floods. Figure 2.16a shows a steep, natural stream in Switzerland that appears to be in supercritical flow. Examples of supercritical flow include flow in street gutters during a rainfall event, flow down a spillway, and flow in steep concrete channels. Log rides in amusement park flumes are also good examples of supercritical flow.
(a)
(b)
Figure 2.16 (a) Supercritical flow in a natural channel and (b) flood bore, unsteady and rapidly varied, in the same channel.
28
Introduction to Open Channel Hydraulics
Chapter 2
Steady, uniform, gradually varied, or rapidly varied flow conditions for subcritical or supercritical flow regimes may be adequately addressed with the procedures outlined in this book. However, some flow situations require special methods outside the scope of this book. Figure 2.16b shows the same scene just a few minutes after the picture in Figure 2.16a was taken. This high-velocity flood wave (flood bore) is similar to what is expected from a dam-break flood event. For this flood wave, the discharge increased from about 175 to 21,200 ft3/s (5 to 600 m3/s) in a matter of seconds. Figure 2.16b thus represents an unsteady, rapidly varied flood event. Special analysis procedures, beyond the scope of this book, are required to estimate the speed and height of the leading edge of the flood wave. The movement of a dam-break type flood can be simulated with unsteady flow modeling, however.
Example 2.2 Computing hydraulic variables. Water flows at a depth (y) of 4 ft in a trapezoidal channel with a bottom width (Bo) of 10 ft and side slopes of 1V:3H (z = 3). If the discharge is 400 ft3/s, determine the velocity, hydraulic depth, and Froude number. Solution From Table 2.1, the cross-sectional area of flow is the area of the trapezoidal-shaped channel: A = (Bo + zy)y = (10 + 3 × 4)4 = 88 ft2 The top width of flow is T = Bo + 2zy = 10 + (2)(3)(4) = 34 ft The hydraulic depth is D = A/T = 88/34 = 2.59 ft The velocity is V = Q/A = 400/88 = 4.55 ft/s The Froude Number is Fr = V/(gD)0.5 = 4.55/[(32.2)(2.59)]0.5 = 0.50 < 1 Therefore, the flow is subcritical.
Example 2.3 Computing hydraulic variables. If the Froude number is 1.2 for the same hydraulic depth as Example 2.2, compute the velocity and discharge in the channel. Solution The new values are Fr = 1.2 = V/(g × 2.59)0.5 V = 10.96 ft/s Q = (10.96)(88) = 964.4 ft3/s A much steeper slope would be required to pass this higher discharge, compared to the slope that resulted in the flow of 400 ft3/s.
Section 2.3
2.3
Fundamental Equations
29
Fundamental Equations Open channel hydraulics problems can be successfully analyzed with four equations: continuity, energy, momentum, and Manning. All were developed between 100 and 500 years ago. The Manning equation is considered to be empirical and is used to estimate friction loss, and the energy equation is considered semi-empirical.
The Continuity Equation The continuity equation, also known as the law of conservation of mass, states that mass cannot be created or destroyed, but its properties may change. Leonardo da Vinci first studied the principle in detail around the year 1500. Da Vinci wrote fluently on the subject of hydraulics; more of his writings exist on this subject than on any of his other interests. After a study of flow movement in rivers and canals, he wrote, “A river in each part of its length in an equal time gives passage to an equal quantity of water, whatever the width, the depth, the slope, the roughness, the tortuosity (sinuosity)” (Rouse and Ince, 1963). Although he did not postulate the formula, the continuity equation could well bear da Vinciʹs name. The familiar equation is Q = A1 V1 = A2 V2
(2.10)
where Q = the flow rate (ft3/s, m3/s) A = the cross-sectional area (ft2, m2) V = the average velocity for the cross section (ft/s, m/s) The continuity equation was formulated in 1628, more than a century after da Vinci, by Benedetto Castelli, considered the founder of the Italian hydraulics school (Rouse and Ince, 1963). The continuity equation allows one to trace changes in velocity and cross-sectional area from location to location.
The Energy Equation Also known as the law of conservation of energy and the Bernoulli equation, the energy equation illustrates that energy cannot be created or destroyed, but does change as flow moves from location to location. Daniel Bernoulli, considered the father of hydraulics (Rouse and Ince, 1963), is credited with proposing the relationship that was later modified into what is used today as the energy equation. Bernoulliʹs equation is a special form (for steady flow) of Eulerʹs equations of motion. The equation was originally developed for flow under pressure and used only two of the three terms that comprise the existing equation (pressure and velocity head). Bernoulliʹs work evolved into the energy equation for pressure conduits: 2
2
p p V V z 2 + ----2- + -----2- = z 1 + ----1- + -----1- + h L 1–2 γ 2g γ 2g where
z p γ V hL
(2.11)
= the elevation of the conduit centerline (ft, m) = the pressure in the conduit (lb/ft2, N/m2) = the specific weight of the fluid (lb/ft3, N/m3) = the flow velocity in the pipe (ft/s, m/s) = the energy losses between downstream point 1 and upstream point 2 (ft, m)
30
Introduction to Open Channel Hydraulics
Chapter 2
For open channel flow under hydrostatic pressure (the normal case), the pressure head term (p/γ) is replaced by the depth (y). As stated earlier in this chapter, hydrostatic pressure means that pressure increases linearly with depth, which is the governing case for gradually varied flow conditions. A substitution of y for p/γ can be made in Equation 2.11, since pressure at any point in the water column is determined from the depth above the selected point times the specific weight of water (P = γy). Including those rare situations where the channel slope is hydraulically steep (so > 10%) and those where the velocity is nonuniform changes Equation 2.11 to the form: 2
2
α2 V2 α1 V1 2 2 - = z 1 + y 1 cos θ + ------------ + hL z 2 + y 2 cos θ + -----------1–2 2g 2g where
(2.12)
z = the elevation of the channel bottom
The first two terms on either side of the equation (datum plus pressure head) represent the potential energy of the water. The velocity head term represents the kinetic energy of the water. The sum of the potential and kinetic energy is the total energy head at a given point along the flow path. As shown in Figure 2.9 on page 22, the term hL represents the head loss between locations 2 and 1, a combination of the friction loss and the expansion or contraction loss between the two points. Section 2.6 includes a further discussion of these losses. Because the terms on the left side of the equal sign represent the total energy head at upstream location 2, the equation can be simplified to H2 = H1 + hL 1–2
(2.13)
where H = the total energy head Energy and continuity are the two equations most often used to solve steady, gradually varied flow problems. Because the slope is small (less than 10 percent) for most applications, y is generally used in lieu of ycos2θ in Equation 2.12, yielding 2
2
α2 V2 α2 V2 - = z 2 + y 2 + ------------ + hL z 2 + y 2 + -----------1–2 2g 2g
(2.14)
As stated previously, the depth plus the datum elevation is considered to be the potential head or energy when the channel slope is less than 10 percent. Figure 2.9 shows that the sum of these two variables equals the water surface elevation. The main assumptions of Equation 2.14 are that the flow is steady, one-dimensional, gradually varying, under hydrostatic pressure, and on a small slope (less than 10 percent). The substitution of the water surface elevation for z + y in Equation 2.14 becomes the main basis for computing water surface elevations along a channel and is further discussed in Section 2.6.
The Momentum Equation The momentum equation used in open channel hydraulics is derived from Newtonʹs second law of motion, which states that the summation of forces acting on an isolated system is equal to the systemʹs mass times its acceleration, or ΣF = ma
(2.15)
Section 2.3
Fundamental Equations
31
where ΣF = the sum of all forces acting on an isolated system (lb, N) m = the mass of the isolated system (slug, kg) a = the acceleration of the center of mass of the isolated system (ft/s2, m/s2) The forces that could act on a volume of fluid in an open channel are shown in Figure 2.17 and include the hydrostatic forces acting at the system boundaries, the friction force acting on the channel area in contact with the water within the isolated system, the weight of the fluid volume (W), and any internal force. An internal force could be caused by an obstruction within the system, such as a change in channel dimensions or a step up or down in the channel bottom. In steady flow open channel hydraulics, mass refers to the mass flow rate (ρQ) and acceleration refers to the difference in velocity in the direction of flow at the system boundaries. For steady flow, momentum calculations are considered only in the downslope (x) direction, with negligible forces in the y or z directions.
Figure 2.17 Forces in the momentum equation.
Using Figure 2.17, Equation 2.15 can be expanded to the form: γ F 2 – F 1 + W sin θ – F f – F o = --- Q ( β 2 V 2 – β 1 V 1 ) g where F1, F2 W sinθ Ff Fo β
(2.16)
= the hydrostatic forces at the system boundaries (lb, N) = the Fg component of the weight of the liquid (lb, N) = the friction force along the sides and bottom of the channel (lb, N) = the force of any internal obstruction (lb, N) = the momentum coefficient (dimensionless)
32
Introduction to Open Channel Hydraulics
Chapter 2
The forces F1 and F2 are hydrostatic and are defined by F 1, 2 = γz 1, 2 A 1, 2
(2.17)
where z1,2 = the distance from the water surface to the centroid of the cross-sectional area for the indicated location (ft, m) The force Fg (W sinθ) is the weight component of the water and is defined as F g = γALs o
(2.18)
where A = the average cross-sectional area between the two boundaries (ft2, m2) L = the distance between the two boundaries (ft, m) so = the slope of the channel invert (ft/ft, m/m) The force Ff is the frictional resistance component, defined as F f = τPL where
(2.19)
τ = the shear stress on the wetted channel surface between the two boundaries (lb/ft2, N/m2) P = the average wetted perimeter between the two boundaries (ft, m) L = the average length between the two boundaries (ft, m)
Fg and Ff are opposing forces. If the slope of the channel and the distance between the system boundaries are both small, then Fg and Ff tend to be very small compared to the other terms. To simplify the equation, these two terms are often omitted in hand computations applying the momentum equation; for example, the terms are omitted when computing upstream or downstream depth in a hydraulic jump. HEC-RAS provides the option to include both terms, neither, or one or the other, depending on the modeler’s judgment. Both terms should be included when solving the full equations of motion in unsteady flow analysis, as discussed in Chapter 14. Further discussion of the Fg term in bridge analysis is addressed in Chapter 6. Fo is an obstructive force defined as F o = γz o A 0
(2.20)
where zo = the distance from the water surface to the centroid of the obstruction (ft, m) Ao = the cross-sectional area of the obstruction to flow (ft2, m2) The term β is a momentum coefficient that adjusts for the nonuniformity of velocity. It is similar to the adjustment (α) previously described for velocity head. The term is calculated using the following equation, with reference to Figure 2.8, Q1 V1 + Q2 V2 + Q3 V3 β = -----------------------------------------------------Q TOT V
(2.21)
All the terms have been defined as part of the derivation of α on page 20. β generally varies from 1 to 1.33, with the larger values representing a deeply flooded cross section or ice-jam flooding. For hand computations, β is often neglected, since it is normally a small value. β is computed and applied automatically by HEC-RAS.
Section 2.3
Fundamental Equations
33
Example 2.4 Computing the momentum coefficient. For the velocities and discharges determined in Example 2.1, compute the momentum coefficient. Solution For the distribution of discharge and velocity in the cross section of Example 2.1, the momentum distribution coefficient is found with Equation 2.21 to be Q LOB V LOB + Q CH V CH + Q ROB V ROB β = ---------------------------------------------------------------------------------------------Q TOT V 572.5 × 2.29 + 4770 × 6.36 + 199.5 × 1.33 = ------------------------------------------------------------------------------------------------------ = 1.19 5542 × 4.82
Expanding Equation 2.16 for a short reach of channel with small slope (Fg ≈ Ff ), without an internal obstruction (Fo = 0), assuming β = 1, substituting Equation 2.17, and simplifying and combining terms yields Q2 Q2 γ ---------- + γz 1 A 1 = γ ---------- + γz 2 A 2 gA 1 gA 2
(2.22)
This equation represents a momentum balance, which exists when the opposing forces acting on the isolated system are exactly equal in the x-direction. Equation 2.22 is frequently used to determine the beginning or ending depth of a hydraulic jump and can be applied between any two cross sections as long as the underlying assumptions are met. The first term on either side of the equation is the momentum of flow
34
Introduction to Open Channel Hydraulics
Chapter 2
passing through the channel section per unit time per unit weight of water and may be considered to be the momentum due to the velocity or water movement. The second term on either side of the equation is the force per unit weight of water and may be considered as the momentum due to the hydrostatic pressure. The two terms together comprise the total momentum (M) at the cross section. Since the units are in terms of force, the sum of the two terms is also referred to as the specific force (Fs). Therefore, the total momentum or specific force at a location is 2
Q M = F s = γ ------- + γzA gA
(2.23)
The momentum equation is used when the energy equation is inadequate to properly analyze open channel flow, such as for rapidly varied flow and especially for the evaluation of a hydraulic jump. It should be emphasized that Equation 2.22 and Equation 2.23 are applicable only for the assumptions stated in their development. When the weight and friction forces (Fg, Ff ) are significant, the full form of the momentum equation (Equation 2.16) is necessary. This situation may exist for steady, rapidly varied flow, such as through bridge openings (discussed in Chapter 6), and is the norm for unsteady flow analysis, when the full equations of continuity and momentum are featured, as presented in Chapter 14. For gradually varied, steady flow, solutions using the energy and continuity equations are the most direct and easiest to apply and understand. The momentum equation could be used, but it is computationally less efficient and somewhat more difficult to apply, thus making analysis with the energy equation preferable. A further distinction between the momentum and energy equations is that the energy equation is used to evaluate changes in depth and velocity caused by internal losses, while the momentum equation is used to analyze these same changes caused by external forces. In steady or quasi-unsteady, gradually varied flow, the energy and continuity equations are typically satisfactory. In unsteady flow, the momentum and continuity equations are necessary. The momentum equation is also used to analyze the force on an object in the flow path. Equation 2.16 is again applied to determine the unknown force. Assuming that the distance between the boundaries of an isolated system is small and the slope of the channel is horizontal or small, the friction and gravity components of Equation 2.16 may be neglected. Substituting Equation 2.17 into Equation 2.16 and rearranging terms gives Fo Q2 Q2 ----- = ---------- + z 1 A 2 – ---------- + z 2 A 1 γ gA gA 2 1
(2.24)
where Fo = the force on the object (lb, N) Equation 2.24 is only appropriate when the gravity force (Fg) and the friction force (Ff ) may be neglected.
Example 2.5 Computing the force on an object. Flow passes smoothly over a low weir in a 10-ft wide, rectangular channel of zero slope (see the following figure). For the boundary depths indicated, compute the force of the water on the weir. Assume that the forces due to friction and gravity are negligible.
Section 2.3
Fundamental Equations
35
Solution Only the depths a short distance upstream and downstream of the weir are known. Solving for a force requires that the velocities and discharge also be known. Therefore, the continuity and energy equations are employed prior to using the momentum equation to solve for force on the weir. The continuity equation gives Q = A2 V 2 = A1 V1 6 × 10 V 2 = 1 × 10V 1 6V 2 = V 1 Assuming there are no losses between points 1 and 2 (a conservative assumption for depth at point 2), the specific energy equation (Equation 2.28 on page 38) gives E2 = E1 or 2
2
V V 6 + -----2- = 1 + -----12g 2g Substituting with V1 = 6V2 yields 2
2
36V V 6 + -----2- = 1 + ------------2 2g 2g Expanding the equation and solving directly gives V2 = 3.03 ft/s, V1 = 18.20 ft/s, and Q = 182 ft3/s. With velocities and discharge known, Equation 2.24 is used to solve for the unknown force (Fo) for the known discharge and boundary depths. This expression is 2 2 2 2 Fo ( 182 ) - + 6----------------× 10 – ------------------------------( 182 ) - + 1----------------× 10 = --------------------------------------32.2 × 10 × 6 32.2 × 10 × 1 62.4 2 2
The equation may be solved directly to give Fo = 5571 lbs as the force on the weir.
The Chézy and Manning Equations In 1768, more than 120 years before Manning published his now-famous equation, Anton Chézy, a French engineer working at the Paris Academy of Science, formulated the first relationship to compute velocity in a canal. Before Chézy, the discharge a canal could deliver could not be determined in advance of construction. Through his observations of flow in existing canals, he postulated that the apparent uniformity of
36
Introduction to Open Channel Hydraulics
Chapter 2
velocity and depth with distance must be due to the balance between the friction and gravitational forces. Chézy thus developed a relationship between velocity, slope, area, and wetted perimeter in an existing canal to similar variables in the proposed canal. This relationship was verified by experiments on French canals and the Seine River. It is not known if his work was immediately used, because the new canal to bring water from the River Yvette to Paris was opposed and the work was permanently delayed with the onset of the French Revolution. Chézyʹs work was temporarily lost and the Chézy equation was not widely applied until the 1830s, when his manuscript was rediscovered and published, well after his death. The form of the Chézy equation used today is V = C Rs o where V C R so
(2.25)
= the average velocity (ft/s, m/s) = the Chézy roughness coefficient = the hydraulic radius (ft, m) = the slope of the channel invert (ft/ft, m/m)
In English units, the Chézy roughness coefficient typically varies from 10 for very rough surfaces to 140 for very smooth surfaces. In the SI system, C varies from about 5 to 77 for the same surfaces. Chézyʹs equation was developed for uniform flow; therefore, the so term is equated to the friction slope (sf ). The Chézy equation was used throughout the world for the rest of the nineteenth century, with much engineering effort directed to refining the prediction of the roughness coefficient. The coefficient varies with depth, hydraulic radius, and other variables, and several prediction equations for the Chézy C were formulated. However, late in the nineteenth century, Robert Manning, an Irish engineer, reevaluated available prototype data gathered from actual canals and channels and compared measured velocities to the computed Chézy velocities. He found that a relationship to compute an average velocity fit the known data much better if R2/3 were used, rather than R1/2. He presented his revised form of Chézyʹs equation in 1889, with publication of his work in 1890 (Manning, 1890).
What Are the Units of Roughness? There are two opinions as to the units of C in the Chézy equation (and also to the units of n in the Manning equation). One opinion holds that the roughness coefficient is dimensionless; the other does not. Chow (Chow, 1959) failed to find any significant discussion regarding the dimensions for roughness coefficient in the early literature on hydraulics and speculates that the friction coefficient was taken as dimensionless by the forefathers of hydraulics. Roughness units may also be evaluated by examining the units of Equation 2.25. The units of velocity are ft/s (m/s), and the units of (Rso)1/2 are ft1/2 (m1/2). For the Chézy equation to be dimensionally correct, the coeffi-
cient C would be required to have units of ft1/2/s (m1/2/s). It seems ludicrous to assume that a friction coefficient would include a time term. Therefore, the Chézy formula, in the form of Equation 2.25, is usually considered to be empirical, since the units on either side of the equal sign are not the same. Manning’s n is also normally considered dimensionless. Manning himself (Rouse and Ince, 1963) wrote that the formula “... was not homogenous, or even dimensional,” indicating that he considered the equation to be empirical, with unbalanced units. Thus, Manning’s n will also be considered dimensionless in this book.
Section 2.4
Energy and Momentum Concepts
37
The Actual Manning Equation? Although Manning published his famous equation in 1890, he was not satisfied with it. The units on either side of the equal sign were not in balance, so the equation was highly empirical. Manning also believed (correctly) that because the formula was based on observed data (measured velocity versus measured depth, area, and slope), it could not be used correctly outside the range of the observed data (Manning, 1890). Consequently, Manning started over to develop an equation that would be dimensionally correct. Manning later proposed a very different equation for velocity: 0.22 ( R – 0.15m ) V = C gS R + ----------------------------------------- m where V = the velocity (ft/s, m/s) C = the “pure” surface roughness (not Chézy C), dimensionless
g = the gravitational constant (9.82 ft/s2, 9.81 m/s2) S = the slope (ft/ft, m/m) R = the hydraulic radius (ft, m) m = the height of a column of mercury corresponding to atmospheric pressure (ft, m) This formula is dimensionally correct, with ft/s (m/s) units resulting on both sides of the equal sign. However, the formula was not greeted with enthusiasm and was not used by the engineering community. What we use today as the Manning equation was not the equation formally proposed by Manning for use in computing channel velocity (Rouse and Ince, 1963). Sometimes, even the “giants” of science and technology don’t realize the value of their work!
The Manning equation, as used today, is k 2⁄3 1⁄2 V = --- R s o n where
(2.26)
k = 1.486 for the English system and 1.0 for the SI system n = Manning’s roughness coefficient
Manning’s n has the same value if used in the English or the SI system of units. Substituting Q/A for velocity gives the Manning equation for discharge as 2⁄3 1⁄2 k Q = --- AR s o n
(2.27)
Like the Chézy equation, the Manning equation also uses so as the friction slope, thereby basing the equation on uniform flow, although later laboratory studies found that the equation also gives valid results for gradually varied flows. For floodplain hydraulics, Manning’s n varies from a value of 0.011 for a very low roughness material, such as smooth cement, up to approximately 0.25 for extremely dense floodplain vegetation and heavy tree growth. Chapter 5 explains how to determine an appropriate value for Manning’s n.
2.4
Energy and Momentum Concepts Section 2.3 developed the four fundamental equations of open channel hydraulics. These equations can now be applied to further the understanding of open channel phenomena, including the determination of alternate and sequent depths, the compu-
38
Introduction to Open Channel Hydraulics
Chapter 2
tation of normal and critical depths, and the hydraulic jump. This section develops these concepts by incorporating example computations for open channel flow analysis.
Specific Energy and Alternate Depths The concept of specific energy is a modification of the total energy equation by dropping the datum energy term (z). Specific energy is then equal to the total energy as referenced to the channel invert. The equation for the specific energy at a selected location is 2
αV E = y + ---------2g
(2.28)
where E = the specific energy at a point on the channel, as measured from the channel invert (ft, m) Using the specific energy equation allows depth and velocity changes to be easily estimated over a short distance for a simple channel.
Example 2.6 to flow.
Applying specific energy to analyze the effect of an obstruction
For the short channel reach shown in the following figure, compute the depth on the step of the channel bottom. Assume no losses between points 1 and 2. The width of the channel, T, is 10 ft and the discharge, Q, is 1000 ft3/s.
Solution The specific energy equation (assuming α = 1) between the two points may be written as 2
2
V V y 2 + -----2- = y 1 + -----1- + stepheight 2g 2g The left side of this equation gives the result
Section 2.4
Energy and Momentum Concepts
39
2
V y 2 + -----2- = 10 + 1.55 = 11.55 ft 2g Because depth and velocity on the step are unknown, a second equation is required to relate depth and velocity at this location to substitute into the preceding equation. The continuity equation can be employed because it is known that the discharge is constant between the two points, which gives Q = Ty2 V 2 = Ty 1 V 1 or Q 1000 100 V 1 = --------- = ------------ = --------Ty 1 10y 1 y1 Substituting the new expression for V1 into the first equation yields 2 100 --------- y1 11.55 = y 1 + ----------------- + 0.5 2g
An iterative solution yields 9.24 ft for y1. Substituting for y1 gives V1 = 10.82 ft/s. These are reasonable estimates because depth and velocity are expected to change by a small amount at a small obstruction in gradually varied flow; therefore, the values at location 1 should not be too different from those at location 2. However, solving the previous equation for y1 yields multiple roots, as illustrated in the following figure. That is, depths of 5.12 and –3.29 ft both satisfy the equation. Certainly, a negative depth is impossible, so this answer can be discarded. However, the other positive depth is possible since the energy balance is satisfied. How can two different depths satisfy the same energy criterion? The answer lies in evaluating the condition of flow, or flow regime for each. Computing the Froude number for the two possible depths gives Fr = 0.63 for the 9.24 ft depth and Fr = 1.52 for the 5.12 ft depth. Because changes in depth and velocity should be gradual to apply the energy equation, the subcritical solution is adopted for the depth on the step. If the depth on the step were supercritical, the basic assumption of zero losses between points 1 and 2 would be invalid.
From the data in Example 2.6, assume that the flow of 1000 ft3/s (28.3 m3/s) is held constant to calculate the specific energy for various depths. A curve with a somewhat
40
Introduction to Open Channel Hydraulics
Chapter 2
parabolic shape can be plotted, as shown in Figure 2.18. The upper half of the curve is asymptotic to the flow depth (y), and the lower half is asymptotic to depth = 0. This specific energy curve shows that there are two possible depths for any given energy. These depths are referred to as alternate depths, one subcritical and one supercritical for the same energy value. As shown in the figure, the alternate depths are 9.24 ft and 5.12 ft (2.82 and 1.56 m) for the same specific energy of 11.05 ft (3.37 m). Only one value of depth is possible when the specific energy is a minimum. Figure 2.18 shows this value to be about 6.6–6.8 ft (2.0–2.1 m). This value is referred to as critical depth (yc), the subject of the next section.
Figure 2.18 Specific energy curve for Example 2.6.
Critical Depth The depth at the point of minimum energy is referred to as the critical depth (yc). Depths greater than the critical depth indicate subcritical flow and depths less than the critical depth indicate supercritical flow. Critical depth can be determined graphically, as shown in Figure 2.18, where yc is estimated from the graph to be about 6.6 to 6.8 ft. However, plotting this curve to compute critical depth is laborious and the accuracy of the critical depth calculation may be unacceptable. A direct solution is preferable. An equation can be developed by differentiating Equation 2.28 and setting the result equal to zero, then solving for the minimum value. Algebraic manipulation leads to the general equation for critical depth for any cross-section shape as 3
2 A Q ------- = ------c g Tc
(2.29)
where Ac = the cross-sectional channel area at the critical depth (ft2, m2) Tc = the top width of flow at the critical depth (ft, m) This equation holds only for the critical depth. For the special case of a rectangular channel, it is usually convenient to work with a unit discharge, given by
Q q = ---T
(2.30)
Section 2.4
Energy and Momentum Concepts
where
41
q = the unit discharge (ft3/s/ft, m3/s/m) T = the top width of the flow in a rectangular channel (ft, m)
The unit discharge, q, is applicable only for a rectangular channel. Substituting Equation 2.30 into Equation 2.29 and rearranging terms gives 2
qy c = 3 ---g
(2.31)
Note that in both Equations 2.28 and 2.30 for critical depth, only discharge and crosssection shape are needed to solve for yc. A change in channel slope or channel roughness has no effect on the solution for critical depth. For Example 2.6, yc can now be obtained directly with Equation 2.31 (yc = 6.77 ft, or 2.10 m), because it is known that the channel is rectangular, making the unit discharge equal to 100 ft3/s/ft (9.29 m3/s/m). Critical depth is an important parameter that allows for the analysis of profile shape when the normal depth (the subject of the next section) and the actual water depth are known. The presence of critical depth is also considered a control on the flow regime, with subcritical flow upstream of critical depth and supercritical flow downstream. Significant obstructions, such as a dam or spillway, or a large slope change, such as a waterfall or the start of rapids, are typical instances of where critical depth will occur. Critical depth can be measured as the flow regime changes from subcritical to supercritical; however, it cannot be measured or located for the reverse situation, from supercritical to subcritical. The hydraulic jump that occurs for this latter condition contains significant turbulence and does not present a smooth profile, precluding a precise determination and location of critical depth. Laboratory measurements have found that the critical depth occurs about four times the critical depth upstream of the weir or channel dropoff. Discharge can be measured quite accurately at locations where critical depth occurs, such as at a dam or weir, and because critical depth is a function of only discharge and geometry, it is easy to calculate. Agencies such as the U.S. Geological Survey install special weirs on small streams to cause critical depth for low streamflow conditions. Determining the depth (head) on the weir can be used to easily determine the discharge over the weir from the weir equation (discussed in Chapter 6).
Example 2.7 Computing the critical depth. For the channel conditions of Example 2.2, determine the critical depth for a flow rate of 400 ft3/s. The trapezoidal channel has a 10-ft bottom width and 1V:3H side slopes. Solution Because the channel is nonrectangular, the Equation 2.29 for critical depth is appropriate. From Table 2.1, the area at critical depth for a trapezoidal shape is 10yc + 3yc2. The top width for a trapezoidal shape at critical depth is 10 + 6yc. Equation 2.29 is then applied to yield 2 3
2 ( 10y c + 3y c ) 400 ----------- = --------------------------------g 10 + 6y c
An iterative computation gives yc = 2.78 ft.
42
Introduction to Open Channel Hydraulics
Chapter 2
Normal Depth When Chézy conducted his observations of flow in prismatic canals, he noted that the depth and velocity appeared to be uniform with distance. Normal depth, yn, is the depth in the channel for uniform flow. Depth and velocity do not vary with distance; therefore, the channel invert profile, the water surface profile, and the energy grade line are all parallel, as shown in Figure 2.19. Uniform flow or normal depth rarely occurs and only in a long reach of a prismatic channel with constant slope and roughness coefficient.
Figure 2.19 Profile at normal depth.
Normal depths for any arbitrary shape can be computed by applying the Manning equation for discharge (Equation 2.27), knowing the discharge, channel slope, and an appropriate value for Manning’s n. The area and hydraulic radius terms are both functions of depth; therefore, a depth found using the channel invert slope is normal depth. Normal depth computations usually require an iterative solution, as shown in Example 2.8. Various parameters (discharge, depth, slope, n) for a normal depth condition may be computed with HEC-RAS (see Chapter 11, page 417).
Example 2.8 Computing the normal depth. For the channel of Example 2.2, compute normal depth. The slope of the channel invert is 0.004 and Manning’s n is 0.03. The discharge is 400 ft3/s. Solution For the 10-ft bottom width trapezoidal channel with 1V:3H side slopes, apply Manning’s equation for discharge. From Table 2.1, the area of a trapezoid at the normal depth is 2 1--( 20 + 6y n )y n = 10y n + 3y n 2
The wetted perimeter at normal depth is 2
2
P = 10 + 2 y n + ( 3y n ) = 10 + 6.32y n Applying Equation 2.27 yields
Section 2.4
Energy and Momentum Concepts
43
2 2⁄3
2 10y n + 3y n 1.486 400 = ------------- ( 10y n + 3y n ) ----------------------------- 0.03 10 + 6.32y n
0.004
This equation is solved iteratively to give yn = 3.57 ft.
The Hydraulic Jump When the flow regime changes from supercritical flow to subcritical flow, a sudden and abrupt rise in the water surface forms, known as a hydraulic jump. The hydraulic jump can occur only when the specific forces are equal on both the supercritical and subcritical sides of the jump: Equation 2.22 must be satisfied. Hydraulic jumps are often used in stilling basin design to intentionally reduce the energy of the flow. For a rectangular channel and with the substitutions q = Q/T, y/2 for the centroid of a rectangular shape, and y = q/V, Equation 2.22 can be modified to yield 2
2
2 2 y1 q + y----2q + ---- = --------------gy 1 2 gy 2 2
(2.32)
where y1 = the supercritical depth immediately before the initiation of the jump (ft, m) y2 = the subcritical depth immediately after completion of the jump (ft, m) These depths upstream and downstream of the jump are called sequent depths or conjugate depths and are illustrated in Figure 2.20. It should be noted that the subscripts increase in the upstream direction in open channel hydraulic analysis and for the equations and examples in this book. The equations for hydraulic jumps are an exception to this rule, however. The smaller subscript is
Figure 2.20 Hydraulic jump.
44
Introduction to Open Channel Hydraulics
Chapter 2
normally used for the supercritical side of the jump and the larger subscript represents the subcritical side. Equation 2.32 requires an iterative solution to determine y2, given y1. It is thus preferable to develop a direct (noniterative) solution to determine this unknown depth. Through substitution and algebraic manipulation of Equation 2.32, a quadratic equation for the depth in a rectangular cross section is derived as y2 2 1 ----- = --- 1 + 8Fr 1 – 1 2 y1
(2.33)
where Fr1 = the supercritical Froude number immediately upstream of the initiation of the jump Equation 2.33 can be used to compute the subcritical sequent depth knowing the supercritical depth and Froude number. For the reverse calculation, the equation is y1 2 1 ----- = --- 1 + 8Fr 2 – 1 2 y2
(2.34)
where Fr2 = the subcritical Froude number immediately downstream of the end of the jump
Example 2.9 Computing the sequent depth in a hydraulic jump. A hydraulic jump occurs in a rectangular channel of horizontal slope. The depth immediately prior to the jump (y1) is 1 m and the unit discharge is 20 m3/s/m. Compute the sequent depth downstream of the jump and the percentage of energy lost in the hydraulic jump. Solution For the depth and unit discharge given, the velocity immediately before the jump is q- = 20 V 1 = --------- = 20 m/s y1 1 Because the actual depth and hydraulic depth are the same in a rectangular channel, the Froude number before the jump is V 20 F R = ------------ = ------------------------ = 6.39 gD 9.81 × 1 Equation 2.33 can be applied to compute the sequent depth, 2 1 y 2 = --- ( 1 + 8 ( 6.39 ) – 1 ) = 8.54 2
Thus, the depth and velocity are y2 = 8.54 m and V2 = 2.34 m/s. The specific energy before and following the hydraulic jump can be used to estimate the energy loss as 2
2
2.34 20 – 8.54 + ------------------1 + ------------------E pre – E post 2 × 9.81 2 × 9.81 ----------------------------- ( 100 ) = ---------------------------------------------------------------------------------( 100 ) = 58.7% 2 E pre 20 1 + ------------------2 × 9.81
Section 2.5
2.5
Profile Shapes
45
Profile Shapes The actual computation of water surface profiles is presented in the next section. However, an expected, gradually varied profile shape can be sketched if the normal and critical depths for the flow and channel geometry under study are known, along with the actual depth at any point.
Governing Equations To aid in understanding profile shapes and classification, a modification of the energy equation is needed. The total energy at a point is given by 2
---------H = z + y + αV 2g
(2.35)
where H = the total energy at a selected location along the stream (ft, m) z = the energy from a datum to the channel invert (ft, m) y = the pressure energy from the channel invert to the water surface elevation (ft, m) αV2/2g = the kinetic energy of the moving water (ft, m) To approximate the changes with distance, Equation 2.35 can be differentiated with respect to distance (x) to give 2
αV d ---------- 2g dH dz dy -------- = ------ + ------ + ------------------dx dx dx dx
(2.36)
Figure 2.21 shows that dH/dx is the slope of the energy grade line (sf ) and dz/dx is the channel invert slope (so). Substituting these terms in Equation 2.36 yields 2
αV d ---------- 2g dy – s f = – s o + ------ + ------------------dx dx
(2.37)
The negative signs indicate that the energy and channel invert elevations are decreasing in the x direction. Rearranging terms gives 2
αV d ---------- so – sf 2g -------------- = 1 + ------------------dy dy -----dx
(2.38)
The velocity head term can be further manipulated algebraically to yield –Fr2. The equation then becomes so – sf dy ------ = ---------------2 dx 1 – Fr
(2.39)
This result can be used to predict the expected profile shape for gradually varied flow, if the normal and critical depths are known.
46
Introduction to Open Channel Hydraulics
Chapter 2
Figure 2.21 Development of the profile shape equation.
Profile Classification A channel invert slope is designated as mild if the normal depth is greater than critical depth (that is, subcritical flow is the expected condition). Figure 2.22 shows a prismatic channel with a mild slope and the calculated normal and critical depths for a known discharge. The water surface profiles for this channel carry an M classification because of the mild slope. Also shown on Figure 2.22 are three zones: Zone 1 for actual depths greater than both normal and critical depth, Zone 2 for actual depths greater than critical but less than normal depth, and Zone 3 for actual depths less than both normal and critical depths. Therefore, water surface profiles in Zone 1 are classified as M1, in Zone 2 as M2, and in Zone 3 as M3. In gradually varied flow, there will be only one profile shape possible for a known depth in a particular zone. If the actual depth for a known discharge at a point along the channel is greater than both normal and critical depth, it would be useful to be able to sketch the expected water surface profile. The sketch would not reflect a precise elevation of the profile, but rather the expected profile shape. Equation 2.39 can aid in sketching the resulting water surface profile. With no need to compute numerical values for dy/dx, Equation 2.39 can be applied to determine the sign of dy/dx. If the sign of dy/dx is positive, the depth increases in the downstream direction. If the sign of dy/dx is negative, the depth decreases in the downstream direction. Four additional rules are also needed for profile classification, as follows: 1.
Profiles approach normal depth asymptotically.
2.
Profiles intersect critical depth at a sharp angle.
Section 2.5
Profile Shapes
47
Figure 2.22 Profile classifications for mild slopes.
3.
Obstructions or changes in subcritical flow affect the profile upstream, but not downstream.
4.
Obstructions or changes in supercritical flow affect the profile downstream, but not upstream.
In using Equation 2.39 to determine the sign of dy/dx, the most difficult part is the determination of the magnitude of the energy grade line, or friction slope (sf ), compared to the invert slope (so). The slope of the energy grade line generally follows the slope of the water surface profile; therefore, the faster the velocity, the steeper the water surface and energy grade line profiles. Also, for normal depth the velocity is constant. Therefore, for depths greater than normal depth, the velocity is less than normal velocity (same flow, but more cross-sectional area). Similarly, for depths less than normal depth, the velocities are greater than normal velocity (same flow, but less cross-sectional area). Thus, for depths exceeding normal depth, the energy grade line slope is flatter (smaller) than the energy grade line slope for normal depth. For known depths less than normal depth, the energy grade line slope is steeper (larger) than that for normal depth. Inspection of Figure 2.22a shows that the known depth exceeds both normal and critical depths. Thus, for this depth, the velocity is less than normal velocity, causing the friction slope (sf ) to be flatter (smaller) than so. For so greater than sf, the numerator in Equation 2.39 is positive. Because the known depth is greater than critical, the regime is subcritical; therefore, the Froude number is less than 1. For Fr < 1, the denominator
48
Introduction to Open Channel Hydraulics
Chapter 2
in Equation 2.39 is also positive, giving a positive dy/dx term. As indicated earlier in this section, a positive dy/dx means that depth is increasing in the downstream direction. Thus, rule (1) above states that flow will eventually approach normal depth (upstream for subcritical flow) in a prismatic channel of constant invert slope, if the channel is long enough. With this knowledge, the resulting profile is sketched as shown in Figure 2.22a. The profile shown is Figure 2.22a is classified as an M1 shape, the most common of all profile shapes. It occurs when a downstream obstruction forces an upstream depth increase. This “backup” caused by the obstruction, or backwater effect, gives the typical backwater curve, or M1 shape. Narrowing of a channel, a reduced flow area caused by a bridge or culvert, or a flattening of the downstream channel slope all result in a backwater condition and an M1 shape. The first and third rules, along with the knowledge that dy/dx is positive, allow the resulting profile to be sketched in Figure 2.22a. Equation 2.39 and the preceding classification rules allow examination of the situation in which the known depth is greater than critical but less than normal (Zone 2). In this case, the Froude number is again less than one and the denominator of Equation 2.39 is still positive. For depths in Zone 2, the velocity is greater than normal velocity, thus the friction slope (sf ) is steeper (greater) than the channel slope (so). This situation gives a negative numerator for Equation 2.39. Thus, the dy/dx term is negative for depths between critical and normal on a mild slope. A negative value of dy/dx indicates that the depth decreases in the downstream direction. With this knowledge, and applying the first through third rules for profile classification, the M2 shape can be sketched, as shown in Figure 2.22b. As the profile approaches critical depth, depth and velocity change abruptly with distance; thus, the M2 shape stops a short distance upstream of the location of critical depth. The depth is thus rapidly varied for a relatively short distance downstream of that point. Figure 2.14 shows a water surface profile having an M2 shape. A mild profile that passes through critical depth is often referred to as a drawdown curve. An M2 profile ending at a waterfall, a spillway, a supercritical length of channel, or a sudden enlargement of the channel geometry results in a drawdown curve. Figure 2.14 and Figure 2.15a show the water surface profile of a drawdown curve. The third mild shape exists for a known depth that is less than both normal and critical. A depth less than critical means that the flow is supercritical and the Froude number exceeds 1. For Fr > 1, the denominator of Equation 2.39 is negative. Supercritical velocities for this situation far exceed the velocity at normal depth, thus requiring an sf term much larger (steeper) than so. For Equation 2.39, a negative numerator and denominator result in dy/dx being positive and the depth increasing in the downstream direction. The second and fourth rules in the preceding section are used to sketch an M3 profile, as shown in Figure 2.22c. How can supercritical flow occur on a mild slope? Obviously, some manipulation of upstream conditions is required. An example is the presence of a sluice gate upstream, which can restrict depth of flow under the gate to less than critical depth, causing the flow to become supercritical for a short distance downstream of the gate. However, supercritical flow cannot be sustained for long on a mild slope before a hydraulic jump returns the flow to subcritical. Figure 2.15b illustrates a profile possibly having an M3 shape.
Section 2.5
Profile Shapes
49
Example 2.10 Profile classification. For the depth given in Example 2.2 and the critical and normal depths found in Example 2.7 and Example 2.8, classify the profile and suggest a cause for the resulting profile shape. Solution From Example 2.2, the known depth is 4 ft. Critical and normal depths computed from Example 2.7 and Example 2.8 are 2.78 and 3.57 ft, respectively. Since normal depth is greater than critical depth, the slope classification is mild. Also, since the known depth exceeds both normal and critical depths, the known depth is in Zone 1. Therefore, the profile is classified as an M1 shape, a typical backwater curve. The M1 shape is caused by downstream conditions. Potential causes could be a narrowing of the downstream channel, a reduced channel slope downstream, an increase in the downstream Manning’s n, or an obstruction in the downstream channel, such as a low dam or weir, that causes an increase in upstream depth.
In open channel hydraulics, the most common profile shapes encountered are M1 and M2. However, there are other profiles: three classifications (S1, S2, and S3) for steep slopes (yn < yc), two classifications (H2 and H3) for horizontal slopes (so = 0), three classifications (C1, C2, and C3) for critical slopes (yn = yc), and two classifications (A2 and A3) for adverse slopes (so < 0). Supercritical flow is expected on steep slopes. A horizontal slope is most common for energy dissipation structures (for instance, a stilling basin) to control a hydraulic jump. Critical and adverse slopes are less common than mild, steep, or horizontal slopes. For horizontal and adverse slopes, there is no Zone 1 because normal depth is undefined (it would be equal to infinity for horizontal slopes and negative for adverse slopes). Consequently, there are only two zones for horizontal and adverse classifications. Figure 2.23 shows the 13 possible profile classification shapes.
Example 2.11 Profile analysis for gradually varied flow. For the channel system shown in the following figure, sketch and label the likely water surface profiles.
50
Introduction to Open Channel Hydraulics
Chapter 2
Figure 2.23 Examples of flow profiles.
Solution Gradually varied profile analysis involves determining in what zone the actual water surface elevations or depths will fall throughout each subreach of the channel system. The water surface elevations at the boundary must be given, as they are in this example, or, if not specified, would possibly be assumed to be at normal depth at the boundary. In comparing normal and critical depth for a certain discharge on each of the three channel segments, it is seen that the upper segment is steep (normal depth less than critical depth), the middle segment is horizontal (no real normal depth for a zero slope), and the lower segment is mild (normal depth greater than critical depth).
Section 2.5
Profile Shapes
Each of the three segments may be evaluated separately, with the profiles sketched during the analysis. Steep slope: Flow passes under the sluice gate, with the water surface elevation at the lip of the gate less than both normal and critical depths. Because this corresponds to Zone 3 on a steep slope, an S3 curve is drawn from the lip of the gate and transitions into normal depth. Presumably, the depth will approach or reach normal depth on the steep slope. The profile would then overlay normal depth for the balance of the steep slope, until the channel slope changes to horizontal. Because supercritical flow cannot be sustained for a significant distance on a zero slope, a hydraulic jump will occur. The jump could initiate on either the steep or horizontal slope. There is insufficient data given in this example to determine on which slope the jump will commence, because a momentum balance between the depths just prior to and following the hydraulic jump is required (using Equation 2.22), along with knowing the discharge. Because this information is not furnished, the hydraulic jump could initiate on the steep slope, with an S1 curve following the jump, or the jump could begin on the horizontal slope, with an H3 shape before the hydraulic jump. For this example, the jump is assumed to begin on the steep slope with an S1 classification, as shown in the following figure. It is equally correct for this example to sketch the profile at normal depth to the intersection of the steep and horizontal slope, and then show an H3 shape for a short distance prior to a hydraulic jump on the horizontal slope, as shown with the alternate shape on the figure. Horizontal slope: With the hydraulic jump assumed to occur on the steep slope, flow on the horizontal slope must be subcritical, with depths greater than critical depth. This situation defines an H2 classification and shape, as shown on the following figure. The depth on the horizontal slope is expected to exceed the depth on the downstream mild slope (a flatter slope means lower velocity for the same discharge and therefore a greater depth) and this depth on the horizontal slope would decrease as the flow approaches the mild slope. The depth at the junction of the horizontal and mild slopes would be equal to or less than normal depth on the mild slope. Mild slope: At the end of the mild slope, the known depth is less than critical depth. Consequently, the profile along the mild reach must transition from nearly normal depth at the upstream end to less than critical depth at the downstream end. As the profile is in Zone 2, an M2 classification and profile are apparent. The profile becomes rapidly varied as it passes through critical depth a short distance upstream of the channel terminus at the dropoff, or free overfall. No classification is appropriate for the short reach of mild channel between critical depth and the downstream water surface, as this reach contains rapidly varied flow. The entire profile through the channel system is shown in the following figure. The profile will either reflect an S3, then H3, then H2 then M2 shape, or it could reflect an S3, S1, H2 and M3 shape, depending on where the hydraulic jump is initiated.
51
52
2.6
Introduction to Open Channel Hydraulics
Chapter 2
Computational Methods The ultimate goal of most open channel hydraulics computations is the depth, or water surface elevation, at all desired locations along a length, or reach, of channel or river. Several different graphical and analytical techniques have been developed since the early 1900s, but only two are still applied on a regular basis: the direct step method and the standard step method.
Direct Step Method This method has limited application, since it is used to solve for a distance given a known depth or for a change in depth (dx/dy rather than the typical dy/dx solution). Normally, the engineer is interested in the depth at a specific location (dy/dx), such as at a bridge, rather than how far upstream is it necessary to go to find a selected change in depth (dx/dy). Also, this technique is generally used only for prismatic channel shapes because it is cumbersome to apply to nonprismatic sections. Multiplying Equation 2.37 by dx/dy, rearranging terms, recognizing that E = y + V2/2g, and assuming that α = 1 yields E2 – E1 ∆x = ----------------so – sf where ∆x E2 E1 so sf
(2.40)
= the distance from location 1 to location 2 for the depth selected (ft, m) = the specific energy at upstream location 2 (ft, m) = the specific energy at downstream location 1 (ft, m) = the channel invert slope (ft/ft, m/m) = the average friction slope between the two locations (ft/ft, m/m)
Figure 2.24 may be used as an aid in understanding Equation 2.40. Figure 2.21 may also be used to derive Equation 2.40, rather than Equation 2.37.
Figure 2.24 Variables used in the direct step method.
Section 2.6
Computational Methods
53
The direct step method requires that the starting boundary conditions (depth or water surface elevation at the downstream-most cross section, assuming subcritical flow), cross-section geometry, so, Manning’s n, and discharge are all known. With the assignment of location 2 as upstream and location 1 as downstream, the velocity, specific energy, and friction slope at Section 1 can be computed. With the depth at location 2 selected (the difference from the depth at location 1 should be small and the depths must both be in the same classification zone), the velocity, specific energy, and friction slope at Section 2 can be computed. With specific energy at both locations computed, the value of the numerator of Equation 2.40 is now known, as well as so. The next step is to develop a value for sf. This value is obtained from the Manning equation for velocity, which is rearranged to solve for sf as 2 2
n V s f = ----------------2 4⁄3 k R where sf n V k R
(2.41)
= the energy grade line slope (ft/ft, m/m) = the Manning roughness coefficient (dimensionless) = the average velocity (ft/s, m/s) = 1.486 for English units and 1.0 for SI units (constant) = the hydraulic radius (ft, m)
The average friction slope can be computed by averaging the friction slopes at locations one and two, or by computing sf directly with Equation 2.41, using the average velocity and hydraulic radius terms for the two locations. If V and R are carried to at least three significant figures following the decimal point, the average value of sf is essentially the same as found by computing and averaging the two friction slopes separately. No significant difference in the computed distance between the two locations is found using either technique. Using an average velocity and hydraulic radius assumes that Manning’s roughness value is the same between the two cross sections, normally the case for a prismatic channel. Knowing all the values on the right-hand side of Equation 2.40 allows the computation of the incremental distance between two cross sections. Example 2.12 illustrates the computational procedure for performing a direct step profile analysis. This technique can be employed to compute a water surface profile in a prismatic channel, such as a storm sewer, culvert, or small drainage channel of constant slope. The HEC-RAS program uses the direct step method to compute an open channel flow profile through a culvert. Since channels are normally nonprismatic, the standard step method, discussed in the following section, has a much wider application.
Example 2.12 Applying the direct step method. A concrete (n = 0.013) trapezoidal channel has a bottom width of 12 ft and 1V:2H side slopes. The channel slope (so) is 0.00023 and the discharge is 600 ft3/s. The channel ends at a free overfall, with an invert elevation of 100 ft NGVD. Assume that critical depth occurs at the brink of the overfall. Using the direct step method, compute the profile from the location of critical depth to a point upstream where the depth is within 0.1 ft of normal depth. Solution Solving for normal depth (Equation 2.27) and critical depth (Equation 2.29) gives yn = 6 ft and yc = 3.48 ft.
54
Introduction to Open Channel Hydraulics
Chapter 2
A water surface profile computed using the direct step method is performed by preparing a table, such as the table included with this example. Computations to determine the distance from the previous depth for another selected depth proceed across each row, one row at a time. Critical depth was computed as 3.48 ft and is the initial depth used at the brink of the free overfall. Since it is known that the profile approaches normal depth (6 ft) at some upstream location, the resulting profile classification is M2 and all selected depths are between 3.48 and 6 ft. Examining the M2 profile shape on Figure 2.23 shows that depth changes at a faster rate near the critical depth, compared to approaching normal depth. Therefore, the incremental depth changes are somewhat larger near critical depth compared to near normal depth. Also, the profile for a short distance upstream of the location of critical depth is actually rapidly varied flow. Therefore, the computations immediately upstream of critical depth are acceptable for plotting the profile, but cannot be considered “highly accurate.” Rapidly varied flow might reflect the reach for 25–50 ft (8–16 m) upstream of critical depth and is normally not a significant issue in profile plotting. Column (1): The depths shown in Column (1) are arbitrarily selected by the engineer. More or fewer values could be selected; more values result in greater precision in the profile calculation, while fewer values lead to less precision. As long as the changes in depth (and velocity) are small with respect to distance, the computed profile will be satisfactory. Column (2): The cross-sectional flow area of the trapezoidal channel is computed. Column (3): The wetted perimeter of the trapezoidal channel is computed. Column (4): Column (2) is divided by column (3) to obtain hydraulic radius. Column (5): The discharge (600 ft3/s) is divided by column (2) to obtain average velocity. Column (6): The velocity head (V2/2g) is computed for the velocity value in column (5). Column (7): The friction slope is computed with Equation 2.41 for the values in columns (4) and (5) and the known n. Column (8): The friction slope for this depth is averaged with the friction slope for the depth at the previous location to obtain the average friction slope between the two computation points. Column (9): The average friction slope is subtracted from the invert slope. This value represents the denominator of Equation 2.40. Column (10): The values in columns (1) and (6) are added to obtain the specific energy head at the location under analysis. Column (11): The downstream specific energy (location 1) is subtracted from the upstream specific energy (location 2). This value represents the numerator in Equation 2.40. Column (12): Column (11) is divided by column (9). This value could be positive or negative; however, the sign is not especially important as long as the engineer understands that the numerical value represents the distance between the two computation points. Column (13): The incremental distance in column (12) is added to all the earlier computed distances to obtain the total distance from the start of computations to the location under analysis. This column represents the distance from the start of computations to each computation location for plotting the profile. Column (14): Column (1) is added to the elevation of the channel invert elevation at the location of the start of computations and the product of the channel invert slope multiplied by the value in column (13). The values in column (14) are given by CWSEL = z 0 + y ± s 0 Σ x
Section 2.6
(1)
(2)
Depth, y (ft)
Area, A (ft2)
3.48
65.98
3.6 3.9 4.2 4.5 4.8 5.1
5.5
77.22 85.68 94.50 103.68 113.22 119.78 126.50
27.56 28.09 29.43 30.774 32.115 33.456 34.797 35.691 36.585
2.394 2.461 2.624 2.784 2.943 3.099 3.254 3.356 3.458
9.094 8.680 7.770 7.003 6.347 5.787 5.299 5.009 4.743
(9)
(10)
(11)
(12)
(13)
Average Friction Slope
so – sf
Specific Energy, E (ft)
Delta E (ft)
Delta x (ft)
Sum of Distance (ft)
(14) Water Surface Elevation, NGVD
0
103.48
0.001846
–0.001616
0.006
–3.7 3.7
103.60
0.001498
–0.001268
0.067
–52.8 56.5
103.91
0.001112
–0.0008816
0.124
–140.6 197.1
104.25
0.0008405
–0.0006105
0.165
–270.3 467.4
104.61
0.0006459
–0.0004159
0.194
–466.4 933.8
105.01
0.0005038
–0.0002738
0.216
–788.9 1722.7
105.50
0.0004118
–0.0001817
0.154
–845.4 2568
105.89
0.0003538
–0.0001238
0.16
–1294.8 3863
106.39
0.165
–2188.9 6052
107.09
0.084
–1927 7879
107.64
0.086
–3372 11350
108.51
(6)
(7)
(8)
Velocity Head (ft)
Friction Slope
1.284
0.001966
1.170 0.937 0.761 0.626 0.520 0.436 0.3896 0.349
4.764
0.001726
4.770
0.00127
4.837
0.0009533
4.961
0.0007276
5.126
0.0005643
5.32
0.0004493
5.536
0.0003801
5.689
0.0003275
5.849 0.0003055 –0.00007598
5.7
133.38
37.479
2.559
4.500
0.314
0.0002834
6.014 0.0002738 –0.00004379
5.8
136.88
37.926
3.609
4.383
0.298
0.0002642
6.098 0.0002554 –0.00002536
5.9
140.42
38.373
3.659
4.273
0.284
0.0002465
6.184
Computational Methods
5.3
69.12
(3) (4) (5) Wetted Perimeter, Hydraulic P Radius, R Velocity, V (ft) (ft) (ft/s)
55
56
Introduction to Open Channel Hydraulics
where CWSEL z0 y s0 Σx
Chapter 2
= the computed water surface elevation (ft, m) = the elevation of channel invert at the start of computations (ft, m) = the depth at the location under analysis (ft, m) = the channel invert slope (ft/ft, m/m) = cumulative distance from the beginning of computations to the computation point (ft, m)
The ± sign is applied as follows: positive for subcritical profile analysis (proceeding upstream) and negative for supercritical profile analysis (proceeding downstream). For Example 2.12, the sign is positive for all the computations. The equation is only applicable where the channel invert slope is constant. Column (14) represents the water surface elevation at each computation point. The data in columns (13) and (14) are used to prepare the water surface profile shown in the figure below.
Standard Step Method This method is applicable for both prismatic and nonprismatic channels, including the adjacent floodplain. The technique is used by most computer programs that compute steady, gradually varied flow profiles and can be used for both subcritical and supercritical flow. The method uses the continuity, energy, and Manning equations to solve for depth or water surface elevations at selected locations along the stream. Standard Step Equation. The basic equation for the standard step solution is a slight restatement of the terms of the energy equation (Equation 2.14). The resulting energy equation for water surface profile analysis is 2
2
α2 V2 α1 V1 - = WSEL 1 + ------------ + hL WSEL 2 + -----------1-2 2g 2g
(2.42)
where WSEL1,2 = the water surface elevation (z + y) at the indicated location (ft, m) = the friction loss plus expansion or contraction loss between the two hL 1-2 points (ft, m) Figure 2.25 illustrates the variables used in standard step computations.
Section 2.6
Computational Methods
57
Figure 2.25 Variables used in the standard step method.
As mentioned previously, the head loss term is a combination of friction and other (expansion or contraction) losses between locations one and two. The head loss equation is hL
1-2
= hf + ho
(2.43)
where hf = the energy loss due to friction between the two locations (ft, m) ho = the energy loss due to expansion or contraction between the two locations (ft, m) Bend losses also could be added as a separate loss component and are included as such in some programs. In HEC-RAS, however, bend losses are assumed to be incorporated in the Manningʹs n used to compute friction losses. In Chapter 5, which covers Cowan’s equation, the use of Manning’s n to include bend losses is further illustrated. The friction loss is found from Equation 2.41 and the distance between the two locations as h f = Ls f where
(2.44)
L = the length of the flow path between the two locations (ft, m) sf = the average energy slope between the two locations (ft/ft, m/m)
The length term could represent an average flow length, because there could be as many as three different flow lengths between two cross-section locations for complex cross sections (one each for the left and right overbanks and one for the channel). The other losses are sometimes referred to as eddy losses and are due to the expansion or contraction of cross-section flow area between the two locations. These losses, which are similar to minor losses in pipeline systems, are included by multiplying the absolute difference in velocity head between the two points by an appropriate coefficient:
58
Introduction to Open Channel Hydraulics
Chapter 2
2
2
α2 V2 α1 V1 - – ------------h o = C c, e -----------2g 2g where Cc Ce V1 V2
(2.45)
= the coefficient of contraction (dimensionless) = the coefficient of expansion (dimensionless) = the average velocity at the downstream section (ft/s, m/s) = the average velocity at the upstream section (ft/s, m/s)
When the difference in velocity head is positive (the downstream velocity head is less than the upstream velocity head), the flow area is expanding and the absolute value of the difference in velocity heads is multiplied by the coefficient of expansion (Ce). When the difference in velocity head is negative (upstream velocity head is less than downstream velocity head), the flow area is contracting and the absolute value is multiplied by the coefficient of contraction (Cc). For subcritical flow, Cc and Ce are often taken as 0.1 and 0.3, respectively. For supercritical flow, the coefficients are much smaller. Values are left to the discretion of the user, but Cc and Ce for supercritical flow in natural or man-made channels are usually no more than 0.05 for contraction and 0.1 for expansion. Contraction and expansion coefficients in prismatic channels are often assumed to be zero for either flow regime. Chapter 5 further discusses expansion and contraction coefficients for both subcritical and supercritical flow. Incorporating Equation 2.43 through Equation 2.45 into Equation 2.42 and rearranging terms yields 2
2
2
2
α 1 V 1 α 2 V 2 α 2 V 2 α 1 V 1 - – ------------- + Ls f + C e, c ------------ – ------------- WSEL 2 = WSEL 1 + -----------2g 2g 2g 2g
(2.46)
Equation 2.46 is the form of the energy equation used by HEC-RAS and most other steady, gradually varied flow programs to solve for the unknown water surface elevation at location 2. Application of the Standard Step Method. To use the standard step method, the discharge, geometry, roughness values, and expansion and contraction coefficients must be known at each desired computation location. In addition, the discharge and boundary conditions (flow regime and starting water surface elevation) must be specified. Chapter 5 describes how to develop these data. An iterative procedure is required to compute the depth or water surface elevation at selected points. In Equation 2.46, the velocity head and the friction slope at location 2 cannot be computed until the water surface elevation at location 2 is determined. Thus, the procedure is to estimate the water surface elevation at location 2, calculate the velocity head and average friction slope, and solve Equation 2.46 for WSEL2. If the original estimate does not approximate the calculated value, a new estimate of the water surface elevation at location 2 is made and the process repeated until the two values are within a specified tolerance. Two to four iterations are usually sufficient for most cross sections to meet the assigned tolerance. For hand computations, the tolerance may be 0.05–0.1 ft (0.015–0.03 m). The selected tolerance directly affects the profile accuracy. The engineer could experiment with various tolerances to determine what tolerance provides acceptable accuracy. Errors in profile computations can accumulate with a loose tolerance and become excessive. If a profile computational accuracy of 0.1 ft (0.03 m) is desired, the tolerance should likely be 0.05 ft (0.015 m) or
Section 2.6
Computational Methods
59
less. Example 2.13 shows the steps for computing a water surface profile using the standard step method for a simple prismatic channel.
Example 2.13 Standard step method for a prismatic channel. Building on Example 2.12 for the direct step method, compute the water surface profile starting at a point 5000 ft upstream of the free overfall and at 1000 ft increments thereafter to a point 9000 ft upstream of the free overfall. A 600 ft3/s discharge is carried in a trapezoidal channel (n = 0.013) of 12 ft bottom width and 1V:2H side slopes. The channel invert slope is 0.00023 and the channel invert elevation at the free overfall is 100 ft NGVD. The expansion and contraction coefficients for this prismatic channel may be assumed to be zero and α = 1. The tolerance between the energy heads for the estimated and computed water surface elevations is 0.05 ft. Solution From the figure, which shows the water surface profile computed with the direct step method, the water surface elevation 5000 ft upstream of the free overfall is estimated as 106.8 ft NGVD, which becomes the elevation at the boundary for this example. The water surface profile computed for a prismatic channel with the standard step method is determined by setting up a table, such as the one in this example. Following are descriptions of the contents of the table. Column (1): The distance from the selected starting point to each cross section is input. Since the first cross section is at 5000 ft upstream from the brink of the free overfall and the problem statement directs the computations to be made at 1000-ft intervals, all values in this column can be included prior to the start of computations. However, adequate space on the table between each cross section should be included for the additional iterations required to achieve the desired tolerance. Column (2): For the first cross section (5000 ft), the known water surface elevation (WSEL) is inserted. For all other cross sections, a water surface elevation will be estimated by the modeler when computations reach each location. Column (3): The maximum depth for each cross section is inserted, obtained by subtracting the channel invert elevation at the location under analysis from the WSEL of column (2). Column (4): The cross-section flow area is computed. Column (5): The average velocity is computed from the known discharge (600 ft3/s) divided by the area in column (4). Column (6): The velocity head is computed from the velocity of column (5). Column (7): The total energy head is obtained by adding column (2) and column (6). Column (8): After computing the wetted perimeter, the hydraulic radius is obtained by dividing the column (4) value by the wetted perimeter. Column (9): The hydraulic radius is raised to the 4/3 power. Column (10): The friction slope is computed using Equation 2.41 and the values in columns (5) and (9), using Manning’s n for the reach. Column (11): The average friction slope between the two computation points is calculated, normally by a simple average of sf at each section. Column (12): The incremental distance between the two cross sections is input. For this example, a single value of distance is applicable because all flow is confined to the trapezoidal channel. Column (13): The average friction slope in column (11) is multiplied by the incremental distance in column (12) to obtain the friction loss between the two cross sections.
60
(2)
(3)
(4)
(5)
(6)
(8)
(9)
(10)
Velocity Head (ft)
(7) Total Energy Head, H (ft)
Distance Sum, x (ft)
WSEL (NGVD)
Depth, y (ft)
Area, A (ft2)
Velocity, V (ft/s)
Hydraulic Radius, R (ft)
R4/3 (ft4/3)
sf
(11) Average Friction Slope
(12)
(13) Friction Loss (ft)
(14) Total Computed Head ft)
Delta x (ft)
Delta H (ft)
0.0002868
1000
0.287
107.41
0
0.0002719
1000
0.272
107.68
0.02
0.000259
1000
0.259
107.96
0.03
(15)
5000
106.8
5.65
131.645
4.558
0.322
107.12
3.528
5.371
0.0002944
6000
107.1
5.72
134.08
4.475
0.311
107.41
3.569
5.454
0.0002793
7000
107.4
5.80
136.84
4.385
0.299
107.70
3.608
5.534
0.0002645
8000
107.7
5.86
139
4.317
0.289
107.99
3.639
5.598
0.0002534 0.0002499
1000
0.250
108.24
0.06
9000
107.9
5.90
140.42
4.273
0.284
108.18
3.659
5.639
0.0002465
9000
107.93
5.93
141.49
4.231
0.279
108.21
3.674
5.670
0.0002415 0.0002474
1000
0.247
108.23
0.02
Introduction to Open Channel Hydraulics
(1)
Chapter 2
Section 2.6
Computational Methods
61
Column (14): The computed energy head is the result of the energy head at the previous cross section (column 7) plus the friction loss between the two cross sections (column 13). H 6000 = H 5000 + h L
5000 – 6000
= 107.12 + 0.287 = 107.41 ft
Column (15): Compute the difference between the column 14 value (computed energy head) from that of column 7 (estimated energy head). As seen, the value in Column (7) is identical to the value in Column (14) and well within the tolerance. A single iteration to achieve the desired tolerance is not normally the case. Because the WSEL at each location can be initially estimated closely from the existing profile for the direct step method, only one iteration at each location (except the last cross section) was needed for this simple example. As would be expected, the computed profile with the standard step method between the 5000 and 9000 ft distances is essentially identical to that computed by the direct step method.
Standard Step Method Using Conveyance. When used to compute water surface elevations for normal cross sections having a left and right floodplain as well as a nonprismatic channel (Figure 2.3), the standard step method, described in the previous section for prismatic channels, includes some modifications to facilitate the computations, especially in the use of conveyance. Conveyance is taken from the geometry and roughness terms in the Manning equation for discharge (Equation 2.27) and is computed with 2⁄3 k K = --- AR n
(2.47)
where K = the conveyance (ft3/s, m3/s) k = 1.486 for English units and 1 for SI Equation 2.7 was used earlier in this chapter to compute α from the velocity and discharge values for the left and right overbanks and for the channel. However, most computer programs use the conveyance to determine α. Similarly, using conveyance is computationally more efficient for determining the distribution of flow in the left and right overbanks and the channel of a cross section, and in calculating the friction
62
Introduction to Open Channel Hydraulics
Chapter 2
slope. To compute the velocity distribution coefficient using conveyance, HEC-RAS, HEC-2, and other similar programs use 3
3
3
K lob K ch K rob 2 A TOT ---------+ --------- + ----------- 2 2 A2 lob A ch A rob α = -----------------------------------------------------------------3 K TOT whereATOT Klob Alob Kch Ach Krob Arob KTOT
(2.48)
= the total cross-sectional area (ft2, m2) = the left overbank conveyance (ft3/s, m3/s) = the left overbank cross-sectional area (ft2, m2) = the channel conveyance (ft3/s, m3/s) = the channel cross-sectional area (ft2, m2) = the right overbank conveyance (ft3/s, m3/s) = the right overbank cross-sectional area (ft2, m2) = the total cross-sectional conveyance (ft3/s, m3/s)
The friction slope at a cross section may also be computed using the conveyance and the Manning equation for discharge (Equation 2.27): 2
Q TOT s f = -------------2 K TOT
(2.49)
After an initial estimate of the unknown water surface elevation, the conveyance in each of the three cross-section segments can be calculated. For a cross section consisting of the channel and the left and right overbank areas, Equation 2.49 is expanded to the form 1⁄2
Q lob + Q ch + Q rob = Q TOT = ( K lob + K ch + K rob )s f
(2.50)
Rearranging the terms of Equation 2.50 gives the equation used to solve for the friction slope at location 2 after estimating the unknown water surface elevation and computing the conveyance: 2 Q TOT s f = ------------------------------------------- K lob + K ch + K rob
(2.51)
The distribution of discharge for the left and right overbanks and channel sections is also based on the conveyance. For one-dimensional steady flow, the friction slope (sf ) must be the same for each part of an individual section. Therefore, the discharge in each subsection is computed from the Manning equation for discharge, using the conveyance. The discharges in the three main segments of the cross section (left and right overbanks and the channel) are found using the total discharge and the conveyance of each of the three segments: K lob Q lob = -------------- Q TOT K TOT
(2.52)
The calculation of total energy head at the upstream location uses a calculated α2 for location 2 from Equation 2.48 and the assumption of subcritical flow. The average of
Section 2.6
Computational Methods
63
the friction slopes for locations 1 and 2 is used as the average friction slope between the two cross sections. The average friction loss is computed using Equation 2.44, with the known length between the two cross sections; a weighted length is used if the lengths vary among the channel and left and right overbank reaches. The equation used in HEC-RAS for a discharge-weighted reach length is L lob Q lob + L ch Q ch + L rob Q rob L Q = -------------------------------------------------------------------------Q TOT
(2.53)
where LQ = the discharge-weighted reach length used to compute the friction loss (ft, m) Llob = the average length of flow between the left overbanks of adjacent cross sections (ft, m) Lch = the average length of flow between the channels of adjacent cross sections (ft, m) Lrob = the average length of flow between the right overbanks of adjacent cross sections (ft, m) The development of different lengths between two cross sections is further discussed in Chapter 5. An expansion or contraction is determined and the value for ho is found from Equation 2.45. Equation 2.46 is then used to compute a value for the water surface elevation at location 2. The computed elevation is compared to the estimated water surface elevation and the difference between the two water surface elevations is compared to the allowable tolerance. If the difference is not within the specified tolerance, the estimate of the water surface elevation is modified and the process is repeated until convergence is reached. Normally, two to five iterations are needed to achieve convergence in hand computations of nonprismatic channels.
Example 2.14 Standard step method for complex cross sections using conveyance. The following figure shows three nonprismatic cross sections, including the elevationdistance data for the geometry of each section, the bank stations (located at the vertical dotted lines), and the n values for each section. Use the standard step method, applying conveyance, to compute a water surface profile for a discharge of 1000 ft3/s. Use Cc = 0.1 and Ce = 0.3. The starting water surface elevation is 412 ft NGVD. Solution When computing a water surface profile by hand for nonprismatic cross sections with flow in the overbanks, a table similar to the following table should be prepared. Sequential computations are performed at each cross section until a balance between the assumed and computed water surface elevation is achieved, within the defined tolerance. Column (1): Cross-section identification number. This value normally corresponds to the cross sectionʹs location (distance) on the stream, as measured from the mouth of the stream. For this simple example, the location number corresponds to the crosssection number, as surveyed. Column (2): Assumed water surface elevation. At the first cross section, this value is specified by the engineer. The estimated normal depth, the critical depth, a known elevation, or simply a best estimate of the starting water surface elevation are all appropriate. At all other sections, the elevation is an initial estimate to begin the
64
Introduction to Open Channel Hydraulics
Chapter 2
computations. Chapter 5 describes methods for estimating a starting water surface elevation. Column (3): The cross-sectional area below the water surface in the left overbank (floodplain) area is computed. Column (4): The cross-sectional area of the channel below the water surface is computed. Column (5): The cross-sectional area in the right overbank (floodplain) below the water surface is computed. Column (6): The values in columns (3) through (5) are summed to obtain the total crosssectional flow area. Column (7): The wetted perimeter of the left overbank is determined. Note that the depth on the imaginary vertical dashed line separating the left overbank from the channel is not included in the wetted perimeter. Column (8): The wetted perimeter of the channel is determined. The depths on both imaginary vertical dashed lines separating the channel from the left and right overbanks are not included in the wetted perimeter.
Section 2.6
Computational Methods
Column (9): The wetted perimeter of the right overbank is determined. The depth on the imaginary vertical dashed line separating the right overbank from the channel is not included in the wetted perimeter. Column (10): The values in columns (7) through (9) are summed to determine the total wetted perimeter of the cross section. Column (11): The value in column (3) is divided by the value in column (7) to give the hydraulic radius of the left overbank. Column (12): The value in column (4) is divided by the value in column (8) to give the hydraulic radius of the channel. Column (13): The value in column (5) is divided by the value in column (9) to give the hydraulic radius of the right overbank. Column (14): The value in column (6) is divided by the value in column (10) to give the hydraulic radius of the full cross section. Column (15): The conveyance of the left overbank is computed, using the values in columns (3) and (11), and knowing the value of Manning’s n for the left overbank. Column (16): K3/A2 is computed for the left overbank, from the values in columns (3) and (15). Column (17): The conveyance of the channel is computed, using the values in columns (4) and (12), and knowing the value of Manningʹs n for the channel. Column (18): K3/A2 is computed for the channel, from the values in columns (4) and (17). Column (19): The conveyance of the right overbank is computed, using the values in columns (5) and (13), and knowing the value of Manning’s n for the right overbank. Column (20): K3/A2 is computed for the right overbank, from the values in columns (5) and (19). Column (21): The total cross-section conveyance is computed by adding the values in columns (15), (17), and (19). Column (22): The friction slope (sf ) is computed for the cross section using Equation 2.49 with the total discharge at the cross section and the total conveyance of column (21). Column (23): The computed friction slope at each of the two cross sections is averaged from the values in column (22) for each location. A simple average is used for this example; there are four different methods to compute average friction slope in HECRAS. Column (24): The average distance between the two cross sections is entered. Distances used in this example are the same between each pair of sections, but this distance is normally a discharge-weighted reach length computed with Equation 2.53, using the distribution of flow in each of the three cross-section segments and the distance between the two sections for each of the three segments. Column (25): The friction loss between the two cross sections is computed with Equation 2.44 and the values in columns (23) and (24). Column (26): The velocity distribution coefficient (α) is computed with Equation 2.48, using the values in columns (6), (16), (18), (20), and (21). Column (27): The average velocity for the full cross section is computed from the known discharge and the value in column (6). Column (28): The adjusted velocity head is computed, using the values in columns (26) and (27).
65
66
WSEL (NGVD)
Area LOB (ft2)
Area Channel (ft2)
1
412.00
60.0
2, Trial 1
412.50
2, Trial 2
Area ROB (ft2)
(6) Area Total Section (ft2)
P LOB (ft)
440.0
80.0
580.0
32.0
37.5
420.0
75.0
532.5
412.26
31.5
410.4
63.0
3, Trial 1
412.50
0.0
332.0
3, Trial 2
412.90
0.0
3, Trial 3
412.86
0.0
(2)
(4)
(3)
(5)
(7)
(8)
(9)
(10)
K /A LOB (x10–6)
K Channel 3 (ft /s)
53.3
42.0
127.3
1.9
8.3
1.9
4.6
2260
3204472
66784
26.5
58.0
51.5
136.0
1.4
7.2
1.5
3.9
1171
1140787
58401
504.9
26.3
58.0
51.3
135.5
1.2
7.1
1.2
3.7
881
688565
56193
0.0
332.0
0.0
56.6
0.0
56.6
0.0
5.9
0.0
5.9
0
0
40115
348.0
0.0
348.0
0.0
57.4
0.0
57.4
0.0
6.1
0.0
6.1
0
0
42985
346.4
0.0
346.4
0.0
57.3
0.0
57.3
0.0
6.0
0.0
6.0
0
0
42696
(26)
K3/A2 Channel
K ROB 3 (ft /s)
K3/A2 ROB
K Total 3 (ft /s)
sf
Average sf
Distance (ft)
hf (ft)
α
1538530292
3045
4409345
72088
0.00019 0.00023
1200
0.273
0.00024
1200
0.290
0.00046
1500
0.684
0.00042
1500
0.624
0.00042
1500
0.630
655828675 648631059
0 0
0 0 0
61617 58609 40115 42985 42696
1.39
0.00026
1.37
0.00029
1.34
0.00062
1.00
0.00054 0.00055
1.00 1.00
(27)
(30)
(31)
(32)
(33)
(34)
Ce (pos) Cc (neg)
ho
hL
Comp WSEL
Delta CWSEL
412.00
0.00
0.011
0.3
0.003
0.277 412.27
–-0.23
0.017
0.3
0.005
0.295 412.28
0.02
0.059
0.3
0.018
0.702 412.92
0.42
0.047
0.3
0.014
0.638 412.87
–0.03
0.048
0.3
0.014
0.644 412.86
0.00
(28)
(29) Delta Average Velocity Velocity V Head Head (ft/s) (ft) (ft) 1.72 1.88 1.98 3.01 2.87 2.89
0.064 0.075 0.081 0.141 0.128 0.130
Chapter 2
(25)
0
(17) 2
K LOB 3 (ft /s)
(24)
585676560
3
R Total Section (ft)
(23)
910388
(16)
R ROB (ft)
(22)
1535
(15)
R Channel (ft)
(21)
1053519366
(14)
R LOB (ft)
(20)
1521709
(13)
P Total Section (ft)
(19)
2046
(12)
P ROB (ft)
P Channel (ft)
(18)
112913419
(11)
Introduction to Open Channel Hydraulics
(1) Cross Section No., Trial
Section 2.6
Computational Methods
Column (29): The velocity head at the section of known water surface elevation (downstream in this example) is subtracted from the velocity head at the section under analysis. Include the sign of the value. Column (30): If the value in column (29) is positive, insert the coefficient of expansion (often 0.3). If the value in column (29) is negative, insert the coefficient of contraction (often 0.1). Column (31): Compute the other losses (ho) by multiplying the absolute value in column (29) by the value in column (30). Column (32): Compute the total losses between the two cross sections by adding the values in columns (25) and (31). Column (33): Compute the water surface elevation for the cross section under analysis using Equation 2.46 and the values for the previous cross section in columns (2) and (28) and the values for the cross section under analysis in columns (28) and (32). Column (34): Compare the value in column (33) to the assumed value in column (2) for the cross section under analysis. If the difference is equal to or less than the specified tolerance, accept the value in column (2) as correct and move to the next cross section to be analyzed. If the difference is greater than the specified tolerance, select a new value for column (2) and repeat steps (3) through (34) until the tolerance is met. Column (35): Add any comments necessary for documentation. The profile is plotted in the following figure, based on the final water surface values for each section in column (2) and the cumulative distance from the start of computations to each cross section (1200 ft from Section 1 to Section 2 and 2700 ft from Section 1 to Section 3).
67
68
Introduction to Open Channel Hydraulics
Chapter 2
The Standard Step Procedure in HEC-RAS The HEC-RAS algorithm uses the following steps to compute water surface elevations using the standard step method: 1. Establish the downstream boundary condition for subcritical flow or the upstream boundary condition for supercritical flow. The boundary conditions include the starting water surface elevation or depth, the discharge, and the initial cross-section geometry. The starting water surface elevation could be obtained from a measured value at a gage, by assuming critical depth, by assuming normal depth, or by estimating. The conveyance and discharge in the left and right overbanks and in the channel are computed for the specified starting water surface elevation. The dischargeweighted velocity head and the friction slope at the boundary are calculated. In addition, the cross-section geometry for all locations at which computations are required must be known, along with Manning’s n values, reach lengths, obstruction data, and discharges throughout the river system. 2. The water surface elevation is estimated, with the assumption of subcritical flow, at the next cross section (Section 2) upstream from the boundary (Section 1). HEC-RAS projects the depth from Section 1 onto Section 2 for an initial estimate of the water surface elevation. 3. For the assumed water surface elevation at Section 2, the incremental conveyance is computed for the left and right overbanks and for the channel at Section 2, using Equation 2.47. The conveyance is summed to obtain the total conveyance at Section 2. 4. The total discharge at Section 2 is distributed to the left and right overbank areas and to the channel in proportion to the incremental conveyance. An average discharge is computed for each of the three flow paths (channel and left and right overbank distance) between the two sections. 5. The friction slope at Section 2 is computed with Equation 2.51 from the total discharge and total conveyance at Section 2. 6. The average velocities in the left and right overbank, the channel, and the entire cross section are computed. The mean velocity head is computed with a modification of
Equation 2.48 for the velocity and discharge terms for each channel subsegment (left and right overbank areas and the channel) and the total section discharge and average velocity. Although HEC-RAS does not use α for the computations, it is computed and displayed for inspection by the user. The program sets the discharge-weighted velocity head (including α) equal to the right-hand side of the following equation: 2
2
2
2
V ave 1 V lob Q lob + V ch Q ch + V rob Q rob α ----------- = ------ ---------------------------------------------------------------------------- Q TOT 2g 2g 7. The initial estimate of the energy grade line elevation is obtained by adding the mean velocity head found from step 6 to the estimated water surface elevation of step 2. 8. A discharge-weighted reach length (LQ) is found from the discharge and the reach length for each of the three flow paths between the two sections. Equation 2.53 is used for this computation in HEC-RAS. 9. The average friction slope is found between the two sections. Four different equations for average friction slope are available in HECRAS. The friction loss between the two sections is computed with Equation 2.44. 10. The mean velocity head at section 2 is subtracted from the mean velocity head at section 1. If the difference is negative, the flow area is contracting and the coefficient of contraction is used in Equation 2.45 to compute the contraction loss. If the difference is positive, the flow area is expanding and the coefficient of expansion is used in Equation 2.45 to compute an expansion loss. 11. Equation 2.46 is used to compute the water surface elevation at Section 2 and the value is compared to the assumed value from step 2. If the difference is within a predefined tolerance, the elevation is accepted as correct and computations move on to the next section upstream (Section 3), with steps 2–11 repeated for computations between Sections 2 and 3. If the difference is outside the required tolerance, a revised WSEL2 is estimated and steps 3–11 are repeated until the tolerance is met.
Section 2.7
2.7
Chapter Summary
69
Chapter Summary Subcritical and supercritical regimes, normal and critical depths, alternate and sequent depths, along with many other terms and variables defined in Chapter 2, are important to compute successful solutions for most open channel problems. The computation of normal and critical depths and knowing how depth changes with distance along the channel are important keys in determining the shape of a water surface profile. Gradually varied flow profiles may be classified and sketched if normal, critical, and actual depths are known. Numerical computation of a gradually varied water surface profile requires the continuity, energy, and Manning equations to obtain an adequate solution. The momentum equation is used for situations in which the energy equation is not adequate, such as where the flow changes from subcritical to supercritical and for analysis of hydraulic jumps. These equations are most often applied to steady, gradually varied, or rapidly varied flow situations to compute a depth or a water surface elevation for a specified discharge. Significant data are needed for these computations, including cross-section geometry, discharge, Manning’s n, expansion and contraction coefficients, boundary conditions, and flow regime. Most computations are for subcritical flow, but the equations and procedures are equally applicable to supercritical flow. The standard step method is the procedure most often used to compute water surface profiles, using the concept of conveyance to determine the distribution of flow in a cross section and the friction slope. The computation process is iterative, due to the nonlinearity of the equations, requiring a trial-and-error solution at every cross section. HEC-RAS is a popular computer program for performing these calculations. Chapter 2 supplies the building blocks, in the form of equations and concepts, to help the reader gain a basic understanding of open channel hydraulics. Building on this introductory material, the following chapters describe the application of this information to develop water surface profile simulation models.
Problems 2.1 English Units – Determine the area, top width, wetted perimeter and hydraulic radius for the trapezoidal channel shown in the following figure if the depth of flow is 3.5 ft. SI Units – Determine the area, top width, wetted perimeter and hydraulic radius for the trapezoidal channel shown in the following figure if the depth of flow is 1.1 m.
70
Introduction to Open Channel Hydraulics
Chapter 2
2.2 English Units – What is the average velocity in the trapezoidal channel shown in the previous figure if the discharge through the channel is 250 ft3/s? SI Units – What is the average velocity in the trapezoidal channel shown in the previous figure if the discharge through the channel is 7.1 m3/s? 2.3 English Units – Complete the table for the compound channel shown in the following figure if the water surface elevation is 47.0 ft. The discharge through the channel is 16,000 ft3/s, the left overbank roughness is 0.075, the main channel roughness is 0.035, and the right overbank roughness is 0.040. The channel slope is 0.00025 ft/ft.
Channel Section
Area, ft2
Conveyance, ft3/s
Discharge, ft3/s
Velocity, ft/s
Left Overbank Main Channel Right Overbank
SI Units – Complete the table for the compound channel shown in the following figure if the water surface elevation is 14.3 m. The discharge through the channel is 450 m3/s, the left overbank roughness is 0.075, the main channel roughness is 0.035, and the right overbank roughness is 0.040. The channel slope is 0.00025 m/m. Channel Section Left Overbank Main Channel Right Overbank
Area, m2
Conveyance, m3/s
Discharge, m3/s
Velocity, m/s
Problems
71
2.4 English Units – Compute the critical depth for the trapezoidal channel given in Problem 2.1 for a discharge of 250 ft3/s. What is the critical depth when the discharge is increased by 25%? SI Units – Compute the critical depth for the trapezoidal channel given in Problem 2.1 for a discharge of 7.1 m3/s. What is the critical depth when the discharge is increased by 25%? 2.5 English Units – Find the normal depth in the channel presented in Problem 2.1 for a discharge of 250 ft3/s. The channel is constructed of concrete (n = 0.013) and has a slope of 0.003 ft/ft. Is the channel flowing under subcritical or supercritical flow? SI Units – Find the normal depth in the channel presented in Problem 2.1 for a discharge of 7.1 m3/sec. The channel is constructed of concrete (n = 0.013) and has a slope of 0.003 m/m. Is the flow in the channel subcritical or supercritical? 2.6 English Units – Find the normal depth for a channel having the characteristics shown in the following table. The roughness for both the left and right overbanks is 0.050 and the main channel roughness is 0.035. The channel slope is 0.0023 ft/ft and the channel discharge is 2200 ft3/s. The left and right channel bank stations are contained in the shaded boxes. Hint: Noting that sf = so for flow at normal depth, solve by applying Equation 2.51 for a series of assumed depths.
72
Introduction to Open Channel Hydraulics
Station, ft
Elevation, ft
–195
936.5
–150
936
–105
935
–87
934
–78
933
–50
928
–20
925.2
–12
920.5
0
Chapter 2
919.95
10
919.9
15
924.5
32
926.4
265
928
325
931
365
932
450
933
640
936
SI Units – Find the normal depth for a channel having the characteristics shown in the following table. The roughness of the left and right overbank is 0.050 and the main channel roughness is 0.035. The channel slope is 0.0023 m/m and the channel discharge is 62.3 m3/s. The left and right channel bank stations are contained in the shaded boxes. Hint: Noting that sf = so for flow at normal depth, solve by applying Equation 2.51 for a series of assumed depths. Station, m
Elevation, m
–59.4
285.4
–45.7
285.3
–32.0
285.0
–26.5
284.7
–23.8
284.4
–15.2
282.9
–6.1
282.0
–3.7
280.5
0
280.4
3.0
280.4
4.6
281.8
9.8
282.4
80.8
282.9
99.1
283.8
111.3
284.1
137.2
284.4
195.1
285.3
Problems
73
2.7 English Units – Using the direct step method, find the distance between the depths given in the following table. Use the same channel geometry given in Problem 2.1 and assume that the channel discharge is 750 ft3/s and Manning’s n = 0.013. The slope of the channel is 0.0008 ft/ft. Assume that critical depth occurs at the downstream end of the channel. Depth, ft
∆x, ft
Cumulative Distance, ft
3.38 3.40 3.45 3.50 3.55 3.60
SI Units – Using the direct step method, find the distance between the depths given in the following table. Use the same channel geometry given in Problem 2.1 and assume that the channel discharge is 21.2 m3/s and Manning’s n = 0.013. The slope of the channel is 0.0008 ft/ft. Assume that critical depth occurs at the downstream end of the channel. Depth, m
∆x, m
Cumulative Distance, m
1.030 1.036 1.052 1.067 1.082 1.097
2.8 Complete the following table using the standard step method for the channel geometry given in Problem 2.1. The discharge is 1250 ft3/s (35.4 m3/s), the channel slope is 0.0005 and the channel roughness is 0.035 along its entire length. Again, assume that critical depth occurs at the downstream cross-section. Cross Section 1 2 3 4
Downstream Distance, ft (m)
Depth, ft (m)
CHAPTER
3 Hydraulic Modeling Tools
Hydraulic simulation of a reach of stream, including the channel and floodplain, can be performed with a variety of computer programs, ranging from simple to complex. But just as one would not use a cannon to hunt a rabbit, there is no need to use a highly sophisticated and complicated hydraulic program when a simpler one will suffice. In general, the more detailed or complex the procedures in the program, the higher the cost of acquiring the data and the longer it takes to develop the data for the program, calibrate the model input to match the observed hydraulic data, and operate the model. For a given hydraulic modeling situation, there is no theoretical basis to know absolutely whether a simple method is adequate. However, the evaluation of project objectives, available data, stream characteristics, and other considerations that are covered in Chapter 4 help the modeler to select a program appropriate for the work at hand. Computer programs that perform steady, gradually varied flow computations are the most widely used and are appropriate for most hydraulic modeling applications. Programs that also perform unsteady flow analysis with the same data set, such as HEC-RAS, are especially valuable if it is later determined that unsteady flow, rather than steady flow, modeling is needed. A brief description of modeling terminology is important before discussing computer programs. Computer programs, such as HEC-RAS, enable engineers to simulate and analyze open channel flow for a reach of river. It is a computer simulation and not a model, per se; although it is common for engineers to refer to a “RAS model” in describing the effort. This book may also occasionally use the term model when referring to a computer program; however, it is the information that goes into describing the geometry, discharge, surface roughness, bridge and culvert characteristics, and other variables comprising a data set that represent a model of the length of the study stream. Throughout this text, the terms model or data set are not intended to refer to a
76
Hydraulic Modeling Tools
Chapter 3
specific program, but rather to the numerical information that defines the floodplain hydraulic variables needed by the program to perform the computations. This chapter describes the general categories of hydraulic programs and provides specific examples of popular computer simulation packages for each of these categories. It also covers the types of studies in which each model is employed, along with the strengths and weaknesses of the techniques. A discussion of some factors to consider for selecting the appropriate computer program is included, as well.
3.1
Uniform Flow The simplest model (and the least accurate) is the assumption of uniform flow (normal depth) to solve a hydraulic problem. As discussed in Chapter 2, the assumption that the channel invert slope and the energy grade line slope are equal (so = sf ) rarely represents a real-world situation. However, this assumption is often sufficient to design and analyze many small-scale flood management systems, such as storm sewers and highway drainage. The principal advantages of a uniform flow assumption are speed and simplicity. Spreadsheet applications for normal depth analysis are either readily available or easily written. The disadvantages are loss of accuracy in water surface profile calculations and the potential to over- or underdesign the storm sewer or small channel, depending on the topography of the site. Many programs incorporate uniform flow/normal depth as a subfeature to facilitate certain designs and computations. Programs developed for design of storm sewers or stormwater detention facilities often incorporate normal depth assumptions, in the latter case to establish a water surface elevation versus discharge relationship for the outlet. HEC-RAS includes a hydraulic design feature that employs the normal depth procedure to solve for any one of the following parameters if the other four are specified: channel depth, slope, channel width, discharge, or Manning’s n. The HEC-1 (USACE, 1990) and HEC-HMS (USACE, 2000) programs include an option to estimate reach storage-outflow relationships in hydrologic routings with the assumption of normal depth. This simplification may be adequate for some applications, but it can include significant error in the storage-outflow estimate. Chapter 8 discusses in more detail the development of storage-outflow data for hydrologic routings using HECRAS. Uniform flow assumptions may be employed when the engineer believes that more complex, rigorous methods will not generate sufficient additional hydraulic accuracy or result in sufficient cost reductions in the engineering design. There are generally few instances in river hydraulic analysis when the engineer assumes uniform flow for the solution of an open channel modeling problem. With the continued development of user-friendly programs that include more rigorous solution algorithms for the design of even simple flood-reduction components, it is expected that uniform flow solutions will progressively be replaced by more appropriate methods—primarily, steady or unsteady, gradually varied flow computations.
3.2
Gradually Varied, Steady Flow Chapter 2 deals extensively with steady, gradually varied flow, in which there are small changes in velocity and depth with distance along the channel. The majority of
Section 3.2
Gradually Varied, Steady Flow
77
popular floodplain hydraulic programs use steady, gradually varied flow assumptions to compute water surface elevations and to size channels, levees, and other flood reduction components. Watercourses to be modeled using a steady, gradually varied flow assumption must satisfy the following criteria: • The peak discharge is not affected by storage in the river system, or the storage has been addressed in a separate study using a hydrologic model. The storage could be a reservoir or natural, floodplain storage in the overbank areas. Analysis of storage using a hydrologic model is referred to as quasi-unsteady flow modeling and was first presented in Chapter 2. This subject is further discussed in Section 3.4. Chapter 8 describes the mechanics of analyzing reach storage with HEC-RAS. • The peak discharge and stage occur simultaneously throughout the reach under study. In reality, the peak discharge may occur only for a short time at a given location, but the flow rate at this time elsewhere in the reach is less than the peak discharge. For steady flow, however, the peak discharge is assumed to occur instantaneously at all locations in the reach. Compared to unsteady flow computations, the steady flow solution tends to give a slightly more conservative (higher) estimate of the water surface elevation. The difference does not necessarily mean that one method is more accurate than another, just that the computational procedures may result in a small difference in peak river stages. The reasons for this difference are presented in Section 3.3. With the level of uncertainty that exists in many of the required data for water surface profile calculations (further discussed in Chapter 5), a little conservatism is acceptable. Channel sizes, levee heights, spillway dimensions, and floodway capacities are often designed for a peak flowrate with steady, gradually varied flow assumptions. Similarly, flood studies often concentrate solely on the peak discharge, without concern for the shape of the hydrograph prior to or after the peak discharge. Flood insurance studies, the subject of Chapters 9 and 10, are the prime example of this type of analysis. Numerous hydraulic simulation packages have been developed to evaluate steady, gradually varied flow using the standard step method (covered in Chapter 2). The balance of this section provides an overview of the more popular computer programs that are available to the U.S. engineering community.
HEC-2 The U.S. Army Corps of Engineers’ HEC-2, Water Surface Profiles program (USACE, 1990b), developed to compute water surface profiles for steady, gradually varied flow conditions, was probably the most widely used open channel hydraulics model worldwide from the early 1970s into the 1990s. HEC-2 grew out of early work by Bill S. Eichert, of the Corps’ Hydrologic Engineering Center (HEC), and was initially released in 1968. The program was updated several times, with the last major release in 1990. The program uses the standard step technique to compute water surface profiles in natural or man-made channels for either sub- or supercritical flow. The continuity and energy equations are the main basis for solutions, with the momentum equation applied where flow is rapidly varied through bridge openings. The program can ana-
78
Hydraulic Modeling Tools
Chapter 3
lyze the effects of obstructions, such as bridges, culverts, weirs, and floodplain structures. HEC-2 can calculate a maximum of 15 water surface profiles in one run and include up to 800 cross sections for describing a profile, with a maximum of 100 points (elevation, distance) describing a single cross section. The program was adapted for personal computers in 1984, but data input still reflected the days of punch cards and mainframes, and was not user-friendly. In 1991, the HEC decided to initiate a major effort to modernize and convert its most popular simulation packages to work with the Windows platform. The first of these programs, a replacement for HEC-2 called HEC-RAS, was released in 1995. HEC-2 is no longer supported by HEC, and the program is being phased out in favor of HEC-RAS.
HEC-RAS for Steady Flow HEC-RAS (River Analysis System) was developed by HEC through the efforts of a program development team led by Gary W. Brunner (USACE, 2002). The HEC-RAS program will eventually replace three major HEC programs: HEC-2, HEC-UNET, and HEC-6. From 1995 through 2000, HEC-RAS featured only steady, gradually varied flow modeling; the computational engine within HEC-RAS for this type of modeling is referred to as SNET (Steady Network). One-dimensional, unsteady flow capability was added to the package in 2001; the computational engine for this type of modeling is UNET (Unsteady Network). A one-dimensional sediment transport module is scheduled to be included in the future. Like HEC-2, HEC-RAS has been primarily used for steady, gradually varied flow situations in which a peak discharge is applied at each cross section to determine a maximum water surface elevation. The energy, continuity, and Manning equations are employed with the standard step method to solve for water surface elevations, with the momentum equation used as part of the analysis for bridges, supercritical flow, and rapidly varied flow. The program can compute and store up to 500 water surface profiles and an unlimited number of cross sections may be used for steady flow analysis. A maximum of 500 elevation-station points is allowed per cross section. The modeler must supply geometric information to describe the channel, floodplain, and major obstructions (such as bridges, culverts, and weirs), along with discharge, boundary conditions, friction coefficients, and other parameters. With a few exceptions, the data needs for HEC-2 and HEC-RAS in the steady flow mode are the same. Chapter 5 discusses in detail the necessary data. Since HEC-RAS was released in 1995, it has undergone several upgrades. HEC-RAS is Windows-based and employs a variety of tabular and graphical features to readily display input and output for review and modification. HEC-RAS is a tremendous improvement over HEC-2 and is the most widely used program of its type. HEC-RAS offers a wide variety of applications for common and unique hydraulic modeling situations, including the following: • Simultaneous subcritical and supercritical flow computations, including the determination of flow regime • Ice hydraulics • Channel modification analysis • Levee modeling
Section 3.2
Gradually Varied, Steady Flow
79
• Current bridge and culvert modeling using Federal Highway Administration (FHWA) HDS-S techniques • Scour analysis at bridges • Floodway analysis • Split flow optimization • Inline and lateral weirs and gates • Multiple bridge and culvert opening analysis • Multiple reach analysis • Geographic Information System (GIS) integration Later chapters discuss these and more items in detail.
WSP2 WSP2 (USDA, 1993) was developed by the U.S. Soil Conservation Service (SCS), now known as the Natural Resources Conservation Service (NRCS), and is similar to the Corps’ HEC-2 program. It applies the standard step method to compute water surface profiles for either subcritical or critical flow. WSP2 does not perform supercritical flow computations. Although the program is limited to a maximum of 50 cross sections and 48 points per cross section, the output can be linked to additional sets of cross sections for longer stream reaches. Fifteen profiles may be computed in a single run. Computations include bridge and culvert modeling using the Bureau of Public Roads (BPR) analysis standards. A single bridge opening or up to four culverts can be analyzed at any cross section. This program has been largely superceded by HEC-RAS; the NRCS has recently phased out WSP2 and adopted HEC-RAS for its hydraulic modeling needs.
80
Hydraulic Modeling Tools
Chapter 3
WSPRO (HY-7) The U.S. Geological Survey developed the bridge waterway analysis model, WSPRO (FHWA, 1990) for the Federal Highway Administration (FHWA). The program is used specifically to analyze and design bridge openings. WSPRO is generally used for relatively short reaches of river to determine the bridge opening design and the bridgeʹs effects on the upstream water surface profile. It can use a maximum of 20 profiles and 100 cross sections. WSPRO uses the standard step method for computations in subcritical flow and when the water surface is below the bridge low chord (bottom of the beam or low steel) elevation. The energy, continuity, and Manning equations are used to analyze water surface profiles through a bridge. WSPRO only considers friction and expansion losses; contraction losses into the bridge are neglected. Chapter 6 discusses these losses and the use of WSPRO. Bridge design for the FHWA during the 1990s required the use of WSPRO because the bridge routines in HEC-2 were not acceptable to the FHWA. Although this program is still used for bridge design, HEC-RAS includes an option to use the WSPRO procedures when modeling bridges. The FHWA procedures have been integrated into the HEC-RAS source code and included in the documentation.
3.3
Quasi-Unsteady Flow All the programs covered in Section 3.2 can determine a water surface profile from a peak discharge. This discharge could come from a simple equation for peak flow, without any attempt at tracing how that discharge changes through the watershed or the effect of reservoir or reach storage on the discharge. When the effect of storage on the peak discharge must be addressed or when the change in discharge caused by the timing of additional flow from major tributaries is to be analyzed, hydrologic modeling is needed. A hydrologic program is necessary to evaluate the effect of storage and tributary flows on the discharges needed to establish water surface profiles. Hydrologic programs trace changes in discharge over time through hydrologic routing, which translates the runoff hydrograph in space and time, accounting for storage in a reach and the travel time through the reach. A hydrograph is a continuous trace of discharge over time. The peak discharges from a hydrologic modeling program are used in a steady gradually varied flow program, like HEC-RAS, to compute the water surface profiles. This hydrologic analysis process is referred to as quasi-unsteady flow analysis, where the continuity equation is employed with hydrologic routing to determine changes in discharge with time. Full unsteady flow analysis uses the continuity and momentum equations to solve for depth, velocity, and discharge simultaneously throughout the system. Several hydrologic programs are available to perform the hydrologic analysis, leading to a discharge for use in HEC-RAS. Popular hydrology programs in the United States are described in the following sections.
HEC-1/HEC-HMS HEC-1, Flood Hydrograph Package (USACE, 1990), and its successor, HEC-HMS, Hydrologic Modeling System (USACE, 2000), are quasi-unsteady flow programs because discharge hydrographs are computed and translated through the watershed, accounting for valley and reservoir storage effects. They both feature mainly hydrologic routing, such as the modified Puls, Muskingum, and the Muskingum-Cunge
Section 3.4
Gradually Varied, Unsteady Flow (One-Dimensional)
81
techniques. Unlike the unsteady flow programs discussed in Section 3.4, these programs do not include dynamic hydraulic routing routines. However, the majority of hydraulic studies for streams having slopes in excess of 5 ft/mi (1 m/km) can be addressed satisfactorily with the combination of HEC-1 or HEC-HMS and HEC-RAS. HEC-HMS can be used to develop the peak discharges throughout the stream system, accounting for storage effects with hydrologic routings. These peak discharges are then used in HEC-RAS to determine the peak stages. However, developing the storage-outflow relationships often requires the use of HEC-RAS first, setting up an iterative process. Chapter 8 further illustrates this analysis.
TR20 The TR20 program (NRCS, 1992) was developed by the Hydrology Branch of the SCS (now NRCS) to compute flood hydrographs and route flow through channels and reservoirs. The program is quasi-unsteady and similar to HEC-1 and HEC-HMS, in that it can process both actual and hypothetical flood events through a watershed and analyze the effects of floodplain and reservoir storage. The hydrologic routing techniques are limited to the Modified Attkin-Kinematic (Att-Kin) method, developed by the SCS for channel routing, and the storage-indication method (similar to modified Puls) for reservoir routing.
PondPack The PondPack program (Haestad, 2003) was developed by Haestad Methods for analysis and design of detention pond and outlet structure geometry. It is a general hydrology program that computes and routes runoff hydrographs through a stream system. The program can employ the NRCS (SCS) unit hydrograph method, the Santa Barbara unit hydrograph method, the modified rational method, or user-defined methodology. Losses may be computed from the SCS (Curve Number), Green and Ampt, Horton, uniform loss, or user-supplied methods. Routing is performed with the Muskingum, modified Puls, or simple translation techniques.
3.4
Gradually Varied, Unsteady Flow (One-Dimensional) The assumptions of steady flow are not sufficiently accurate in all situations. The design engineer should consider an unsteady flow model when any of the following conditions are present: • Rapid changes in discharge or river elevation. These changes usually occur in conjunction with the operation of man-made structures, such as rapid opening or closing of a sluice gate, sudden start or stop of pumping, or a dam break flood. Rapid changes cause large increases in depth or discharge in very short times. For a dam break, this could be a change from a discharge of near zero to one of thousands of cubic feet per second in a few minutes. Figure 2.16b (page 27) illustrates a similar situation. • A complex stream system where discharge leaves the main channel at various locations and then returns at downstream locations. Complex stream networks are often found in low-sloping, swampy, or wetland areas. This situ-
82
Hydraulic Modeling Tools
Chapter 3
ation does not necessarily include split flow, islands, or diversions, which can be handled by steady flow assumptions for most channel slopes. • A looped rating relationship. Rivers with slopes less than about 0.0004 (2 ft/ mi, 0.4 m/km) seldom have a unique relationship between stage and discharge, but rather exhibit different stages for the same flowrate, resulting in a looped rating curve (USACE, 1993b). A looped rating curve occurs when the discharge on the falling leg of the hydrograph passes at a higher elevation (and therefore a lower velocity) than the same discharge on the rising leg. Figure 3.1 illustrates a looped rating curve. The higher velocity on the rising limb means the stream can pass more discharge for a given water surface elevation (steeper slope of water surface profile at t1 shown on Figure 3.1), while exactly the reverse situation exists on the falling limb of the hydrograph (milder sloping water surface profile at time t2 shown on Figure 3.1). The peak stage may occur considerably later than the peak discharge.
Figure 3.1 Looped rating curve example.
• Flood forecasting for major rivers. Providing stage forecasts for major river systems at numerous locations for different times is best performed with unsteady flow hydraulic modeling, particularly when the rivers have slopes less than about 2 ft/mi (0.4 m/km). Many major river systems are characterized by slopes in this range, including the Mississippi River (0.5 ft/mi or 0.1 m/km, or less) and the Missouri River (about 1 ft/mi, 0.2 m/km) in the United States. Forecasts for smaller watersheds and for larger streams with slopes exceeding 5 ft/mi (1 m/km) can be successfully made with hydrologic modeling, using a program such as HEC-HMS to compute the discharge and then converting the flowrate to a river stage within HMS, based on a rating curve developed from HEC-RAS. Rivers having a slope of 2–5 ft/mi (0.4–1 m/km) are in a transition range for which unsteady flow modeling would be a first choice, but steady flow modeling could also be satisfactory.
Section 3.4
Gradually Varied, Unsteady Flow (One-Dimensional)
83
• Backwater analysis at major river junctions. On low-sloping tributaries of major rivers, the maximum tributary river elevation is a function of both the discharge flowing downstream on the tributary and the stage in the main river at the mouth of the tributary. Continuous variation in the main river water surface elevations and in the tributary discharge requires unsteady flow modeling to completely analyze the situation. An example is an 80-mi (129-km) reach of the Illinois River upstream of its confluence with the Mississippi River. The tributary Illinois River has less than one-third the slope of the Mississippi River and the Illinois River’s peak discharge is often separated from the peak stage by several days along this reach because of the flat slope and the great influence of Mississippi River backwater. While steady flow procedures are often applied to profile analysis at stream junctions, major backwater effects may be poorly modeled using steady flow assumptions. During the Great Flood of 1993 in the Midwestern United States, the peak discharge at Lock and Dam 25 on the Mississippi River, approximately 50 miles (80 km) upstream of the mouth of the Missouri River, occurred three days before the peak stage due to backwater effects from the Missouri River. A somewhat similar situation is a flow reversal (negative discharge) on a mild slope, another situation that cannot be adequately addressed by steady flow. Modeling rivers emptying into a bay or estuary subject to tidal influences normally requires unsteady flow modeling. One-dimensional, unsteady flow programs use the momentum and continuity equations (St. Venant equations) to perform a simulation through time and space. Changes in velocity and depth with time and distance result in accelerations and forces that cannot be adequately modeled using the energy equation. One-dimensional unsteady flow models can be used for long stream reaches and long time periods and are most appropriate for streams for which velocity vectors can be assumed to be approximately parallel to the direction of flow. The U.S. National Weather Service (NWS) and the USACE have used unsteady flow models to provide river forecasts and operate navigation or flood storage dams, respectively. The following sections provide information on some of the most common models in this category.
HEC-UNET Robert Barkau, formerly with the USACE, developed the Unsteady Network Program (UNET) in the late 1980s (Barkau, 1992). UNET was later adopted by the USACE as its preferred model for one-dimensional, unsteady flow. Future program upgrades, modifications, maintenance, and documentation were made the responsibility of the USACE’s Hydrologic Engineering Center. HEC-UNET (USACE, 1997) is the current version of the program and it is used to perform subcritical, gradually varied unsteady flow analysis. The program was originally designed to use HEC-2 cross-section data as input to both UNET and HEC-UNET, and they both used a preprocessor (CSECT) to convert the cross-section data to tables of hydraulic properties, such as elevation-area and elevation-conveyance. These tables were then interpolated during the unsteady flow computations for the appropriate values at each section. The HEC-UNET program incorporated dam and spillway analysis, levee overtopping and breaching, and offchannel storage (ponding). The program has since been superceded by the addition of unsteady flow capability in HEC-RAS.
84
Hydraulic Modeling Tools
Chapter 3
HEC-RAS, Unsteady Flow HEC-RAS can now incorporate both steady and unsteady, one-dimensional flow computations using the same set of geometry data for either analysis. Unsteady flow computations use the full equations of motion (St. Venant equations), presented in detail in Chapter 14. The unsteady flow equation solver is taken directly from the HECUNET program, but all other unsteady flow procedures in HEC-RAS are different from those in HEC-UNET. The unsteady portion of the program accepts geometric input in the form of standard HEC-2 or HEC-RAS cross sections and then converts each section to tables of hydraulic properties, using a preprocessor program (HTAB) to facilitate the computations in the unsteady flow engine (UNET). The engineer must specify all cross sections, inflow hydrographs (not just peak discharge) for all tributaries, upstream and downstream boundary conditions (flow or stage hydrographs or discharge rating curves), and various coefficients. A postprocessor program is available to facilitate the output review. The postprocessor provides all the tables and plots for unsteady flow that are available for steady flow computations. Without the postprocessor, only graphical output consisting of stage and/or discharge hydrographs at all cross sections is available. The unsteady flow portion of the program can perform subcritical, supercritical, or mixed-flow computations. Dam breaching and levee break algorithms are also included, as is the ability to model pumping stations. A maximum of ten pump groups, with each group consisting of up to 20 identical pumps, can be modeled in the unsteady flow portion of HEC-RAS. The modeling of flap-gated culverts (allowing only one-way flow) is also an option. As is the case when modeling steady flow in HEC-RAS, the unsteady analysis is limited to 500 profiles. A maximum of 6000 cross sections may be used in the model, with up to 500 elevation-station points for each cross section. Both steady and unsteady flow analysis in HEC-RAS begin with the same set of geometric data, but the water surface profiles for the same actual or hypothetical event are normally somewhat different. Differences are primarily due to three key features: • For eddy or other losses, steady flow computations use the absolute difference in velocity heads at adjacent cross sections multiplied by an expansion or contraction coefficient. In unsteady flow computations, these eddy losses are computed within the momentum equation. • Steady flow computations find the average friction slope between cross sections based on the average conveyance method (HEC-RAS default method). Unsteady flow computations use the average friction slope between cross sections directly from a simple average of the computed friction slopes. Tests using both UNET and HEC-UNET (Brunner, 2002) have shown that the unsteady flow program is more stable when using average friction slope, rather than the average conveyance method that is applied in steady flow computations. • For a given discharge, steady flow computations compute losses through bridges, culverts, and other obstructions directly from the obstruction geometry and the type of flow conditions through the bridge (low flow, pressure, weir, momentum, or combination, as discussed in more detail in Chapter 6). In unsteady flow, a family of curves is developed for defining the headwatertailwater-discharge relationships through each obstruction for a full range of
Section 3.4
Gradually Varied, Unsteady Flow (One-Dimensional)
85
flow. Unsteady flow analysis in HEC-RAS interpolates the headwater elevation for computed discharge and tailwater data for each time period. Depending on the number of discharges used to set up the family of curves, there could be differences in computed losses at obstructions between steady and unsteady state computations. Given the computational differences between steady and unsteady state analysis, there is generally a small difference between results for a selected flood discharge for a steady flow solution compared to the unsteady flow solution. The steady flow solution is generally 0.1–1 ft (0.03–0.3 m) higher than the unsteady flow solution, but the difference can be outside this range, depending on how the engineer developed his input data and the degree of variation in flow expansion and contraction through a reach. The difference does not necessarily mean that one method is more accurate than another; it simply means that a difference may exist because the computation procedures are different between steady and unsteady flow analysis. The unsteady flow analysis routing in HEC-RAS has been successfully applied for a variety of rivers and streams, ranging from more than 2000 mi (3200 km) of the Mississippi and Missouri River system for 100 years of daily discharge data, to analyzing a hypothetical design flood for small, swampy streams experiencing flow reversals.
FLDWAV In the late 1980s, the U.S. National Weather Service (NWS) developed the FLDWAV (pronounced floodwave) computer program (NOAA, 2000) for unsteady flow analysis using the full equations of motion. The program performs hydraulic simulations for real-time forecasting of natural floods or dam-break events and supplies information for the design of waterway improvements and for flood inundation mapping for dambreak flood planning. The flow can be subcritical, supercritical, or mixed throughout the downstream reach. The flood being modeled can be interconnected through a river system (main stem and tributaries). Levee overtopping and breaching are handled, along with split flow (island) situations and the modeling of mud-debris flow. Bridges can be modeled with the program, but not culverts. Planned improvements include the addition of culvert modeling, the operation of movable gates, sediment transport, additional routing methods, and the modeling of landslide-generated waves in reservoirs. The FLDWAV program is a combination of two popular NWS programs: the Dynamic Wave Operation Network Model (DWOPER) and the Dam-Break Forecasting Model (DAMBRK). DWOPER was developed by Danny Fread (Fread, 1982) of the NWS for use in the river forecasting program. It is a general model with many added features to allow simulation of river structures and levees. The NWS used the program to routinely provide daily stage and discharge predictions for the Lower Mississippi River prior to FLDWAV. The NWS also developed DAMBRK (Fread, 1984) specifically for simulating the failure of a dam and the resulting flood wave through the downstream valley. The model has been used in numerous dam break simulations to determine the maximum crest height to be expected and the warning time available for downstream inhabitants.
86
Hydraulic Modeling Tools
Chapter 3
Hydraulic Models on the Mississippi River The Corps of Engineers has used several models and procedures for the 300 mi (483 km) reach of the Mississippi River that comprises the limits of the St. Louis District, from the mouth of the Ohio River to near Hannibal, Missouri. 1950s/1960s – During this period, hand computations and mechanical calculators were used to perform standard step backwater computations to determine design water surface profiles for levee design events. Days or weeks of work were required by the engineer to compute a profile over a long reach of river. These computations were sometimes confirmed or modified based on results of the Mississippi Basin (physical) Model (MBM) of the Waterways Experiment Station. The levees and floodwalls near St. Louis, as well as lower levees protecting farmland downstream of St. Louis, were analyzed and designed with these tools. The first rudimentary computer programs to perform water surface profile computations for this reach were used in the mid to late 1960s. 1970s – The large flood on the Mississippi in 1973 set new records for much of this reach of the river. Following this event, discharge data were analyzed statistically (discussed in Chapter 5) to update estimates of the peak discharge for hypothetical flood events, such as the 100-year average recurrence interval event. These steady flow discharges for the 5-year through 500-year average recurrence interval floods were used in the MBM to compute peak water surface profiles over 300 mi (483 km) of the river. These results served as the best estimates of hypothetical flood profiles into the 1990s. Flood insurance studies, feasibility reports, and other studies all employed the results of these physical model tests for the Mississippi River. 1980s – The hydraulic needs of the USACE required a more available source for computation of hydraulic profiles than the MBM. Consequently, surveyed cross-section data for the 300-mi (483-km) study reach of the Mississippi River floodplain was collected in the 1970s for use in the development of a HEC-2 model of the river. Many additional sections were interpolated from both the nearby survey data and USGS topographic maps. Hydrographic survey data (soundings of the channel beneath the water surface) were incorporated to obtain geometric descriptions of the channel. An HEC-2 model was
built for the 300 mi (483 km) of the Mississippi River within the boundaries of the Corps of Engineers’ St. Louis District and calibrated to several recent large floods. The model was used throughout the 1980s to refine the frequency profiles computed with the MBM, to evaluate proposed changes in the floodplain, such as levee raises, and to establish a regulatory floodway on both sides of the Mississippi River for the U.S. Federal Emergency Management Agency. Two-dimensional hydraulic modeling was also performed for a short reach of the river just upstream of the mouth of the Missouri River for the new locks and dam that would replace old Locks and Dam 26 at Alton, Illinois. The TABS2 package was used to study flow patterns around the first-stage cofferdam. Calibration and verification data for this numerical modeling effort were also obtained from physical models in conjunction with two-dimensional modeling (hybrid modeling). 1990s – Following the Great Flood of 1993, which broke all discharge and stage records over nearly this entire 300-mi (483-km) reach of the Mississippi River, it was apparent that an unsteady hydraulic model of the river was needed. Barkau's UNET program was selected for use and the initial unsteady flow model, using 1970s survey information, was developed in 1994 to study various alternate scenarios for the 1993 flood, such as 1993 flood elevations for no levees, higher levees, more flood storage, and so on. Following the 1993 flood, closecontour-interval aerial mapping was obtained of the entire floodplain throughout the reach. The new mapping was later incorporated in the model and the model was calibrated to both recent flood and low flow events. The HEC-UNET model has been successfully used for river forecasting to better regulate USACE reservoirs and navigation works. By 2002, the HEC-UNET model had been applied to 100 years of daily discharge data to perform period-ofrecord hydraulic routing throughout the reach. Period-of-record inflows to the HEC-UNET model were developed using the HEC-HMS program to compute continuous discharge hydrographs for all tributaries to the Mississippi. This effort will be used to determine revised frequency relationships both with and without upstream reservoir effects and to update the stage-frequency relationships currently in use for the Mississippi River.
Section 3.5
Gradually Varied, Unsteady Flow (Two-Dimensional)
87
FEQ The Full Equations (FEQ) computer program (Franz and Melching, 1997) simulates flow in a stream system by solving the full equations of motion for one-dimensional, subcritical unsteady flow. The effect and/or operation of structures including bridges, culverts, dams, spillways, weirs, and pumps may be simulated with the program. A companion program (FEQUTL) operates as a preprocessor to convert cross-section data into hydraulic tables for use during the unsteady computations. FEQ uses the continuity and momentum equations to determine the flow and depth throughout the stream system following the specification of initial flow and boundary conditions. The program was initially developed in 1976 for simulation of flow through the Sanitary and Ship Canal in Chicago, Illinois. The program has been improved and modified in many versions over the years. Documentation was published by the USGS in 1997, as referenced in the previous paragraph. The program has been used for a wide variety of rivers and streams, ranging from 600 mi (966 km) of the Mississippi River to small creeks in DuPage County, Illinois. The program is distributed by the USGS and additional information may be obtained at the USGS web site: http://water.usgs.gov/.
3.5
Gradually Varied, Unsteady Flow (Two-Dimensional) Although the steady and unsteady flow problems described in Sections 3.2 through 3.4 are used in the vast majority of all hydraulic studies, a multidimensional analysis is occasionally required. Two- or three-dimensional hydraulic analysis is necessary when the basic assumptions that the energy grade line elevation and the water surface elevation are constant across each cross section are no longer valid. For one-dimensional models, cross sections are entered to describe the geometry and streamlines are considered to intersect the sections at right angles. All velocity vectors are generally assumed to be parallel at any given cross section (in the x-direction). Although this assumption is not theoretically correct (there is movement in the y- and z-directions that is neglected in one-dimensional analysis), it is suitable for most open channel hydraulic work. In some situations, however, the river elevation and velocity components in both the x- and y-directions are needed at key locations along the river. Most often, this analysis is only required for a relatively short reach of river, ranging from a few thousand feet to a few miles (km), and for a relatively short simulation period. A finite-element analysis is typically performed, featuring links and nodes at computation points, rather than normal cross sections. In 2-D modeling, a cross section of a river is usually characterized by several nodes that represent average depths for the channel area near the node. Although data input for river channel geometry in HECRAS might use 30 or more points for one cross section, four to seven node points are typically used at a cross section for two-dimensional modeling. Each node point (elevation) might represent an average for several cross-section points near the node. Nodes are usually developed from close-interval contour maps, with nodes normally located at much closer distances than are cross sections for one-dimensional flow. Depth-averaged values of velocity are used. Considerably more data and engineering expertise are needed for multidimensional models. In addition, extensive actual depth and velocity data are collected for the study reach to use in the model calibration process.
88
Hydraulic Modeling Tools
Chapter 3
A multidimensional model covers less distance and a shorter simulation period than does a one-dimensional model, due to the need to solve the full equations of motion in two or three dimensions. The large number of computations requires a limited reach and time period to efficiently analyze the problem. To properly use complex two- and three-dimensional models, engineers often require special training and expertise, which might not be available in-house at most engineering firms or local government agencies. Typical studies requiring two-dimensional models include: • Flow through and around severe channel obstructions, thereby identifying dangerous current patterns that could cause a hazard to river navigation. • Flow in a wide floodplain that is crossed by a curving roadway embankment (not perpendicular to the flow direction) having multiple bridge and/or culvert openings through the embankment. For an embankment perpendicular to flow, or nearly so, the HEC-RAS multiple opening option, discussed in Chapter 6, may be acceptable. • Low slope, swampy, or wetland areas with poorly defined or no channels, with as much flow moving laterally as downstream. • Flood elevations throughout the floodplain at the junction of major rivers. • Pollutant dispersion in a reservoir, bay, or estuary. • Flow patterns into and out of hydropower plants. Figure 3.2 compares the computational results between one- and two-dimensional models. For the two-dimensional output, the length of the arrows represents a relative magnitude of the velocity and the arrowhead indicates the velocity direction. The cost of applying 2-D programs is typically much greater than the cost of applying 1-D programs. Because of the lack of much of the basic data needed for these models, a numeric model may rely on a physical model of the reach under study to estimate some of the data. The USACE often performs limited tests with a physical model to obtain calibration and verification data, and then relies on the numeric model for the balance of the hydraulic analysis. The use of two or more different models (physical and numerical) in a study is often referred to as hybrid modeling. The two-dimensional models most often used in the United States are described in the following sections.
RMA2 RMA2, or the Finite Element Model for Two-Dimensional Depth-Averaged Flow program (USACE, 2001), was first developed in 1973 for the USACE Walla Walla District. It later became part of the USACE’s Waterways Experiment Station (WES) TABS-MD analysis system (USACE, 1985), with numerous enhancements over the intervening years. RMA2 computes water surface elevations and the horizontal velocity components (x, y directions) for subcritical, free-surface, two-dimensional flow. The system has been used to calculate flow distribution patterns around islands, at bridges having multiple openings, into and out of off-channel hydropower plants, at major river junctions, for circulation and transport in wetlands, and for general flow patterns in rivers, reservoirs, and estuaries. It is designed for use where the vertical velocities are
Section 3.5
Gradually Varied, Unsteady Flow (Two-Dimensional)
89
Figure 3.2 Velocity vectors in one-dimensional and two-dimensional flow.
negligible and the velocity vectors usually point in the same direction over the entire height of the water column at any selected time. The TABS-MD modeling system consists of modules (RMA2 being one) that perform 1-, 2-, and 3-D hydrodynamic computations, water quality, and sediment transport operations.
90
Hydraulic Modeling Tools
Chapter 3
FESWMS-2DH The U.S. Geological Survey used a modified version of RMA2 to develop the Element Surface-Water Modeling System (FHWA, 1989) for the FHWA. FESWMS2DH simulates two-dimensional, depth-integrated, free-surface flows. The overall package consists of separate modules, including one each for input data preparation, flow modeling, simulation output analysis, and graphics conversion. Specifically, this program was developed to analyze flow patterns at bridge crossings under complicated hydraulic conditions.
3.6
Gradually Varied, Unsteady Flow (Three-Dimensional) Most applications of three-dimensional analysis have been for river estuaries and water quality studies. Velocities in the x-, y-, and z-directions are determined at nodes within the overall network. As with two-dimensional models, the three-dimensional simulation is typically for a limited reach and simulation period, and may also use a physical model to supply certain input parameters. Significant computational power and specialized engineering expertise are required to properly perform a threedimensional simulation, as well as more data. Actual velocity data in the vertical direction are gathered from the river under study, possibly along with water quality and sediment samples. This work has primarily been performed at universities and hydraulic laboratories, such as the USACE’s WES. WES has conducted many threedimensional studies using physical and numerical models, including a major study of the Chesapeake Bay Estuary (Kim, Johnson, and Heath, 1990). Following is an example of a three-dimensional model used for this type of complex analysis.
RMA10 The Waterways Experiment Stationʹs RMA10 computer program (USACE, 2001) is a finite element numerical model that handles steady or dynamic simulation of one-, two-, and three-dimensional elements. The program can accommodate threedimensional hydrodynamics, salinity, and sediment transport conditions. Only hydrostatic conditions are assumed; that is, the vertical acceleration is neglected. The program has been used to analyze coastal and estuarine flows for San Francisco Bay and Galveston Bay in the United States and overseas for coastal waters near Sydney, Australia and Hong Kong. The program is undergoing extensive beta testing and, as of early 2003, is not yet available to the engineering community.
3.7
Sediment Models Open channel hydraulic models often ignore the effect of sediment transported by the stream or assume that the sediment has no significant effect on the hydraulic computations. This assumption is usually acceptable; however, certain situations require that sediment transport be considered. For example, modeling a river that is obviously in distress, such as rapid and frequent channel shifts, great scour or deposition during flood events, extensive downed trees in the channel, and headcutting (channel erosion in an upstream direction) on the main channel or tributaries, may require that the sed-
Section 3.7
Sediment Models
91
iment transport characteristics of the river be evaluated in conjunction with the hydraulics. Major man-made modifications, such as extensive channelization, reservoir construction, and flow diversions, can result in significant effects on the riverʹs sediment regime, as well as to the streamʹs hydrology and hydraulics. Chapters 11 and 13 further discuss the interrelationship between the hydrologic/hydraulic and sediment regimes. Sediment studies can range from qualitative “impact”-type studies to major sediment transport, scour, and deposition analyses performed by computer simulation. References on this subject are available in Chapter 11. In addition to the data needed for steady or unsteady flow hydraulic studies, use of a sediment analysis program requires a description of the bed material (grain sizes) throughout the reaches under study, as well as the definition of the sediment load curve (discharge versus sediment carried) for the main river and all tributaries carrying significant sediment and water inflow. The grain size distribution of each load curve is also needed. Sediment transport studies are more data intensive than pure hydraulic studies and will normally give less precise results. Trends in deposition and erosion with rough estimates of channel geometry changes in the reach over time are often the main information derived from such studies. The following section describes two popular sediment transport models used in the United States. Neither program is intended for detailed scour analysis through bridges. Bridge scour incorporates contraction, pier, and abutment scour components that may be computed with FHWA procedures by HEC-RAS. These procedures are discussed in Chapter 13. These two programs could be used to determine the overall reach scour (for the reach containing the bridge), with HEC-RAS performing the detailed bridge scour analysis. HEC-RAS also allows the computation of the sediment transport relationships for either the steady or unsteady flow version. Six different sediment transport equations are available in the program to compute the water dis-
92
Hydraulic Modeling Tools
Chapter 3
charge versus sediment discharge relationship for any cross section or over a specified reach. This feature is further discussed in Chapter 13.
HEC-6 The Corps of Engineersʹ program HEC-6, Scour and Deposition in Rivers and Reservoirs (USACE, 1993), has been the most widely used sediment transport model in the United States since its initial release about three decades ago. It was created by Tony Thomas of the HEC and WES and has been upgraded and expanded several times. This program will be incorporated within HEC-RAS in the future. The model is appropriate for one-dimensional, gradually varied, steady flow simulation. For a given flow, the standard step equations are applied to compute system hydraulics for the entire reach. Following this step, sediment transport is computed from cross section to cross section, with gains or losses to the transported sediment. The geometry is then modified (elevations increased uniformly for deposition, decreased for scour) based on these changes, a new discharge for the next time step is applied, and the process repeated. Although the sediment computations are based on steady flow, a long-term hydrograph of discharge may be modeled in a series of time steps with the program. Decades of discharge data may be used to study changes over time. HEC-6 can be applied over long segments of rivers, ranging from 10 miles (16 km) to more than 100 miles (160 km). Sediment deposition in reservoirs has also been evaluated with the program. HEC-6 does not allow for modeling sedimentation in floodplain areas, lateral variations in channel deposition or erosion, or bankline migration.
SED2D The SED2D program (USACE, 2000a) is an extensively rewritten and modernized version of the Sediment Transport in Unsteady, 2-Dimensional Flow, Horizontal Plane program (STUDH). STUDH and now SED2D is the sediment analysis module for the WES TABS-MD modeling system. SED2D can be used as a one- or two-dimensional model to analyze steady state or dynamic flow situations. The program can determine the exchange of material between the moving water and the stream bed. Bed shear stress due to currents or shear stress for combined currents and wind waves can be calculated. Both clay and sand can be analyzed, but only a single effective grain size can be used during each simulation. Thus, separate simulations are needed for each effective grain size. The program does not compute water surface elevations or velocities. These values are usually computed externally with the RMA2 program. SED2D may be applied to clay- or sand-bed streams where the velocities are two-dimensional in the horizontal plane (depth-average velocity). It is typically used in sediment scour, transport, and deposition studies near major obstructions to river flow, such as navigation dams and bridge crossings. SED2D permits the evaluation of complex river and reservoir geometry and has good output-visualization graphics. It has extensive data requirements and is very computationally intensive.
Section 3.8
Physical Models
93
Application of a Sediment Transport Program Sediment transport programs are generally used to estimate the overall degradation or aggradation trends for a reach of stream. Major channel modification projects are prime candidates for these studies, with either qualitative or quantitative sediment studies being appropriate, depending on the magnitude of the sediment problem. The Harding Ditch sediment analysis (Dyhouse, 1982) is a representative case study of sediment transport modeling. Harding Ditch is a man-made channel first constructed early in the 1900s to take runoff from hillside watersheds draining to the Mississippi floodplain east of St. Louis and transport the flow south to exit through a levee to the Mississippi. Urbanization of the hillside watersheds in the second half of the twentieth century resulted in significant deposition in portions of Harding Ditch. As the Harding Ditch area was just a small portion of an 86,000 ac (34,800 ha) urban floodplain under study by the USACE, it was selected as a test area to quantify the sediment problems. Twenty years of discharge data were developed with a hydrologic model of the two main watersheds tributary to Harding Ditch. These discharge data were further modified into a histogram representing a series of steady flow discharges for use in the USACE's HEC-6 sediment transport program. Sediment-inflow data were developed with HEC-6 to estimate the amount of material in transit for a full range of discharges from each watershed. Bed and bank material samples were collected along the 11.5 mi (18.5 km) of Harding Ditch for specification
3.8
of the sediment bed material grain size distribution in HEC-6. Channel and overbank cross sections were surveyed and coded for HEC-6 and supplemented with additional interpolated cross sections. The model was calibrated to the limited actual data available. Base conditions were established for comparison to other land use and sediment conditions. Water and sediment runoff from estimated land use conditions for the year 2020 were evaluated using HEC-6, with findings that the major effect on channel deposition will occur during the urban development phase. Following the urbanization process, the sediment transported to Harding Ditch and the subsequent deposition decreases significantly, primarily due to the increased amount of impervious area that limits land surface erosion and transport of the eroded materials. The effect of a Harding Ditch diversion around some state park lakes on the sediment regime was also modeled, finding that deposition in the downstream channel greatly increased now that the lakes were no longer a sediment sink. Dredging intervals were studied with HEC-6 to determine the frequency of channel dredging required to maintain the channel flood capacity. Intervals of 5, 10, and 20 years between dredging were simulated using HEC-6, with a finding that dredging every 10 years is necessary to maintain adequate channel capacity. A detailed description of the full study process, analysis, and findings is given in the reference.
Physical Models With the plethora of simulation computer programs available for nearly any hydraulic modeling task, it would be rather unusual for a physical model to be needed for a floodplain modeling study. Today, physical models are primarily employed for the following: • Detailed analysis of the performance of spillways and energy dissipators for major dams. Physical models are used to confirm or improve spillway design performance and to evaluate modifications to the energy dissipater that will maintain or improve hydraulic performance at the least cost. Because these structures are very expensive, any construction cost savings or improvements
94
Hydraulic Modeling Tools
Chapter 3
to the safety of the structure are usually well worth the cost of the physical model testing. • Evaluating modifications in the design of supercritical flood reduction channels. Modifying bridge piers, access roads into the channel, flow around bends, wave setup at channel geometry changes, and other structural features often requires physical model testing to obtain acceptable accuracy in the design water surface profile and to properly evaluate the performance of the features on the design profile. • The study of current patterns affecting navigation approaches to obstacles such as bridges, severe channel bends, and lock structures. • Movable-bed physical models to study scour and deposition patterns at navigation dams and any effect on river traffic moving through navigation locks. • Obtaining calibration and verification data for later use in multidimensional numerical models. Physical models require specialized engineering skills to design and construct, require considerable physical space, and are quite expensive to operate and maintain. Only if numerical modeling is inadequate for the task at hand should physical modeling be considered. Physical modeling has usually been conducted at government facilities, such as the USACEʹs WES in Vicksburg, Mississippi. The Bureau of Reclamation and the Tennessee Valley Authority also have physical model testing facilities in Denver, Colorado and Norris, Tennessee, respectively. These facilities may occasionally perform physical model tests for nongovernmental entities. Interested parties should contact a selected laboratory to obtain a time and cost estimate for construction of a physical model and operation of a testing program, if the project requires such work.
3.9
Selecting a Simulation Program How does the engineer know which program to use? That is a question that cannot be answered directly, but only with the engineerʹs knowledge of the studyʹs scope, objective, data availability, and so on; the subject of the next chapter. However, simple is better, as long as the major concerns of the study are addressed. Key issues to remember when selecting a simulation program include the following: • Applicability. Was the program developed only for a specific locale or problem and can it be used for your problem? • Development. Can the program be used on your project directly or must it be further developed before you can use it? • Documentation. Does the program have sufficient documentation? Many excellent programs can be used by the developer but no one else because of insufficient documentation. One of the best reasons to use programs developed by various government agencies and some private vendors is the excellent documentation in the form of user manuals, reference manuals, and example applications. • Support. Does the program have an individual, an agency, or a firm that you can turn to with questions and help with problems encountered? What are the
Section 3.10
Chapter Summary
95
costs associated with this support and is there someone readily available for assistance when needed? • Training. Is there a formal workshop or training course available for new users? How often is the training offered and what does it cost? • Level of expertise required. Can the program be understood and used without extensive formal training? Are the model program requirements easy to understand? • Costs. How much does the program cost? Costs to purchase a hydraulic simulation program can range from nothing to several thousand dollars. Remember that the cost of any program is usually small compared to the cost of the data required and the cost of engineer training in its use. • Quality of program. Is the program dependable, easy to modify, sensitive to data changes, stable, and able to simulate the processes of flow that are important to your study objectives?
3.10
Chapter Summary This chapter separated popular computer programs into several major categories for discussion. For the great majority of floodplain modeling problems, steady and unsteady gradually varied flow are the categories of concern to the modeler. Currently, HEC-RAS is the only program that can perform either steady or unsteady analyses with basically the same set of data, using standard step computations for steady flow and the full equations of motion for unsteady flow. This versatility is a meaningful consideration in program selection if it is not initially clear which type of analysis is necessary for the project. The simplest program that will adequately address the modeler’s goals and objectives for the project is usually the best choice. An engineer may spend his or her entire career without needing anything more sophisticated than a one-dimensional steady flow model, with an unsteady flow model occasionally needed.
Problems 3.1 True or False. A more sophisticated model, such as a two-dimensional unsteady flow model, will always produce results that are more accurate than a simpler model. Explain your answer. 3.2 Engineers and planners frequently want to use steady state, one-dimensional models to examine the effects of a dam failure on a downstream channel. Is this an appropriate application of such a model? 3.3 Engineers and planners frequently want to use steady state, one-dimensional models to examine the effects of a culvert within a stream system. Is this an appropriate application of such a model?
CHAPTER
4 Planning for Floodplain Modeling Studies
Engineers often view the floodplain modeling effort in terms of the technical details: which computer program should be used, how to code a complicated bridge, or how to select an n value. However, the most important part of hydraulic modeling, planning the study, is often given the least consideration and time. The importance of the initial planning phase of a study cannot be overemphasized. The success of a hydraulic study is often directly proportional to the amount of thought and effort given to the overall process prior to the start of technical work. Planning has been defined as “the orderly consideration of a project from the original statement of purpose through the evaluation of alternatives to the final decision on a course of action” (Linsley, et al., 1992). This chapter focuses on the mechanics of planning for a hydraulic study, providing the following benefits: • A clear understanding of the study activities from start to finish • A basis for a defensible time and cost estimate for the work • A technical guideline for the working engineer • A basis for selecting the appropriate method and program This chapter discusses study planning for hydraulic modeling and references other areas of this book where additional details can be found. The reader is directed to River Hydraulics (USACE, 1993b) and Hydrologic Engineering Studies Design (USACE, 1994a) for further information on this subject. River Hydraulics is included along with other documents on the CD accompanying this book.
98
4.1
Planning for Floodplain Modeling Studies
Chapter 4
Ten Steps of Floodplain Modeling Most floodplain modeling studies follow a clearly defined path toward a solution. The following sections describe ten steps comprising this path, as listed in Table 4.1. The reader should note that more steps may become necessary in complicated studies. Table 4.1 Ten steps in a floodplain modeling study. Step
Description
1
Setting project and study objectives
2
Study phases
3
Field reconnaissance
4
Determining the type of hydrologic or hydraulic simulation needed
5
Determining data needs
6
Defining hydrologic modeling procedures
7
Performing data input and calibration
8
Performing production runs for base conditions
9
Performing project evaluations
10
Preparing the report
Steps 1 through 8 establish base (existing or preproject) hydraulic conditions, such as the water surface profiles for different floods and maps showing the areal extent of flooding for these events. Preparation of flooded-area maps in Step 8 can mark the end of a technical study if hydraulic information is only required for land-use planning purposes, such as for a flood insurance study. However, studies that include quantifying the effect of alternative flood mitigation measures involve considerably more technical effort, as presented in Step 9, “Performing Project Evaluations.” Step 10, “Preparing the Report,” entails documenting the hydraulic analyses in a technical report. Figure 4.1 shows the sequence of the steps. With the exception of Step 9, the steps documented in this chapter are common to most studies. Step 9 covers the development of reduced water surface profiles and/or reduced economic damages resulting from a proposed structural change on the watershed, such as adding a reservoir, channelization, or a levee project. Nonstructural solutions, such as floodproofing, flood forecasting, or relocations, usually donʹt require development of additional water surface profiles because they rarely affect the flood levels of the pre-project profiles. However, reduced economic damages would accrue, making the project evaluation step necessary, even for nonstructural solutions. The floodplain modeling planning process should include a written technical outline of the work to be performed in the hydraulic analysis. A defensible time and cost estimate for the overall project really canʹt be developed without such a document. A poor or inadequate technical analysis is likely if the engineer guesses a study time and cost without analyzing the technical details required for the analysis. This poor outcome is even more likely if the engineer is simply given a budget or total cost from a funding authority that has little knowledge of the required work. A technical outline, which should be performed early in the project, greatly aids the engineer in justifying the time and costs necessary for the floodplain modeling effort.
Section 4.1
Ten Steps of Floodplain Modeling
99
Step 1: Setting Project and Study Objectives The project and study objectives may not be solely the decision of the hydraulic engineer, but rather they may be determined in consultation with other members of the project team and funding authority. For most floodplain modeling efforts that involve evaluating changes to the stream or watershed, the overall project objective is flood damage reduction. Additional project objectives that may be considered are navigation, hydropower, irrigation, water supply, environmental concerns, and permits.
100
Planning for Floodplain Modeling Studies
Chapter 4
After project objectives have been identified, the study objectives can be listed. Some examples of study objectives are • Identifying the economic optimum of the various flood damage reduction methods to be evaluated. • Determining the most environmentally effective method to restore a reach of stream. • Achieving a flood damage reduction goal without significantly affecting the stream environment.
Step 2: Study Phases The three main phases of a study are preliminary evaluation, feasibility, and detailed design. These levels may be discussed in three separate technical reports for large, expensive, and complex projects, such as for the design of a major dam or levee. For less complex or controversial projects, such as a minor stream relocation for a culvert project, the three study levels are usually combined into one report. Preliminary Evaluation Phase. A preliminary evaluation is made when it is uncertain whether there is an economic interest in further pursuing a project. The engineer performing the hydraulic study may work with other members of the team to develop rough designs with the associated costs and benefits. This information is then used to ascertain if it is likely that more-detailed studies will lead to a feasible and desirable solution. In general, there is limited time and money for the preliminary evaluation phase, so evaluations are often based on existing hydraulic data (such as from an available flood insurance study) and the judgment of experienced engineers. Detailed floodplain modeling during a preliminary evaluation is the exception rather than the rule. If the study does not involve a full economic (benefit-cost) analysis, a least-cost alternative analysis to satisfy local criteria (such as the minimum size bridge opening to pass the design peak discharge without causing significant stage increases) is often performed. The preliminary evaluation may provide only rough costs for a few options to determine if the available funds for the project are adequate for the lowest cost alternative that still meets project performance requirements. A detailed technical outline should be developed during the preliminary evaluation phase to determine a time and cost estimate for the major floodplain modeling work that will take place in the feasibility phase. Feasibility Phase. The objective of the feasibility phase is to determine the scope and magnitude of the project. The bulk of the floodplain modeling is normally done during the feasibility phase—floodplain hydrology and hydraulic analyses are performed, leading to the establishment of base, or predeveloped, conditions. This portion of the work results in the hypothetical frequency flood profiles (such as the 100year flood profile) that show the depth and areal extent of flooding for various events. Next, final or postproject hydrology and hydraulics studies are performed to determine the potential flood damages along the study stream. Figure 4.1 illustrates the process of determining economic benefits of a project. The differences between the base and postproject profiles are an indication of the potential benefits that could be obtained from a proposed flood reduction structure, such as a reservoir. Such a structure could reduce the base water surface profiles, resulting in less potential damage to properties along the stream.
Section 4.1
Ten Steps of Floodplain Modeling
101
Figure 4.1 Economic benefits of a proposed flood reduction structure.
The project benefits for each option studied are compared to the costs associated with possible structural measures, using established economic analysis procedures. Each different structural measure (such as reservoirs, levees, or channelization) is modeled, and the measureʹs impact on base condition flood profiles is determined by the hydraulic engineer and evaluated by an economist in terms of reduced flood damage. Economic analysis leads to a determination of the “best” or “optimal” economic plan. The best plan is usually the one that gives the maximum net benefit, based on the following relationship: Maximum net benefit = (base damages – postproject damages) – project costs
(4.1)
These benefits, damages, and costs are calculated on an average annual basis. Detailed Design Phase. The detailed design phase concentrates on the structural, foundation, and hydraulic design of the features of the selected plan. It can include, for example, designing the pumping plants and collector ditches for a levee project, along with the inlet/outlet structures for any culverts through the levee. For channelization projects, the engineer would design the stream junctions, drop structures, side drainage, bridge and culvert features, and scour protection. For reservoir projects, the engineer might design the spillway shape, stilling basin features, and downstream channel protection. The engineer may perform detailed sediment transport studies employing numerical models to evaluate the effect of the project on the streamʹs sediment regime. The frequency and amount of dredging may also be studied to maintain desired channel capacities or to determine if sedimentation will adversely affect the levee capacity or reservoir storage.
Step 3: Field Reconnaissance One cannot appropriately model a reach of river without conducting site visits; the hydraulic engineer needs to visit the study site in person as often as practical. Field trips will likely be conducted throughout the course of the study and during all three study phases. While in the field, the engineer should photograph representative
102
Planning for Floodplain Modeling Studies
Chapter 4
reaches of the river under study and all bridge and culvert crossings of the main channel, the adjacent floodplains, and any relief openings. Digital cameras are especially useful for reconnaissance. A valuable feature of HEC-RAS is the ability to link digital images, such as those taken with a digital camera or scanned from a photograph, with certain cross sections. Bridge geometry can be linked with a picture of the bridge, allowing the modeler to view the actual structure and compare it to the geometric input. The channel bed material should be inspected at different locations to ascertain whether it is predominantly silt, clay, sand, or gravel. Bed material grain size is an important factor in estimating Manning’s n for the channel. Bed material size is also an important parameter for bridge scour analysis. The application of prediction equations, such as Cowan’s for Manning’s n (discussed in Chapter 5), requires the estimation of several channel parameters in addition to the bed material. Therefore, the modeler should address the following questions during the field inspection: • Does the cross-section shape change significantly from location to location? • Does the low flow channel shift frequently? • How dense is the vegetation within the channel? • How obstructed is flow in the channel? • How much does the stream meander?
Section 4.1
Ten Steps of Floodplain Modeling
103
The bankline should also be closely observed. Leaning or fallen trees in the channel, exposed root wads in the channel bank, large deposits of material, scour around bridge footings, and vertical banks with sloughed material at the toe are all important observations. These factors indicate that a stream may be experiencing rapid changes in channel geometry and stream slope caused by major scour and deposition. This situation could require the changing channel geometry to be included in the floodplain modeling process. If problems are found, it is important to identify the source of the problem. It could be that a past channelization produced a headcut that is unraveling the channel as the erosion moves upstream. Channel distress could also be due to upstream urbanization or other land-use changes that have greatly increased the discharge associated with any rainfall event. A field reconnaissance should provide an opportunity to collect calibration data. Highwater marks obtained from interviews with local residents are invaluable. Local newspapers typically carry past flood stories in their archives, which can also be a valuable source of flood data and highwater marks. Calibration considerations are further discussed in Chapters 5 and 8. The opportunity to observe the stream during a flood event is especially important. A video recorder should be used if the opportunity to observe an actual flood arises. Field reconnaissance is important for all study phases, but especially in the preliminary evaluation and early in the feasibility study.
Step 4: Determining the Type of Hydrologic/Hydraulic Simulation Needed Chapter 3 discusses hydrologic and hydraulic computer programs. For floodplain hydraulic modeling, the most appropriate method will almost always be a onedimensional model coupled with either steady, quasi-unsteady, or fully unsteady hydraulics. A steady (with peak discharge possibly determined from a simple equation) or quasi-unsteady (with peak discharges developed from a hydrologic computer model) solution should be used unless one or more of the exceptions listed in Section 3.4 apply. The majority of floodplain hydraulic modeling studies employ the steady flow model in HEC-RAS with peak discharge computed from an equation, statistical analysis of gage records, a previous study, or a hydrologic computer program. These techniques will be further discussed in Chapter 5. The use of a hydrologic computer program also depends on the complexity of the watershed and the methods to be evaluated. Table 4.2 lists the procedures usually selected for various flood mitigation methods. Many of the items listed in Table 4.2 are discussed in detail in Chapters 9 through 11. If a multidimensional model is deemed necessary, study planning should allow additional time and expense for training the engineer in its use and application. Significant additional data acquisition is also necessary for a multidimensional model. Table 4.2 General guidelines for analysis procedures for various hydraulic features. Features
Typical Analysis Procedure
Levees
Gradually varied steady flow (GVSF) using a program such as HEC-RAS. Discharges developed from a hydrology program. Sediment analysis is often qualitative, if needed. Some sediment sensitivity studies could be necessary.
Dams (height)
Inflow hydrographs to the reservoir and hydrograph routings through the reservoir from hydrology computer programs such as HEC-HMS. Sediment storage (loss of reservoir storage) may be addressed qualitatively or with a program such as HEC-6.
104
Planning for Floodplain Modeling Studies
Chapter 4
Table 4.2 General guidelines for analysis procedures for various hydraulic features. (cont.) Features
Typical Analysis Procedure
Spillways
Same methods as for dams (see preceding table item) to establish spillway crest elevation and width. General design criteria from existing sources (from hydraulic texts, Federal publications, and so on) are used to develop the spillway profile for the design flood. Specific physical model tests to refine profile and design for large structures may be performed, as well.
Energy dissipators
Discharge from reservoir routing using a hydrology program. General design criteria from existing sources (often Federal publications) to establish stilling basin floor elevations, length, and appurtenances. Specific physical model tests to refine the design of large structures are common. Movable boundary analysis (HEC-6 or equivalent) to establish downstream degradation and tailwater design elevation for major structures.
Channel modifications
Hydrology computer program to determine peak discharge and GVSF programs for water surface profiles. Sediment studies are often needed. Qualitative movable-boundary analysis to establish magnitude of effects, and/or quantitative analysis (with a program like HEC-6 or equivalent) for long reaches of channel modifications and/or high sediment concentration streams. Physical model tests may be needed for problem designs (typically supercritical flow channels).
Bypasses/diversions
A hydrology computer program for discharges and GVSF or gradually varied unsteady flow (GVUSF) analysis. Physical model testing for major structures. Detailed sediment transport analysis on sediment-laden streams.
Drop structures
Similar to energy dissipator design, although physical model tests typically are not required.
Confluence analysis
Discharges from a hydrology program or from hydraulic routing with a GVUSF program. GVSF normally; GVUSF for a major confluence or tidal effects.
Flood profiles
Discharges from equations, previous studies, statistical analysis or hydrology program. GVSF normally.
Floodways/encroachments Same as for flood profiles. Overbank flow
Same as for flood profiles. One- or two-dimensional GVUSF for a very wide floodplain or an alluvial fan.
Step 5: Determining Data Needs This section provides some understanding of how much data is available or is required during the study planning process (Chapter 5 discusses data needs and availability in more detail). Data needs vary, depending on the methods to be analyzed and the procedures employed. In the majority of floodplain modeling projects, the data needed consist primarily of discharge and geometry information. Discharge Data. For study planning purposes, the questions that need to be answered to properly model the situation include the following: • Will only the peak discharge be used or should a complete discharge hydrograph be generated? • Are actual discharge data available from a gage? • What discharge information is available from previous studies of the stream, how old is the information, and what is its quality? If the study reach is short and uncomplicated, only a peak discharge may be necessary. For these situations, a peak discharge may be estimated through a regionally derived regression equation (see Chapter 5). If the reach is long with several tributaries, or if there are ongoing changes in the watershed (such as urbanization and
Section 4.1
Ten Steps of Floodplain Modeling
105
upstream reservoirs), a full hydrograph is often necessary to capture the effects of these features. For analyses of moderate to large watersheds and the modeling of many miles of stream, both a hydrologic simulation program, such as HEC-HMS, and a steady flow hydraulic program, such as HEC-RAS, are usually needed. When full unsteady flow modeling is required, complete discharge hydrographs are needed to perform unsteady flow computations throughout the stream system. Chapter 5 discusses discharge data in more detail. Geometry Data. Planning activities need to determine the availability and quality of existing survey data. If necessary, appropriate costs should be developed for the collection of survey data that is adequate for the level of accuracy and confidence that is desired in the hydraulic output. Channel and floodplain cross-section data must be collected at a sufficient number of locations to accurately define the water surface profile. Stream locations that have an effect on flood elevations should also be surveyed or estimated—these locations could include sharp breaks in the channel slope, large expansions or contractions of the floodplain width, and significant changes in land use or vegetation. Cross sections should extend across the entire width of the floodplain, if possible. Roadway and low chord profiles of each road crossing should also be obtained, either from field surveys or by getting bridge sections from the agency responsible for the bridge. Although plans may be available, in some cases the plans will be very old and occasionally based on a local datum that might not be transferable to the National Geodetic Vertical Datum (NGVD). For old bridge plans that are not in an acceptable datum, new surveys should be performed to determine both accurate bridge geometry and current channel elevations through the bridge opening.
Getting Discharge Data from the Web The Web provides a wealth of easily accessible information. Much data are available for easy downloading from various web sites, including discharge data. In the United States, the U.S. Geological Survey (www.usgs.gov) is the repository for most discharge data and is the first source to check when looking for flow data. Selecting Water and then Surface Water transfers to the surface water web page for flow data (waterdata.usgs.gov/hwis/sw). For floodplain modeling studies, peaks will likely be the item of interest on the page, either to obtain a peak discharge from an actual event for model calibration or to obtain the annual peak discharges to perform a frequency analysis. Following a selection of peaks, a site location is selected, if the USGS gage number is known for gage(s) along the stream reach under study. In addition to surface water data, the USGS also
has groundwater and water quality databases. If a complete, recorded hydrograph is required, the state USGS office can supply copies of the stage readings at the gage throughout the flood of interest and the water level-discharge relationship for the gage. The modeler can then manually develop a discharge hydrograph from these data. Although the USGS is the most likely source of gage data in the United States, other federal, state, provincial, or local agencies may have additional discharge and stage data. Some private vendors also market rainfall, streamflow, water quality, and other river data for purchase by an interested modeler. A thorough search of any recorded data by government and nongovernmental agencies in the area of interest should be included to ensure that all possible sources of flow data have been investigated.
106
Planning for Floodplain Modeling Studies
Chapter 4
When the approach roadway to the bridge or culvert is located on a significant embankment, spot elevations or a full cross section of the floodplain adjacent to the embankment should be obtained. One source for such supplemental data are USGS topographic maps, most of which have been digitized and are available in a Geographic Information System (GIS) format for use as a base map. If the mapping scale is inadequate, the engineer may recommend orthophoto contour mapping or digital elevation maps (DEMs). Recent advances in survey and computer technology allow RAS cross sections to be obtained in the correct format directly from a computer-generated DEM. Chapter 5 discusses topographic data in more detail.
Step 6: Defining Hydrologic Modeling Procedures As part of the planning process, the engineer should tentatively select the modeling procedures to be employed, thus leading to a more accurate time and cost estimate. This step will also include investigating which methods have been found to be most acceptable and accurate for the hydrologic area being studied. For steady flow modeling situations that require the development of flood hydrographs, the selection of modeling procedures can include the following: • Precipitation – Depth, temporal distribution, or mean areal precipitation • Infiltration modeling technique – Uniform and initial, SCS curve numbers, Green-Ampt, Holtan, Horton, or other • Runoff modeling – Kinematic wave or unit hydrograph (SCS, Clark, Snyder, or other) • Hydrograph routing – Straddle-stagger, Muskingum, Modified Puls, Muskingum-Cunge, or other. The routing selection may require information generated by the hydraulic computer program, particularly for the Modified Puls routing method. Chapters 8 and 14 discuss routing techniques. • Calibration data – If a flood has produced known highwater marks or if stream gage data are available, gaged rainfall data should be obtained. Rainfall maps are prepared using the Thiessen or isohyetal techniques. Either of these techniques may be used to estimate the average storm rainfall on a watershed and are described in any hydrology textbook. If discharge gages are available, the recorded flood events should be obtained from the agency in charge or from a reliable web site. If several actual storm-flood events are available, all should be used in the calibration and verification process. Chapter 8 discusses the calibration and verification steps. For unsteady flow modeling, modeling procedures also include the following: • Boundary conditions at upstream and downstream locations and for each major tributary. Such data as stage and/or discharge hydrographs, rating curves, normal depth, lateral inflows, gate opening settings are needed at each boundary location. • Although a single hydrograph is often sufficient, some studies require a full period of record for unsteady flow routing. Several years to several decades have been simulated in some studies. The discharge data could come from gage records or from simulation with runoff models. A “warm-up” period featuring a constant flow for a specified time is typically also included as an initial condition for the model operation.
Section 4.1
Ten Steps of Floodplain Modeling
107
Step 7: Performing Data Input and Calibration Most of the effort in a floodplain modeling project occurs during data preparation, input to the model, and debugging and calibrating the model. This effort involves coding all geometric data into HEC-RAS, including bridges, culverts, dams, diversions, and other structures affecting water surface profiles. Ineffective flow areas (discussed in Chapters 5 and 8) should be included in the HEC-RAS cross sections if storage-discharge data are needed for hydrologic routing. Historic discharge and highwater marks can be used to calibrate the output from HEC-RAS. Following calibration, a series of steady flow discharges is used to obtain a storage-discharge relationship for each routing reach in the hydrologic simulation. Following calibration and verification of the model input, an independent technical review of the output should be made for quality assurance/quality control (QA/QC) purposes. Chapters 5 through 8 further discuss these hydraulic activities.
Step 8: Performing Production Runs for Base Conditions Following the input and the model calibration and verification processes, determination of whether the model adequately represents the actual reach of river being simulated is based on the calibration events. Unfortunately, the engineer seldom has real data for the actual events that represent the rare floods that he or she is tasked with modeling. Further adjustment to model parameters during the production runs may be required, based on available local data and the hydraulic engineer’s knowledge and experience. If the calibration event(s) are small to moderate floods, the simulation of large and rare events may require the following: • Modification of infiltration parameters to reflect more runoff • Modification of peaking coefficients to increase the peak discharge of the unit hydrograph or hydrograph peak • Modification of routing travel times to reflect a faster movement of the hydrograph through a routing reach • Reduction of Manning’s n to reflect the more efficient channel during rare flood events • Simulation of the buildup of trash and debris on bridges during a major flood These considerations are presented in more detail in Chapter 8. The proposed water surface profiles for flood events of various frequencies should be given at least a cursory independent review for QA/QC purposes. A more detailed review should be performed for a flood insurance study or similar floodplain information report, since profiles and flooded area maps will be the main technical output of the hydraulic effort.
Step 9: Performing Project Evaluations After a model has been sufficiently calibrated and the base condition flood profiles have been developed, the engineer has a numeric representation of the water surface elevations of actual and hypothetical floods at any location along the study reach. These water surface profiles and corresponding flooded area maps form the basis for further evaluation of the effects of different flood reduction scenarios. If the basin hydrology and/or hydraulics are expected to change in the future (such as from
108
Planning for Floodplain Modeling Studies
Chapter 4
upstream urbanization or reservoir construction), the hydrologic and hydraulic models need to be run for the expected future changes as well. A new set of water surface profiles representing future conditions, without any proposed project, should be developed for one or more future condition scenarios. These additional profiles can then be used by an economist to develop potential flood damage costs for these future conditions and to conduct the benefit/cost analysis for the proposed flood reduction methods. This effort should commence well in advance of detailed design based on the hydraulic results by other civil engineering disciplines, so that the overall study effort is not delayed. To analyze the selected methods, the hydrologic and/or hydraulic data sets for base and future condition scenarios can be adjusted to simulate the addition of each structural modification, such as detention storage, levees, channel modification, and flow diversions. The simulations can be achieved by modifying the storage-outflow (routing) relationships in the hydrologic model to simulate reservoirs and/or the geometry in the hydraulic model to simulate levees and channel modifications. Chapters 8, 11, and 12 discuss these activities. The initial hydraulic planning activities, however, should include the most likely solutions to evaluate with detailed hydrologic and hydraulic modeling. Experienced engineers and planners can inspect the study watershed and often eliminate options that would obviously be ineffective or more costly than other solutions, so these would not need to be analyzed in detail. The evaluation of the project includes the comparison of preproject versus postproject profiles and flooded areas. For most large projects, especially those undertaken by the federal government, the reduction in flooding for each flood event is translated into an annualized project economic benefit. If the average annual project benefits exceed the average annual project costs, the project is economically justified. If benefit-cost analysis is not applied, then a least cost alternative solution to satisfy a design criterion is selected. Local drainage improvements, bridge construction, and most stormwater detention structures fall into the least-cost option category. The hydraulic engineer, economist, cost estimator, and project manager typically conduct the project evaluation and method selection. An independent technical review of at least the recommended method and why other options are less desirable should be made for QA/QC purposes.
Step 10: Preparing the Report The report should be considered in the planning stage to determine the time and cost estimates involved in its preparation. The best technical analysis will be poorly received if the resulting technical report is inadequate, but a reviewer will frequently accept the technical work if the report is perceived as a quality product. Consequently, planning activities should include adequate time and budget to prepare a clear, concise, and well-written report of the hydraulic activities. Too often, nearly all the time and budget is spent on technical activities, leaving inadequate resources to prepare the final report. In actuality, the report should be written as the technical work progresses. Some engineers even draft the report prior to the technical work, thereby obtaining a better understanding of how the work needs to progress. The tables, figures, and numeric data are left blank during the initial draft, but the flow of the report indicates how the technical work should proceed. The detailed hydraulic technical outline could also be used in lieu of writing the report first. The final draft report should be independently reviewed for QA/QC purposes.
Section 4.2
4.2
Chapter Summary
109
Chapter Summary Before initiating technical studies to model a reach of river, the engineer should develop a detailed outline of the hydraulic study to assist in establishing a defensible time and cost estimate and to serve as a guide in processing the technical study. Floodplain modeling almost always includes the steps itemized in this chapter to model base, or predeveloped, conditions. A key factor in the technical outline is whether or not a hydrologic model is needed to develop the peak discharges and complete hydrographs throughout the study watershed. Flood profiles and flooded area maps for the base condition of the river are the prime result of this work and may be used to estimate the potential flood economic damages. Various measures to reduce the severity of flood damages, such as reservoirs, levees, or channelization, can be simulated with hydrologic or hydraulic models. Conversely, nonstructural solutions, including floodway analysis, floodproofing, and relocation, which serve to reduce damages rather than to modify the stream system, may be examined. The technical report describing the hydraulic studies should not be overlooked. Adequate time and funds should be allocated to ensure that a high quality technical report is prepared for independent review and to document the analysis.
Problems 4.1 True or False – A good floodplain modeler will develop an HEC-RAS model of a stream system regardless of the nature of the study. Explain your answer. 4.2 List the basic data needs for an HEC-RAS study. 4.3 Which of the data needs for an HEC-RAS study accounts for the vast majority of the data? 4.4 True or False – A good floodplain modeler will not budget much time or resources to the documentation phase of a floodplain study. 4.5 True or False – Model calibration is one of the most important—if not the most important—step in a floodplain study.
CHAPTER
5 Data Needs, Availability, and Development
Along with selecting the appropriate simulation program and planning the details of the floodplain modeling study, the initial preparation also requires determining what data are needed and where and how the data can be obtained or developed. This chapter describes the data needed for a floodplain modeling study as well as their sources. It covers determining the study reach, developing cross-section information, assessing discharge data, estimating roughness coefficients, and calibration and verification data needs.
5.1
Data Sources Although a floodplain modeling study may concentrate on only a few miles or kilometers of a stream, the study area and reach may be much larger. The search for useful data may even extend outside of the watershed in which the study is being conducted. The primary data used in floodplain modeling are discharges and geometry. For analyses of the effects of structural modifications on the streamʹs sediment regime, sediment data are often important, as well.
Stream Gage Data Stream gage records for the study area are invaluable for calibrating and verifying the model. In some cases, the records may also provide data that can be used for “whatif” simulations of a rare historic flood event. Gage data can be stage (water surface elevation) only or stage plus discharge. In the United States, the primary source of these data is the U.S. Geological Survey, the agency responsible for gathering and maintaining river data. However, other federal, state/provincial, and local agencies
112
Data Needs, Availability, and Development
Chapter 5
should be queried, as well, to see whether they can provide stream gage information. Published data normally include the annual peak stage and/or discharge, daily stages recorded at a predetermined time each day, average daily discharge, and monthly and annual summaries. For steady flow floodplain studies, flood peak discharge and crest stage are the two variables most often needed. However, for full unsteady flow analyses and for sediment transport studies, a complete stage or discharge hydrograph is required at all boundaries and at gage sites. Hydrographs at gage sites are also needed for calibration of hydrologic models in a quasi-unsteady flow analysis. After determining the data that are available, the engineer may have to contact the appropriate agency or firm to obtain the stage and/or discharge records over the time period or flood of interest. If only data representing stage (depth) are available, then the discharge hydrographs may have to be developed from the observed recording stage data. The USGS has information (Kennedy, 1983) available on the development of a continuous discharge record from stage data. Unfortunately, observed flows and stage data are usually only available for large streams and rivers. It is unlikely that small streams, particularly those in rural areas, are gaged. Urban streams may have some gage records available, but the period of record is often short. If the records are for a time period when urbanization is occurring in the watershed, the resulting period of record will not be homogenous, since ongoing land-use changes will affect the runoff for the same rainfall event over time. Adjustments to the discharge records for such urban streams are often necessary before applying the data. These adjustments are discussed in EM 1110-2-1417, Flood-Runoff Analysis (USACE, 1994d). Even if no large floods have been recorded, the stage-discharge relationship should be available for the events experienced when the gage has been in place for a year or more. Although these data may only be for in-channel flows, this information might allow the calibration of a channel roughness value (n) for bankfull discharge (often the one- to two-year recurrence-interval flood event). Computation and selection of Manningʹs n values are discussed in Section 5.5. If there are no gages in the study reach or watershed, similar nearby watersheds should be evaluated for gage records. Nearby watersheds having similar land use and soil types may have gage records, which at least can be used to estimate a peak flow rate vs. drainage area relationship for the study watershed.
Previous Studies An Internet search keyed to the stream name may turn up valuable past studies for the reach under evaluation. Larger rivers and streams, especially those in or near populated areas, have often been studied. In the United States, flood insurance studies have been performed for thousands of communities, and the discharge and geometric data are often available from the Federal Emergency Management Agency (FEMA) or from the technical contractor who performed the study. Depending on the time that has passed since the previous study was completed, the geometric data may still be fully applicable to the study reach. However, it should always be the rule to closely review any acquired data to ensure that it is accurate and reflects the existing stream and floodplain. Depending on the area of the United States, the Bureau of Reclamation, the U.S. Army Corps of Engineers (USACE), the Natural Resources Conservation Service, the Tennessee Valley Authority, and other agencies are sources of data for hydraulic studies.
Section 5.1
Data Sources
113
State, county, or municipal highway departments may be able to furnish design discharge and bridge or culvert geometry for structures in the study reach. Similarly, railroads often have information on their bridges that cross the study stream. It is important to be careful when using data from these sources, since the elevation data are sometimes not referenced to the current datum (NGVD), but possibly to some local datum that may have been established many decades before. A conversion to the accepted datum may not be readily available. Similarly, if the plans are old, the channel shown for the bridge may not represent the existing channel. The channel cross section should be surveyed at or near the crossing location, even if bridge plans are available. State/provincial and local agencies, such as water districts or flood control districts, may also be able to provide useful information. Regional equations to estimate peak discharge as a function of measurable parameters, such as area, slope, and percent imperviousness, are often available for urban areas. These equations normally give only an estimated peak discharge, but an estimate may be adequate if no hydrologic modeling is planned. If hydrologic modeling is planned, these values offer another way to calibrate, or at least compare, the peak discharge from the hydrologic model. In the United States, these equations are presented in studies and reports typically obtainable from the U.S. Geological Survey (USGS) state office. Similar studies performed by local universities, the local USACE District Office, and other agencies may also be available.
Mapping and Aerial Photos The availability and adequacy of topographic mapping and aerial information must be assessed, along with determining the need for additional data. Part of nearly any floodplain modeling study is to create an outline of the flooded area on a map; thus topographic information is needed. Figure 9.3 shows a flooded area map as it might be prepared for a flood insurance study. In recent decades, aerial mapping has become more advanced and less expensive. As a result, detailed contour mapping is available for many areas of the United States, especially the densely populated regions. Even communities with a population of less than one thousand may well have 1 or 2 ft (0.3 or 0.6 m) contour maps for their corporate boundaries. Orthophoto maps, or aerial maps overlain with topographic contours, are often available, usually at 5 ft (1.5 m) intervals or less. The mapping needs and availability must be determined in the early planning stages, because mapping is typically expensive. In addition, aerial mapping for contour development is normally done in the nongrowing season, when foliage is off the trees. For many parts of the Northern Hemisphere, aerial photography must be flown before April, before vegetation covers the floodplain. Where aerial mapping is nonexistent, available topographic contour maps should be evaluated. The USGS has prepared topographic maps for all parts of the United States, although the contour interval and the length of time since the basic mapping vary widely. Standard USGS contour mapping is 10 ft (3 m) contour intervals with a scale of 1:24,000, which translates into a horizontal scale of 1 in. = 2000 ft. This contour interval is generally considered the maximum for use as a base map in a hydraulic study, and a tighter interval is preferred. Hundreds of flood insurance studies have used this basic USGS mapping, supplemented with surveyed cross sections, to develop flood inundation information for communities throughout the United States. In addition, the USGS
114
Data Needs, Availability, and Development
Chapter 5
contour maps are used to lay out the cross sections to be surveyed, showing crosssection location and alignment for the field survey crew. In some cases, the digital elevation maps (DEMs) used to develop the contour maps can be downloaded from the USGS web site. The NRCS has conducted aerial flights for much of the United States at periodic intervals since the 1950s. Although these photographic records are primarily for rural areas, the pictures are good for evaluating changes in stream geometry, the streamʹs position in the floodplain, and changes in floodplain land use with time. Hydraulic studies that also include sediment transport analyses may find these photos invaluable. The NRCS also provides maps that show soil type by county throughout the United States. These maps are extremely useful for estimation of the infiltration parameters needed for hydrologic simulations. Other previously mentioned agencies should also be contacted for mapping data. Many studies today are relying on LIDAR (LIght Detection And Ranging) instead of aerial photos for elevation data. While LIDAR is more expensive than aerial photos, the accuracy and density of points are much higher.
5.2
Study Limits and Boundary Determinations The locations of study limits or study boundaries define the area or reach where detailed topographic information is needed as well as the extent to which hydraulic computations are required. When sediment transport analyses are included, the limits may be extended much further, compared to the hydraulic study requirements. For example, a channelization project may cause significant channel erosion well upstream of the end of the hydraulic study, or a flood reduction measure, such as a reservoir, may affect sediment transport capacity in the river for a long distance downstream of the end of the floodplain hydraulic study limits. Chapters 11 and 13 further address sediment effects.
Hydraulic Boundaries A studyʹs limits or boundaries are usually different from those of the detailed studyʹs hydraulic computations. The final inundation mapping may cover only the city limits or local political boundary. For accurate flood elevations at the political boundary or location of interest, however, water surface profile analyses must begin well downstream of the boundary. Similarly, if a new bridge or flood reduction measure, such as a reservoir or levee, is proposed, the hydraulic analysis must evaluate how far any adverse effects extend upstream. Depending on the stream slope, the downstream boundary for beginning the hydraulic computations may be a mile (1.6 km) or more past the study boundary. Upstream, the effects of an obstruction could extend several times this distance from the obstruction. These effects can also extend up tributaries that are significantly affected by backwater from the main river. Downstream Hydraulic Boundary. Chapter 2 states that a stream flows at or near normal depth if the channel is prismatic and the slope is constant. A natural river always has geometry and slope that vary from location to location; however, the river will still trend toward normal depth. An obstruction or drop-off in the channel bed may cause a significant change to the water surface elevation at its location, but the
Section 5.2
Study Limits and Boundary Determinations
115
water surface elevations in the river will taper back toward normal depth as the effects of the obstruction damp out with distance. Water surface profile calculations require a starting water surface elevation. The downstream boundary defines the starting water surface elevation for subcritical flow, while the upstream boundary defines the starting water surface elevation for supercritical flow. For subcritical flow, the downstream hydraulic boundary should be located such that any errors in the starting water surface elevation will be damped out before the start of the detailed hydraulic study reach. In the past, determining this location was simply guesswork, with computations for a selected discharge starting at critical depth and at one or two other elevations above and below the estimated normal depth. Engineers then reviewed their computations to determine whether all the profiles converged to the same value before the start of the reach under study, as shown in Figure 5.1.
U.S. Army Corps of Engineers
Figure 5.1 Study distance analysis concepts.
The USACE’s Hydrologic Engineering Center published Accuracy of Computed Water Surface Profiles (USACE, 1986) one of the few definitive guides for determining where to locate this boundary. Their work, prepared for the U.S. Federal Highway Administration, developed a prediction equation and nomograph for locating the downstream hydraulic boundary. Figures 5.2 and 5.3 show the nomographs for starting conditions of critical and normal depth, respectively. The equation for downstream reach length for the critical depth criterion in Figure 5.2 is HD L DC = 6600 --------S
(5.1)
where LDC = the downstream reach length for computations starting at critical depth (ft) HD = the average hydraulic depth for the reach (1% chance flow) (ft) S = the average reach slope (ft/mi) The equation for downstream reach length for the normal depth criterion in Figure 5.3 is
116
Data Needs, Availability, and Development
Chapter 5
U.S. Army Corps of Engineers
Figure 5.2 Downstream reach-length estimation – critical depth criterion.
0.8
HD L DN = 8000 --------------S
(5.2)
where LDN = the downstream reach length for computations starting at normal depth (ft) If the engineer can estimate the river slope (from a topographic map) and the hydraulic depth (possibly from assuming normal depth for the computation) for the 100-year flood event, the nomograph can be used to determine how far downstream from the beginning of the detailed study to begin computations for both normal and critical depth. Although it may be difficult to determine the hydraulic depth alone, HEC-RAS does compute and show hydraulic depth for each cross section. After data entry and an initial run, the output can be reviewed for the calculated hydraulic depths. These results can then be used in Equations 5.1 and 5.2 or the nomographs of Figures 5.2 and 5.3 to reestablish the proper start of computations.
Section 5.2
Study Limits and Boundary Determinations
117
U.S. Army Corps of Engineers
Figure 5.3 Downstream reach length estimation – normal depth criterion.
Example 5.1 boundary.
Computing the location of the downstream hydraulic study
A reach of stream to be modeled with HEC-RAS has an average slope of 10 ft/mi, estimated from a topographic contour map. Based on the engineerʹs judgement, the initial estimate of the reachʹs average hydraulic depth (cross-section area/top width) for the 100-year flood profile is 8.0 feet. Estimate the location of the downstream boundary (first cross section) so that profiles will converge before the beginning of the detailed study boundary. For boundary conditions starting with critical depth, Equation 5.1 gives HD 8 L DC = 6600 --------- = 6600 ------ = 5280 ft S 10
For boundary conditions starting with normal depth, Equation 5.2 gives
118
Data Needs, Availability, and Development
Chapter 5
0.8
0.8
HD 8 L DN = 8000 --------------- = 8000 --------- = 4222 ft S 10 These distances may be used for an initial location of the boundary. Additional cross sections should be included between the hydraulic boundary and the beginning of the detailed study boundary. HEC-RAS should then be used to solve for hydraulic depth. If the computed hydraulic depth is significantly different from the initial estimate, the LDC and LDN values should be recomputed and the distances adjusted in the model. If the engineer wants to use both normal and critical depths at the boundary, thereby performing multiple computer runs, the longer distance should be selected for use in the model.
Example 5.2 boundary.
Computing the location of the downstream hydraulic study
Compute the same distances for Example 5.1, assuming the average stream slope is 2 ft/mi. For boundary conditions starting with critical depth, Equation 5.1 gives HD 8 L DC = 6600 --------- = 6600 --- = 26,400 ft 2 S For boundary conditions starting with normal depth, Equation 5.2 gives 0.8
0.8
HD 8 L DN = 8000 --------------- = 8000 --------- = 21,112 ft S 2 For flatter streams, the downstream reach distances are significant. Very mildly sloping streams may require a reach of several miles before the profile converges.
Upstream Hydraulic Boundary and Project Effects. The upstream hydraulic boundary is normally the location along the stream where no further hydraulic computations are needed. For a flood insurance study, this location is usually the upstream corporate limits of the municipality. For a flood protection project, the effects extend upstream for some distance past the end of the project. Part of the hydraulic analysis is to determine how far this effect extends and to identify and mitigate any adverse effects caused by the project. This is accomplished by creating two HEC-RAS simulations, one with and one without the project, then locating where the two profiles converge upstream. HEC’s Accuracy of Computer Water Surface Profiles (USACE, 1986) suggests using a prediction equation and nomograph for locating the upstream limit for project effects under subcritical conditions. This location is defined as the point where there is no more than 0.1 ft (0.03 m) between the water surface profiles computed with and without the obstruction. The work done by HEC specifically addressed the effects of a bridge; however, it could be used for estimating the distance for levee effects or for small weirs or check dams. Figure 5.4 shows the nomograph for upstream estimation with subcritical flow. The equation for calculating the upstream reach is L U = 10,000 HD
0.6 HL
0.5
-------------- S
(5.3)
Section 5.2
Study Limits and Boundary Determinations
119
U.S. Army Corps of Engineers
Figure 5.4 Upstream reach-length estimation for subcritical flow.
where LU HD HL S
= the upstream reach length (ft) = the average hydraulic depth (100-year event flow) (ft) = the head loss at the channel crossing structure for the 100-year flow (ft) = the average reach slope
Estimating the upstream limit requires a third variable: the head loss at the obstruction, or the difference in water surface elevation just upstream of the bridge with and without bridge conditions. If a proposed bridge or other obstruction will result in an effect beyond the upper end of the study reach, Figure 5.4 may be used to determine how far beyond the nominal study limits the profile computations should extend. In some cases, a supercritical flow profile is necessary. For this flow regime, the starting water surface elevation is specified at the upstream hydraulic boundary (upstream from the detailed study boundary), because supercritical flow computations proceed in the downstream direction. There is no formal guidance on how far the hydraulic boundary should be located upstream of the detailed study boundary
120
Data Needs, Availability, and Development
Chapter 5
for supercritical flow conditions. However, unless the computations are strictly for a supercritical flow (man-made) channel, the resulting profile may well be a mix of subcritical and supercritical flow stream reaches. (This mixed-flow analysis is discussed in Chapters 8 and 11.)
Example 5.3 Computing the upstream effect of an obstruction. Assume that the same reach of stream in Example 5.1 has a bridge causing an estimated 2 ft of water surface increase (swellhead) for the 100-year event. How far upstream will the effect of the bridge extend? From Example 5.1, the estimated hydraulic depth is 8 ft and the stream slope is 10 ft/mi. To estimate the upstream effect of a bridge obstruction, Equation 5.3 gives L U = 10,000 HD
0.6 HL
0.5
0.5
-------------- = 10,000 ( 8 ) 0.6 2--------- = 4925 ft 10 S
Example 5.4 Computing the upstream effect of an obstruction. Assume that the reach of stream from Example 5.2 has a bridge causing an estimated 2 ft of swellhead for the 100-year event. How far upstream will the effect of this bridge extend? The stream slope of Example 5.2 is 2 ft/mi. Equation 5.3 is still appropriate and gives L U = 10,000 HD
0.6 HL
0.5
0.5
2 - -------------- = 10,000 ( 8 ) 0.6 ------- 2 = 24,623 S
Comparing the results of Example 5.3 and Example 5.4 shows that the milder the slope, the farther upstream the effects of the obstruction extend.
Sediment Boundaries The effects of a project on the sediment regime may extend far upstream and downstream of the hydraulic areas of interest. Consequently, when a project requires detailed sediment studies, including analysis of a flood reduction measure’s effect on the sediment regime, the sediment boundary could incorporate the entire watershed. For example, sediment carried into a reservoir is deposited in the reservoir, resulting in relatively clear water leaving the reservoir. This clear water may cause scour and erosion for a great distance downstream, because clearer water has a greater capacity to move sediment (for the same stream slope and river conditions) than does water already laden with sediment. In a similar fashion, channelization can result in scour, erosion, and headcutting upstream, along with deposition in and downstream of the channel modification. A headcut can travel far upstream from where it began, potentially (but rarely) all the way to the drainage divide. Reservoirs, channelization, and diversions often greatly affect a river’s sediment regime and should be addressed at the time of the hydraulic study. Further information on setting boundaries for sediment transport studies can be found in USACE, 1995b.
Section 5.3
Geometric Data
121
Floodplain Mapping: How Accurate Should It Be? Mapping requirements vary based on the use of the map. The accuracy of the map is determined by comparing the vertical and horizontal distances (tolerances) between objects on the map to the actual distances between the same two objects measured in the field (USACE, 1994).
may be from 0.2–2 ft with contour intervals ranging from 2–5 ft.
For general flood control project planning, floodplain mapping, and flood control studies, map scales typically range from 1 in. = 400 ft to 1 in. = 1000 ft, with a feature (horizontal) tolerance ranging from 20–100 ft. The elevation tolerance
For the actual siting of structures, such as navigation locks or storage reservoirs, map scales may range from 1 in. = 20–50 ft with a feature location tolerance of 0.05–1 ft. Vertical tolerances of 0.01–0.05 ft. with contour intervals of 0.5–1 ft are typical.
5.3
For flood insurance studies, the normal map scale is 1 in. = 400 ft with a feature location tolerance of 20 ft. The elevation tolerance is 0.5 ft with a normal contour interval of 4 ft.
Geometric Data Geometric data generally account for the most time and expense. Hydraulic computations take place at predefined points along the stream or river, where cross-sectional data have been developed. Issues related to geometric data include assessing available topographic information, examining aerial photos and/or performing site visits, determining where cross-section information is needed, determining the section stationing and orientation, assigning bank stations, defining reach lengths and roughness values for each section, and converting all this information to HEC-RAS (or another program) format.
Assessing Existing Topographic Data After following the steps described in Chapter 4, the engineer should have determined the suitability of existing topographic maps and/or surveyed cross sections for use in the study. Following this step, the engineer must evaluate any additional mapping and survey data needs and prepare a request for this data, laying out the location and alignment of each surveyed cross section on a topographic map or aerial photograph.
Aerial Photographs and Site Visits Aerial photography can help determine floodplain land use (for roughness coefficient estimates) and locate where the roughness estimates change values. The photos or topographic maps can also help determine the distance between cross sections for later input to the hydraulic model. Site visit(s) are critical for the engineer to visualize flow patterns through or around obstructions, to help estimate roughness values, to gather highwater marks or other data, and to photograph the channel and obstructions. Site visits and photographs taken during these visits constitute the main basis for estimating Manning’s n for the study reach. For sediment transport analyses, aerial photos taken at widely spaced times are extremely valuable for identifying channel
122
Data Needs, Availability, and Development
Chapter 5
movement and changes over time. These photos are also useful in laying out surveyed section locations, especially for the field crew’s efforts to precisely locate the section alignment in the field.
Locating and Modeling Cross Sections Before locating and laying out the required cross sections, the engineer should develop an identification or numbering scheme for each potential cross section. All hydraulic programs require that each cross section have a unique identifier, in most cases a numerical value. The most common method is to indicate a section ID or station as the distance along the channel centerline from the mouth of the river or other prominent downstream point. In the U.S., the identifier is most often river mileage. For short reaches of small streams, distance in feet may be selected. Stream mileage may already have been completed for the study stream by a governmental agency; for example, in the United States the USACE has established river mileage for all navigable streams. For hydraulic models received from the USACE, the cross-section IDs for the streams are usually the river miles from the mouth of the river. Other agencies may have river mileage developed and published, perhaps for an entire state or province. Table 5.1 is an excerpt from a State of Illinois publication (Healy, 1979) that summarizes mileage for all streams within the state. This report is available to study contractors and identifies drainage areas and mileage from the mouth of every river, creek, and stream for all prominent features within the state, including political boundaries, gages, bridges, dams, and tributaries. Other states/provinces or agencies may maintain similar mileage records. After an identification scheme is established, required cross sections can be laid out for survey crews. Cross sections typically extend from high ground on one side of the stream valley to high ground on the opposite side. The approximate 100-year water surface elevation is often used as the cross-section beginning and end mark for survey crews. If the floodplain section ends at near-vertical bluffs, the sections could only extend to the toe of the bluff on either side of the valley. The modeler can simply extend the ends of the sections by using topographic maps to add additional elevation and station locations to simulate the valley walls, thus saving survey costs to obtain these beginning and ending points. Similarly, if the floodplain is very wide and only the portion near the channel is effective for conveyance, the engineer might only obtain surveyed cross sections extending through the conveyance area. However, surveying only the portion of the floodplain that is effective for conveyance is not adequate for quasi-unsteady or full unsteady flow analysis. The full cross section is needed to include both the conveyance and ineffective flow areas (floodplain storage). Because a steady flow model today may be used for an unsteady flow model in the future, as a general rule the full cross section should be surveyed. In lieu of surveying ineffective flow areas (floodplain storage), the engineer could use topographic maps to complete the rest of each cross section, potentially saving considerable field survey costs. The modeler has to decide if this cost-saving method is acceptable in terms of accuracy of flooded area maps. If aerial contour mapping is available at an adequate contour interval, surveyed cross sections of only the channel, bridge, and culvert crossings should be adequate, with the floodplain geometry taken from the mapping.
Section 5.3
Geometric Data
123
Table 5.1 River mileage for Crooked Creek, Illinois (excerpt). Mileage
Description
0.0
at Mouth nr Covington
3.2
Little Crooked Cr L
3.2
Area above Little Crooked Cr
10.1
IL PT 127
10.1
USGS Gage 05593525 nr Posey
10.5
Lost Cr R
10.5
Area above Lost Cr
20.9
Road 526, T IN, R 2W
20.9
USGS Gage 05593520 nr Hoffman
23.8
Grand Point Cr L
Drainage Area, m2 465
Topographic Quad Addieville Addieville
348
Addieville
366
Carlyle
Carlyle Carlyle 265
Carlyle Carlyle
254
Carlyle Centralia W
23.8
Area above Grand Point Cr
24.0
Washington-Clinton Co
185
Centralia W Centralia W
31.9
IL Rt 161
Centralia W
32.7
Southern RR
Centralia W
35.8
Road S 1, T IN, R 1W
Centralia W
36.6
Burlington Northern RR
Centralia W
37.3
Clinton-Marion Co Ln
Centralia W
38.5
Illinois Central RR
Centralia W
38.6
US Hwy 51
Centralia W
38.9
Turkey Cr R
Centralia W
39.9
Raccoon Cr L
39.9
Area above Raccoon Cr
40.4
Road S 5, T IN, R 1E
Centralia E
42.3
Road S 4, T IN, R 1E
Centralia E
Centralia E 93.2
Centralia E
HEC-RAS automatically extends the end of each cross section vertically if the water surface elevation is higher than the elevation of the last point on the cross section. Normally, this means that the modeler should add additional points to properly model the valley geometry beyond the point of the vertical extension. If there is no significant conveyance outside of the vertical extension, however, the use of the automatic vertical extension may be allowable, although it will likely be a source of negative comment during a technical review. Where possible, the modeler should attempt to place cross sections at locations where access is readily available. When field surveys are used rather than aerial mapping, forcing the survey crew to hack through a mile or more of dense undergrowth to get to a cross-section location significantly increases the data acquisition costs. However, it is important to obtain geometric data at critical locations, regardless of access difficulties. In general, cross sections (actual or interpolated) are desired at the following points: • All major obstructions to flow, such as bridges and culverts • Stream gages and highwater marks • Roadway and railroad embankments across the floodplain
124
Data Needs, Availability, and Development
Chapter 5
• Significant increases or decreases in the floodplain width • Significant geometric changes in the channel • Significant changes in Manning’s n values in the channel or overbank areas • At and near levees or other flood damage reduction structures • Locations just upstream and downstream of significant tributary streams • Index points where economic-damage information is computed • Boundaries – start and end points on the main stream and at the ends of any tributaries under study • Significant changes in stream slope, or at and near control sections where critical depth may occur, such as rapids, drop structures, and dams Not all of these locations require actual survey data. The engineer must determine the amount of cross-section and/or mapping data that is adequate for the development of accurate profiles. When modeling the floodplain, the engineer can develop additional cross sections by interpolating between two surveyed sections. Typically, a maximum of about one-quarter to one-half of the cross sections in a hydraulic model may be actual surveyed sections, with the balance developed from maps and from crosssection interpolation by the engineer or by the interpolation routine within the HECRAS program. For sections generated from digital mapping, all the cross sections could be considered surveyed, except for the portion of the channel that is underwater. Field sections or hydrographic surveys will be necessary for any portion of the channel or overbank geometry that is under water. There is no hard and fast guidance concerning the appropriate distance between cross sections. In the author’s experience, large rivers (rivers with several thousand square miles of watershed) on low slopes (less than 5 ft/mi, 1 m/km) can have a maximum cross-section spacing of approximately 2500 ft (750 m). On smaller streams with steeper slopes, closer spacing should be the rule. For urban situations, a section every few hundred feet (100 m) or less is often needed. Bridges and culverts require close spacing to properly model flow movement through the openings. Chapters 6 and 7 further address spacing between cross sections at bridges and culverts. A valuable feature in HEC-RAS is the ability to automatically generate interpolated cross sections. The engineer can ascertain the value of additional sections after completing the initial cross-section input (both the surveyed sections and the user-developed, interpolated cross sections), running the program, and reviewing the computed water surface profile. If the distance between sections exceeds a specified value (such as 500 ft or 150 m), the program is rerun with the instruction to automatically interpolate additional cross sections. The engineer should review differences in computed water surface elevations with and without the HEC-RAS cross-section interpolations for significant profile changes. If significant differences appear, the engineer could make an additional interpolation with sections no farther apart than 250 ft or 75 m, for example, and again evaluate the results. If the differences between 500 ft and 250 ft spacing are minimal, the 500 ft spacing can be used for the profile analysis. Chapter 8 further discusses using HEC-RAS for cross-section interpolation. It is not unusual to see differences in water surface profiles of a foot (0.3 m) or more, simply by adding additional cross sections to reduce the length between computation points. HEC (USACE, 1986) found that a significant number of the tested geometric data sets underestimated the water surface profile as compared to tests made with
Section 5.3
Geometric Data
125
additional sections that reduced the maximum distance between sections to 500 ft (150 m). Generally speaking, a reduced length improves the accuracy of the friction loss computation discussed in Chapter 2. Cross sections used to model channel and floodplain geometry are normally perpendicular to flow across the river valley and cross each contour line at a right angle. However, the section should be modeled to have the velocity vectors intersect each section at right angles. This requirement means that cross sections may be curved, bent, kinked or “dog-legged” to maintain a right angle to flow. Figure 5.5 illustrates the layout of example cross sections incorporating these features.
Figure 5.5 Sample cross-section survey layout.
In addition, each cross section should be representative of the reach for half the distance to each adjacent section. This is necessary because of the way friction losses are computed. Recall from Chapter 2 that friction losses are calculated using a measure of the average friction slope and a discharge-weighted reach length between two cross sections. Features identified in the field survey may be modified or deleted to ensure proper modeling. Figure 5.6 gives an example of section editing, using a cross section from Figure 5.5. As shown in Figure 5.6, the cross section of the pond in the left overbank and the tributary channel in the right overbank were deleted when plotting the cross section, because there is no significant floodplain conveyance in these segments and because these segments are not representative of the reach modeled by the cross section. In fact, the cross section in the survey request would likely have included a note to the survey crew to skip the pond and not include its geometry in cross section 10.9. Section 10.9 in Figure 5.5 and Figure 5.6 represents surveyed data. In Figure 5.5, the road crossing and sections 5.2 and 7.5 were also surveyed. The other sections on Figure 5.5 could be interpolated from a topographic map and from the surveyed
126
Data Needs, Availability, and Development
Chapter 5
sections. The engineer may then direct HEC-RAS to interpolate additional sections between those shown. At a minimum, all cross sections should represent the full active flow area, or conveyance, when the maximum water surface elevation is being determined. When both elevation and storage information are to be developed, however, the cross-section data must include both conveyance and storage areas. Figure 5.7 illustrates this facet, which is further discussed in Chapters 6 and 8.
Figure 5.6 Surveyed cross section 10.9 from Figure 5.5.
Figure 5.7 Example showing floodplain storage and conveyance areas.
Cross-Section Modeling Information The geometric data for each cross section are modeled by providing a series of stationelevation (x, y) points from the left side of the valley to the right side, looking downstream. Left to right, looking downstream is a standard convention long used in profile computations. Obtaining accurate water surface elevations does not normally require a large number of cross-section points. For wide floodplains, it is not unusual for the surveyed data to contain more than 100 points for an individual cross section. All these points could be used, but greatly reducing the number of points will still result in an accurate model in most cases. Usually, the larger the river channel, the more cross-section points are needed to accurately model and define the channel geometry. For instance, a small creek is often modeled with just five points (two bank-
Section 5.3
Geometric Data
127
line points, two points at the waterʹs edge, and the channel invert). A major river could easily have 25 or more geometry points for the channel portion alone. Based on the authorʹs experience, a total of 15–30 station-elevation pairs are usually sufficient to model the vast majority of floodplain and channel cross sections. Figure 5.8 shows a typical cross section coded for HEC-RAS. Besides the section station or identifier and the x-y points, necessary cross-section data also include the specifications of the following items: • Bank stations: These are the stations (x values) of the right and left channel boundaries, as shown in Figure 5.8. Station-elevation data outside of the bank locations represent floodplain or overbank areas. The field survey information often designates bank stations; however, the modeler should review each plotted cross section to evaluate the appropriateness of the designated bank stations. Some channels have intermediate bank lines within the larger channel. Normally, the bank station is designated to a hydraulic program as the point where flow begins to leave the channel and occupy the floodplain. Bank stations are not the stations at the water surface elevations recorded for the section in the survey notes. • Roughness values: These values, typically Manning’s n, represent the roughness of the left floodplain (or left overbank), the main channel, and the right floodplain for each cross section. Most cross sections will have three values of n, but where land use or vegetation vary widely across the floodplain, the overbank areas could have several different values of Manning’s n, as shown on Figure 5.8. Infrequently, multiple values of n are used for the channel; however, a single value of Manning’s n for the channel is normally sufficient. Estimation of Manning’s n is discussed in Section 5.5.
Figure 5.8 Typical valley cross section, taken left to right and looking downstream.
• Reach lengths: The left floodplain, channel, and right floodplain segments each require the distance to the corresponding segment of the next downstream cross section. These values are often scaled from topographic maps.
128
Data Needs, Availability, and Development
Chapter 5
Sample Field Survey Request The following is an excerpt from an actual survey request prepared for a flood insurance study on a major river in the State of Illinois. The format of the request may be useful for other similar studies requiring surveyed cross sections for floodplain modeling. SUBJECT: SURVEY REQUEST FOR CROSS SECTIONS FOR XYZ COUNTY FLOOD INSURANCE STUDY. 1. The following information is requested for a flood insurance study in XYZ County on the Big River. Right-of-way has not been obtained for any of this work. 2. The survey information may be obtained by the stadia method. Vertical accuracy of ±0.5 feet and horizontal accuracy of ±5% is acceptable. 3. Valley sections should be taken at approximate locations indicated on the enclosed maps (not included in this book). These section locations are not absolutely rigid and may be moved upstream or downstream several hundred feet for ease of surveying. The channel portion of these sections as well as the channel only sections shall be at right angles to the channel even though the overbank may not be at a right angle to the channel flow. Conditions along each section, such as direction of flow, channel high bank, fence lines, fields, wooded areas, roads, and railroads, should be noted. Section stationing from zero should be included in the field notes and the zero point should be shown on the map. Submitted section stationing should increase from left-to-right looking downstream. Each end of the section should be tied to a prominent structure or ground feature. 4. Bridge openings should be defined by taking over and under sections, i.e., the length and width of the bridge, the abutment elevations, the low steel elevations, the pier widths and location, the wingwalls, the elevation of the top of parapet walls, a cross section under the bridge, a road or rail profile across the bridge, and any other feature that defines the structure. A sketch of each structure should be included in the survey notes. Also note if the bridge is a perched structure. On road/railroad profiles in which the road/railroad is on fill above the natural ground, take a ground shot of the natural ground adjacent to each road/railroad profile shot. 5. Sections, bridge openings, and road/railroad profiles are numbered by river mile. They are requested as follows: BIG RIVER – Requested Cross Sections Description A. Valley section 50.9: approximately 15,000 ft long from elevation 405.0 ft NGVD in the left overbank to 405.0 ft NGVD in the right overbank, looking downstream. B. Valley section 55.0: approximately 10,500 feet long from road on left overbank to L & N RR embankment on the right overbank. Do not take soundings of Queen's Lake. C. Railroad profile and bridge openings (Louisville & Nashville RR) at section 57.1 approximately 13,000 feet long from road intersection on left overbank to road intersection on right overbank. D. Valley section 59.1: approximately 18,500 ft long from road on left overbank to elevation 410.0 ft NGVD on right overbank. Do not take soundings of Halfmoon Lake. 6. The data pairs (elevation and station) for each cross section should be delivered as a single file on a high-density floppy disk or CD-ROM in addition to the conventional survey books. The data should be presented in the HEC-RAS input arrangement as shown on the attached sample (not included in this book). The stationing for the data pairs must increase from left-to-right looking downstream and the individual sections in the data file must progress in order from valley section 1.
Section 5.3
Geometric Data
129
• Expansion and contraction coefficients: A specified coefficient is applied to the difference in the discharge-weighted average velocity heads at adjacent sections, depending on whether the average velocity head increases or decreases between the two locations. The HEC-RAS program determines the correct coefficient for each cross section during the computations. Typical expansion and contraction coefficients between full valley sections are 0.3 and 0.1, respectively, and these are the default values in HEC-RAS for subcritical flow. Coefficients for supercritical flow are discussed in Section 5.6. These coefficients are adjusted for large expansions or contractions (typically bridges and culverts) and are further addressed in Section 5.6 and also Chapters 6 and 7. • Other information: Ineffective flow areas, blocked areas in the cross section, levees, and other obstructions to flow and/or conveyance may also be specified as part of the cross-section input, but discussion of these variables is covered in later chapters.
Geometric Data for Obstructions Drastic decreases in cross-sectional area from an upstream section to a downstream section can cause energy losses beyond what can be modeled with expansion and contraction coefficients. The typical obstructions that the modeler encounters are roadways, bridges, culverts, weirs, and dams that partially to fully obstruct flow in the floodplain, forcing discharges to pass through and even over the obstruction. Geometric data for these obstructions can be field surveyed; however, this may not be necessary, as the data are often available from the agency that designed or constructed the feature as detailed plans and as-built drawings. Bridges and culverts cause the modeler the most difficulties in properly modeling flow patterns through and over them. Chapters 6 and 7 discuss these two features in much more detail.
130
Data Needs, Availability, and Development
Chapter 5
Reach Length Information For each cross section except the downstream boundary section, the engineer must supply the distance to the next cross section. Lengths for the right and left overbank areas and for the channel must be specified, as well. These lengths are estimated by the engineer, often by sketching in the flow boundary for the largest flood of interest and using an engineer’s scale to measure the distance, following the estimated flow path between cross sections for the left and right overbanks. If digital elevation maps are used, the CAD or GIS program can provide estimates for these distances. The channel distance is typically taken from the section stationing (ID) work discussed previously in this chapter; that is, the development of the river mileage from the mouth of the stream. To obtain a distance converted to feet or meters, subtract the location (river mileage) where the previous cross section intersects the channel from the current cross-section location and multiply by the appropriate conversion factor. Ideally, the distances in each overbank are taken from the center of flow mass in one overbank to the same location in the next cross section downstream. Figure 5.9 shows two common cross-section shapes under flood conditions. For the triangular-shape overbank cross section, the center of mass of the left overbank flow is one-third of the distance from the bank station to the waterʹs edge. For the rectangular-shape overbank cross section, the center of mass is one-half the distance. Reach lengths are usually estimated from a plan view on a map, making the center of mass for a flood cross section for a nonrectangular shape somewhat difficult to estimate. In addition, multiple profiles are usually computed, so the width of each flood on a particular cross section (and thus the length of the overbank flow path) varies among the different profiles. Therefore, for convenience, the flow path for each overbank reach is normally taken approximately midway between the channel bank station and the edge of high ground for a selected flow. The flood used for establishing reach lengths is usually the one of most interest to the modeler, such as the 100year average recurrence interval flood in a flood insurance study. For streams having well-defined floodplains, floods with a greater than 10- to 25-year frequency may extend from bluff to bluff. Rarer floods may therefore be deeper but not much wider and will often reflect a constant overbank reach length between cross sections. Figure 5.10 illustrates the development of reach lengths. Occasionally, channel lengths are modified as floods become larger. So-called “superfloods” (frequencies rarer than a 100-year average recurrence) tend to have a watersurface slope closer to that of the valley floor than do smaller floods, for which slopes are closer to the channel slope. Especially for severely meandering streams, the engineer could consider reducing the channel reach length for larger floods, because much of the channel flow may cut across the neck of the meander loop and be part of the overall floodplain flow. This would likely require separate geometric models, one for small-to-moderate floods and another for the superflood. Figure 5.11 illustrates such a situation for a full range of potential floods under study.
Survey Data Accuracy Of all the data needed for floodplain modeling, engineers usually consider the geometric data to be the most accurate, even if much of the data come from topographic contours rather than actual surveys. The profile accuracy study (USACE, 1986) evaluated the effects of various methods of acquiring geometric data on profile computation accuracy. One conclusion of that study was that topographic information
Section 5.3
Geometric Data
131
Figure 5.9 Locating the approximate center-of-flow mass.
generally results in less error in water surface profile computations than is generally believed. A typical misconception is that topographic mapping is accurate to plus or minus a half contour interval (that is, a 10 ft interval indicates an accuracy of ±5 ft). U.S. survey and mapping standards require much higher precision. Table 5.2 illustrates the basic accuracy level of various types of survey data. A standard deviation of 3 ft is a much tighter tolerance for a 10 ft contour-interval topographic map than the common assumption, and this deviation normally represents the upper bound of the error. Published maps generally have accuracy standards exceeding those of Table 5.2.
132
Data Needs, Availability, and Development
Chapter 5
Figure 5.10 Determining lengths between cross sections.
Figure 5.11 Adjusting channel reach length for large floods. Separate geometric models would be needed, showing different reach lengths.
Section 5.3
Geometric Data
133
Table 5.2 Standard deviations for aerial spot elevations and topographic maps. (USACE, 1986) Contour Interval, ft
Aerial Spot Elevations, ft
Topographic Maps, ft
2
0.3
0.6
5
0.6
1.5
10
1.5
3.0
Table 5.2 is interpreted as follows. For example, for a 10 ft contour map, a spot elevation is within 1.5 ft of the true value. A point on the 10 ft contour is within 3.0 ft of the true value. Although cross sections taken from a topographic map without the benefit of any field surveys are not desirable or sufficiently accurate for most profile computations, the accuracy level of these maps is generally greater than the accuracy associated with discharge and friction estimates, as demonstrated in USACE, 1986. The HEC study (USACE, 1986) used geometric data from numerous streams around the United States. The sets were edited to reflect only surveyed cross-section data with no interpolated sections. Hydraulic models were developed using the edited datasets and to establish base water surface profiles. Each elevation point in each cross section was then subjected to a random adjustment, using information from Table 5.2, to produce a floodplain model that was based only on the field surveys, aerial spot elevations, or topographic contour maps. New hydraulic profiles were computed and the results compared to the base profiles. The results varied by contour interval and stream slope. Tables 5.3, 5.4, and 5.5 list some of the results regarding the effects of both survey data and estimates of Manning’s n value on the final profile. In these tables, Emean is the mean absolute reach error for a hydraulic depth of 5 ft. Table 5.3 Water surface profile errors for field survey data. (USACE, 1986) Stream Slope, ft/mi
Manning’s n Reliability, Nr
Profile Error Emean, ft
1
0.0
0.0
1
0.5
0.36
1
1.0
0.57
10
0.0
0.0
10
0.5
0.47
10
1.0
0.74
30
0.0
0.0
30
0.5
0.53
30
1.0
0.83
134
Data Needs, Availability, and Development
Chapter 5
Table 5.4 Water surface profile errors for aerial survey data. (USACE, 1986) Emean for Nr = 0, ft
Emean for Nr = 1, ft
Stream Slope, ft/mi
Contour Interval, ft
1
2
0.02
0.59
1
5
0.04
0.61
1
10
0.07
0.64
10
2
0.06
0.75
10
5
0.13
0.78
10
10
0.22
0.83
30
2
0.10
0.85
30
5
0.22
0.88
30
10
0.39
0.93
Table 5.5 Water surface profile errors for topographic map data. (USACE, 1986) Stream Slope, ft/mi
Contour Interval, ft
Emean for Nr = 0, ft
Emean for Nr = 1, ft
1
2
0.09
0.95
1
5
0.28
1.19
1
10
0.63
1.58
10
2
0.16
1.28
10
5
0.47
1.60
10
10
1.07
2.13
30
2
0.21
1.48
30
5
0.61
1.84
30
10
1.38
2.46
In Tables 5.3, 5.4, and 5.5, the level of confidence in the estimate of Manning’s n is indicated by the numerical value of Nr. A value of zero indicates that n is known precisely (possibly based on extensive gage records and calibration), Nr = 0.5 means that there is moderate confidence in n (possibly estimated from the techniques presented in Section 5.5), and a value of 1.0 indicates limited confidence in n (possibly a rough field estimate based solely on engineering judgment). As shown, field surveys give the highest level of accuracy for all values of Nr , compared to aerial and topographic mapping. The mean error is still less than 1.0 ft (0.3 m) even if the value of n is highly unreliable (Nr = 1) for both field and aerial surveys. Survey data taken only from topographic contour maps have a greater error; however, for contour map intervals of 5.0 ft (1.5 m) or less, accuracy may be acceptable, as long as n is “known.” If the estimate of n is highly unreliable, the resulting error for the use of topographic mapping only is quite high and the computed profile would likely be unacceptable. Where n is known, the resulting mean error in profile computations is about 1.0 ft (0.3 m) or less, except for topographic maps with a contour interval of 10 ft (3 m). The use of topographic maps alone for survey data in floodplain modeling is inadvisable and would typically result in unacceptable levels of accuracy in the profile computations.
Section 5.4
Discharge Data
135
Friction Slope Averaging Within HEC-RAS, the friction loss between adjacent cross sections is computed as the product of the representative rate of friction loss (friction slope) and the weighted reach length. Four choices of expressions are available in HEC-RAS for calculating the friction slope: the average conveyance equation, average friction slope equation, geometric mean friction slope equation, and harmonic mean friction slope equation. The average conveyance equation is the program default for steady flow analysis, since it has been shown to permit the longest spacing between cross sections without regard to the water surface profile type. The other three equations have each been shown to maximize crosssection spacing for particular profile types. The modeler may also choose to have the program select the most appropriate equation, based on the profile type between a pair of adjacent cross sections. However, these comments apply only to prismatic channels. In irregular natural channels, which are the norm, the standard backwater profiles (such as Ml and S2) have little relevance to slope averaging. With such channels it becomes much more important to consider the reasons for changes in the friction slope and to locate the cross sections so that an average friction slope can be obtained. For example, no averaging method will be even approximately correct if the total energy line has a point of inflection between cross sections, as shown in the figure.
between corresponds to a small area-large velocity region. Cross sections should ideally be located at the points marked 1 and 2, as well as at the point marked X. A good approximation of the average friction slope in the reach bounded by 1 and X would then be obtained from the average of the friction slopes at locations 1 and X. Similarly, the average friction slope between X and 2 would be closely approximated by the average of the friction slopes at locations X and 2. In summary, cross sections should be located at points where it is judged that the channel and floodplain flow will change from being relatively unconfined (horizontally or vertically) to relatively confined (Section 1) and vice versa (Section 2). A cross section should also be located between these points (that is, location X in the figure). The choice of slope averaging method is not important to the outcome of a practical irregular channel study. It is important only that the same method be used for all flows studied, both calibration flows and production flows. The locations of the cross-sections are important, since poor locations may lead to a totally unrealistic determination of the average friction slope within a reach.
Changes in the friction slope are principally caused by reduction or enlargement of the channel cross-sectional area. In the figure, cross sections 1 and 2 correspond to large area-slow velocity regions, while the steeper friction slope
5.4
Discharge Data Required discharge data can vary widely, from a single value for a design peak discharge to full discharge hydrographs for numerous locations and frequencies throughout the study reach. The development of discharge data could be the topic of an entire book in itself and cannot be covered in detail here. The engineer should study the references cited and hydrologic modeling books to develop a complete understanding of discharge computation.
136
Data Needs, Availability, and Development
Chapter 5
Previous Study Information Engineers have frequently studied large rivers and urban streams in the United States, usually making discharge and other information available. Federal, state/provincial, and local agencies can be queried for appropriate reports and studies. The contractor who performed the original study may have all the technical data and will often provide copies of computer models for free or at a nominal charge. Copies of the computer model runs are preferred over a technical report alone because the model contains all the data used in the study. For example, the report may only list peak discharges, when full hydrographs were actually used. When dealing with recently developed models, the engineer may only have to review and adjust the model to his or her satisfaction to use it directly in the study. Even older programs, such as HEC-2, can be converted to the current standard, HECRAS, making both geometric and discharge data available for the new study. After the conversion, however, the engineer must review and modify some of the transferred data, as procedures used to model bridges, culverts, and other features have greatly changed between the two programs. Chapters 15 discusses the differences in the two programs in more detail. After these modifications, the engineer needs to execute the new program and thoroughly review both the input and output. A level of detail considered satisfactory in an earlier study may not be satisfactory for the current effort. Sometimes the modification of an earlier effort to achieve a solid, defensible model for use today is as much work as starting from scratch.
Gage Data Stage and/or discharge data that were obtained at a gage site are very valuable for a floodplain modeling study. Figure 5.12 shows a typical gage, where the river stage is continuously measured. The USGS takes discharge data every two to four weeks and during floods. Eventually, sufficient discharge values are obtained to define the rating relationship of river stage versus discharge at the gage site. If the floodplain modeler is also performing a watershed simulation, he or she would use the full hydrograph for comparison with the output of the watershed computer simulation. If only a hydraulic program is used, the peak discharge may be sufficient for development of the flood peak elevation and comparison to the recorded elevation. These scenarios assume that the modeled reach represents gradually varied steady flow, when the maximum elevation occurs at or near the time of the peak discharge. An unsteady flow model is necessary for rivers with very mild slopes or where there are significant backwater or tidal effects, and requires full discharge and stage hydrographs. Accuracy of Recorded Gage Data. Engineers often talk in terms of a “discharge measurement.” However, a stream gage does not measure discharge; it records a river elevation or stage at preselected times. Discharge is then calculated based on these measured elevations, the channel cross section, and a series of discrete velocity samples at locations across the section. Engineers calculate discharge by adding the subsection discharges found by multiplying subsection areas by the average subsection velocities. Most users assume published discharge data records are precise and accurate; however, the published values for peak or average daily discharge are only as accurate as the techniques used to obtain area and velocity measurements. The stream itself also has an effect on the accuracy of the measurements. During the measurement, a rapid rise or fall of the stream, a changing cross-section shape due to scour or
Section 5.4
Discharge Data
137
Figure 5.12 Typical water stage recording station.
deposition, different channel bed forms, and other factors can affect the estimated discharge at the gage site. The smaller the stream, generally the less accurate the discharge data. In the United States, the USGS collects most of the discharge data. The USGS rates each gage from excellent to poor in terms of the accuracy of the published discharge data. Each rating is described as follows: • Excellent – 95% of the daily discharge data are within 5% of the “true” value. • Good – 95% of the daily discharge data are within 10% of the “true” value. • Fair – 95% of the daily discharge data are within 15% of the “true” value. • Poor – Worse than fair. The USGS rates individual peak discharge measurements for accuracy as follows: • Excellent – Within 2% of the “true” value. • Good – Within 5% of the “true” value. • Fair – Within 8% of the “true” value. • Poor – Within 10% of the “true” value. Flood discharge estimates may be somewhat less accurate. Only measurements made at a constant cross section, such as at weirs or spillways, carry a 2-percent accuracy rating. Measurements for large rivers, such as the Mississippi and Missouri Rivers in the United States, generally are rated as good. However, for these large rivers, a variation of 5 percent in peak discharge can easily result in a foot (0.3 m) or more difference in stage. Most small rivers have individual discharge measurement records that are rated fair to good. Small rural or urban streams prone to flash flooding are often rated fair to poor.
138
Data Needs, Availability, and Development
Chapter 5
Accuracy of Survey Data Cross sections are obtained by field surveys with different instruments having varying levels of accuracy. For floodplain modeling studies, the author's experience is that vertical accuracy is much more critical than horizontal accuracy. Changes in flood elevations are typically small, even if horizontal distances increase or decrease by 5–10 percent. However, general increases or decreases in the average ground elevation of 1 ft (0.3 m) may produce a corresponding change in the water surface elevation. Field surveys typically use an Electronic Distance Meter (EDM). The standards of the American Congress on Surveying and Mapping (ACSM) indicate that an accuracy of ±0.05 ft (±0.015 m) may be maintained over a distance of 500 ft (152 m) with this method. A two-man crew is normally sufficient to obtain surveys with an EDM. A significant advantage of this technique is that the
electronic recording of survey data can be imported directly by HEC-RAS. Surveys may use a conventional level, although a three- or four-man survey crew may be needed. The ACSM indicates that accuracy for this method is ±0.03–0.05 ft (±0.01–0.015 m) over 800 ft (244 m), with the higher accuracy for an automatic level. Cross sections for floodplain hydraulic studies are often obtained by stadia equipment. The ACSM indicates that an accuracy level of ±0.4 ft (±0.01 m) over 500 ft (152 m) is achievable. Stadia surveys may be completed by a two-man crew. A hand level provides the least accurate results. ACSM standards for accuracy for this technique are ±0.2 ft (±0.06 m) over 50 ft (15 m). A hand level would normally be used during a preliminary reconnaissance of the stream to estimate road embankment heights or highwater marks.
Accuracy of Historic Gage Data. Although published discharge data for historic floods (usually before the beginning of actual record keeping) may be valuable, engineers must recognize that the data are a best estimate and not 100-percent accurate. This is particularly true for historic flood data, which often represent the results of rough estimates of discharges made at the time of the flood or analytical computations based on the characteristics of later floods. Historic data from periods before World War I in the United States may represent engineering estimates made without any area or velocity measurements during the flood event. Various velocity meters and gaging techniques that often gave widely varying estimates of the speed of the current were in use during this period. Engineers should treat U.S. data prior to about 1930 with caution, because gaging techniques and engineering estimates may not reflect a degree of accuracy comparable to modern-day methods (Dyhouse, 1985).
Statistical Analysis When an agency collects data at a gage site for at least 10 years, there is usually sufficient information to perform a statistical analysis of the discharge data. The results allow estimates of the peak discharges for frequencies ranging from a 2-year to 500year average return interval flood. However, statistical discharge-frequency estimates are generally considered reasonably accurate only for frequencies that are similar to the length of the actual record. An often-used “rule of thumb” states that frequency estimates should extend to no more than twice the period of record. Thus, it would require 50 years of continuous streamflow data to develop a reasonably defensible estimate of the 100-year average return interval event.
Section 5.4
Discharge Data
139
In addition to the record length, the data must be homogenous. For example, if the upstream land use has changed (becoming urbanized, for example) or if there is a significant flood reduction project, such as a major reservoir, the predevelopment data (or the postdevelopment data) must be adjusted in an appropriate manner before any frequency analysis. USACE, 1994d provides information for making these adjustments. Where a stream gage has been present for a long time, statistical analyses most likely have already been performed. In the United States, the USGS, the USACE, the Bureau of Reclamation, and many other federal, state, and local agencies have developed peak discharge-frequency estimates for gages in their area of interest. Where no statistical analysis exists, the engineer can perform the computations following the procedures outlined in Bulletin 17B (WRC, 1982). This document has been in use in the United States since the late 1970s, and methods detailed in Bulletin 17B have been adopted by all federal agencies as the standard for computing peak discharge-frequency relationships. The publication recommends using the log Pearson Type III distribution to estimate frequencies after computing the mean, standard deviation, and skew from station and regional data. Standard software is readily available to perform a statistical analysis, with the HEC-FFA program (USACE, 1995a) being a popular tool for such an analysis. Of those methods typically used to obtain peak flood discharge estimates, engineers consider the results of a statistical analysis to be the most accurate. If the study requires complete flow hydrographs, engineers can fold the results of the statistical analysis into the results of a watershed model during the calibration process to obtain full hydrographs.
Regional Analysis If the study requires only peak discharges and floodplain or reservoir storage is not a factor, then regional analysis is often employed. This technique uses the results of the statistical analysis of a great number of gages throughout the area and then develops prediction equations linking these peak discharge values with measurable basin parameters. For example, a typical equation predicts the peak discharge of the 10-year or 100-year return period flood at a specified location. These values are computed using physical information of the watershed, such as the size of the drainage area, average annual rainfall, the slope of the upstream basin, and so on, including one or more coefficients developed from the regression equations. In the United States, the USGS has developed flood-peak prediction equations for recurrence intervals from 2to 100-year return periods for each of the 50 states. This technique has also been used by the USGS to develop similar equations for urban areas around the country as well as for specific cities. Reports are available from each state USGS office. In addition, USACE offices and other agencies, both federal and local, may have similar equations or techniques applicable to the local study area. Regression equations are often considered the next most accurate estimate of peak-discharge frequency, because the equations are derived from statistical analyses of actual gage data (described in the preceding section). Table 5.6 displays the prediction equations developed for different areas of the State of California (USACE, 1994d). The modeler should be advised that regression equations normally contain a significant amount of error.
140
Data Needs, Availability, and Development
Chapter 5
Variation of Stage with Discharge Using gage records of large flood events requires care in drawing conclusions about what is causing an increase or decrease in river stage for a given discharge. Gage records of stage and discharge are invaluable, but the published discharge for the recorded stage may still contain significant uncertainty and be inaccurate. Although river hydraulic studies often compute a unique relationship between discharge and river stage, the actual relationship usually varies. The variation may be caused by water temperature, the types of channel bed forms present, channel vegetation, and other factors. The larger the river and the flatter the slope, the more likely the discharge will vary for a given stage. An excellent example of this phenomenon occurred at the St. Louis gage for the Mississippi River from December 1982 through May 1983. Three moderate flood events were recorded over a five-month period, all having similar discharges but very different stages. The values for the three flood events are listed in the table below. The peak discharge for the May event was less than the other two floods but recorded the highest stage. Indeed, the April and May peak discharges were nearly identical, but their stages were 2.7 ft (0.8 m) apart. At St. Louis, it has been noted that cold-water discharges pass at lower stages than do warm-water discharges, mirroring findings of similar studies showing increasing Manning’s n with increasing water
temperature (Vanoni, 1975). This fact, along with the presence of spring vegetation in May, may explain why there is such variation between nearly identical flood events. This difference also points out the fallacy of taking stage data from several decades earlier for a specific discharge, comparing it to that same discharge occurring today, and drawing conclusions as to what is causing the difference. This method is often used as a basis to “prove” that levees, or some other man-made changes, are responsible for increased flood stages. There were no man-made changes to the St. Louis reach between the April and May 1983 flood events, yet nearly a 3 ft difference is recorded for the same discharge, due strictly to natural phenomena. Nonengineers have compared stages at St. Louis for similar discharges occurring 50 to 100 years apart and have tried to attribute all the differences to levee construction or channel modifications. Although these flood-reduction measures do cause changes in the stage-discharge relationship, natural changes in a dynamic river may have a greater effect than man-made changes. The rating curve for the St. Louis gage in effect during this period is shown in the figure. The plotted points represent computed discharges for measured flood stages for the period 1947– 1985. The variation in discharge for a given stage is readily apparent.
Data of Flood Peak
Discharge, ft3/s (m3/s)
Stage, ft (m)
December 7, 1982
739,000 (20,975)
38.0 (11.6)
April 8, 1983
714,000 (20,200)
36.6 (11.2)
May 4, 1983
707,000 (20,020)
39.3 (12.0)
Section 5.4
Discharge Data
141
Table 5.6 Regional flood-frequency equations for the State of California. North Coast Region 0.90 0.89
Northeast Region
–0.47
Q2 = 22A0.40
Q5 = 5.04A0.89 p0.91 H–0.35
Q5 = 46A0.45
Q10 = 6.21A0.88 p0.93 H–0.27
Q10 = 61A0.49
Q25 = 7.64A0.87 p0.94 H–0.17
Q25 = 84A0.54
Q2 = 3.52A
Q50 = 8.57A
p
H
0.87 0.96 –0.08
p
Q50 = 103A0.57
H
Q100 = 9.23A0.87 p0.97
Q100 = 125A0.59
Sierra Region 0.88 1.58
Q2 = 0.24A
p
H
Central Coast Region –0.80
Q2 = 0.0061A0.92 p2.54 H–1.10
Q5 = 1.20 A0.82 p1.37 H–0.64
Q5 = 0.118A0.91 p1.95 H–0.79
Q10 = 2.63A0.80 p1.25 H–0.58
Q10 = 0.583A0.90 p1.61 H–0.64
Q25 = 6.55A0.79 p1.12 H–0.52
Q25 = 2.91A0.89 p1.26 H–0.50
Q50 = 10.4A0.78 p1.06 H–0.48
Q50 = 8.20A0.89 p1.03 H–0.41
Q100 = 15.7A0.77 p1.02 H–0.43
Q100 = 19.7A0.88 p0.84 H–0.33
South Coast Region
South – Colorado Desert
Q2 = 0.41A0.72 p1.62
Q2 = 7.3A0.30
Q5 = 0.40A0.77 p1.69
Q5 = 53A0.44
0.63A0.79 p1.75
Q10 = 150A0.53
Q25 = 1.10A0.81 p1.81
Q25 = 410A0.63
Q50 = 1.50A0.82 p1.85
Q50 = 700A0.68
Q100 = 1.95A0.83 p1.87
Q100 = 1080A0.71
Q10 =
Q is the peak discharge, ft3/s A is the drainage area, mi2 P is the mean annual precipitation, in. H is the altitude index, ft/1000
Example 5.5 Computing a peak discharge from a regression equation. Using the equations in Table 5.6, compute the peak discharge for the 10-year and 100year floods for a 12 mi2 watershed located in the Sierra Mountains east of Sacramento, California. The average main-channel elevation of the basin is 6200 ft NGVD and the mean annual precipitation is 52 in. The basin location falls in the Sierra Region and the equations for the peak discharge for the 10- and 100-year floods are used. H represents an elevation index found by taking the average of the main channel invert elevations (in thousands of feet) at the 10and 85-percent lengths from the point where the flood discharge is needed. For the study watershed, H = 6.2 (6200 ft ave elevation). The two discharges are Q 10 = 2.63 A
0.8 1.25
p
H
– 0.58
= 2.63 ( 12 )
0.8
( 52 )
1.25
( 6.2 )
– 0.58
= 931 ft3/s
and Q 100 = 15.7 A
0.77 1.02
p
H
– 0.43
= 15.7 ( 12 )
0.77
( 52 )
· 1.02
( 6.2 )
– 0.43
= 2732 ft3/s.
142
Data Needs, Availability, and Development
Chapter 5
These discharges could be used directly in HEC-RAS to compute the water surface profiles of the 10- and 100-year floods, provided that the underlying assumptions of simply computing a peak discharge are valid (no effect from floodplain or upstream reservoir storage, no great change in discharge in a short time frame, no flow reversals, and so on).
Watershed Modeling Engineers frequently perform watershed modeling to develop discharge values throughout a river basin for floodplain modeling. If the hydraulic study is to incorporate the effects of changes due to urbanization, to evaluate potential flood mitigation projects, or to perform quasi-unsteady or full unsteady flow analyses, full discharge hydrographs are needed. Only watershed modeling yields full discharge hydrographs and translates these hydrographs through the watershed, allowing the effects of timing, tributary inflows, reservoirs, channel modifications, and other flood mitigation components to be properly evaluated. Hydrologic modeling consists of developing an actual or hypothetical (synthetic) design storm and then calculating the runoff hydrograph and peak discharge for the selected event. A great variety of hydrologic models is available, including the NRCS’s TR-20 and the USACE’s HEC-1 program. The USACE’s HEC-1 model was possibly the most widely used watershed model in the world over the past 25 years. It has been replaced by the Windows-based HEC-HMS model, which performs similar functions as HEC-1. Watershed modeling simulates the entire rainfall-runoff process and shows how changes in infiltration parameters, land use, channel geometry, storage, and other variables affect the flow hydrograph. A major weakness of the technique is in the application of design storms, such as the 100-year storm, to calculate the runoff and then accept the resulting runoff hydrograph as representing the 100year average recurrence-interval flood. The runoff is highly dependent on a wide variety of variables, including the incremental arrangement of the rainfall, the antecedent moisture condition of the soil, and the time of year (reflecting the vegetation present). Thus, an X-year storm does not necessarily result in an X-year flood. This weakness is a main reason why hydrologic modeling is considered less accurate than either statistical analysis or use of a regional equation. In many instances, however, the lack of actual stream gage data and the need to determine complete discharge hydrographs requires the use of a hydrologic simulation package such as HEC-HMS. Even though engineers judge watershed modeling to be less accurate than gage data or regional analysis for determining discharge frequency, it can incorporate these techniques in the procedures. Watershed modeling allows the engineer to adjust certain parameters to reproduce the peak-discharge frequency from the statistical method with the output of the hydrologic model. Figure 5.13 illustrates an adopted discharge-frequency curve developed with a computer watershed simulation, compared to the results of both statistical and prediction-equation methods at the same location. Many books deal with the subject of hydrologic modeling, as do publications available from federal agencies such as USACE.
Section 5.4
Discharge Data
143
Uncertainty of Historical Flood Data Although recorded stage and discharge data are desired, even historical stage data obtained before the start of actual gaging records can be of value. However, before using these data, the engineer should attempt an evaluation of the accuracy of the historical data. Before the Great Flood of 1993 in the Midwestern United States, the two largest floods at St. Louis were believed to be the 1844 and 1903 events. Published records by the USGS included a discharge estimate for the 1844 flood under the “Extremes Outside Period of Record” section of the gage records. The 1903 flood is included in the actual records, but there were no discharge measurements during the 1903 flood. The published values for the 1993 and the historic flood events are listed in the table below. Although these discharges have been in the records for years, only the 1993 flood was actually computed from velocity and depth measurements of the actual flood. The stages of the earlier floods are presumed to be accurate; however, the discharges were never measured, but were estimated after the flood. In fact, the 1844 peak discharge was not estimated until over 60 years later, based on the 1903 event. The 1903 flood discharge was only computed at the Chester, Illinois gage about 70 miles (113 km) downstream of the St. Louis gage. The river between the two sites was very different in 1903, compared to 1844, with the clearing of a large portion of the floodplain for agriculture and a shortening of the river by several miles from a natural river cutoff in 1881. In addition, the velocity meters used in 1903 overestimated the velocities for higher discharges
Date of Flood Peak
compared to today’s standard, the Price current meter. It has been long suspected that the estimated discharges for both the 1844 and 1903 flood events are overly conservative. Consequently, as part of some physical model tests using the Mississippi Basin Model in the late 1980s, channel and overbank conditions representing those of 1844 and 1903 were incorporated into the model. For both historic flood events, the MBM was used to determine the steady flow discharge that approximated about a dozen high water marks recorded for each flood through the St. Louis reach. The results of the MBM study found that peak discharges of 892,000 ft3/s (25,280 m3/s) and 782,000 ft3/s (22,160 m3/s) closely matched the high water marks for the 1844 and 1903 floods, respectively. It was conservatively estimated that the maximum discharge for the historic 1844 flood of record was no more than 1,000,000 ft3/s (28,350 m3/s). Following the review of the Corps’ work, the USGS modified their records to reflect the revised discharge for the 1844 event for the water-records publication in 1999. The 1993 flood discharge is almost certainly the greatest flow at St. Louis over at least the last 200 years (Dieckmann and Dyhouse, 1998). This example demonstrates the need for caution when evaluating historic data, especially flood discharge data from the nineteenth or early twentieth centuries, when the gaging techniques and methods were less accurate than those used today. Published values of historic flood discharge are simply best estimates by an individual or agency and may be very different from the discharges that actually occurred. Discharge, ft3/s (m3/s)
Stage, ft (m) 42.0 (12.1)
1785
unknown
June 27, 1844
1,300,000 (36,800)
41.3 (12.6)
June 1903
1,019,000 (28,880)
38.0 (11.6)
August 1, 1993
1,070,000 (30,320)
49.58 (15.1)
144
Data Needs, Availability, and Development
Chapter 5
Figure 5.13 Example of discharge-frequency curves computed with three different techniques.
5.5
Roughness Data Roughness data required for a model include estimates of the surface roughness coefficients, or surface friction values, for the channel and the right and left floodplain areas for every cross section in the model. Historically, engineers have used Manning’s n values for nearly all floodplain modeling studies.
Estimation of Manning’s n The roughness values assigned to the channel and floodplain of a stream are generally considered to have the most uncertainty of any hydraulic or hydrologic variable in the model. The selection of an n value is as much an art as a science and there is no hard and fast rule that allows the engineer to precisely determine the n value for a specific situation with a high level of confidence. The factors that affect channel roughness include the following: • Bed material and average grain size • Surface irregularities of the channel • Channel bed forms (such as ripples, dunes, transition, and plane bed) • Erosion and depositional characteristics • Meandering tendencies • Channel obstructions (downed trees, exposed root wads, beaver dams, debris, and so on) • Geometry changes between channel sections • Vegetation along the bankline and in the channel
Section 5.5
Roughness Data
145
To collapse all these parameters into a single value is difficult, to say the least. For estimates of the floodplain n, the engineer typically bases the adopted values on vegetation, land use, or both. For channel and especially for floodplain estimates, the time of year is also important. Manning’s n varies considerably from summer to winter, when foliage is typically less. The n value should be estimated for the time of year when floods occur. Sensitivity tests should also be performed to evaluate the effect of varying the value of n on the final results. The engineerʹs best estimate could easily be 20 percent off from the “true” value of n. Therefore, a conservative analysis of floods could use the upper limit of a range of likely n values. Similarly, a lower range of possible n values could be used where velocity estimates are needed, as in the design of erosion prevention measures such as riprap (rock revetment). A variety of techniques can be applied to the stream reach to assist the engineer in making a determination. As discussed in the sections that follow, engineers can apply experience, tables, picture comparisons, and the Cowan formula or similar techniques to estimate n values for different channel segments of the study stream. A straight or weighted average of some or all of these techniques can be applied to initially select the channel n. Reasonable adjustments may then be made during the calibration process. For example, floodplain n values can be estimated from tables and modified from aerial photographs showing the locations of vegetation changes. Judgment/Experience. Engineers who regularly work on open channel hydraulic studies can develop an intuitive feel for appropriate n values. However, one should never rely on experience or judgment alone, but evaluate n with many different techniques before adopting a value. Figure 5.14 (USACE, 1996) displays the results of querying several classes held by the USACE’s Waterways Experiment Station and attended by hydraulic personnel of varying experience. The participants were asked to view a series of slides showing different rivers and streams and to estimate the channel n value by judgment alone. The figure illustrates the variation of the estimates. Selecting a value of Manning’s n of 0.06 from the figure, which might represent the average estimate for one site, yields a standard deviation of approximately 0.022. This deviation means that one-third of the estimators felt the actual value was either less than 0.04 or more than 0.08. This example shows that even experienced hydraulic personnel can look at the same river channel and estimate significantly different values of n. The author has conducted numerous open channel hydraulics classes and workshops, with the participants ranging from experienced hydraulic engineers to undergraduate civil engineering students. Even employing the procedures described in the following paragraphs, the average estimate of Manning’s n tended to be conservative; that is, higher than the known value. The authorʹs experience has been that estimates of Manning’s n varies widely among engineers and generally tends to be overestimated for channel situations. Using some of the techniques discussed in the following sections can lead to a more defensible estimate. Table Lookup. Through site visits, the study reach (channel and floodplain) can be described and then compared to standard descriptions of channel and floodplain conditions defined in different hydraulics texts. The most used values for Manning’s n are
146
Data Needs, Availability, and Development
Chapter 5
USACE
Figure 5.14 Uncertainty of Manning’s n value estimates based on estimated mean values.
shown in Table 5.7 (Chow, 1959). This table displays maximum, minimum, and normal values of n for a variety of man-made and natural channels, for floodplains, and for rivers of varying width. The channel n values are primarily for streams with less than 100-ft (30-m) top width at flood stage. For streams wider than this, the effects of vegetation, geometry changes, and so on are somewhat less, and Manning’s n usually falls in a narrower range. Sediment grain size and channel bed forms may be more important in the estimate of Manning’s n for larger streams. Table 5.7 Values of Manning’s n for a variety of man-made and natural channels . Type of Channel and Description A. Closed conduits flowing partly full A-1. Metal a. Brass, smooth b. Steel 1. Lockbar and welded 2. Riveted and spiral c. Cast iron 1. Coated 2. Uncoated d. Wrought iron 1. Black 2. Galvanized e. Corrugated metal 1. Subdrain 2. Storm drain A-2. Nonmetal a. Lucite b. Glass
Minimum
Normal
Maximum
0.009
0.010
0.013
0.010 0.013
0.012 0.016
0.014 0.017
0.010 0.011
0.013 0.014
0.014 0.016
0.012 0.013
0.014 0.016
0.015 0.017
0.017 0.021
0.019 0.025
0.021 0.030
0.008 0.009
0.009 0.010
0.010 0.013
Section 5.5
Roughness Data
147
Table 5.7 Values of Manning’s n for a variety of man-made and natural channels (cont.). Type of Channel and Description c. Cement 1. Neat, surface 2. Mortar d. Concrete 1. Culvert, straight and free of debris 2. Culvert, with bends, connections, and some debris 3. Finished 4. Sewer with manholes, inlet, etc., straight 5. Unfinished, steel form 6. Unfinished, smooth wood form 7. Unfinished, rough wood form e. Wood 1. Stave 2. Laminated, treated f. Clay 1. Common drainage tile 2. Vitrified sewer 3. Vitrified sewer with manholes, inlet, etc. 4. Vitrified subdrain with open joint g. Brickwork 1. Glazed 2. Lined with cement mortar h. Sanitary sewers coated with sewage slimes, with bends and connections i. Paved invert, sewer, smooth bottom j. Rubble masonry, cemented B. Lined or built-up channels B-1. Metal a. Smooth steel surface 1. Unpainted 2. Painted b. Corrugated B-2. Nonmetal a. Cement 1. Neat, surface 2. Mortar b. Wood 1. Planed, untreated 2. Planed, creosoted 3. Unplaned 4. Plank with battens 5. Lined with roofing paper c. Concrete 1. Trowel finish 2. Float finish 3. Finished, with gravel on bottom 4. Unfinished 5. Gunite, good section 6. Gunite, wavy section 7. On good excavated rock 8. In irregular excavated rock d. Concrete bottom float finished with sides of 1. Dressed stone in mortar
Minimum
Normal
Maximum
0.010 0.011
0.011 0.013
0.013 0.015
0.010 0.011 0.011 0.013 0.012 0.012 0.015
0.011 0.013 0.012 0.015 0.013 0.014 0.017
0.013 0.014 0.014 0.017 0.014 0.016 0.020
0.010 0.015
0.012 0.017
0.014 0.020
0.011 0.011 0.013 0.014
0.013 0.014 0.015 0.016
0.017 0.017 0.017 0.018
0.011 0.012
0.013 0.015
0.015 0.017
0.012
0.013
0.016
0.016 0.018
0.019 0.025
0.020 0.030
0.011 0.012 0.021
0.012 0.013 0.025
0.014 0.017 0.030
0.010 0.011
0.011 0.013
0.013 0.015
0.010 0.011 0.011 0.012 0.010
0.012 0.012 0.013 0.015 0.014
0.014 0.015 0.015 0.018 0.017
0.011 0.013 0.015 0.014 0.016 0.018 0.017 0.022
0.013 0.015 0.017 0.017 0.019 0.022 0.020 0.027
0.015 0.016 0.020 0.020 0.023 0.025
0.015
0.017
0.020
148
Data Needs, Availability, and Development
Chapter 5
Table 5.7 Values of Manning’s n for a variety of man-made and natural channels (cont.). Type of Channel and Description 2. Random stone in mortar 3. Cement rubble masonry, plastered 4. Cement rubble masonry 5. Dry rubble or riprap e. Gravel bottom with sides of 1. Formed concrete 2. Random stone in mortar 3. Dry rubble or riprap f. Brick 1. Glazed 2. In cement mortar g. Masonry 1. Cemented rubble 2. Dry rubble h. Dressed ashlar i. Asphalt 1. Smooth 2. Rough j. Vegetal lining C. Excavated or dredged a. Earth, straight and uniform 1. Clean, recently completed 2. Clean, after weathering 3. Gravel, uniform section, clean 4. With short grass, few weeds b. Earth, winding and sluggish 1. No vegetation 2. Grass, some weeds 3. Dense weeds or aquatic plants in deep channels 4. Earth bottom and rubble sides 5. Stony bottom and weedy banks 6. Cobble bottom and clean sides c. Dragline excavated or dredged 1. No vegetation 2. Light brush on banks d. Rock cuts 1. Smooth and uniform 2. Jagged and irregular e. Channels not maintained, weeds and brush uncut 1. Dense weeds, high as flow depth 2. Clean bottom, brush on sides 3. Same, highest stage of flow 4. Dense brush, high stage D. Natural streams D-1. Minor streams (top width at flood stage < 100 ft) a. Streams on plain 1. Clean, straight, full stage, no rifts or deep pools 2. Same as above, but more stones and weeds 3. Clean, winding, some pools and shoals 4. Same as above, but some weeds and stones 5. Same as above, lower stages, more ineffective slopes and sections 6. Same as 4. but more stones
Minimum
Normal
Maximum
0.017 0.016 0.020 0.020
0.020 0.020 0.025 0.030
0.024 0.024 0.030 0.035
0.017 0.020 0.023
0.020 0.023 0.033
0.025 0.026 0.036
0.011 0.012
0.013 0.015
0.015 0.018
0.017 0.023 0.013
0.025 0.032 0.015
0.030 0.035 0.017
0.013 0.016 0.030
0.013 0.016 …
0.500
0.016 0.018 0.022 0.022
0.018 0.022 0.025 0.027
0.020 0.025 0.030 0.033
0.023 0.025 0.030 0.028 0.025 0.030
0.025 0.030 0.035 0.030 0.035 0.040
0.030 0.033 0.040 0.035 0.040 0.050
0.025 0.035
0.028 0.050
0.033 0.060
0.025 0035
0.035 0.040
0.040 0.050
0.050 0.040 0.045 0.080
0.080 0.050 0.070 0.100
0.120 0.080 0.110 0.140
0.025 0.030 0.033 0.035
0.030 0.035 0.040 0.045
0.033 0.040 0.045 0.050
0.040
0.048
0.055
0.045
0.050
0.060
Section 5.5
Roughness Data
149
Table 5.7 Values of Manning’s n for a variety of man-made and natural channels (cont.). Type of Channel and Description 7. Sluggish reaches, weedy, deep pools 8. Very weedy reaches, deep pools, or floodways with heavy stand of timber and underbrush b. Mountain streams, no vegetation in channel, banks usually steep, trees and brush along banks submerged at high stages 1. Bottom: gravels, cobbles, and few boulders 2. Bottom: cobbles with large boulders D-2. Flood plains a. Pasture, no brush 1. Short grass 2. High grass b. Cultivated areas 1. No crop 2. Mature row crops 3. Mature field crops c. Brush 1. Scattered brush, heavy weeds 2. Light brush and trees, in winter 3. Light brush and trees, in summer 4. Medium to dense brush, in winter 5. Medium to dense brush, in summer d. Trees 1. Dense willows, summer, straight 2. Cleared land with tree stumps, no sprouts 3. Same as above, but with heavy growth of sprouts 4. Heavy stand of timber, a few down trees, little undergrowth, flood stage below branches 5. Same as above, but with flood stage reaching branches D-3. Major streams (top width at flood stage > 100 ft). The n value is less than that for minor streams of similar description, because banks offer less effective resistance a. Regular section with no boulders or brush b. Irregular and rough section
Minimum
Normal
Maximum
0.050
0.070
0.080
0.075
0.100
0.150
0.030 0.040
0.040 0.050
0.050 0.070
0.025 0.030
0.030 0.035
0.035 0.050
0.020 0.025 0.030
0.030 0.035 0.040
0.040 0.045 0.050
0.035 0.035 0.040 0.045 0.070
0.050 0.050 0.060 0.070 0.100
0.070 0.060 0.080 0.110 0.160
0.110 0.030 0.050
0.150 0.040 0.060
0.200 0.050 0.080
0.080
0.100
0.120
0.100
0.120
0.160
0.025 0.035
… …
0.060 0.100
Picture Comparison. In the author’s experience, comparing photographs of the study stream to similar streams whose channel n value has been determined may be the most accurate method for estimating n, unless gage information for the site is available. The USGS publishes reference material that allows comparison of a wide range of channel conditions to the study stream. The USGS photos are all for sites where discharge measurements have been taken. For recorded site information, all geometry and discharge variables are (theoretically) known, and the only unknown variable—Manning’s n—is calculated. The USGS (Barnes, 1987) publishes a very useful book referencing stream sites around the United States where channel n has been computed from measured geometry and discharge data. Figures 5.15 and 5.16 show two of the sites from that publication. For the stream in Figure 5.16, the n value varied with depth in two floods as follows. A flow of approximately 65 ft3/s (1.84 m3/s) with a depth of about 1 ft (0.3 m) resulted in n = 0.073, while a discharge of 1200 ft3/s (34 m3/s) with a depth of 3–4 ft (0.9–1.2 m),
150
Data Needs, Availability, and Development
Chapter 5
(the approximate channel capacity), had a measured n = 0.045. Changes in channel depth change the channel n value. For flood discharges, however, the channel n is often considered fairly constant and represented by the channel n at channel capacity conditions. In addition to photographs, other data such as cross-section and reach geometry, discharges, flow depths, and descriptions of reaches provide useful information with which to compare the site under study. Other publications (Fasken, 1963; Hicks and Mason, 1991) give similar visual displays, descriptions, and estimates of n. Cowan’s Equation. This formula (Cowan, 1956) is very useful for deriving an analytic estimate of channel n. The formula attempts to assess the various components that comprise the overall estimate of channel n. Cowan developed his procedure from studying 40 to 50 small- to moderate-size channels, so the procedure is questionable for streams with a hydraulic radius exceeding about 15 ft (4.6 m). The formula is n = ( n 0 + n 1 + n 2 + n 3 + n 4 )m 5
(5.4)
where n0 = the portion of the n value that represents the channel material in a straight, uniform smooth reach n1 = the additional value added to correct for the effect of channel surface irregularities n2 = the additional value for variations in shape and size of the channel cross section through the reach n3 = the additional value for obstructions (such as beaver dams, debris dams, stumps, downed trees, and root wads extending into the channel) n4 = the additional value for vegetation in the channel m5 = the correction factor for the meandering of the channel Figure 5.17 illustrates variations for n1 and n2 and Table 5.8 gives the range of values for use with Cowan’s formula. In selecting the values for the various parameters, the engineer must take care not to double count conditions already considered in selecting earlier estimates. For instance, it is not uncommon to tend to include vegetative effects in the estimation of both n3 and n4, when it should really only be considered in n4. Further information on applying Cowan’s formula may be found in Chow, 1959 and in FHWA, 1984. The latter publication also presents an additional method similar to Cowan’s.
Section 5.5
Roughness Data
.
(a) Upstream from right bank below section 3.
(b) Upstream from right bank at section 2.
(c) Plan view and cross sections.
Figure 5.15 Two views of Indian Fork Creek below Atwood Dam, near New Cumberland, Ohio.
151
152
Data Needs, Availability, and Development
Figure 5.16 Two views of Provo River near Hailstone, Utah.
Figure 5.17 Examples for variations in Cowan’s n1 and n2 variables.
Chapter 5
Section 5.5
Roughness Data
153
w
Table 5.8 Range of values of coefficients for use in Cowan’s equation. Channel Conditions
Material Involved
Degree of Irregularity
Values
Earth
0.020
Rock cut
0.025
Fine gravel
n0
0.028
Smooth
0.000
Minor Moderate
n1
Severe Variations of Channel Cross Section
Relative Effect of Obstructions
Vegetation
Gradual Alternating occasionally
0.005 0.010 0.020 0.000
n2
0.005
Alternating frequently
0.010–0.015
Negligible
0.000
Minor Appreciable
n3
0.010–0.015 0.020–0.030
Severe
0.040–0.060
Low
0.005–0.010
Medium High
n4
Very high Appreciable Severe
0.010–0.025 0.025–0.050 0.050–0.100
Minor Degree of Meandering
0.024
Coarse gravel
1.000 m5
1.150 1.300
Example 5.6 Development of Manning’s n for a channel. Use Table 5.7 and Cowan’s Equation 5.4 to estimate Manning’s n for Indian Fork Creek, shown in Figure 5.15, for bankfull flow conditions. Compare the estimates to the actual value of 0.026 determined by the USGS for this site. Table 5.7 is used to find a written description that compares well with Indian Fork Creek. From the photograph, the creek appears to be a natural stream less than 100 ft wide (between bank stations) at flood stage, flowing in a floodplain. Therefore it falls on Table 5.7 in the D-1a stream category (natural streams, minor streams, streams on plain). For this classification, there are eight subcategories. From the picture of the stream in Figure 5.15, Category 1 (clean, straight, full stage, no rifts or deep pools) seems appropriate. Thus, the range of potential n values for the channel is 0.025–0.033, with a normal value of 0.03. A slightly more conservative estimate could be Category 2, which increases the estimates of n by 0.005–0.007, with a normal value of 0.035. The use of Cowan’s Equation requires an estimate of separate n factors for different channel conditions: n0 – Channel material. Based on the written description for the Indian Fork Creek channel material (clay), the value for earth material (0.02) is appropriate. n1 – Degree of irregularity. In reviewing the available channel cross sections for the short reach of creek, each section is smooth from bank to bank, with no undulations. Thus, a rating for this category would be “smooth” (0.000).
154
Data Needs, Availability, and Development
Chapter 5
n2 – Variations of channel cross section. In reviewing the available channel cross sections, each is U-shaped, with no significant change in cross-section shape between sections. A rating of “gradual” (0.000) appears appropriate. n3 – Relative effect of obstructions. From the pictures, there appear to be limited or no obstructions. Some exposed tree roots may be seen. A rating of “negligible” (0.000) or “minor” (0.01–0.015) appears appropriate. Select a compromise value of 0.005. n4 – Vegetation. Some minor vegetation is present along the bank line. A rating of “low” (0.005–0.1) appears adequate. Use a value of 0.005. m5 – Degree of meandering. Since there is no meandering for this short reach, a rating of “minor” (1.000) is appropriate. Inserting the estimates into Equation 5.4 yields n = (0.02 + 0.00 + 0.00 + 0.005 + 0.005) 1.00 = 0.03 Because this reach of stream is very short compared to a normal reach of stream that would be studied, it is not unusual to have zero values for different categories within Cowan’s Equation. For studies involving several thousand feet of channel, most of the different categories could have positive values, or variations in values. The study stream could be subdivided into reaches and different values of channel n computed or estimated for separate reaches. For this example, both estimates gave the same result—a situation that is not typical. Both estimates exceeded the measured value of n obtained by the USGS by 0.004, or 15%, a situation that is rather typical, based on the authorʹs experience. If only the modelerʹs experience is used to estimate channel n, the estimate likely would have been higher yet, as compared to the 0.03 values obtained from the two techniques used in this example. Reasonable modifications in the selected values making up the estimate with Cowanʹs equation could be made to evaluate the variation in possible channel n, such as is given in Table 5.7 (0.025–0.033). As seen, the USGS measurement is near the lower range of possible n values. This variation further indicates the need for sensitivity tests to evaluate the effect of the Manning’s n estimate.
Calibration to Gage Data. Where discharge data have been recorded at a stream gage site, the calibration of n to reproduce known stages from published discharges represents the most accurate method of determining n for a study stream. This technique is especially desirable when one or more significant floods have been recorded, thereby allowing a more defensible estimate of the floodplain n. Even a year or so of gage records, with only in-channel flows recorded, are useful. A bankfull discharge, which is often taken as a 1- to 2-year average recurrence interval flood event, could be used to calibrate a value of n for the channel. If the value of n for the channel can be adequately estimated from these data, only the floodplain roughness needs be determined, by comparison with other criteria or data. Overbank roughness is generally considered to be less difficult to estimate than channel roughness and may have less effect on the overall flood discharges than does the channel roughness, if the channel carries the majority of the flood discharge. The floodplain n values may be initially estimated from the prevailing vegetation, using multiple values of n in overbank areas where vegetation and roughness change significantly. The overbank roughness values are adjusted within allowable limits to approximately reproduce the known stage for the measured discharge. Even with known roughness data, one should not expect a perfect match of the data between the modelʹs output and the known river data. As mentioned previously in this chapter, discharge estimates may carry significant error and the actual and mea-
Section 5.5
Roughness Data
155
sured discharges could differ by 5 percent or more. This difference could easily translate into a computed water-surface elevation difference of 0.5 ft (0.15 m) or more. Also, a stage reading can be faulty. The tube containing the device that records changes in water level is often attached to a bridge pier, a location that could experience rapidly varied flow conditions rather than gradually varied flow. The acceleration of flow into the bridge opening can cause the water surface to be significantly lower under the bridge. The recorded depth could then be less than the actual depth immediately upstream or downstream of the bridge, because of the flow acceleration. A gradually varied flow program may not be able to properly match this rapidly varied flow situation. During the 1993 flood on the Missouri River near its mouth, the reading on the stage recorder (located on a bridge pier) measuring river levels at St. Charles, Missouri, was as much as 2 ft (0.6 m) below the water level a short distance both upstream and downstream of the gage location. Velocities up to 18 ft/s (5.5 m/s) resulted in a severe drawdown at the gage site. The gage was moved to a new site a short distance downstream of the bridge following the 1993 flood to eliminate this problem for future stage measurements (Coleman, 2001). Although this much drawdown is unusual, several inches to a foot (0.1–0.3 m) are not unusual under rapidly varied flow conditions. In general, calibration of the model to reproduce known elevations at the gage site to within 0.5 ft (0.2 m) is considered acceptable (FEMA, 1985). Engineers can apply experience, table lookup, picture comparisons, and the Cowan or similar technique to estimate n values for different channel segments of the study stream. An average of all techniques can be applied, or the engineer can develop a weighting of some or all of these methods to initially select the channel n. Reasonable adjustments may then be made during the calibration process. For example, floodplain n values can be estimated from table lookup and changed from aerial photographs showing the locations of vegetation changes. The channel and floodplain n values can then be adjusted during calibration runs until the engineer is satisfied with the results. Calibration to recorded stage and discharge data is desirable, however actual data are often not available, especially for small streams. Section 5.8 addresses additional calibration methods when gage data do not exist.
Other Techniques to Estimate n Several other methods have been developed to assist in the estimate of Manning’s n for certain types of channels. Although these techniques are generally less often used than those of the preceding sections, the engineer should not overlook their applicability to the study reach. These methods include the use of an equivalent roughness value (k) and specific equations derived for certain categories of stream. Equivalent Roughness (k). The value k represents the average roughness height in the channel or overbank area that affects flow movement. The advantage of using this approach is that it results in changing n values with depth of flow. Chow (Chow, 1959) states that k for river channels ranges from 0.1–3 ft (0.03–0.9 m) and accounts for particle size as well as channel bed forms and other factors. The equation to compute n for a selected k value used in HEC-RAS (USACE, 2002) is 1⁄6
1.486R n = ----------------------------------------R 32.6 log 12.2 ---k
(5.5)
156
Data Needs, Availability, and Development
where
Chapter 5
n = Manning’s roughness value (dimensionless) R = the hydraulic radius (ft) k = the equivalent roughness height (ft)
Equation 5.5 is in English units; for metric units, the constant 1.486 is replaced with 1 and the constant 32.6 is replaced with 18. A constant value for k results in a changing value of n with depth, perhaps a better reflection of what is occurring in the prototype river. Values for k may be entered directly into HEC-RAS and the program computes n based on these estimates. Other Methods. Limerinos (Limerinos, 1970) developed an equation relating n as a function of the hydraulic radius and the D84 bed material particle size. The equation was based on tests of 11 streams with bed material ranging from small gravel to medium-size boulders. The D84 reference is for a particle size of the bed material, in feet, that equals or exceeds that of 84 percent of the particle sizes found in the sample and that represents one standard deviation from the mean particle size. Jarrett (Jarrett, 1984) developed an equation for high-gradient streams, defined as invert slopes ranging from 0.2–4 percent and hydraulic depths from 0.5–7 feet. Based on 75 data sets obtained from 21 different stream locations, the equation is applicable for main channels having stable bed and bank materials ranging from gravels to cobbles and boulders. The equation relates n to friction slope and hydraulic radius, with channel invert slope used where the friction slope is unknown. Limerinos’ and Jarrett’s equations should be limited to streams having characteristics similar to those used to develop the expressions. Additional methods for computing n are presented in Chapter 11.
5.6
Other Data Most of the data required for a steady, gradually varied flow analysis have already been described. However, some additional data are necessary, or could be required, depending on the study. Contraction and expansion coefficients are needed to estimate the nonfriction losses in all studies. Sediment data are needed for movable boundary analysis using a program such as HEC-6. For a watershed undergoing physical changes (most typically urbanization), land use and other data are necessary to estimate future changes in peak discharge and flow hydrographs.
Contraction/Expansion Coefficients Flow through an open channel is similar to flow through a closed conduit in the sense that there are head losses due to friction and expansion/contraction. Expansion and contraction losses are minor losses found by multiplying a user-specified expansion/contraction coefficient by the absolute difference in the discharge-weighted average velocity head (V2/2g) between two adjacent cross sections. These coefficients are used to model losses that occur between cross sections having different geometry. The cross-sectional area below the water surface becomes either larger or smaller as one moves from location to location, thus causing average velocity to decrease or increase, respectively. This change reflects either an expansion or a contraction, resulting in a decrease or an increase, respectively, in the average velocity.
Section 5.6
Other Data
157
Expansion and contraction losses are generally small for both flood and nonflood modeling situations. Compared to the total losses between cross sections, expansion and contraction losses are often less than 5 percent of the total energy losses, with the great majority being friction losses. For channels of constant cross section, expansion and contraction losses are typically considered negligible. These losses are most important in the vicinity of significant obstructions to the flowing water, particularly bridges and culverts. The coefficients for expansion and contraction losses have generally been adopted from “rules of thumb.” Generalized expansion and contraction coefficients have been used since water surface profiles were calculated by hand. Table 5.9 illustrates the coefficients used for the majority of past flood studies. As shown in the table, the coefficients increase as the obstruction effects become potentially more severe. Table 5.9 Generalized expansion and contraction coefficients for subcritical flow. Type of Transition
Contraction
Expansion
Constant cross section
0.0
0.0
Gradual transition
0.1
0.3
Typical bridge section
0.3
0.5
Abrupt transition
0.6
0.8
HEC-RAS defaults to the gradual transition values between cross sections. These values are only applicable to subcritical flow and there are no standard guidelines for supercritical values of expansion and contraction coefficients. In general, however, coefficients for supercritical flow are usually taken as a small percentage of the table values, possibly 10 percent, with further adjustments then included as part of the calibration process. Practical experience shows that the upper limits of contraction and expansion coefficients in supercritical flow are approximately 0.05 and 0.10, respectively. Higher values often result in numerical oscillation of the computed water surface elevations and a “sawtooth” profile that is not representative of the actual profile. For prismatic channels carrying supercritical (or subcritical) flow, the coefficients are often taken as zero. The standard values listed for bridge sections are now considered conservative, giving a high estimate of the upstream water surface elevation (USACE, 1995). Chapter 6 presents alternate values for bridge expansion and contraction coefficients. Flow through some culverts is considered an abrupt transition, where the culvert opening represents a small percentage of the upstream and downstream cross-sectional flow area, as further discussed in Chapter 7.
Sediment Data These data could be obtained from sediment discharge sites, regional methods, or other techniques. In addition to geometric data, additional needs include • Sediment inflow relationship (water discharge versus sediment load) for the main river and for important tributaries • Gradation data for the inflowing sediment load • Bed material sediment samples and gradation • Bank material sediment samples and gradation
158
Data Needs, Availability, and Development
Chapter 5
• Sediment yield (sediment runoff per time period, often in tons/year) • Water temperature data throughout the year • Continuous water-discharge hydrograph data throughout the year Engineers can determine bed and bank material and gradations by collecting field samples and processing them in a lab. If suspended sediment records are not available, which is typical, it may be possible to obtain “grab samples” during a runoff event to at least estimate the predominant type of sediment and the sediment concentration. Because sediment studies are expensive, engineers often initially perform a qualitative study to estimate the magnitude of the problem and the effect of the proposed project on the sediment regime. If the qualitative study finds a significant effect, then the quantitative study is performed. Detailed information on these types of studies and on obtaining sediment data for river and reservoir studies is given in EM 1110-2-4000, Sediment Investigations in Rivers and Reservoirs (USACE, 1995).
Future Changes Hydraulic modeling is typically concerned with determining the base conditions; that is, what exists now. However, when significant changes are planned to take place throughout the watershed, additional hydraulic modeling is often performed to determine the future conditions. If the intent of a hydraulic study is to provide flood information for future land use conditions or to design a structure to operate safely under future land use or stream conditions, then knowledge of these future changes is necessary. These changes can include the following: • Urbanization of the watershed, usually reflected by operating a hydrologic program and determining the (normally) increased discharges that will occur with future urbanization. Future structures in the floodplain can be modeled with the cross-section data. • New or replacement bridge or culvert construction affecting stream hydraulics. These changes can be modeled by adding the new or revised geometry of the bridge or culvert to the hydraulic model. • Land-use changes in the floodplain (for example, forests to farmland). The effects of these changes can be estimated by modifying Manning’s n.
5.7
Routing Data When hydrologic simulations, such as the USACE’s HEC-HMS or the NRCS’s TR-20 program, are used for a study, the results of floodplain modeling can supply the needed routing data. These data consist of discharge versus storage information and hydrograph travel times. Routing information requires both conveyance and storage simulation, which is often obtained through floodplain modeling. Figure 5.7 illustrates locations for both conveyance and storage along a reach of stream. Proper modeling of the reach shown in Figure 5.7 will supply the storage and conveyance values for each selected discharge. The resulting information from the floodplain modeling program then allows the modeler to obtain discharge and stream storage data for each routing reach, which are often used in a Modified Puls routing operation. Accurate routing data are needed for the modeling of watershed changes, such as levees or channel modifications, that will modify the floodplain routing characteris-
Section 5.8
Calibration and Verification Needs
159
tics. Thus, the effects of these changes can be addressed through both the routing in the hydrologic program and in the profile development in the hydraulic program. Chapter 8 covers the procedures to perform this work. Hydrologic routing is also discussed in Chapter 14.
5.8
Calibration and Verification Needs Although the data for a hydraulic study may have been determined and developed with care, the hydraulic model always requires calibration to give a sense of confidence that the program output does, in fact, properly represent what would occur on the prototype river. Calibration adjusts model parameters (within reason) so that predicted system performance agrees with observed system performance over a range of conditions. For water surface profile modeling, a proper calibration and verification of the model require actual stream data, measured stages, discharges, highwater marks, and more. However, these actual data may not exist for the reach under study. Other techniques may be necessary, as discussed in this section. Chapter 8 provides detailed calibration and verification procedures.
Calibration Data Data with which to calibrate a model are often hard to come by. Stage and/or discharge records are the best calibration data but are often unavailable for smaller streams or streams in urban areas. Gage Data. Where gages are present, the engineer should obtain the largest discharges and/or stages recorded at the site, along with the corresponding dates. These data are usually published annually for federal gage sites. For studies using the entire hydrograph, the engineer will often have to obtain the raw data (continuous stage readings over the time of interest) from the appropriate agency and convert stage to discharge using the established rating curve for the gage. Calibrating a model to only a single cross section has limited value. Output from the floodplain modeling program should be calibrated to several actual discharge and stage data pairs representing different runoff events. If multiple gage sites or flood highwater marks are available, they should be used to calibrate the model to several sites along the stream. The most effective way to calibrate the model is to approximate the entire rating curve, or at least that portion representing the higher in-bank flows and any flood records available. The change in channel n with increasing depth can therefore be evaluated and the appropriate value of n selected, depending on the range of discharges that are of interest in the study. HEC-RAS can incorporate variations in n as water surface elevations increase. An appropriate target for comparing the peak stages developed by the floodplain model to the prototype is ±0.5 ft (0.2 m). Highwater Mark Data. If one or more large floods have occurred, highwater marks are often available from the USGS or possibly from a local agency. While recorded discharge data may not be available, recorded flood elevations at several locations throughout the study reach would allow the engineer to approximately match the model output to field conditions. But what if the computed and observed profiles are dissimilar? In this case, the discharge and n values would most likely contain the most uncertainty, and the engineer would have to decide how to adjust one or
160
Data Needs, Availability, and Development
Chapter 5
both (within reason) to better approximate the prototype data. The engineer must be aware that highwater marks can contain some error. If the maximum elevations were obtained from debris lines that were possibly affected by wind-driven waves, the deposited debris would be at a somewhat higher elevation than the water could reach without the wind. Highwater marks obtained from field interviews depend on a person’s memory and whether the individual witnessed the flood level on the recession side rather than at the peak. Debris pileups on the upstream side of bridges can result in higher water levels than the program can compute, unless the debris is simulated (discussed in Chapter 6). This happens because the debris partially blocks the flow, reducing bridge cross-sectional area and increasing the upstream water surface elevation. Field Interviews/Newspaper Records. If no formal highwater mark surveys were performed, the engineer can survey local residents to obtain these estimates directly. The problems identified in the preceding paragraph still apply here. Newspaper records are often a good source of highwater mark data, as references to flood level on a local landmark are often printed. Many papers maintain a “morgue” (database) of different subject headings, and reviewing these newspaper files could facilitate finding data on floods in the study area. The field interviews and records research should look for indications of a road or bridge overtopping, especially if the road was designed for a certain flood frequency. If the low chord of a bridge was designed to be 2 ft (0.6 m) above, for example, the 10year design water level, then it could be expected that the hydraulic model would show the 10-year water levels being less than the low chord. Similarly, one might expect the 25- to 50-year average recurrence-interval flood to overtop the structure.
Section 5.8
Calibration and Verification Needs
161
Bankfull capacity is often taken as the one- to two-year recurrence interval event. Therefore, the one- to two-year peak discharges could be used to determine whether the hydraulic model is approximating the bankfull stage for this discharge. Similarly, if the largest actual flood in recent memory (possibly over the past 20 to 40 years) has lower elevations than those the engineer is obtaining for the 10-year average recurrence interval flood, the simulated discharge and/or the selected n values may be too high. The following, taken from USACE, 1993b, lists some additional considerations when gathering flood data in the field: • Obtain as many highwater marks (HWM) as possible after any significant flooding, no matter how close together and how inconsistent they are with nearby HWMs. Describe each HWM location so that surveys may be obtained at a later date. • Obtain HWMs upstream and downstream of bridges, if possible, so that the effects of these obstructions can be estimated and so that bridge modeling procedures may be confirmed. • Check on bridge or culvert debris blockages with local residents. For urban streams, check with residents and newspaper files on occurrences of bridge opening blockages by automobiles or debris. • For historical flooding, check on land use changes, both basinwide and local, since the flood(s) occurred. • What changes have occurred to the stream channel since the last flood? Have channel modifications been undertaken by the local community? Channel changes, or just natural erosion or deposition that may have occurred since historic floods, if significant, will render calibration with todayʹs channel configuration invalid. • If HWMs are taken from debris lines, remember that wave wash can result in the debris line’s being higher than the HWM, particularly for pools. • Is the observer giving a biased HWM? A homeowner may give an excessive HWM if he thinks it might benefit a potential project to better protect the property. Similarly, the owner with a house for sale may give a low estimate or indicate that no flooding occurs if he thinks it will affect the sale. Hydrologic Comparisons. The peak discharge output for a selected recurrence interval flood from hydrologic modeling programs can be compared to hydrographs from gage data and/or the results of regional regression equations for peak discharges of the same frequency. If one or more discharge gages are available in the study watershed, actual rainfall data for each runoff event should be obtained. The runoff hydrographs for each event can be computed with the hydrologic program, based on the historic storms. The most important outputs from the hydrologic model during calibration are the discharge hydrographs at each gage site. The computed hydrographs are compared to the actual hydrographs, with time to peak, peak discharge, hydrograph shape, and hydrograph volume being the important parameters to compare. Calibrating to match hydrograph shape and time of peak generally results in a more defensible model than one that concentrates only on the peak stage or discharge. If the comparisons are poor, adjustments to loss-rate parameters, transformation coefficients (usually unit hydrographs), and routing parameters can be made to better approximate the known
162
Data Needs, Availability, and Development
Chapter 5
hydrograph. Once the calibration is complete, hypothetical rainfall (such as the 100year return period storm) is used in the simulation to generate the 100-year return period runoff hydrograph. The peak discharge from this event can be compared to the peak discharge computed with a regression equation for the parameters of the watershed. If the comparisons are significantly different, selected watershed parameters (normally infiltration values) are adjusted to achieve a better match between the model simulation and the regression equation calculation. All adjustments should be reasonable and defensible to a technical reviewer. Calibration of hydrologic models is further discussed in Chapter 8. When a study area has no stream gages, the calibration of the output from the hydrologic program may only be to the peak discharge computed from a regression equation. Adjustments to the output of the program are normally made by increasing or decreasing infiltration losses to better approximate the results of the regression equation. There is, however, much uncertainty in the regression equation results. For the 100-year average return-interval flood, the predicted peak discharge from a typical regional equation often contains a standard error of 30 percent or more. The adjustment of the results of a hydrologic model would be most appropriate if the model results were consistently higher or lower than the results from the prediction equation at several sites. This comparison is appropriate for any watershed but is probably most often used for urban streams. Verification Data. Verification data are either gage records or highwater marks that were not used in the calibration process. This amount of data is often not available unless the floodplain modeling study is for a large river having long-term gage records. Where such records are available, the engineer would select calibration and verification events. This process could, for instance, be a calibration to the second- and third-largest floods, with model verification on the largest event. Verification is simply the operation of the model(s) using the recorded information for the verification event or events and comparing the actual records to the resulting discharge and/or stage simulation. No model parameter adjustment is done in the verification stage. The engineer is simply looking for further confirmation that the model reflects the processes of the actual watershed. Chapter 8 discusses verification in detail. Calibration and verification are extremely important steps in a hydraulic study and should not be ignored or overlooked. Calibrating and verifying a model gives the modeler confidence in the results, which should give further confidence in design elements associated with the study. In the absence of calibration data, the modeler should perform a sensitivity analysis by adjusting those variables that have the most uncertainty associated with them. The purpose of the sensitivity analysis is to give the modeler an intrinsic feel for the behavior of the hydraulic system in response to changes, especially for flows and roughness. Based on the results of the sensitivity analysis, one may find that the water surface profiles do not change that much with higher discharge but rather are very sensitive to changes in roughness values. Consequently, the modeler can concentrate more effort on obtaining suitable values for channel roughness coefficients and still have some confidence in the results of the modeling effort.
Section 5.9
5.9
Chapter Summary
163
Chapter Summary Data needs for floodplain modeling comprise a very large portion of the work required of the engineer. Developing the cross-section geometric and discharge data throughout the stream length typically accounts for most of the time and expense of data gathering. However, roughness coefficients, expansion and contraction values, obstruction geometry, sediment data, and future watershed changes are also important. A wide variety of data sources may be available, including data published by the federal government, floodplain models developed in earlier studies, and field interviews of people living near a river or stream. Geometric data development carries the most acquisition cost but is typically the most accurate data used for the study. Discharge data may be obtained through several different techniques, but contains much uncertainty unless extensive discharge and stage records are available. Roughness coefficients are normally regarded as having the largest uncertainty of any of the hydraulic data. Several techniques are available to assist the modeler in estimating roughness values for a floodplain modeling effort. All data used in a floodplain model should represent reasonable and defensible values that can withstand an independent review. Calibration and verification of the hydraulic model are very important and can best be performed when actual stage and discharge data are available. In the absence of such data, other techniques may be employed, but the calibration process would be considered less rigorous and thus less accurate. Regardless of whether extensive, or even any, calibration data are available, sensitivity tests on key variables such as peak discharge and Manning’s n values should be performed to estimate the importance of these variables on the final makeup of the project or on the final water surface profiles.
Problems 5.1 English Units – Construct an HEC-RAS model using the data in the following tables and answer the questions that follow. The channel discharge is 1200 ft3/s along its entire length, the flow regime is subcritical, and the water surface elevation at river station 1.0 is 163.5 ft mean sea level. Note that the left and right bank stations of the main channel are indicated by the shaded boxes. a. What is the computed water surface elevation at river station 2.0? b. What is the average velocity in the main channel at river station 3.0? c. What is the head loss due to friction between sections 1.0 and 2.0? d. What are the conveyances for the left overbank, main channel, and right overbank at river station 4.0? e. What is the energy grade elevation at river station 2.0? f. What is the energy correction factor (α) at river station 3.0?
164
Data Needs, Availability, and Development
River Station
Left Overbank Manning’s n
Length, ft
1.0
0.035
2.0
0.035
3.0 4.0
River Station 1.0
Chapter 5
Main Channel
Right Overbank
Manning’s n
Length, ft
Manning’s n
Length, ft
N/A
0.02
N/A
0.04
N/A
250
0.02
250
0.04
250
0.035
330
0.02
340
0.04
350
0.035
500
0.02
500
0.04
500
River Station 2.0
River Station 3.0
River Station 4.0
Station, ft
Elevation, ft
Station, ft
Elevation, ft
Station, ft
Elevation, ft
Station, ft
Elevation, ft
200.0
165.0
200.0
165.4
200.0
165.8
189.9
167.3
206.1
163.3
206.1
163.6
206.1
164.1
216.7
164.4
220.9
161.0
235.2
163.4
220.9
161.8
220.9
162.2
237.8
160.6
237.8
161.0
251.9
161.4
237.8
161.8
250.0
158.0
250.0
158.4
254.6
160.2
250.0
159.2
267.9
158.8
269.1
158.2
266.9
158.7
267.9
159.5
278.1
158.5
278.3
157.7
278.3
158.5
278.3
159.4
290.0
158.0
290.0
158.5
290.0
158.8
290.0
159.2
298.9
161.0
298.9
161.4
298.9
161.8
298.9
162.2
305.7
163.3
314.2
162.1
316.1
162.7
320.3
164.1
310.0
165.0
319.8
166.4
334.8
164.9
332.4
167.3
SI Units – Construct an HEC-RAS model using the data in the following tables and answer the questions that follow. The channel discharge is 34 m3/s along its entire length, the flow regime is subcritical, and the water surface elevation at river station 1.0 is 49.8 m mean sea level. Note that the left and right bank stations of main channel are contained in the shaded boxes. Answer questions (a) through (f) above. Left Overbank
Main Channel
Right Overbank
River Station
Manning’s n
Length, m
Manning’s n
Length, m
Manning’s n
Length, m
1.0
0.035
N/A
0.02
N/A
0.04
N/A
2.0
0.035
76.2
0.02
76.2
0.04
76.2
3.0
0.035
100.6
0.02
103.6
0.04
106.7
4.0
0.035
152.4
0.02
152.4
0.04
152.4
River Station 1.0
River Station 2.0
River Station 3.0
River Station 4.0
Station, m Elevation, m Station, m Elevation, m Station, m Elevation, m Station, m Elevation, m 61.0
50.3
61.0
50.4
61.0
50.5
57.9
51.0
62.8
49.8
62.8
49.9
62.8
50.0
66.1
50.1
67.3
49.1
71.7
49.8
67.3
49.3
67.3
49.4
72.5
49.0
72.5
49.1
76.8
49.2
72.5
49.3
76.2
48.2
76.2
48.3
77.6
48.8
76.2
48.5
Problems
River Station 1.0
River Station 2.0
River Station 3.0
165
River Station 4.0
Station, m Elevation, m Station, m Elevation, m Station, m Elevation, m Station, m Elevation, m 81.7
48.4
82.0
48.2
81.4
48.4
81.7
48.6
84.8
48.3
84.8
48.1
84.8
48.3
84.8
48.6
88.4
48.2
88.4
48.3
88.4
48.4
88.4
48.5
91.1
49.1
91.1
49.2
91.1
49.3
91.1
49.4
93.2
49.8
95.8
49.4
96.3
49.6
97.6
50.0
94.5
50.3
97.5
50.7
102.0
50.3
101.3
51.0
5.2 English Units – Construct an HEC-RAS model for the system shown in the figure, and answer the questions that follow. The channel is trapezoidal with a bottom width of 49.2 ft and 3:1 side slopes. The channel slope is 0.002, the material is concrete (Manning’s n = 0.013), and the length is 492.1 ft. A flow of 11,300 ft3/s enters the channel from the broad-crested weir, as illustrated in the figure.
a. Is the flow in the channel subcritical or supercritical? b. What is the depth of water at the upstream end of the channel? c. What is the depth of water at the downstream end of the channel? d. What should be the minimum depth of the channel? e. Does uniform flow occur within the channel? f. What type of flow regime does this profile depict? SI Units – Construct an HEC-RAS model for the system shown in the figure, and answer the questions that follow. The channel is trapezoidal with a bottom width of 15 m and 3:1 side slopes. The channel slope is 0.002, the material is concrete (Manning’s n = 0.013), and the length is 150 m. A flow of 320 m3/s enters the channel from a broad-crested weir, as illustrated in the figure. Answer questions (a) through (f) above.
CHAPTER
6 Bridge Modeling
Bridges are the most common obstruction that modelers must address in water surface profile computations. Obtaining accurate profile estimates of rivers and streams with bridges can require much time and effort. A variety of flow situations through a bridge are possible, including subcritical low flow, pressure and weir flow, and supercritical flow. This chapter gives guidance for modeling bridge flow and discusses the various types of flow conditions that are possible through bridges. Modeling bridges with HEC-RAS is discussed along with the critical simulation of contraction and expansion of flow into and out of the bridge. The ineffective flow area concept, which is one of the most common sources of error in bridge computations, is presented in detail. The procedures and methods for modeling different types of bridges are described with examples to illustrate the key points.
6.1
The Effects of a Bridge on Water Flow Bridges are constructed over waterways, resulting in the bridge structure and its elements obstructing the natural water flow. For a bridge to be structurally sound, it must have supports, such as piers and abutments. These supports are normally located within the waterway. An obstruction to flow typically forces water surface elevations on the upstream side of the structure to be higher than they would be if the obstruction werenʹt present. Water surface elevations can be affected for some distance upstream of the structure. When designing a bridge, it is extremely important to analyze its adverse effects on upstream flow. Under subcritical flow conditions, the effects of a bridge may be observed well upstream of the structure as the width of flow across the valley contracts to pass
168
Bridge Modeling
Chapter 6
through the smaller width of the bridge opening. (The terms length and width of a bridge in hydraulics are exactly the opposite of the meaning used by highway engineers or motorists. In hydraulics, the length refers to the distance parallel to the flow and the width refers to the opening perpendicular to the flow. So, while a motorist may see a 1000 ft long bridge that is 50 ft wide, a hydraulic engineer sees a 50 ft long bridge that is 1000 ft wide.) The amount of flow contraction varies within the contraction reach. During a flood, for example, flow within the channel may not contract significantly, but flow near the floodplain limits may have to cross the entire floodplain, returning to the channel, to move through the bridge opening and continue downstream. Figure 6.1 displays this movement of flow, in an idealized sense, along with the full contraction and expansion reaches through the bridge.
Modified from FHWA
Figure 6.1 Flood flow lines for a typical bridge crossing.
Section 6.1
The Effects of a Bridge on Water Flow
169
Flow accelerates as it approaches the bridge opening, due to the smaller cross-sectional area through the bridge, and usually reaches a peak velocity near the downstream face of the opening. Water can move through the bridge at subcritical, critical, or supercritical depth. The water surface may be rapidly varied, passing through critical depth within the bridge opening. As illustrated in Figure 6.1, downstream of the bridge fast-moving flow expands into the wider valley cross section, resulting in a decrease in velocity as the flow expands across the floodplain. Energy is lost through the bridge, and so the water surface may be significantly higher upstream of the bridge than downstream. The difference in water surface elevations for a selected discharge just upstream of an obstruction is often called the swellhead. In a low-flow condition, the water surface is below the low chord (low steel) or underside of the bridge. If the bridge opening becomes submerged, the bridge functions as a sluice gate, orifice, or weir, or as some combination of these, depending on the depth of flow. Figures 6.1 and 6.2 show the locations of the four key cross sections required for bridge modeling. Cross section 1 is downstream of the bridge, at the end of the flow expansion. Cross section 4 is upstream of the bridge, at the beginning of the flow contraction. Properly locating these two sections is discussed in Section 6.4. Two more cross sections are placed at the bridge, with the precise locations based on the bridge analysis technique used. For HEC-RAS, these two sections (Nos. 2 and 3) are placed a short distance outside of the downstream and upstream bridge faces, respectively. The locations of these two sections are discussed in detail in Section 6.4. HEC-RAS automatically adds two more cross sections immediately inside the upstream (BU for bridge upstream) and downstream (BD for bridge downstream) bridge faces, based on sections 2 and 3 and the bridge geometry supplied by the modeler. Thus, in HECRAS, bridge modeling is usually performed with a total of six cross sections, with four sections supplied by the modeler and two more developed by the program. If only flow through a bridge reach is to be modeled, the modeler might think that the data set should start with section 1 and end with section 4. However, section 1 does
USACE
Figure 6.2 Cross-section placement for a typical bridge crossing.
170
Bridge Modeling
Chapter 6
not represent the first cross section in the HEC-RAS data set, even though it does represent the end of the bridge effects. The modeler has to determine how far downstream of section 1 the additional cross sections are required so that profile convergence occurs before cross section 1. Similarly, the data set should extend further upstream than section 4 to properly compute any adverse effects of the obstruction. These distances can be estimated with the procedures presented in Section 5.2.
6.2
Low Flow Through Bridges Low flow is the most common analysis case for a bridge. Low-flow situations exist whenever the discharge passes through the bridge opening and the water surface or energy grade line elevations do not reach the elevation of the bridge low chord. A variety of potential solution methods is available in HEC-RAS for low flow, with low flow classified as Class A, B, or C, based on momentum computations at the bridge. Figure 6.3 illustrates the water surface profiles for each of the three classifications. HEC-RAS must first determine the flow regime to properly classify the flow. It accomplishes this evaluation by computing the momentum at the bridge cross sections (2, BD, BU, and 3). First, HEC-RAS determines the momentum at critical depth at sections BD and BU for the given discharge. The section with the higher momentum is designated as the controlling section. If the two sections have equal momenta, section BU is selected as controlling. For subcritical flow analysis, the momentum at section 2 is then computed and compared to the controlling section in the bridge. If the momentum at section 2 exceeds the critical momentum at the controlling section, the flow is assumed to be Class A throughout the bridge reach. If the momentum at section 2 is less than the critical momentum at the controlling section, Class B flow is assumed, with critical depth occurring within the bridge opening. For supercritical flow, the momentum at section 3 is computed and compared to the critical momentum at the control section in the bridge opening. If the momentum at section 3 exceeds the critical value, the flow through the bridge is designated as Class C.
Equations for Low Flow Energy Method. The energy method, described in detail in Chapter 2, is applied in a similar manner for bridges. When an energy solution is obtained, losses through the bridge opening sections (2, BD, BU, and 3) are computed as if each were an unobstructed cross section. The friction losses between sections and losses due to expansion or contraction are computed and summed. If piers are present, the additional lengths on both sides of each pier are included in the wetted perimeter calculation and the area of the piers is removed from the cross-sectional flow area of sections BD and BU. For bridge analysis with the energy method, expansion and contraction losses dominate through the bridge opening (between sections 2 and 3), as they are much larger than the friction losses through this same area. This is a reversal of the situation for normal valley cross sections. This is due to the short reach length between the upstream and downstream bridge face (minimizing the friction loss) and the (usually)
Section 6.2
Low Flow Through Bridges
171
Modified from FHWA (HDS-1)
Figure 6.3 Low flow classification at bridges.
large velocity heads experienced within the bridge opening, which often result in significant expansion or contraction losses. Water surface elevations and energy losses through a bridge are computed with Equations 2.43 through 2.46 (see page 57), applying the standard-step method as if the bridge sections represented normal valley cross sections. The energy method is also used to compute losses between sections 1 and 2 and between sections 3 and 4 for all of the other methods of bridge computations. Bridge computations differ only in the way the water surface elevations are computed between sections 2 and 3. Momentum Method. With the momentum method, momentum balances are computed through the four cross sections (2, BD, BU, and 3, respectively) that define the bridge opening. The equations used by the program for a momentum solution are presented in the following paragraphs.
172
Bridge Modeling
Chapter 6
From section 2, just outside the downstream face, to section BD, just inside the downstream face of the bridge, the momentum equation is written as 2
2
β BD Q BD β2 Q2 A BD Y BD + ---------------------= A 2 Y 2 – A p Y p BD + ------------ + Ff – Wx BD gA BD gA 2
(6.1)
where ABD and A2 = the active flow areas at the respective cross sections (ft2, m2) A p = the obstructed area of the piers (ft2, m2) BD
Y2 and YBD = the vertical depths from the water surface to the centroid of the cross-sectional area at the indicated sections (ft, m) βBD and β2 = the momentum coefficients at the indicated locations (dimensionless) Q2 and QBD = the discharges at the indicated sections (ft3/s, m3/s) g = the gravitational constant (32.2 ft/s2, 9.81 m/s2) Ff = the frictional resistance force acting from section 2 to section BD (lb, N) Wx = the weight component acting from section BD to section 2 in the direction of flow (lb, N) The forces Ff and Wx act in opposite directions and, when the distance between sections 2 and BD is limited, these forces are quite small compared to the other terms in the equation. These two terms are often neglected in hand computations, without significant error. In HEC-RAS, Ff and Wx can be toggled on or off, together or independently. The default in HEC-RAS is for Ff to be included and Wx not. The Wx term requires an estimate of the channel slope, s0, between adjacent sections. Around bridges, s0 can be difficult to accurately determine and the slope may even be adverse (negative). In addition, the section just inside the bridge may have the same elevation as the section just outside the bridge, resulting in the value s0 = 0. Large errors in momentum can result from a poor estimate of the slope term. The momentum equation, from section BD to section BU, is written as 2
2
β BU Q BU β BD Q BD A BU Y BU + ---------------------= A BD Y BD + ---------------------+ Ff – Wx gA BU gA BD
(6.2)
From section BU to section 3 the momentum equation is 2
2 2 β3 Q3 β BU Q BU 1 A p BU Q 3 - + Ff – Wx A 3 Y 3 + ------------ = A BU Y BU + ---------------------+ A p Y p BU + --- C D ------------------BU gA 3 2 gA 3 gA BU
(6.3)
where CD = the drag coefficient used to estimate the drag force on the piers. ABU and A3 = the active flow areas at the respective cross sections (ft2, m2) A p = the obstructed area of the piers (ft2, m2) BU
Y3 and YBU = the vertical depths from the water surface to the centroid of the crosssectional area at the indicated sections (ft, m) βBU and β3 = the momentum coefficients at the indicated locations (dimensionless) Q3 and QBU = the discharges at the indicated sections (ft3/s, m3/s)
Section 6.2
Low Flow Through Bridges
173
Drag forces are caused by the flow splitting around the piers, flowing along the piers, and then creating a downstream pier wake. The drag coefficient represents the effect of pier shape or streamlining. Common drag coefficients for piers are listed in Table 6.1. Table 6.1 Drag coefficients for selected pier shapes. Pier Shape
CD
Circular
1.20
Elongated with semicircular ends
1.33
Elliptical with 2:1 length-to-width ratio
0.60
Elliptical with 4:1 length-to-width ratio
0.32
Elliptical with 8:1 length-to-width ratio
0.29
Square nose
2.00
Triangular nose with 30° angle
1.00
Triangular nose with 60° angle
1.39
Triangular nose with 90° angle
1.60
Triangular nose with 120° angle
1.72
No piers
0.00
The energy and momentum equations can both be used for Class A low flow at bridges with or without piers. If the water surface, or the energy grade line (if selected), exceeds the highest value of the bridge low chord elevation, the momentum solution is no longer valid. HEC-RAS reverts to a pressure flow, pressure/weir flow, or energy/weir flow solution. These combinations are discussed in Section 6.3. Yarnell Equation. The Yarnell equation (Yarnell, 1934) is another valid approach to examine Class A low flow through bridges with piers. The Yarnell equation is an empirical solution, developed in the 1920s from more than 2600 laboratory model tests. It evaluates the effect of bridge piers on the water surface elevation upstream of the bridge. The equation is most applicable for bridges that have many piers, with the piers causing the majority of the energy losses through the bridge. The Yarnell equation is concerned only with the pier shape, the pier obstructed area, and the velocity of the water. However, this method does not include any effects of the shape of the bridge opening, the shape of the abutments, or the width of the bridge. Yarnell’s experiments were conducted for rectangular and trapezoidal channel shapes, so these shapes are most appropriate for application of the Yarnell method. Figure 6.4 shows a bridge that can be appropriately modeled with the Yarnell method. This bridgeʹs width is about 300 ft (90 m) and there are 15 to 20 trestle bents supporting the roadway. A railroad trestle is often best modeled with the Yarnell equation, as follows: 2
V2 H 3–2 = 2K ( K + 10ω – 0.6 ) ( α + 15α ) -----2g 4
(6.4)
where H3–2 = the drop in the water surface elevation from section 3 (immediately upstream) to section 2 (immediately downstream) of the bridge (ft, m) K = the Yarnell pier shape coefficient (dimensionless) ω = the ratio of the velocity head to the depth at section 2 (ft/ft, m/m)
174
Bridge Modeling
Chapter 6
Figure 6.4 Flood flow passing through a railroad trestle bridge, St. Charles County, Missouri.
α = the obstructed area of the piers divided by the total unobstructed area at section 2 (dimensionless) V2 = the velocity at section 2 (ft/s, m/s) Only pier losses (no friction losses) are considered in Equation 6.4. H3–2 is simply added to the downstream water surface elevation of cross section 2 to obtain the water surface elevation at cross section 3, immediately upstream of the bridge. To use the Yarnell method, a K value must be assigned. This coefficient is based on the pier shape, as is the drag coefficient for the momentum method. Table 6.2 lists commonly used values for the Yarnell K. Table 6.2 Values of Yarnell K for selected pier shapes. Pier Shape
Yarnell K
Semicircular nose and tail
0.90
Twin-cylinder pier with connecting diaphragm
0.95
Twin-cylinder pier without diaphragm
1.05
90º triangular nose and tail
1.05
Square nose and tail
1.25
10-pile trestle bent
2.50
Energy, momentum, or WSPRO may be more appropriate solutions for bridges for which significant losses are expected from bridge abutments or from the shape of the bridge opening. WSPRO is described in Section 6.8.
Section 6.2
Low Flow Through Bridges
175
Class A Low Flow Class A flow is the most common and corresponds to the Type I classification used by the FHWA. The flow regime is subcritical throughout the expansion and contraction reach, with an unsubmerged bridge opening. Figure 6.5 shows the I-255 bridge across the Mississippi River near St. Louis, Missouri, during the 1993 flood. Class A low flow occurred at this structure for all flows, including the peak discharge of 1,070,000 ft3/s (30,300 m3/s). For this flow condition, an adequate analysis of the bridge effect can be obtained by performing an energy or momentum analysis, by applying the Yarnell equation, or by using the methods developed by the FHWA for the WSPRO program.
Figure 6.5 I-255 crossing, Mississippi River near St. Louis, Missouri, June 1993.
Class B Low Flow When the bridge opening width is small compared to the upstream width of flow at section 4, the opening may serve as a throttle. This situation can cause such a severe constriction of flow that critical depth occurs within or just downstream of the bridge opening, creating Class B flow (designated Type IIA or IIB in FHWA analyses). Under this type of flow pattern, the bridge acts as the control for the flow regime, and supercritical flow may be experienced (usually for a very short distance downstream of the bridge). Figure 6.3 shows a profile for Class B flow through a bridge. Class B flow may also occur in supercritical flow channels, potentially resulting in a hydraulic jump at the bridge. When critical depth occurs in the bridge, the Yarnell and the WSPRO methods are not appropriate, as both are based on subcritical flow. Rather, the calculations use either the energy or momentum equations. The momentum equation tends to be more appropriate, however, due to its ability to handle rapidly varied flow through the bridge. If the momentum equation doesnʹt converge to a solution, then energy methods are used.
176
Bridge Modeling
Chapter 6
For Class B low flow, the modeler should consider performing a mixed flow analysis, with both subcritical and supercritical computations to solve for the proper flow regime through the bridge. Chapter 8 discusses mixed-flow analysis procedures.
Class C Low Flow At bridges crossing supercritical flow channels, Class C low flow (designated Type III flow by the FHWA) is the norm. Figure 6.3 displays a profile for Class C low flow. Bridges crossing steep, concrete-lined flood reduction channels or steep mountain streams can be designed for Class C flow. Both the energy and momentum methods are applicable in these cases, with the momentum equation preferred because of the high velocities and rapidly varied nature of supercritical profiles through bridges. Figure 6.6 shows a prismatic supercritical flow channel spanned by bridges in the Los Angeles, California area. For this constant cross-sectional reach, the cross-section geometry remains unchanged, so expansion or contraction reaches adjacent to the bridge are not needed. Only the piers affect the water surface elevations. The lack of an expansion or contraction reach is fairly typical in the analysis of most man-made channels. Note the long “splitter” extension on the bridge pier; this is added to smoothly split the flow and minimize pier losses through the bridge. Chapter 10 discusses this type of pier in more detail. Bridge effects in a Class C flow regime may require testing with a physical model to verify computational accuracy.
USACE
Figure 6.6 Pier extension in a supercritical flow channel, Los Angeles, California.
6.3
High Flow Through Bridges When the elevation of the water surface or the energy grade line (if selected by the modeler) exceeds the maximum elevation of the upstream low chord of the bridge, the flow is classified as high. High flow through the bridge may occur under pressure
Section 6.3
High Flow Through Bridges
177
flow conditions, with the bridge opening acting as either a sluice gate or as an orifice; under weir flow conditions; under energy conditions for highly submerged bridges; or combinations of these conditions. This section presents examples of each of these conditions, with the applicable equations.
The Bridge as a Sluice Gate When the upstream opening of the bridge is submerged but the downstream opening is not, the bridge acts as a sluice gate, and the bridge opening may be partially pressurized. Figure 6.7 shows a typical profile through a bridge for this flow situation, and Figure 6.8 shows a photograph of a railroad overpass acting as a sluice gate during a flood.
Figure 6.7 Pressure flow, upstream entrance submerged.
The governing equation for sluice gate flow through a bridge is 2
Z α 3 V 3- Q = C d A BU 2g Y 3 – ---- + ----------- 2g 2
1⁄2
(6.5)
where Q = the discharge through the bridge opening (ft3/s, m3/s) Cd = the coefficient of discharge for pressure flow (dimensionless) ABU = the net area of the bridge opening at section BU, just inside the upstream bridge face (ft2, m2) Y3 = the vertical distance from the water surface to the mean river bed elevation at section 3, just outside the upstream bridge face (ft, m) Z = the vertical distance from the maximum bridge low chord to the mean river bed elevation at section BU, immediately inside the upstream bridge face (ft, m) V3 = the average velocity at section 3 (ft/s, m/s)
178
Bridge Modeling
Chapter 6
FHWA
Figure 6.8 Bridge operating as a sluice gate.
The term in the parentheses in Equation 6.5 represents the head on the centroid of the opening as measured from the energy grade line at section 3. The discharge coefficient varies, based on the depth of flow as compared to the height of the bridge opening. The default value of 0.5 in HEC-RAS is typically an acceptable and conservative value. HEC-RAS does employ internal checks to determine when a coefficient value less than 0.5 is needed. For the interested reader, the variation in the coefficient of discharge can be reviewed in the HEC-RAS Hydraulics Reference Manual. Values of the discharge coefficient less than 0.5 are used only for ratios of Y/Z between 1.1 and 1.3. (C varies from 0.35 to 0.5.)
The Bridge as an Orifice When the downstream water surface also submerges the low chord, the entire bridgeopening length is pressurized and the bridge acts similar to an orifice. Figure 6.9 shows a profile of this condition. Differences in water surface elevation across the bridge are found using the orifice equation: Q = CA 2gH
(6.6)
where C = the coefficient of discharge for fully submerged pressure flow (dimensionless) A = the net area of the bridge opening (ft2, m2) H = the difference in elevation between the upstream energy grade line at section 3 and the downstream water surface elevation at section 2 (ft, m) Actual determinations of C by the FHWA found that the values varied between 0.7 and 0.9. The FHWA (Bradley, 1978) recommends a value of 0.8 for a typical two- to four-lane bridge, which is the default value for the discharge coefficient in HEC-RAS.
Section 6.3
High Flow Through Bridges
179
FHWA
Figure 6.9 Pressure flow, downstream entrance submerged – bridge operating as an orifice.
The Bridge as a Weir Where water flows both over the roadway and through the bridge, the roadway acts as a weir. Figure 6.10 shows a profile of a bridge under pressure and weir flow and Figure 6.11 is a photograph of weir flow over a road embankment.
FHWA
Figure 6.10 Profile of a bridge under pressure and weir flow.
180
Bridge Modeling
Chapter 6
Figure 6.11 Bridge under pressure and weir flow.
The basic equation for weir flow is Q = CLH
3⁄2
(6.7)
where C = the weir coefficient for either broad-crested or ogee weirs (dimensionless) L = the length of bridge and embankment that is overtopped (ft, m) H = the difference between the energy grade line elevation at section 3 (immediately upstream of the bridge) and the roadway crest (or appropriate start of weir flow) elevation (ft, m) Typical values of C for broad-crested weirs range from 2.50 to 3.08 (English) and 1.38 to 1.70 (SI). A submerged roadway acts as a broad-crested weir, with the water surface profile somewhat parallel to the roadway surface, as shown in Figure 6.10. The default value for the broad-crested weir coefficient in HEC-RAS is 2.6, which is conservative and results in computing a higher head for a weir and, thus, a higher water surface elevation. Various publications, including Bradley, 1978, and King, 1963, give values for C for different heads on the roadway and for different shapes of weirs, respectively. Parapet walls, highway guardrails, debris on the roadway, and other factors make the “weir” less effective in passing flow than might otherwise be expected. These factors can also result in selection of a somewhat higher elevation for the weir-crest than the actual roadway elevation. For example, the drawing in Figure 6.10 shows the bridge parapet wall as the weir crest for the bridge. The weir coefficient is reduced as the difference between the tailwater and headwater elevations becomes smaller, causing a submerged weir flow situation, as illustrated in Figure 6.12, a case of partially submerged weir flow across a railroad embankment. HEC-RAS automatically decreases the weir coefficient as submergence begins and continues to reduce C as the submergence increases.
Section 6.3
High Flow Through Bridges
181
Bridge Operating as an Orifice in HEC-2 It is interesting to compare pressurized-bridge computations made with HEC-2 and HEC-RAS. In HEC-2, the modeler either computes the total loss coefficient through the bridge (XKOR) or accepts the HEC-2 default value (1.56) (USACE, 1990b). The XKOR value is the sum of the entrance and exit loss coefficients and a friction loss coefficient through the bridge. A pier coefficient is included, if piers are present. The equation is XKOR = kENT + kEF + kf where kENT is the entrance loss coefficient (dimensionless), varying from 0.1 to 0.9 and based on the bridge entrance conditions. It is similar to the entrance condition values for a culvert presented in Chapter 7. A typical value for a bridge with wingwalls is 0.5 (default in HEC-2). kEX is the exit loss coefficient (dimensionless), normally taken as 1.0 (default in HEC-2). kf is the friction loss coefficient (dimensionless), with a value of 0.06 assigned as the default. The equation for kf in the English system of measurement is
2
29n L k f = --------------4⁄3 R For the SI system, a constant value of 19.6 is used instead of 29. For a bridge under pressure flow throughout its length, HEC-2 models the bridge as if it were a culvert, summing the loss coefficients and multiplying this value by the velocity head. In HEC-RAS, the orifice equation (6.6) is used to model this condition. To convert the XKOR value to a C value for use in the orifice equation in HEC-RAS, the following relationship is applied: 1 C = --------------------XKOR For the default XKOR value of 1.56 in HEC-2, C is 0.8, which is also the default value in HECRAS. For long bridges or long culverts under submerged conditions, XKOR is actually computed for use in the HEC-2 program. For long structures, the computed value of the friction coefficient is frequently much larger than the default value of 0.06.
When the bridge becomes highly submerged (95-percent submergence is the default), the program switches to energy flow computations. For a highly submerged structure, the tailwater downstream of the bridge begins to control upstream water surface elevations more than the bridge obstruction itself. Figure 6.11 shows 1–2 ft (0.3–0.6 m) of weir flow across the approximately 2000 ft (610 m) of low embankment early in the flood. By the next day, the tailwater elevation had completely submerged the roadway by several feet and the water surface profile across the roadway was governed by the energy, rather than the weir, equation. For interested readers, the relationship between reduction in C and submergence is given in the HEC-RAS Hydraulics Reference Manual, Figure 5.8, page 5-25. The coefficient, C, is the full value of the weir coefficient up to a submergence of 76 percent and is then gradually reduced by a varying factor as submergence increases. At 95-percent submergence, when flow computations shift from weir to energy, the reduction factor is 0.75, which is multiplied by the original value of C to compute the reduced value.
Example 6.1 Weir flow at a bridge. A road embankment (elevation 426.2 ft) is overtopped by flood flow for a width of 600 ft. The bridge roadway at the opening has a 100-foot solid parapet wall blocking the
182
Bridge Modeling
Chapter 6
Figure 6.12 Partially submerged weir flow over a railroad embankment. weir flow. For a weir discharge of 2000 ft3/s, estimate the energy grade line elevation upstream of the bridge. Solution The weir equation, Equation 6.7, is appropriate to analyze flow over the roadway. The roadway embankment acts as a broad-crested weir with a weir coefficient between 2.5 and 3.1; use C = 2.6 for a conservative estimate. Weir length is the 600 ft flow width less the 100 ft blocked by the parapet wall, giving L = 500. The equation for head is 2000 = 2.6 ( 500 )H
3⁄2
Solving this equation gives H = 1.33 ft. Therefore, the energy grade line just upstream of the bridge is 1.33 + 426.2 = 427.53 ft. The water surface elevation can be determined by subtracting the section’s discharge-weighted average velocity head from the energy grade line elevation.
Combination Flow When a bridge is overtopped, flow continues to pass through the bridge opening, resulting in two or more flow paths through and over the obstruction. Multiple flow paths require different procedures to determine the discharge passing over the bridge superstructure and through the opening. HEC-RAS handles combination flow, which is either low flow plus weir, or pressure flow plus weir. These situations are illustrated in Section 6.6. An iterative procedure is used until the appropriate split of discharge through the bridge opening and discharge over the bridge converge to the same energy grade line elevation at section 3, immediately upstream of the bridge (within a defined tolerance). Low-flow computations are performed only with the energy or the Yarnell equation, when combined with weir flow. Section 6.6 further addresses bridge computations under combination flow.
Section 6.4
6.4
Defining Bridge Cross Sections and Coefficients
183
Defining Bridge Cross Sections and Coefficients To properly model the effects of a bridge, the full reach of river (both upstream and downstream) affected by the structure must be included in the analysis. The presence of the bridge causes flow to start contracting toward the bridge opening well upstream of the structure, and the expansion of flow out of the bridge continues even further downstream. Bridge modeling requires determining the proper cross-section locations for the start of contraction (section 4) and end of expansion (section 1), assigning appropriate expansion and contraction coefficients through this reach, and developing ineffective flow areas around the bridge.
Cross-Section Location Techniques In large floods, the entire floodplain on either side of the bridge is often under water. The width of the bridge opening is almost always significantly smaller than the width of the valley, thus flow first contracts to pass through the bridge opening and then expands downstream. There are energy losses associated with this contraction and expansion, and these losses are usually greater than expansion and contraction losses between normal valley cross sections. Locating the cross sections at the beginning of the contraction and the end of the expansion is based on the modeler’s judgment, supplemented by limited published guidance. Historically, a common technique for locating the two cross sections has been the rule of thumb. This technique applies a contraction ratio (CR) into the bridge of 1:1 and an expansion ratio (ER) out of the bridge of 1:4. This relationship is interpreted as follows: For every 4 feet or meters downstream of the bridge, the effective flow width expands out one foot or meter on each side of the bridge. Figure 6.13 illustrates this concept. USACE has used this general rule since the early 1960s, although improved techniques are now available to better estimate these cross-section locations. The U.S. Geological Survey (USGS) uses different techniques to locate the bounding cross sections at a bridge crossing. The USGS locates the beginning of the contraction (cross section 4) at one bridge opening width upstream. The location of the end of the expansion (cross section 1) can vary, but is most often one bridge opening width downstream of the bridge face. For example, if the bridge opening width is 400 ft, the beginning of the contraction would be located 400 ft upstream and the end of expansion would be 400 ft downstream. Figure 6.14 shows the sections located using the USGS procedures. These sections may be at very different locations, compared to the locations determined using USACE’s contraction and expansion ratios. There is no reason to select one rule of thumb over the other; it is the modelerʹs responsibility to appropriately select cross-section locations based on site constraints and knowledge of the flow patterns. Contraction Lengths and Ratios. To provide a more accurate and defensible method of selecting locations for the expansion and contraction sections, the Army Corps of Engineers’ Hydrologic Engineering Center published guidance (USACE, 1995) that gives a more scientific basis for selecting both cross-section locations and the corresponding loss coefficients. Actual data for five flood events at three bridges in Alabama and Mississippi were used to calibrate two-dimensional unsteady flow models. These models were used to study where the effective start of contraction and
184
Bridge Modeling
Chapter 6
Figure 6.13 Traditional contraction and expansion ratios through a bridge opening.
Figure 6.14 Location of expansion and contraction sections, USGS techniques.
Section 6.4
Defining Bridge Cross Sections and Coefficients
185
end of expansion occurred for these bridge locations and flood events. The models were used to develop generalized two-dimensional models for small, medium, and wide bridge openings, compared to the floodplain width. The studies showed that the start of contraction and end of expansion at bridges were not as far from the bridge as had been assumed with the USACE rule of thumb. Studies of narrow, medium, and wide bridge openings, comparing bridge width to active floodplain flow width, showed that the contraction ratio can be as low as 1:0.5 upstream and that the downstream expansion can end at a ratio of from 1:1 to 1:3. Table 6.3 provides a summary of the results for contraction ratios for various channel slopes and Manning’s n ratios. Table 6.3 Contraction ratio ranges. Channel Slope (s0), ft/mi
nob/nc = 1
nob/nc = 2
nob/nc = 4
1
1.0–2.3
0.8–1.7
0.7–1.3
5
1.0–1.9
0.8–1.5
0.7–1.2
10
1.0–1.9
0.8–1.4
0.7–1.2
The variables nob and nc represent the Manning n values for the overbank and channel, respectively, and s0 is the channel invert slope. Natural channel and floodplain situations with equal channel and overbank roughness (described by the values in the second column of Table 6.3), are seldom encountered. The overbank is normally considerably rougher than the channel; therefore, the ratios in columns 3 and 4 are more typical. As illustrated in the table, the contraction ratio (CR) rule of thumb of 1:1 is generally adequate for situations in which the roughness ratios are 2-4. The studies also demonstrated that increasing contraction ratios are associated with increasing discharges. Additionally, the work developed equations for estimating both the CR and the length of contraction (Lc). Somewhat surprisingly, the contraction length correlated better with the actual results when downstream Froude Numbers at sections 1 and 2 were used rather than at sections 3 and 4. The best prediction equation for the length of contraction was determined to be the following, but should be used only when the CR is within the ranges presented in Table 6.3: Q ob 2 F c2 n ob 0.5 L c = 263 + 38.8 -------- + 257 --------- – 58.7 -------- + 0.161L obs Q nc F c1
(6.8)
where Lc = the length of the contraction reach upstream of the bridge face (ft) Fc2 = the main channel Froude Number at section 2, immediately downstream of the bridge (dimensionless) Fc1 = the main channel Froude Number at section 1, the end of expansion (dimensionless) Qob = the overbank flow at section 4, beginning of contraction (ft3/s) Q = the total flow at section 4 (ft3/s) nob = the n value for the overbank areas at section 4 (dimensionless) nc = the n value for the channel at section 4 (dimensionless) Lobs = the average length of the bridge obstructions; the portion of the bridge approach embankments that extend into the flow (ft)
186
Bridge Modeling
Chapter 6
It was found that Equation 6.8 has an adjusted determination coefficient (R2) of 0.87 and a standard error of estimate (Se) of 31 feet. The adjusted determination coefficient reflects the amount of variance in the actual contraction length captured by Equation 6.8 (87 percent). The standard error of estimate means that, on average, use of Equation 6.8 for the computation of contraction length will result in one-third of the estimates being more or less than 31 feet from the actual value. Both these values are indicative of a statistically sound equation. In SI units, the prediction equation for Lc is Q ob 2 F c2 n ob 0.5 L c = 80.2 + 11.8 -------- + 78.3 --------- – 17.9 -------- + 0.161L obs Q nc F c1
(6.9)
The units of Equation 6.9 are m and m3/s. The adjusted determination coefficient is 0.87 and the standard error is 9.6 m. The modeler can use either of these equations with confidence when the stream being modeled has variables that fit the guidelines for which Equation 6.8 and Equation 6.9 were derived. The ranges of the variables are s0 = 1–10 ft/mi (0.2–2 m/km), floodplain width of about 1000 feet (300 m), bridge widths of 100–500 feet (30–150 m), and discharges of 5000–30,000 ft3/s (140–850 m3/s).
Example 6.2 Computing the length of contraction with Equation 6.8. A bridge crossing a stream is to be modeled with HEC-RAS. The reach has the following properties upstream of the bridge: • Floodplain flow width (B) = 1200 ft • Bridge width (b) = 400 ft • Average channel n = 0.045 • Average overbank n = 0.09 • Average stream slope = 8 ft/mi • Total discharge = 35,000 ft3/s
Solution The discharge is only slightly outside the range of flow data for which the equation was developed and is judged acceptable for this example. An initial value of the contraction ratio (CR) is needed to develop a location of cross section 4 so that the HECRAS model can be coded and operated. With the model output, the contraction ratio may then be refined using Equation 6.8. First, estimate the parameters required to determine CR from Table 6.3:
Section 6.4
Defining Bridge Cross Sections and Coefficients
187
The stream slope is given, therefore the ratio of the n values is needed (nob/nch = 0.09/ 0.045 = 2). From Table 6.3, CR (for the higher discharges) is interpolated as 1.4–1.5. Select an initial value of 1.5. If the bridge is symmetrical, both embankments are about 400 ft long [LOBS = (1200 – 400)/2 = 400 ft]. Therefore, the initial location for the cross section at the beginning of the contraction (section 4) is 1.5 × 400 = 600 ft upstream of the bridge face. This value is used for the initial HEC-RAS model and the program is operated for the selected discharge. From the model output, the variables required to compute the contraction length with Equation 6.8 are selected. This equation is appropriate because the floodplain width, bridge width, and discharge are close to the values used to derive Equation 6.8. From the HEC-RAS output for sections 1 and 2 (downstream of the bridge), the following values are found: • Channel Froude Number at section 2 = 0.52 • Channel Froude Number at section 1 = 0.21 • Overbank discharge at section 4 = 20,000 ft3/s Inserting these values into Equation 6.8 gives 0.52 20, 000 2 0.09 0.5 L c = 263 + 38.8 ---------- + 257 ------------------ – 58.7 ------------- + 0.161 ⋅ 400 = 424 ft . 0.21 35, 000 0.045 The computed contraction length is much smaller than the initial estimate of 600 ft. Therefore, the HEC-RAS data set is modified, with section 4 relocated to 424 ft upstream of the bridge and any geometry changes caused by the relocation made to the section. The program is run again and the new values for channel Froude numbers at sections 1 and 2 and the discharge in the overbank area at section 1 were unchanged, as would be expected for changes made upstream for this subcritical flow computation. The computed value of Lc is thus unchanged. No further modification to the location of section 4 is necessary.
For problems in which the variables are significantly out of these ranges, applicable to Equations 6.8 and 6.9, the following equation can be applied for the English system only. No similar equation was developed for SI units, although the modeler can convert the SI flowrate values to ft3/s to use this equation: Q ob 2 F c2 n ob 0.5 CR = 1.4 – 0.333 -------- + 1.86 --------- – 0.19 -------- Q nc F c1
(6.10)
All variables are as defined in the previous equation, with CR being the contraction ratio. This equation has an adjusted determination coefficient of 0.65 and a standard error estimate of 0.19; therefore, it contains considerably more error (uncertainty) in the estimate of CR than does Equation 6.8 for contraction length. Once a CR is calculated, the contraction length (Lc) is determined by multiplying the CR by the obstruction length. Assuming that the bridge opening is in the center of the cross section, the obstruction length equals (floodplain width – bridge width)/2. When developing the location of the start of the contraction, tentative locations should be selected for an initial model run. The HEC-RAS model can then be executed and initial values for use in Equation 6.8 or Equation 6.10 can be obtained from the HEC-RAS output. All the variables in the two equations can be found in the detailed cross-section output from the program. The start of contraction can be found directly with Equation 6.8, or from the CR obtained from Equation 6.10 used in conjunction with a topographic map of the bridge reach. Depending on the range of geometry and discharge values obtained for the bridge being modeled, the engineer should use the
188
Bridge Modeling
Chapter 6
appropriate equation to develop the final location for the section defining the start of contraction. Typically, only an initial estimate and one modification, to reflect the equation results, are required to properly locate the start of contraction. Values derived with either equation should be checked against the range of ratios shown in Table 6.3. Computed CR values less than 0.3 or more than 2.5 should be adjusted to values that are more reasonable.
Example 6.3 Computing the contraction ratio when Equation 6.8 is not applicable. A bridge crossing a stream is to be modeled with HEC-RAS. The bridge reach has the following properties: • Floodplain flow width (B) = 220 ft • Bridge width (b) = 60 ft • Average channel n at section 4 = 0.05 • Average overbank n at section 4 = 0.08 • Average stream slope = 22 ft/mi • Total discharge = 7200 ft3/s
Section 6.4
Defining Bridge Cross Sections and Coefficients
189
Solution As in Example 6.1, an initial value of the contraction ratio (CR) is needed so that the HEC-RAS model can be coded and operated. However, the floodplain width and bridge width are not within or near the range of widths for which Equation 6.8 was developed; nor is the stream slope. Consequently, Equation 6.8 cannot be used to compute contraction length directly for this bridge. For streams with values outside of those for which Equation 6.8 was derived, Equation 6.10 is used to determine CR, using model output after an initial HEC-RAS run. The contraction length is determined by multiplying the CR and the obstruction length. First, make an initial estimate of the parameters required to determine CR from Table 6.3. For a stream slope greater than 10 ft/mi and a ratio of overbank to channel n of 1.6, a CR is interpolated from Table 6.3. For higher discharges, a CR of 1.6 is appropriate for a stream slope of 10 ft/mi. Because the study stream is more than twice as steep, a lower CR can be used, since CR appears to decrease as slope increases. However, to be conservative, use CR = 1.6. If the bridge opening is in the center of the cross section, the obstruction length is (220 - 60)/2 = 80 ft. The first estimate of the contraction distance is 1.6 × 80 = 128 ft, which is then coded to the HEC-RAS model as the initial estimate of the contraction length. HEC-RAS is then operated and the detailed output at sections 1 and 2, just downstream of the bridge, and section 4 are reviewed to obtain the additional parameters for Equation 6.10. From the HEC-RAS output, • Channel Froude Number at section 1 = 0.3 • Channel Froude Number at section 2 = 0.64 • Overbank discharge at section 4 = 2850 ft3/s Applying Equation 6.10 gives the contraction ratio as 0.64 2850 2 0.08 0.5 CR = 1.4 – 0.333 ---------- + 1.86 ------------ – 0.19 ---------- = 0.74 . 7200 0.05 0.30 The revised contraction length is 0.74 × 80 = 59 ft, or less than half the initial estimate. The distance from the upstream bridge face to the beginning of contraction (section 4) is adjusted to the new value in the HEC-RAS model, the cross-section geometry is modified, if necessary, and the program rerun. Any significant revision in the overbank discharge at section 4 with the revised distance should be reapplied to Equation 6.10 to check for any additional adjustments in CR and contraction length. For this problem, no additional length adjustments may be required. The CR value computed with Equation 6.10 should be reasonable, with a range of allowable CR between 0.3 and 2.5.
Note that Equation 6.8 and Equation 6.10 both contain discharge terms. This indicates that the contraction distance or ratio will be different for every discharge analyzed. Many hydraulic analyses, such as flood insurance studies, must evaluate several water surface profiles, which can result in different geometric models for each discharge studied. Needless to say, managing this many data sets can be rather cumbersome. Therefore, for multiple profiles, a practical solution is to compute a contraction length, CR, based on an “average” flood discharge, or based on the largest discharge that does not greatly overtop the bridge or the embankments. In most cases, this average length is then used for analysis of all flood events. The modeler may wish to validate the use of the average length by performing sensitivity tests on the effect of the water surface elevation through the bridge by using varying contraction lengths with discharge. If the elevation difference between using a specific or an average value of contraction length is significant when compared to using separate lengths for each discharge, separate geometric models for each discharge may be necessary. In the
190
Bridge Modeling
Chapter 6
experience of the author, the location of the start of the contraction section can vary by 100–200 ft (30–60 m) or more, and not result in a significant change in the computed water surface elevation through the bridge reach. The information in this paragraph is also applicable for computing an expansion length or ER, which is presented in more detail in the following subsection. Expansion Lengths and Ratios. With the same USACE data as in the preceding section, expansion ratios (ER) were found to be a function of channel roughness and slope, with bridge opening and floodplain widths also proving to be important factors. Expansion ratios were all considerably less than those given by the 1:4 rule of thumb, with the majority computed as less than 1:3. Table 6.4 shows the ranges of ER found for a variety of bridge conditions. In this table, b is the width of the bridge opening and B is the total floodplain flow width, as illustrated in Figure 6.1. Similar to contraction ratios, the greater the discharge, the higher the expansion ratio. The mean of all the values is approximately 1.5, indicating that the traditional value of 1:4 is very conservative. Overbank roughness is normally considerably greater than channel roughness, so the last two columns of Table 6.4 represent more typical expansion ratios. The expansion ratios are generally no more than 1:2, much lower than past rule-of-thumb estimates. Table 6.4 Expansion ratio ranges. Geometry, b/B 0.1
0.25
0.5
Channel Slope (s0), ft/mi
nob/nc = 1
nob/nc = 2
nob/nc = 4
1
1.4–3.6
1.3–3.0
1.2–2.1
5
1.0–2.5
0.8–2.0
0.8–2.0
10
1.0–2.2
0.8–2.0
0.8–2.0
1
1.6–3.0
1.4–2.5
1.2–2.0
5
1.5–2.5
1.3–2.0
1.3–2.0
10
1.5–2.0
1.3–2.0
1.3–2.0
1
1.4–2.6
1.3–1.9
1.2–1.4
5
1.3–2.1
1.2–1.6
1.0–1.4
10
1.3–2.0
1.2–1.5
1.0–1.4
Equations for expansion length and for ER were also developed. For English units, the best of the two prediction equations for expansion length is F c2 L e = – 298 + 257 -------- + 0.918L obs + 0.00479Q F c1
(6.11)
where Le = the length of the expansion reach (ft) Lobs = the average length of the obstruction caused by the two bridge approaches (ft) The adjusted determination coefficient is 0.84 and the standard error of estimate is 96 feet, indicating that the equation is statistically sound. For SI units, Equation 6.11 takes the form F c2 L e = – 90.98 + 78.3 -------- + 0.918L obs + 0.515Q F c1
(6.12)
Section 6.4
Defining Bridge Cross Sections and Coefficients
191
The lengths are in meters and the discharge is in m3/s. The adjusted determination coefficient is 0.84 and the standard error is 29.3 m. Equation 6.11 and Equation 6.12 are applicable at bridge sites having parameters in the same range as was used to derive the equations. Parameter limits were discussed in the section above for contraction lengths and ratios.
Example 6.4 Computing the expansion length with Equation 6.11. Compute the expansion reach for the bridge site of Example 6.2. An initial value of the expansion ratio (ER) is needed so that the HEC-RAS model may be coded and operated. With the model output, the expansion ratio may then be refined using Equation 6.11. Solution First, estimate the parameters required to determine the ER from Table 6.4. The stream slope is 8 ft/mi and the ratio of the n values was found to be 2 in Example 6.2. The bridge opening ratio is computed as 400/1200 or 0.33. From Table 6.4, the ER ranges from approximately 1.2–2.0 for these values. Because the higher discharges reflect higher values of ER, an initial value for ER is selected as 2. The average abutment length (obstruction length) was found to be 400 ft in Example 6.2. Therefore, the initial location for the cross section at the beginning of the expansion (section 4) is 2 × 400 = 800 ft downstream of the bridge face. This value is used in the initial HEC-RAS model and from the model output, the variables required to compute the expansion length using Equation 6.11 are selected. This equation can be used because the floodplain width, bridge width, and discharge are within or close to the range of values used to derive Equation 6.11. The Froude numbers for the channel at sections 1 and 2 were found in Example 6.1, allowing Equation 6.11 to be applied to give 0.52 L e = – 298 + 257 ---------- + 0.918 ⋅ 400 + 0.00479 ⋅ 35,000 = 873 ft 0.21 This computed value is approximately 10 percent greater than the initial estimate of Le. Therefore, the distances in the HEC-RAS model between the downstream bridge face and the end of expansion should be increased to 873 ft. Any cross-section geometry changes caused by the relocated section are made and the program is rerun. If there are significant changes in channel Froude numbers at sections 1 and 2, these values should be used in Equation 6.11 to recompute Le and determine if there are significant alterations in calculated water surface elevations through the bridge with the adjusted lengths. Normally, the initial revision for expansion length is all that is required.
For sites with discharge values or floodplain widths significantly less than the suggested ranges, Equation 6.13 (for English units) or Equation 6.14 (for SI units) should be used to compute the expansion ratio (ER): F c2 Le –5 ER = --------- = 0.421 + 0.485 -------- + 1.80 × 10 Q F c1 L obs
(6.13)
F c2 Le –4 - = 0.421 + 0.485 -------- + 6.39 × 10 Q ER = --------F L obs c1
(6.14)
and
192
Bridge Modeling
Chapter 6
The adjusted determination coefficient for Equation 6.13 and Equation 6.14 is 0.71 and the standard error of estimate is 0.26, so significant uncertainty is still present in the results of both equations. After an initial location of the sections defining the bridge (possibly based on Table 6.3 and Table 6.4), HEC-RAS output can provide the variables at sections 1 and 2 to solve these equations. The calculated variables then allow an improved estimate for expansion reach data when substituted into Equation 6.11 (6.12) or Equation 6.13 (6.14). The initial location of the contraction and expansion sections may then be adjusted to reflect the results of the appropriate equation.
Example 6.5 Computing the expansion ratio when Equation 6.11 is not applicable. Determine the expansion ratio (ER) for the bridge of Example 6.3. Solution For the bridge and reach data given, b/B = 60/220 = 0.27; the ratio of overbank to channel n was found in Example 6.3 as 1.6. With these values, Table 6.4 is used to determine a preliminary estimate of ER. As in Example 6.4, an initial value of ER is needed so that the HEC-RAS model may be coded and operated. However, the floodplain width, bridge width, and stream slope are not within or near the range of widths for which Equation 6.11 was developed. Consequently, Equation 6.11 cannot be used to compute the expansion length for this bridge. For streams with discharge values less than those for which Equation 6.11 was derived, Equation 6.13 is used to determine ER, using model output after an initial HEC-RAS run, and then length is determined with ER and the obstruction length. Make an initial estimate of the parameters required to determine an ER from Table 6.4. For a stream slope greater than 10 ft/mi and a ratio of overbank to channel n of 1.6, an ER is interpolated from Table 6.4. For higher discharges, an ER of 2 is appropriate for a stream slope of 10 ft/mi. A lower ER can probably be used, as ER appears to decrease as slope increases. However, select an ER of 2 for a conservative initial estimate. With the obstruction length of 80 ft found in Example 6.3, the first estimate of the expansion distance is 2 × 80 = 160 ft, which is then coded to the HEC-RAS model. The HEC-RAS detailed output at sections 1 and 2, just downstream of the bridge, are reviewed to obtain the additional parameters required to solve Equation 6.13. The parameters for channel Froude Numbers at sections 1 and 2 were found in Example 6.3. Applying Equation 6.13, the expansion ratio is found to be 0.64 –5 ER = 0.421 + 0.485 ---------- + 1.8 × 10 ( 7200 ) = 1.59 0.30 The revised expansion length is 1.59 × 80 = 127 ft, or 33 ft (21 percent) less than initially estimated. The distance from the downstream bridge face to the end of expansion (section 1) is adjusted to the new value of 127 ft within the data set. Any geometry changes necessary to reflect the new location are made and the program is rerun. Any significant revision in the channel Froude Numbers at sections 1 and 2 downstream of the bridge should be reapplied to Equation 6.13, then ER and the expansion length recomputed and the program rerun until no significant changes in ER occur. The value computed with Equation 6.13 should be reasonable, with a range of allowable ER between 0.5 and 4.
When discharges are significantly greater than 30,000 ft3/s (850 m3/s), the location of the end of expansion may be overestimated by Equation 6.11 or Equation 6.13. For these discharge conditions, the following equation is more appropriate:
Section 6.4
Defining Bridge Cross Sections and Coefficients
F c2 Le - = 0.489 + 0.608 -------ER = --------F c1 L obs
193
(6.15)
The adjusted determination coefficient for this equation is 0.59 with a standard error of 0.31, indicating significant uncertainty in the results.
Example 6.6 30,000 ft3/s.
Computing the expansion ratio for discharges greatly exceeding
Determine the expansion ratio (ER) at a bridge site having the following parameters: • Discharge = 100,000 ft3/s • B = 3000 ft • b = 1200 ft • stream slope = 3 ft/mi
Solution B and b far exceed the maximum values for Equation 6.11 and the discharge greatly exceeds the 30,000 ft3/s upper limit. Table 6.4 is not applicable for values significantly outside the range shown. However, the upper limit for ER for stream slopes similar to the example is approximately 2. Therefore, initial estimates of ER (and CR, Cc, and Ce) are made and the bridge reach is modeled in HEC-RAS. The output from the initial run is inspected and the values of the channel Froude Numbers at sections 1 and 2 are found as 0.16 and 0.25, respectively. These values are then substituted in Equation 6.15 to give 0.25 ER = 0.489 + 0.608 ---------- = 1.44 0.16 The revised expansion length is then determined with the new, computed value of ER and the program is rerun to evaluate the need for any further adjustments in ER and Le.
The expansion reach length is derived from the most appropriate of the three equations, with the calculated value checked against the range of values in Table 6.4 for appropriateness. If the ER is greater than 3, the modeler should consider using intermediate sections between sections 1 and 2 to more accurately compute the average friction slope between the two sections. A computed ER greater than 4 should be adjusted downward to a more reasonable value. As with the CR and contraction lengths discussed in the previous paragraphs, the ER and expansion length are based on a single discharge value, theoretically requiring
194
Bridge Modeling
Chapter 6
different geometry sets for each profile analyzed. The development of an appropriate ER or expansion length for each bridge is handled similarly to the method for contraction length. A single, representative ER or expansion length is normally chosen, based on an “average” flood discharge or the largest flood that does not greatly overtop the bridge or embankments and this value is used for all further calculations. Sensitivity tests can be performed to assess the effect of varying the ER or expansion reach length, based on various discharges. The traditional 1:4 ER overestimates the losses between the end of the expansion location and the downstream bridge face, giving a higher water surface and a lower velocity estimate. While this might be considered a factor of safety, these values result in less accurate profiles. Lower velocity estimates can result in underestimating potential scour, which may ultimately result in safety and stability issues for the bridge structure and foundation. Therefore, there is little justification in using the traditional 1:4 ER. Similarly, the USGS method of locating the end of expansion a distance equal to the bridge opening width was not validated by the HEC study.
Loss Coefficients for Flow Through Bridges Expansion and contraction losses are defined in Chapter 5. These losses are generally more severe (higher) through a bridge than a natural valley cross section, due to the structure’s constriction of the flow. Contraction and expansion loss coefficients of 0.3 and 0.5, respectively, are widely used in bridge analyses in a subcritical flow regime. However, the same tests that developed prediction equations for CR and ER also examined expansion and contraction coefficients. This study found that the traditional values of the loss coefficients generally overestimate the actual value of the expansion and contraction losses through the bridge reach. Manning’s n is another coefficient that may require modification at bridges. Contraction Coefficient. The contraction coefficient (Cc) is applied to the absolute difference in velocity heads at adjacent cross sections approaching and entering a bridge. The contraction coefficient is applied when the velocity head at the downstream cross section is greater than the velocity head at the upstream cross section. In this situation, the flow area contracts. For subcritical flow, HEC-RAS normally applies the contraction coefficient at sections 4, 3, BU, and usually BD. For the tests performed in the HEC research, nearly all the profiles through bridges were best modeled with a Cc value of 0.1. For this reason, 0.1 is the accepted minimum value assigned for subcritical flow conditions through bridges. Values for all tests ranged from 0.1 to 0.5, with an average of 0.12. Due to the narrow range of results for contraction coefficients, the research suggests that Table 6.5 be employed to estimate Cc. Table 6.5 Contraction coefficients at bridges. Degree of Constriction
Recommended Cc
0% < b/B < 25%
0.3–0.5
25% < b/B < 50%
0.1–0.3
50% < b/B < 100%
0.1
Section 6.4
Defining Bridge Cross Sections and Coefficients
195
In Table 6.5, b is the width of the bridge opening and B is the width of the floodplain flow. The selection of B should be based on the largest discharge that does not overtop the bridge or the approach embankments. When the roadway is overtopped and a significant amount of flood flow passes over the obstruction, the contraction and/or expansion will not necessarily be as significant as when all flow is confined to pass through the bridge opening. As Table 6.5 suggests, for most situations the traditional value of Cc = 0.3 at bridges is conservative, except for narrow bridge openings (b/B < 25%) and a value of 0.1 for Cc is now applicable for many bridges. However, the contraction coefficient used between natural channel cross sections (without a bridge) is also 0.1 and it would seem that a Cc for a cross section representing a bridge should be larger than for nonbridge sections. Without any actual data for calibration at a bridge, the modeler may opt to be conservative and retain the traditional value of 0.3 for bridges. No useful regression equations have been developed for the contraction coefficient. Expansion Coefficient. The expansion coefficient, Ce, is applied to the absolute difference in velocity heads at adjacent sections leaving the bridge. For subcritical flow, the expansion coefficient is used when the downstream sectionʹs velocity head is less than the upstream section’s, indicating decreasing velocity and thus an expansion of flow area. In subcritical flow computations, the expansion coefficient is applied to section 2 and occasionally to section BD. Because the water surface elevation at section 1 is computed from downstream conditions, the normal valley contraction and expansion coefficients (0.1/0.3) are used at section 1, rather than the bridge expansion and contraction coefficients. As with the contraction coefficient, regression analysis did not provide a strong statistical relationship to develop an equation for the expansion coefficient. The expansion coefficients that best reproduced the known water surface profiles in the HEC tests ranged from 0.1 to 0.65, with an average value of 0.3. The only equation that showed a reasonable correlation with the hydraulic variables is F c2 D ob C e = – 0.092 + 0.570 --------- + 0.075 -------Dc F c1
(6.16)
where Ce = the expansion coefficient (dimensionless) Dob = the hydraulic depth for the overbank at section 1, end of the expansion (ft) Dc = the hydraulic depth for the main channel at section 1 (ft) Fc2 = the Froude Number for the channel at section 1 (dimensionless) Fc1 = the Froude Number for the channel at section 2 (dimensionless) A corresponding equation for SI units was not developed, although the modeler may convert metric hydraulic depths to their English unit values to apply Equation 6.16. The adjusted determination coefficient for this equation was 0.55 with a standard error of estimate of 0.10, which indicates a high level of uncertainty in the prediction of Ce. Hydraulic depth for the channel and overbank and Froude Numbers for the channel at sections 1 and 2 can be obtained from the detailed section printout. These are used to get an initial estimate of the location of section 1 and in Equation 6.16 to estimate Ce.
196
Bridge Modeling
Chapter 6
Example 6.7 Computing the expansion and contraction coefficients for the bridge of Example 6.2. The bridge crossing of Example 6.2 has the following parameters, which are needed for the initial estimate of the contraction and expansion coefficients: • Floodplain width (B) = 1200 ft • Bridge width (b) = 400 ft Solution The contraction coefficient value is estimated using Table 6.5, knowing the bridgeopening width ratio. The range of Cc from Table 6.5 for a bridge ratio of 400/1200 = 0.33 is 0.1-0.3. In general, the lower the ratio, the higher the expected value of Cc. The modeler is free to choose any value of Cc within this range. For the initial estimate before computing Ce , assume Cc = 0.2. The expansion coefficient is estimated using Equation 6.16. However, HEC-RAS must be run to obtain the hydraulic depth and Froude numbers at sections 1 and 2, downstream of the bridge, before applying Equation 6.16. Since Cc = 0.2 was selected (midrange of contraction coefficient values), an initial selection of Ce based on the midrange (0.3–0.5) can be assumed appropriate, or Ce = 0.4. These values are then included for the bridge reach (upstream of section 1 through section 4), along with the initial estimates for contraction and expansion length, and the HEC-RAS model is operated. From Example 6.2, the channel Froude Numbers at sections 1 and 2 are 0.21 and 0.52, respectively. The hydraulic depth for the channel at section 1 is obtained from the detailed cross-section output (D = 18.6 ft). The hydraulic depth for the overbanks at section 1 may be computed by the modeler from the top width of the section, subtracting the channel width and adding the cross-sectional area of the right and left overbank areas. The hydraulic depth of the overbank is then found by dividing overbank area by overbank top width, for a value of 4.6 ft. Hydraulic depth, left and hydraulic depth, right are also available as HEC-RAS variables. With the values generated by HEC-RAS, Equation 6.16 gives the estimate of Ce as 4.6 0.52 C e = – 0.092 + 0.57 ---------- + 0.075 ---------- = 0.23 18.6 0.21 The computed value for Ce is about 60 percent of the initial estimate and nearly the same as the initial estimate for Cc. Because Cc is typically much less than Ce, the modeler may consider decreasing Cc to reflect the computed value of Ce. A simple proportion can be used to give 0.23 C c = 0.2 ---------- = 0.12 0.4 HEC-RAS should be rerun using the new coefficients and the revised value of channel Froude Number at section 2 evaluated. If the revised value is significantly different than the initial value of 0.52, Equation 6.16 should be reapplied to determine a revised value of Ce. The computed values for the two coefficients are within the allowable range of possible values; however, the computed value of Ce for the bridge is less than that for nonbridge sections. The modeler must determine whether this represents a realistic value or whether a minimum value of 0.3 should be used for the bridge reach.
Section 6.4
Defining Bridge Cross Sections and Coefficients
197
Example 6.8 Computing the expansion and contraction coefficients for the bridge of Example 6.3. For the bridge crossing of Example 6.3, the following parameters are needed for the initial estimate of the coefficients: • Floodplain width (B) = 220 ft • Bridge width (b) = 60 ft • b/B = 0.27 Solution For b/B between 0.25 and 0.5, the contraction coefficient ranges from 0.1 to 0.3, as shown in Table 6.5. Since the actual bridge opening ratio is close to 0.25, an initial estimate of the contraction coefficient of 0.3 is appropriate (smaller ratio, higher coefficient). However, the modeler may select a different value within this range, if desired. Because the value of Cc initially adopted reflects the “traditional” value for bridges, an initial value of Ce = 0.5 is also used. These values are then included for the bridge reach (upstream of section 1 through section 4), along with the initial estimates for contraction and expansion length, and HEC-RAS is rerun. From Example 6.3, the channel Froude Numbers at sections 1 and 2 are 0.3 and 0.64, respectively. The hydraulic depth for the channel at section 1 is obtained from the detailed section output (D = 9.4 ft). The hydraulic depth for the overbank at section 1 may be computed from the top width of the full cross section, subtracting the channel width and adding the cross-sectional area of the right and left overbank areas. The hydraulic depth of the overbank is then found by dividing overbank area by overbank top width, for a value of 4.3 ft. Hydraulic depth, left and hydraulic depth, right are also available as HEC-RAS variables. With these values from the HEC-RAS output, Equation 6.14 estimates Ce as 4.3 0.64 C e = – 0.092 + 0.57 ------- + 0.075 ---------- = 0.33 . 0.3 9.4 Because the computed value for Ce is much lower than the initial value, it is reasonable to adjust the initial estimate for Cc in proportion to the change in the expansion coefficient. Because Cc is typically much less than Ce, the modeler may consider decreasing Cc to reflect the computed value of Ce. A simple proportion can be used to give 0.33 C c = 0.3 ---------- = 0.12 . 0.5 HEC-RAS is then run again with the new coefficients and the revised value of channel Froude Number at section 2 evaluated. If the revised value is significantly different from the initial value of 0.64, Equation 6.16 is reapplied in order to determine a revised value of Ce. Both the coefficient values exceed those for nonbridge sections, which appears reasonable.
If there is a long contraction or expansion reach at the bridge, resulting in large differences in conveyance and friction slope between sections 1 and 2, the modeler should insert intermediate sections. These intermediate sections reflect the higher coefficients used to model bridges. Intermediate sections should also include the ineffective flow option used at bridges, presented in detail later in this chapter. The expansion coefficient is more important than the contraction coefficient when analyzing bridge losses. This is because more energy is lost in an expansion than in a contraction. The photograph in Figure 6.8 illustrates this phenomenon, where one can observe the smooth streamlines entering the bridge, compared to the high turbulence
198
Bridge Modeling
Chapter 6
leaving the bridge. For this reason, sensitivity tests on the selected expansion coefficient should be considered. HEC’s guidance suggests operating the model with expansion coefficient values of ±0.2 from the computed value. This increment represents ±2 standard deviations of a 95-percent confidence band around the computed value. If the difference in the water surface elevations through the bridge is large for the range of Ce, a conservative (high) value of Ce is warranted. Where the added increment gives a very large value for the coefficient, an upper limit for Ce of 0.8, equal to an abrupt expansion, is recommended. Where the subtracted increment gives values of Ce less than 0.1, a minimum value of 0.1 is recommended. The traditional expansion and contraction values through bridges generally result in a conservative estimate of the nonfriction losses. This provides a factor of safety when computing bridge losses. However, the higher expansion coefficients result in higher water surface elevations and, therefore, less accurate water surface profiles at the bridge face. The higher water surface elevations at the bridge face produce a lower velocity, which can cause errors in bridge scour computations. With the work done by HEC, lower values of expansion and contraction coefficients may be more representative of field conditions and are based on a scientific study calibrating Cc and Ce against measured discharge and highwater mark data. The traditional coefficients are found to be appropriate only for those bridge openings that represent less than 25 percent of the effective flow width in the floodplain. However, the modeler must make the final selection of the expansion and contraction coefficients. Without detailed data to calibrate a profile through a bridge, the modeler may opt for retaining the more traditional, and generally higher, values of Cc and Ce. Loss Coefficients for Supercritical Flow. No firm guidance is available for bridge coefficient selection in a supercritical flow regime. Although the same values for expansion and contraction coefficients may be used as described in the previous section for subcritical flow, lower values are normally more appropriate for modeling supercritical flow reaches. The guidance given in Chapter 5 for supercritical flow, in normal valley cross sections, suggests that values of 0.05 and 0.1 for the contraction and expansion coefficients, respectively, represent the upper limits (to avoid oscillation of the computed profile). Because the profile computations proceed upstream to downstream in supercritical flow, section 4 has expansion and contraction coefficients similar to a normal valley section. Sections 3, BU, and usually BD are expected to represent expansions, because obstacles in supercritical flow cause the flow velocity to decrease and the water surface elevation to increase. Thus, Ce is applied by HEC-RAS to sections 3, BU, and usually BD. Sections 1, 2, and occasionally BD are expected to represent contractions in supercritical flow, since the velocity increases after passing the obstruction and the water surface elevation decreases. Thus, Cc would be applied by HEC-RAS at sections 1, 2, and occasionally BD. In natural channels experiencing supercritical flow, the guidance given by HEC-RAS suggests lower expansion and contraction coefficients than for the same bridge under subcritical flow. Suggested values for most bridges for supercritical contraction and expansion coefficients are 0.1 and 0.3, respectively, and 0.3 and 0.5, respectively, at very abrupt transitions. However, most instances of supercritical flow over a length of stream containing a bridge occur within man-made channels of nearly constant cross-sectional area. Where these nearprismatic channels are present, expansion and contraction values of zero or near zero (0.01 to 0.02) are often used. Physical model testing may ultimately be required to properly and adequately
Section 6.5
Ineffective Flow Areas
199
address the effect on water surface profiles for bridge design under supercritical flow conditions. Manning’s n at Bridges. The channel and floodplain Manning’s n values can require adjustment at bridge cross sections. Sections 2 and 3 are located a short distance from the bridge face and may have a lower value of Manning’s n for both the channel and floodplain, compared to sections 1 and 4. Normal road maintenance includes periodically mowing the bridge right-of-way and removing tree growth for several yards (meters) on either side of the embankment toe, where sections 2 and 3 are often located. Reduced vegetation along the alignment of these two sections can result in an overbank n value representative of grass rather than the dense brush or woods which may exist upstream or downstream of the bridge. The modeler will have to estimate an appropriate average n value for sections 2 and 3, depending on the flow regime, possibly based on a distance weighting of n, because these sections should be representative of the roughness for one-half the distance to the next cross section (1 or 4). Similarly, the original bridge design or later erosion problems may have resulted in a widened, straightened, or lined (with concrete or rock, for instance) channel through the bridge, compared to the original channel configuration and roughness. This situation again results in a lower value of n for the channel at sections 2 and 3, compared to those of sections 1 and 4. The modeler may want to apply lower values of Manning’s n at sections 2 and 3 to more accurately represent actual conditions. If the channel through the bridge is much larger than the channel at sections 1 or 4, a transition section can be considered between 1 and 2 or between 3 and 4, where the change in channel cross section (and channel and overbank n) can be specified. Cross sections BD and BU, automatically added by HEC-RAS, use the Manning’s n values associated with sections 2 and 3. However, the modeler may overwrite the Manning’s n values for BD and BU to reflect a different condition within the bridge. For instance, if the channel is paved inside the bridge but not at sections 2 and 3, the n value for concrete can be substituted for the n value at sections BD and BU. The channel and floodplain geometry inside the bridge opening for sections BD and BU can also be adjusted, if needed. Similarly, if the profile analyses for discharges that overtop the roadway are being computed using the energy method, the Manning’s n reflecting the roadway surface should be used for sections BD and BU to reflect the roadway surface at these sections. Because of the normally short length of a bridge, friction losses computed with Manning’s n are usually small. Other losses (expansion and contraction) are typically much larger and, therefore, more critical than the friction losses through the bridge. The engineer should check the conveyance and friction slope values between sections 1 and 2 and between 3 and 4 for large differences that may in turn lead to large differences in water surface elevations. If there are large changes in water surface elevations between these cross sections, intermediate sections may be needed to best model the change in n between each pair of sections.
6.5
Ineffective Flow Areas Many bridges have approach roadway embankments that block the normal flow of water. This blockage forces the flood flow width to narrow towards the bridge opening and creates areas on the upstream and downstream side of the bridge where
200
Bridge Modeling
Chapter 6
water will pond. The velocity of the ponded water, in the downstream direction, will be close to or equal to zero. Therefore, the floodplains just upstream and downstream of the bridge are ineffective in conveying flow until the roadway elevations are exceeded and are thus considered ineffective flow areas. If the conveyance at cross section 3, just upstream of the bridge, is not limited to approximately the width of the bridge opening, there will be computation errors for the profile of this flood. The floodplains for the two cross sections immediately upstream and downstream of the bridge opening (sections 2 and 3) have very limited effectiveness for conveying flow until a large portion of the flood flow overtops the embankment. When overtopping occurs, a portion of the total flow bypasses the bridge opening and is conveyed in the overbank area. Specifying ineffective flow areas in HEC-RAS for portions of sections 2 and 3, just outside the bridge opening, is normally required to properly model flow constrictions. Figure 6.15 is a cross-sectional view of a bridge opening and Figures 6.16 and 6.17 illustrate the use of ineffective flow areas (in HEC-RAS) at cross sections 2 and 3 for this bridge, with the hatched area representing the ineffective flow area.
Figure 6.15 Cross-sectional view of a bridge opening modeled in HEC-RAS.
Defining ineffective flow areas can be complicated, since it is not known at exactly what flood elevations or flow the floodplain area outside the bridge opening becomes effective. Ineffective flow area elevations are normally significantly different upstream and downstream of a bridge, because there are energy losses through the bridge, leading to a higher water surface elevation upstream of the bridge than downstream when the adjacent floodplain becomes effective. The ineffective flow area elevation, or constraint elevation, on the downstream side is thus lower than the constraint elevation on the upstream side. Figure 6.18 shows several profiles through a bridge, with corresponding cross sections that illustrate this variation in water
Section 6.5
Ineffective Flow Areas
201
Figure 6.16 Ineffective flow areas at cross section 2.
Figure 6.17 Ineffective flow areas at cross section 3.
surface elevations. Of the five discharges used to compute water surface profiles, all discharges pass through the opening until discharge Q4, which overtops the left approach embankment. When this discharge occurs, both the upstream and downstream constraint elevations are exceeded on the left side of the cross section and the conveyance for the full left overbank portions of sections 2 and 3 are now considered
202
Bridge Modeling
Chapter 6
effective. With an even higher discharge (such as Q5) that exceeds the right ineffective flow area elevations, the right overbank sections for 2 and 3 become effective. Although the location of the ineffective flow areas can be determined immediately, two or three iterations varying the constraint elevations that specify the ineffective flow areas are typically required to determine the elevations to be used by HEC-RAS.
Figure 6.18 Water surface profiles and cross-section flow area at a bridge.
Ineffective Flow Area Elevations The lowest roadway elevation is usually selected as the constraint elevation for ineffective flow areas. However, at section 3 it may be appropriate for the elevation constraint to be somewhat higher than the lowest roadway elevations on either side of the bridge, since even if the roadway elevation is exceeded by only an inch (cm) or two, HEC-RAS now considers the entire upstream overbank area as effective in conveying flood discharge over the embankment. The actual flow over the embankment for a depth of 0.1 ft (0.03 m) or so may only be a few ft3/s, whereas there may be several hundred to several thousand ft3/s shown for the overbank conveyance at section 3. Therefore, the modeler may want to consider specifying the constraint depth several
Section 6.5
Ineffective Flow Areas
203
tenths of a ft above the roadway elevation. The constraint elevations should be based on the point at which there is significant flow across the embankment surface. Ineffective flow area elevations on the left and right sides of the upstream section may be different because of changes in the roadway profile across the floodplain, as displayed in Figure 6.18. On the downstream side, the constraint elevation is initially unknown, since the water surface elevation at section 2 is lower than that of section 3 for the same discharge, but the modeler would not know for certain how much lower. A long-used rule of thumb for an initial estimate of the constraint elevation at section 2 is an average of the highest low chord elevation and the lowest roadway surface elevation. Different downstream constraint elevations on either side of section 2 are typical if the low chord elevation varies across the bridge opening and/or if the roadway initial overtopping elevation is different on either side of the bridge. If the low roadway elevation is less than the low-chord elevation, then an initial estimate of the downstream constraint elevation is based on the engineer’s judgment of the estimated head loss through the bridge. Because of the low embankment and large bridge opening (compared to the floodplain flow width) in Figure 6.18, there will probably be a rather small difference in the upstream and downstream water levels at the time of road overtopping. Thus, a downstream constraint elevation that is 0.5–1.0 ft (0.15–0.30 m) less than the upstream constraint elevation may be a good initial estimate for the left side (where the initial road overflow will take place). On the right side of section 2, the roadway elevation is much higher than the left. Because flow will cross the left side of the bridge at a significant depth before flood elevations exceed the right roadway elevations, the difference in constraint elevations on the right side of sections 2 and 3 may only be 0.1 ft (0.03 m). These elevations represent initial estimates and are intended for later refinement with the water surface profile computations. The initial elevation is not critical, since it will be adjusted up or down based on the results of hydraulic profile computations for a range of discharges. If the correct downstream elevation is not used, flood flows may still be confined to the downstream bridge opening while the roadway embankments are overtopped on the upstream side, obviously a situation that cannot occur in real life. This error can lead to large changes in the hydraulic profile through the bridge opening and give highly erroneous results. Figure 6.19 illustrates such a situation. The graphical output from HEC-RAS shows two water surface profiles through the bridge, based on using the roadway elevation upstream (440 ft) for the upstream constraint elevation and about one-half the elevation of the roadway plus the low chord elevation (436 ft) for the initial estimate of the downstream constraint (438 ft). For the higher profile, the water surface elevation is about 436 ft just downstream of the bridge and is about 442 ft on the upstream side. Therefore, the constraint elevation was exceeded upstream, but not downstream of the bridge causing the flow to be confined to the bridge opening on the downstream side, but is overtopping the bridge with weir flow occurring on the upstream side. Thus, the initial estimate of the downstream constraint was too high and the profile is not correct. However, the lower profile is acceptable, because it is confined to the bridge opening both upstream and downstream. The downstream constraint elevation must be lowered to a value slightly less than the 436-ft water surface elevation, but higher than the elevation of the lower flood, and the profile recalculated. The result is shown on the set of profiles of Figure 6.20, where both the upstream and downstream constraint elevations are exceeded for the higher discharge. This example illustrates why the ineffective flow area elevations should be closely checked at each bridge before accepting the results as correct. Poor estimates
204
Bridge Modeling
Chapter 6
Figure 6.19 Ineffective flow area elevations at a bridge with downstream constraint (438 NGVD) estimated too high.
of constraint elevations at bridges are common sources of errors in profile computations. The engineer uses the Cross Section Geometry Data Editor in HEC-RAS to specify these ineffective flow area constraint elevations at the cross sections just outside of the bridge opening. If intermediate sections for contraction or expansion of flood flows are used before reaching full floodplain flow (cross sections 1 and 2), the engineer must also specify constraint elevations and locations. The locations of the constraint elevations at intermediate cross sections are based on the ER or CR selected by the engineer.
Ineffective Flow Area Locations Selecting the proper stationing for the ineffective flow constraint elevations can be just as important as the elevation itself. The novice modeler may initially decide to select the location of the constraint elevations to be the bank station of the channel as it passes through the bridge or the edge of the bridge opening on either side. If the bridge has sloping abutments, some point along the abutment could be another choice. All of these choices are usually incorrect, however. The two sections immediately outside the bridge opening (sections 2 and 3) bound the bridge. There may be a significant distance between the bridge face and the section location, depending on the embankment configuration. HEC-RAS requires a nonzero distance between the sections just inside and just outside the bridge face. If the bridge has an elevated roadway, a common location for these two sections is at the toe of the embankment slope, where it touches the floodplain.
Section 6.5
Ineffective Flow Areas
205
Figure 6.20 Ineffective flow area elevations at a bridge with better estimate of downstream constraint (435.5 NGVD).
Depending on the embankment height and slope, sections 2 and 3 can be as little as about 1 ft (0.3 m) to more than 20 ft (6 m) away from the bridge face. Therefore, as the flow contracts into and expands out of the bridge opening, the horizontal limits of the ineffective flow area will be wider than the bridge opening. For example, if the flood flow contracts into the bridge opening at a 1:1 ratio and section 3 is 10 ft upstream of the bridge face, then the location of the ineffective area elevations will be 10 ft to the left and right of the edge of the bridge. These locations are adjusted if the bridge opening has sloping abutments, which can limit the effective flow width to less than the width of the bridge at the low chord. Figure 6.21 illustrates possible upstream constraint elevation locations for sections with and without abutments. Similarly, the flow expands once it passes through the downstream bridge face. If a 1:2 expansion ratio is used and section 2 is 10 ft downstream, the ineffective flow locations for section 2 can be placed 5 ft outside the left and right bridge opening stations. Different ER ratios will result in different locations for the ineffective flow area constraint at section 2. Figure 6.22 shows an example of locating downstream constraint locations for the expansion section and illustrates how the downstream constraint elevations may be significantly different on either side of the bridge. Use of the exact bridge opening stationing for placing the constraint elevations will not properly reflect the contracting and expanding of flow at the sections outside of the bridge and may give erroneous energy losses through the bridge.
206
Bridge Modeling
Chapter 6
Figure 6.21 Locating upstream stations for ineffective flow area constraints.
Figure 6.22 Locating downstream stations for ineffective flow area constraints.
6.6
Modeling the Bridge Structure with HEC-RAS The roadway embankments, bridge opening, piers, and abutments (if any) are all modeled from the HEC-RAS Bridge/Culvert Data Editor. Bridge information need not be entered in the cross-section data, as was required in HEC-2. Figure 6.23 shows a cross-sectional view of a simple bridge encoded in HEC-RAS and will serve as the example for the following paragraphs. To model a bridge using HECRAS, the modeler first opens the Bridge/Culvert Data Editor from the Geometric Data menu. For a new bridge model, the plot on the Bridge/Culvert Data Editor shows only the bounding cross sections, because no bridge data have been encoded yet.
Section 6.6
Modeling the Bridge Structure with HEC-RAS
207
Floodplain Flow Distribution at a Bridge When weir flow is computed, the flow distribution in the adjacent cross sections (2 and 3) to the bridge should be reviewed and compared to the flow passing over the bridge at sections BD and BU. Ideally, the weir flow passing over the roadway on each side of the bridge should approximate the discharge in the respective floodplain for sections 2 and 3. Figure 6.20 illustrates the profile results from a bridge model that will be used in the next section to provide an example of this review. The standard bridge tables available in HEC-RAS are used here to inspect the flow distribution. An incorrect flow distribution may not result in significant profile errors, but it can cause inaccuracies in bridge scour computations. Chapter 13 discusses bridge scour. For the computations shown below, the weir flow was 16,399 ft3/s for the largest flood (shown in bold). Therefore, one would expect that a total discharge somewhat less than this flow would be present in the left and right floodplain sections immediately outside the bridge, because some of the weir flow across the roadway is passing
between the channel bankline stations. For this example, these sections adjacent to the bridge are labeled 2.3 (downstream) and 2.4 (upstream). At these sections, the total discharge in the overbank areas is between 11,000 and 12,000 ft3/s (the sum of the bolded values for sections 2.3 and 2.4). The overbank discharge at sections BD and BU is about 25 percent higher. If bridge scour analysis will take place for this bridge, some additional adjustment (decreasing overbank n to increase the overbank discharge) at sections 2.3 and 2.4 should be made to better approximate the proper flow distribution. Although this adjustment of n will not likely cause a significant impact to the flood elevations, a greatly unbalanced flow distribution can adversely impact bridge scour potential. For bridge scour computations, the proper discharge distribution is important. However, for a water surface profile analysis alone, the output does not seem unreasonable and would be acceptable for a final profile.
Bridge-Only Table – n = 0.04 Prs O WS, ft
Q Total, ft3
Min Weir El, ft
River Sta
E.G. US, ft
Min El Prs, ft
BR Open Area, ft2
2.35
435.23
436.00
1362.14
15,000
440.01
2.35
444.73
436.00
1362.14
35,000
440.01
Q Weir, ft3
Delta EG, ft
16,399
3.35
1.32
Six Bridge Sections Table – n = 0.04
River Sta
E.G. Elev, ft
W. S. Elev, ft
2.5
435.60
2.5
444.91
Crit. W.S., ft
Top Width, ft Q Left, ft3
Q Channel, ft3
Frctn Loss, ft
C&E Loss, ft
435.32
0.10
0.26
533.33
5450.92
5702.92
3846.32
6.45
444.58
0.07
0.11
624.80
14621.21
9738.24
10640.55
7.71
6913.17
23667.42
4419.41
8.06
9653.08
18211.29
2.4
435.23
434.08
427.31
546.86
2.4
444.73
444.04
433.36
624.80
Q Right, ft3
15000.00
Vel Chnl, ft/s
8.61
2.35 BR U
435.57
432.08
429.82
83.16
2.35 BR U
444.73
444.04
443.78
624.80
2.35 BR D
435.05
429.82
429.82
78.65
2.35 BR D
444.73
444.04
443.90
2.3
433.91
432.00
427.71
0.33
0.76
528.72
2.3
441.38
440.22
434.22
0.24
0.34
600.55
2.2
432.81
432.43
0.50
0.00
541.15
5211.79
6126.74
3661.47
7.41
2.2
440.80
440.32
0.48
0.00
610.13
14245.44
10503.43
10251.13
9.13
624.80
15000.00
15.00 7135.63
15000.00 9737.80
18051.79
7210.41
10.11
4561.85
10.51
15000.00 7133.59
23304.56
9.86 18.35 11.08
208
Bridge Modeling
Chapter 6
Figure 6.24 Figure 6.26 Figure 6.28 Figure 6.31
Figure 6.33
Figure 6.30
Figure 6.23 Bridge/Culvert Data Editor for example bridge model.
Bridge Superstructure The modeler defines the bridgeʹs roadway by entering a series of high chord and low chord elevations with the associated stations in the Deck/Roadway Data Editor (Figure 6.24), accessed within the Bridge/Culvert Data Editor. HEC-RAS connects a straight line between every pair of points. Identical station values that show a vertical increase or decrease in elevations are acceptable and may be used to code abutments. The weir coefficient for the roadway and the distance from the upstream bridge face (BU) to the next section upstream (section 3) must also be defined. Default values for reduction in weir flow due to submergence of the tailwater, at the minimum weir flow elevation (blank for the lowest roadway elevation), and the selection of broad-crested weir are normally accepted, although the modeler can change these values or selections. The upstream and downstream embankment side slopes (U.S. and D.S. Embankment SS boxes on the template) are used only for the WSPRO method and are discussed in Section 6.8. Figure 6.24 shows the Deck/Roadway Data Editor template with all data for the example bridge of Figure 6.23 inserted. Blank values are normally used for the low chord outside the bridge abutments; no value indicates to the program that the roadway elevation is outside the bridge opening and there is no flow area below the road. HECRAS can plot the data for inspection. Figure 6.25 shows the completed geometric model for only the bridge roadway and low chord. Only six points are needed to define the roadway and low chord elevations for this simple bridge, as shown in the figure. Many more points are needed if the roadway and low chord elevations are not constant. If the downstream roadway and low chord station elevations are identical to the upstream values (a common case), only the upstream values need be entered in
Section 6.6
Modeling the Bridge Structure with HEC-RAS
209
the template of Figure 6.24. The modeler can then use the Copy Up to Down button to copy all the upstream values to the downstream locations. If the bridge crosses the river and floodplain at a severe angle, the bridge opening can be adjusted for skew. Skew is further discussed in Section 6.8.
Figure 6.24 Deck/roadway data editor for the example bridge.
The section in Figure 6.25 consists of the cross-section data from section 2 (copied and used for section BD by HEC-RAS) or from section 3 (copied and used for BU by HECRAS), with the low chord and roadway elevations of Figure 6.24. The geometry of sections BD and BU may be viewed from the Bridge/Culvert Data Editor, as shown in Figure 6.25.
Bridge Piers Bridge pier geometry is entered on the Pier Geometry Data Editor within the Bridge/ Culvert Data Editor (shown in Figure 6.23). It is important to note that all pier structures must be entered within the Pier Geometry Data Editor and not within the bridge structure itself, or many of the program equations will not provide appropriate results. Each pier requires a width and elevation, starting at or below the ground elevation of the channel or overbank. If the pier elevation extends below the ground or above the low chord, the program automatically truncates the pier at the limiting elevation. A pier needs a minimum of two points (elevation and width) to define its geometry, although piers with varying widths may also be modeled. Figure 6.26 shows the Pier Geometry Data Editor with the data inserted for the left pier of the example bridge, and Figure 6.27 shows a close-up view of the two piers. Two piers have been added to the bridge using the Pier Data Editor. The centerline station for each pier is specified and the geometry of each pier is described with pier widths and elevations. A constant-width pier needs only two points, with the first point at or below the lowest elevation. Because the piers in this example are wider at the bottom than at the top, each pier requires four points and the location of the pier
210
Bridge Modeling
Chapter 6
centerline station to properly define its shape and location. If many identical piers are present, the first pier encoded may be copied and the centerline station modified to reflect the location of the new pier, instead of entering width and elevation data for each pier. HEC-RAS subtracts the cross-sectional area of the piers to compute the net area of the bridge opening for sections BU and BD and includes the wetted perimeter on both
Figure 6.25 Simple bridge opening and roadway embankment (roadway and low chord information only).
Figure 6.26 HEC-RAS Pier Data Editor, modeling the left pier of the example bridge.
Section 6.6
Modeling the Bridge Structure with HEC-RAS
211
Figure 6.27 Modeling piers. The circled numbers on the pier correspond to the row numbers on Figure 6.26.
sides of each pier in the hydraulic computations for the two interior bridge sections. In addition, debris and trash buildup on the piers may be modeled by specifying a width and depth of debris at each pier. The program decreases the cross-sectional area for flow to reflect the area lost due to pier debris. If the piers are on a significant skew to the direction of flow, the width of the pier should be increased for the effect of skew. Section 6.8 further discusses skew.
Sloping Bridge Abutments If the bridge has sloping abutments, the Sloping Bridge Abutment Editor within the Bridge/Culvert Data Editor (shown in Figure 6.23) can be used to encode this information. The elevation and station of the points defining the abutment on either or both sides of the bridge are entered. HEC-RAS removes the cross-sectional area occupied by the abutments from the active flow area. If the modeler is concerned about the effect of abutment shape on water surface profiles, WSPRO, discussed at the end of this chapter, is the preferred method of analysis. Figure 6.28 shows the HEC-RAS Sloping Bridge Abutment Editor with the left abutmentʹs data filled in. Figure 6.29 shows a close-up view of sloping abutment geometry as coded into HEC-RAS. Three points (station, elevation) were needed to model each abutment. Abutment stations must increase from left to right, as with the cross-section points. The program will truncate abutment elevations greater than the low chord, or lower than the channel/ floodplain.
Use of the Bridge Design Editor HEC-RAS provides another tool for developing bridge input data: the Bridge Design Editor, located within the Bridge/Culvert Data Editor (refer to Figure 6.23). This option is useful for developing data both for simple existing bridges and for the design of new bridges. All roadway, low chord, bridge opening width, pier, and abutment data can be entered in the Bridge Design Editor template (shown in Figure 6.30). Future changes to the bridge geometry can be made from the Bridge Design Editor or
212
Bridge Modeling
Chapter 6
Figure 6.28 Sloping Abutment Data Editor for the left abutment of the example bridge.
2 1
3
Figure 6.29 Modeling sloping abutments. Circled numbers on abutment correspond to numbered rows on Figure 6.28.
from the individual deck/roadway, pier, and abutment editors. After the data for the example bridge are encoded on the template of Figure 6.30, the Pier Editor is needed to modify the pier widths. The modifications reflect a varying pier width, and the Abutment Data Editor is needed to enter the short reach of horizontal abutment at elevation 434 feet. Similarly, a sloping roadway or low chord would require modifications using the Deck/Roadway Editor.
Section 6.6
Modeling the Bridge Structure with HEC-RAS
213
Figure 6.30 Bridge design editor for the example bridge.
Bridge Computation Methods The applicability of different computation methods has been discussed throughout the earlier portions of this chapter, but it is appropriate to summarize the techniques again here. After all of the required bridge information is encoded, the modeler chooses the desired method(s) of computation in the Bridge Modeling Approach Editor (accessed within the Bridge/Culvert Data Editor). In addition to the method of bridge computations, this editor allows input of the pier shape coefficients and the pressure flow coefficient. If the WSPRO method is chosen, additional data must be entered from this editor. For subcritical low flow (Class A), multiple methods to compute the upstream water surface elevation are recommended; the program selects the method giving the highest upstream energy elevation. As shown on Figure 6.31 for Low Flow Methods, the check marks for Energy, Momentum, and Yarnell indicate that all three methods will be used, with the method yielding the highest computed energy grade line elevation selected for the profile. Under High Flow Methods, Energy or Pressure and/or Weir flow are the only choices. Because the height of the roadway embankment is significant for the example above, pressure and weir flow were selected for the high flow computation method. For bridges that have roadway embankments, pressure and weir flow are normally the appropriate first choices. For bridges with little or no embankment height, energy is normally the appropriate method of computation for the submerged bridge/roadway. The high flow default values are typically accepted for the Submerged Inlet Cd (blank), the Submerged Inlet + Outlet Cd (0.8), and the Max Low Chord (blank). Section 6.3 discussed these coefficients in detail. The blank value for maximum low chord instructs the program to pick the correct value from the data supplied to the Deck/ Roadway Data Editor. Figure 6.31 shows the HEC-RAS template with the needed information for bridge computations included for the bridge shown in Figure 6.29. Low Flow Methods. For low flow, when the water surface or the energy grade line elevation (if selected by the modeler) is less then the highest low chord elevation, the following bridge analysis methods are recommended:
214
Bridge Modeling
Chapter 6
Figure 6.31 Bridge Modeling Approach Editor for the example bridge.
• Class A flow (subcritical), no piers or piers are small obstructions: The energy, momentum, and WSPRO methods are all appropriate. • Class A flow (subcritical), piers are moderate to large obstructions: Any of the four low flow methods can be used, but the momentum or Yarnell method may be the most appropriate. • Class B flow (critical): The energy or momentum method may be used, with the latter normally more appropriate. WSPRO and Yarnell are only appropriate for subcritical flow. • Class C flow (supercritical): The energy or momentum method can be used, with the latter normally more appropriate. High Flow Methods. For high flow, when the water surface elevation or energy grade line elevation (as selected by the modeler) exceeds the highest low-chord elevation, the following bridge analysis methods are recommended: • When the roadway embankment presents a moderate to large obstruction to flow and the highest low chord elevation is less than the lowest roadway elevation, pressure and weir flow is appropriate. This situation is represented by the example bridge modeling in the previous subsections (refer to Figure 6.29). • When the roadway embankment presents a small obstruction to flow, the energy method is normally appropriate. Figure 6.34 shows a perched bridge, representative of this situation. • When the roadway embankment presents a moderate to large obstruction to flow and the highest low chord elevation is greater than the lowest roadway elevation, the weir and low flow method is normally most appropriate. • When a roadway embankment is greatly submerged, the energy method is normally appropriate. This situation is demonstrated for Q5 on Figure 6.18. • When an intermediate condition exists between the last and the first three high flow methods, the program automatically reduces the weir coefficient to
Section 6.7
Special Situations
215
reflect increasing levels of weir submergence. HEC-RAS switches to the energy method when the degree of submergence (ratio of headwater divided by tailwater depths) reaches 95 percent.
6.7
Special Situations Engineers may occasionally encounter special situations when modeling bridges. Some examples of these are multiple openings, parallel bridges, “perched” bridges, low-water crossings, bridges on skew to the direction of flow, and bridges with small openings and much upstream flood storage that serve as dams. The following sections discuss these situations in detail.
Multiple Openings For roadways crossing wide floodplains, more than one opening for flood flow is normally needed. The main bridge opening allows the majority of flood flows to pass, with one or more supplemental openings providing additional flood capacity. Relief bridge openings for flood flows, culvert openings for smaller streams and ditches, and road underpasses all convey flow through a roadway embankment during a large flood event. Multiple openings may require complex two-dimensional modeling for a roadway crossing of the floodplain that is not reasonably perpendicular to flow. With HEC-2, multiple bridge openings could not be modeled well. The only way this situation could be modeled in HEC-2 was to perform separate split-flow calculations (a time-consuming task) or to simply assume that the energy grade elevation was the same at each opening, an obvious and erroneous simplification. HEC-RAS performs split-flow analysis for multiple openings and iterates the operation between the full expansion at section 1 (downstream) and the full contraction at section 4 (upstream) until the correct flow split is determined that gives all the flow paths the same energy grade elevation at section 4, the start of contraction. The only additional data needed to model multiple openings are entered with the Multiple Opening Editor located within the Bridge/Culvert Data Editor (refer to Figure 6.23). The modeler specifies the local area of influence for each opening by identifying stagnation points, which represent a dividing line for flow to the different openings through the embankment. Flow to the left of the stagnation point moves toward the opening to the left of the stagnation point. Similarly, flow to the right of the stagnation point moves toward the next opening to the right. It is usually best to have some overlap (50 ft/15 m or more) in identifying these points between bridges and/or culvert groups, thereby allowing the computer program some leeway in determining the splits for each flow path. From the previous example, a box culvert is added to the sample bridge shown in Figure 6.29 to serve as a relief opening during major floods. The revised road crossing is shown in Figure 6.32. Culvert modeling is presented in Chapter 7. To model the bridge and culvert as a multiple opening requires the modeler to estimate the location of the stagnation points and encode these data in the Multiple Opening Editor. Figure 6.33 shows the data input for the Multiple Opening Editor for the bridge and culvert shown in Figure 6.32. Figure 6.32 also shows the defined stagnation points, called out on the figure by #1 and #2 for the culvert and bridge, respectively. Flow that overtops the road but moves via a separate flow path may also be modeled in the
216
Bridge Modeling
Chapter 6
Figure 6.32 Cross section illustrating multiple opening analysis.
Figure 6.33 Multiple Opening Analysis Editor for the example bridge and culvert.
multiple opening, but only by simple friction loss computations (no weir flow), with the overflow location being the first or last flow path on the section. If weir flow occurs, the same energy grade line elevation is used for all flow paths. For the bridge and culvert shown in Figure 6.32, the multiple opening option would not be used for flows overtopping the roadway elevation, because weir flow would be occurring. HEC-RAS can model up to seven separate flow paths for a long bridge embankment. There may be a different energy elevation at each bridge opening or flow path. The iterations continue until the right balance of flow is achieved that computes the same energy elevation at section 4 (within a specified tolerance or a default of 0.03 ft or 0.009 m) or until the maximum number of iterations is reached (30 iterations is the default). This powerful feature greatly simplifies complex bridge modeling of
Section 6.7
Special Situations
217
multiple openings, although the solution is still considered one dimensional. For complicated bridge crossings, such as an embankment that runs upstream or downstream in the floodplain during the crossing, a two-dimensional, unsteady flow solution would likely be needed. Chapter 12 further addresses split flow modeling, which is similar to the analysis for multiple bridge openings.
Parallel Bridges High-speed road travel, especially on dual highways, often results in two nearly identical bridges located a short distance apart. Tests by the FHWA have found that dual bridges result in more losses than a single bridge but less than if the two structures were independent. Modeling of these structures requires engineering judgment. If the two bridges are fairly close, they can be modeled as a single bridge, simply showing the length between sections BD and BU as the total length from the downstream face of Bridge 1 to the upstream face of Bridge 2. If the openings of the two bridges are very different, or if they are located far enough apart that flows can partly expand after exiting the upstream bridge and then contract back into the downstream bridge, the structures should be modeled as separate bridges and include the partial expansion and contraction paths. When modeled as two separate bridges, each bridge should have separate sections 2 and 3. An additional cross section would be supplied between the two bridges to indicate to the program when the expansion from the upstream bridge changes to a contraction into the downstream bridge. Additionally, ineffective flow area elevations and locations must be specified for both bridges. This complex situation most likely requires additional trials for determination of the ineffective flow area elevations, since there are now four locations where the ineffective flow elevations must be defined rather than the normal two locations for one bridge.
Perched Bridges Old bridges on secondary or township roads are often perched. That is, the bridge is significantly higher than the floodplain, but the approach road on one or both sides is much lower. The bridge can become an “island” during a flood if the road on both sides is under water. This situation is appropriately addressed by the energy method. The obstructed area caused by the bridge is removed from the available cross-sectional flow area, along with any pier areas, and the losses between bridge sections are computed based on friction losses and expansion or contraction losses. Recall that weir/pressure flow is only appropriate when the roadway is on a significant fill embankment and there is an appreciable head difference between bridge sections 2 and 3. If such a situation does not occur, as is typical with perched bridges, energy computations normally give the most accurate answers. Figure 6.34 displays a perched bridge. If deemed necessary, an alternate solution for profiles at a perched bridge is to analyze the structure using the multiple-opening method presented in Section 6.7. For a perched bridge, the flow around the bridge structure should be modeled as conveyance, and flow through the bridge opening can be modeled with the energy, momentum, or Yarnell methods.
Low Water Bridges On minor roads with limited traffic, low water crossings are sometimes used to avoid the expense of building a formal bridge structure. A low water crossing occurs when
218
Bridge Modeling
Chapter 6
Figure 6.34 Perched bridge.
the roadway is actually in the channel and the roadway elevations are less than those of the bank stations. Figure 6.35 illustrates such a crossing. One or more culverts in the channel allow low flows to pass under the road. These flows normally represent only the base or average low flow, and seldom include any significant allowance for runoff from storm events.
Figure 6.35 Low water crossing.
During a significant rainfall event, the increased discharge rises over the road and often halts all vehicular traffic until the flow drops back to the base level. Obviously, low water crossings are only practical where the flows are not blocking the road for an excessive time and/or where the traffic volume on the road is very low. For this type of crossing, flow modeling can be simple or complicated. For low flows, only the culverts could be modeled. When flows increase and overtop the road, a combination of weir and pressure flow may exist. As flows continue to increase, the structure has a progressively smaller obstructive effect on flows, and the energy equation becomes the most appropriate solution technique.
Section 6.7
Special Situations
219
Modeling Two Closely Placed Bridges Smith Creek is northwest of Melbourne, Australia. The creek has large floodplains on either side. A railway bridge crosses the creek between embankments that substantially block the floodplain. A second railway bridge was built immediately upstream of the old structure and uses the same embankments as the old bridge. The two bridges have similar cross sections and are separated by a gap of 4 m (13 ft). The upstream (“new”) bridge abutments consist of pillars in line with the downstream retaining wall abutments. The issue to be resolved is the upstream water surface elevation, associated with the dual-bridge structure, for the 1% flood of 340 m3/s (12,000 ft3/s). An initial approach was to model each of the two bridges separately, each with their own values of contraction and expansion coefficients. The contraction into the upstream bridge was characterized by a coefficient of 0.3 and the expansion from the downstream bridge by a coefficient of 0.5. Between the two bridges, values of 0.1 and 0.3 were used. An issue is the capability of the hydraulic model to reproduce the energy loss across the two bridges, especially under high flows. Under the design flow of 340m3/sec (12,000 ft3/s), the water surface elevation on the downstream side is computed to be 4.44 m (14.57 ft), which is well above the soffit (underside) of the bridges—3.56 m (11.68 ft) for the upstream bridge and 3.58 m (11.75 ft) for the downstream bridge. Between the two bridges, the water level will be higher than 4.44 m (14.57 ft). The model requires that the flow expand fully throughout the flow depth between the two bridges (that is, up into the “gap” between the two bridges). Additionally, the modeling approach described above produces overtopping flows of the two bridges of 208 m3/s (7345 ft3/s) (upstream bridge) and 40 m3/s (1413 ft3/s) (downstream bridge). This would require 168 m3/s (5933 ft3/s) to flow into the waterway at a location between the two bridges. The geometry of the single embankment, which forms a broad crested weir approximately 800 m (2625 ft) wide, makes it impossible for the 168 m3/s (5933 ft3/s) to re-enter the creek at this location, but HEC-RAS does not have the “intelligence” to know this.
These hydraulic characteristics are unrealistic consequences of the separated model of flow through the two bridges. Because the bridges are so close together and are of almost identical waterway areas, it is much more realistic to consider that they act essentially as a single bridge. It has to be recognized, however, that there will be significant energy dissipation between the two bridges resulting from interaction between the water flowing through the bridge waterway and the “dead” water between the two bridges, which is outside the effective waterway area. The issue is how to realistically reproduce this additional energy loss. The HEC-RAS model incorporates two options for modeling high flows: a standard step (energy) approach and an orifice combined with a weir. The first of these offers an appropriate method of incorporating the energy loss between the two bridges in an explicit fashion by adjusting the Manning’s n values of the two cross sections located within the bridge site. The second option also offers a possibility by permitting an operator-nominated value of discharge coefficient in the orifice equation. By reducing this value below the standard value of 0.8, an increased energy loss across the bridge site will be calculated. However, this too is in the nature of a de facto method for the geometry under consideration and is not favored. In the present situation, the standard step approach is particularly appropriate and was utilized in a second model. The primary issue is to determine a reasonable value of Manning’s n to assume within the bridge opening to simulate the energy dissipation effect of the flowing water interacting with essentially dead water in the “gap” between bridges. This is a matter for professional engineering judgment. In the present situation, a value of 0.07 was assumed. In summary, when two bridge structures are located very close together, and both span the same embankments, it is not appropriate to model them as separate structures. Hydraulically, they behave as a single structure, albeit with a substantial effective internal roughness due to the interaction between the flowing water and the dead water between the two bridges.
220
Bridge Modeling
Chapter 6
To model only flood flows, energy methods are normally applied, and the culvert capacity is ignored as negligible. A low water crossing must be carefully designed, especially for the control of erosion just downstream of the structure. Erosion may not be significant for major floods, because there is little difference in water surface elevation between the upstream and downstream sides. For low flows, however, there is often a significant head difference. Class B flow, or supercritical flow over and just downstream of the bridge, is common, with a hydraulic jump on or near the downstream face of the structure. Scour protection or more formal energy dissipaters are often needed at low water crossings to protect the channel bed and the bridge structure. Low water crossings have frequently been destroyed by erosion shortly after installation, because of the failure to include adequate erosion protection in the design.
Bridges on Skew Where the bridge and approach embankments cross the valley, the river, or both at a severe angle, the modeler should consider an adjustment for the skew of the structure. Figure 6.36 shows two situations for which a skew adjustment is warranted. In both cases, the river “sees” less opening than is defined from the field surveys, because the field surveys are normally taken parallel to the bridge alignment. The modeler supplies the skew angle between a line perpendicular to the bridge and the main direction of flow, and then HEC-RAS adjusts the bridge opening width for this angle. Bridge stations are adjusted by the cosine of the skew angle (θ). The effective width of the bridge is the actual width (b) multiplied by cos θ. An old rule of thumb, confirmed by scientific studies (Bradley, 1978), states that the skew angle should be at least 20 degrees before an adjustment for skew is needed. Because the cosine of this value is 0.94, a decrease in bridge opening width of 6 percent will result. Angles less than 20 degrees are considered to provide acceptable flow conditions and no adjustments for skew are typically made. Conversely, the upper limit for skew adjustments is about 30 to 35 degrees. This angle shortens the bridgeopening stations by approximately 14 to 18 percent. Where bridge piers are also skewed to the flow direction, the effective flow width is much smaller because the flow “sees” a wider pier due to the flowʹs angle of approach. However, good bridge design should orient the bridge piers parallel to the direction of flow, even if the bridge opening is skewed. For example, Figure 6.6 shows a bridge in the background crossing the man-made channel at a sharp angle. Notice, however, that the piers are still aligned parallel to the flow direction. An adjustment for skew is only appropriate for flow through the bridge opening. During weir flow, the flow across the roadway moves perpendicular to the roadway and the full length of the embankment should be used. Calculations with skew angles greater than 30 to 35 degrees should be closely examined because the true effective flow width may be more than is determined by the skew adjustment. For a bridge with several piers, such as shown in Figure 6.32, an adjustment for skew may block too large a percentage of the opening. HEC-RAS can apply separate angles for the bridge and for the piers to compute varying amounts of skew. Two-dimensional flow modeling may be necessary for large skew angles if the best assessment of flow patterns and the maximum profile accuracy is desired. Where a skew adjustment is performed, the bounding sections (2 and 3) may also be adjusted in the Cross-Section Data Editor.
Section 6.7
Special Situations
221
Figure 6.36 Effect of skew at bridges.
The Bridge as a Dam In certain instances, the road embankment and bridge opening severely throttle the outflow through the bridge opening during large flood events. This condition is more common for culverts under a high embankment, but it is occasionally found at older bridges, especially railroad crossings. In this case, the small opening causes a large backwater effect extending far upstream of the bridge location. When this occurs, the roadway embankment acts as a dam, with the bridge opening serving as the low flow tunnel or conduit. To properly assess the effect of this situation, a hydrologic routing, performed outside of HEC-RAS, is required.
222
Bridge Modeling
Chapter 6
Modeling Arch Bridges in the U.K. The United Kingdom has a long history of bridge building and still has many river bridges that are centuries old. These are typically masonry arch bridges, but often multiple arches were needed to span a river, as these arches had limited spans for a given height. Later, brick was used instead of masonry, and relatively large spans could then be achieved with the appropriate temporary works. Finally, recent works often add further arches for flood relief, and these are frequently designed to be in keeping with the original arches. However, many of these brick and, especially, masonry arches may never have been truly parabolic in the first place. As a result, over the years many have settled unevenly, creating slightly asymmetrical soffit (underside) shapes, with a different shape to the adjacent arch. Additionally, many arches have had their inverts lowered to improve drainage and the standard of flood protection, but this has often been carried out within the original width, resulting in a narrower section at the new invert level, which widens out at the level of the original bridge invert. These unique shapes make it impossible for the modeler to use any standard geometric shape, and so the model must be constructed to represent each individual arch. Fortunately, HEC-RAS makes this task very easy—high-chord and low-chord levels can be entered at varying stations. Being able to view the shape being constructed in the model is a real advantage—it is immediately obvious if an entered level is not quite right. The importance of the levels of the top chord should not be overlooked; HEC-RAS will treat this as a weir, thus representing a flood that has flow
passing through the arches as well as over the top of the bridge. Beware of entering the top chord by using roadway levels because these bridges usually have a solid parapet, which will not allow water to flow over the road until the parapet itself is overtopped. Many brick arch bridges have a relatively flat soffit, which can cause problems with conveyance variations. In one example, where a blockage downstream was being modeled, the higher water level at the bridge created a slightly increased cross-sectional area, but a substantially increased wetted perimeter, even though the soffit was still clear of the water. Thus the increase in water level caused by the downstream blockage was higher upstream of the bridge than immediately downstream. Most arch bridges that are modeled are existing bridges, but occasionally a new bridge is required to have the appearance of these old bridges. The restrictions attached for the construction of one such bridge was that the afflux (increase in water level caused by the new bridge) immediately upstream of the bridge should not exceed 70 mm (28 in.); and at a distance of 1.2 km (0.7 mi) upstream of the bridge (at the limit of the land owned by the potential bridge owner), the afflux should be zero. In this case, the soffits of the three new arches were clear of the flood level (important to allow floating debris to pass through), but the bridge approaches were inundated and acted as weirs. These approaches had to be reduced slightly in level to allow the requirements on afflux to be achieved.
Credit: Andrew Pepper
Section 6.8
WSPRO Bridge Modeling
223
The routing operation uses the storage reach upstream of the embankment to compute the attenuation of the peak discharge caused by the restricted outflow and upstream storage. Discharges for the cross sections downstream of the road (dam) should reflect the reduced discharge through the bridge opening caused by the upstream storage. In Figure 6.37, the width of the opening is a small percent of the width of the floodplain and the roadway embankment is very high, preventing or limiting overflows. A series of profiles for varying discharges are necessary to develop the reach storage versus bridge opening outflow data to use in a hydrologic model, like HEC-HMS. Chapter 8 addresses the development of these data in more detail.
Figure 6.37 Bridge as a dam and conduit.
6.8
WSPRO Bridge Modeling The Water Surface Profile (WSPRO) Program was developed specifically for bridge design and the determination of the effects of a bridge on water surface profiles (FHWA, 1990). The procedures for WSPRO have been incorporated into HEC-RAS to provide WSPRO methods within HEC-RAS. WSPROʹs low flow analysis procedures are only valid for Class A conditions (subcritical flow). When the bridge opening becomes submerged, pressure and weir flow methods are used. WSPRO has major advantages over other methods of bridge computation in that it allows analysis of the abutment shape, upstream spur dikes, and other special bridge features. The use of WSPRO within the HEC-RAS package requires only a limited amount of additional input.
WSPRO Modeling Procedures Computational procedures in WSPRO focus on the energy equation to determine water surface elevations, although the energy computations employed have slightly different assumptions and methods than have previously been presented. Contraction losses into the bridge are assumed to be negligible and are not included. Only friction losses between sections 1 and 4 and an expansion loss between sections 1 and 2 are employed to evaluate bridge effects. Coefficients are included to determine the effects of abutment shape and upstream spur dikes. In addition, the locations of sections 1 and 4 as defined by the WSPRO method are different than the locations for these two sections presented earlier. WSPRO Required Cross Sections. A minimum of four sections are required to model a bridge using WSPRO. These four sections are located at the beginning of the contraction and the end of the expansion (sections 4 and 1, respectively), a section
224
Bridge Modeling
Chapter 6
defining the full floodplain just downstream of the bridge face (designated section 2F in WSPRO), and a section defining the bridge opening (designated section 2 in WSPRO). These locations are shown in Figure 6.38. In HEC-RAS, however, the Bridge Editor supplies WSPRO section 2 by developing sections BU and BD, and the modeler supplies section 3, just upstream of the bridge, which is not used in WSPRO. Therefore, for this discussion, the same section nomenclature is used, rather than as defined by WSPRO. Thus, WSPRO section 2F is 2 and WSPRO section 2 is BD.
Figure 6.38 WSPRO section locations for a stream crossing with a single waterway opening.
WSPRO Cross Section Locations. The start of contraction and end of expansion section locations are defined as one bridge-opening width from both the upstream and downstream bridge face in WSPRO, as shown on Figure 6.38a. For instance, if the bridge-opening width is 500 ft, sections 1 and 4 are located 500 ft from the downstream and upstream bridge face, respectively. For wide valley sections or for sparsely vegetated floodplains, this distance may underestimate losses through the bridge. Although the modeler may choose to use the other techniques described earlier in this
Section 6.8
WSPRO Bridge Modeling
225
chapter to locate Sections 1 and 4, these methods do not comply with WSPRO methodology. Therefore, when the modeler specifies the use of WSPRO along with the other three techniques in HEC-RAS for analyzing Class A low flow, the bridge crosssection locations must be set up as defined in Section 6.4, or a separate geometric model for the WSPRO analysis will be needed. If a separate model is used, the modeler will need to compare the WSPRO results to the HEC-RAS results (for the energy, momentum, or Yarnell methods). When locating the cross section at the end of expansion, the WSPRO method will likely result in a cross-section location that is closer to the bridge than the equations shown earlier for expansion lengths, or for the USACE rule of thumb previously presented. Where spur dikes are used to prevent significant flow from moving parallel to the roadway embankment and into the bridge opening, the contraction section is located one bridge opening width upstream of the end of the spur dike (Figure 6.38b). The studies for the length of contraction (Lc) and length of expansion (Le) performed by the HEC found no justification for locating either the expansion or contraction sections as defined in WSPRO. However, even with the computational and cross-section location differences, all the major water surface profile programs or methods give adequate results. A comparison of water surface profiles through bridges as computed by WSPRO, HEC-2, and HEC-RAS was conducted by the HEC (USACE, 1995c). Detailed data from the USGS were used for 13 bridge sites on thickly vegetated floodplains in the states of Louisiana, Mississippi, and Alabama. The general conclusions from the study were that all three programs computed accurate profiles …within the tolerance of the observed data. The variation of the water surface at any given cross section was on the order of 0.1 to 0.3 ft (0.03 to 0.1 m). The mean absolute error in computed versus observed water surface elevations varied from 0.24 ft (0.07 m) with HEC-RAS to 0.33 ft (0.1 m) with WSPRO. Given the small variance in the results, it is concluded that any of the models can be used to compute adequate water surface profiles at bridge locations and that no one model performed significantly better than another.
226
Bridge Modeling
Chapter 6
WSPRO Coefficients. Contraction coefficients are not used in WSPRO, so a value of zero should be supplied for Cc. An expansion loss is computed in the following subsection with Equation 6.19. Manning’s n may be adjusted at the bridge, similar to the discussion in Section 6.4, when WSPRO is used.
WSPRO Computation Procedures Loss computations in WSPRO proceed in a similar fashion as for energy analysis earlier in this chapter and in Chapter 2. The total energy equation between the exit and approach sections (sections 1 and 4) is 2
2
V4 V1 WSEL 4 + α 4 ------ = WSEL 1 + α 1 ------ + Losses (1–4) 2g 2g where WSEL4 α4 V4 WSEL1 α1 V1
(6.17)
= water surface elevation at section 4 (ft, m) = adjustment coefficient for velocity head at section 4 (dimensionless) = velocity at section 4 (ft/s, m/s) = water surface elevation at section 1 = adjustment coefficient for velocity head at section 1 (dimensionless) = velocity at section 1
The losses between sections 1 and 4 represent the sum of the friction losses between the two cross sections plus the expansion losses between sections 1 and 2. From sections 1 to 2, the friction loss is found by applying the geometric mean friction slope to the flow at a weighted distance between the two sections. The geometric mean friction slope equation is one of four methods within HEC-RAS used to compute friction loss and it is the specified technique for use in WSPRO. The equation for friction slope between sections 1 and 2 is 2
BQ h f(1–2) = -----------K2 K1 where hf(1–2) B Q K
(6.18)
= friction loss between sections 1 and 2 (ft, m) = flow-weighted distance between sections 1 and 2 (ft, m) = total discharge (ft3/s, m3/s) = total conveyance at the indicated section (ft3/s, m3/s)
The expansion loss between sections 1 and 2 is given by the equation 2 A1 A1 2 Q h e = ------------- 2β 1 – α 1 – 2β 2 ------ + α 2 ------ A 2 2 A2 2gA 1
(6.19)
where he = expansion loss between sections 1 and 2 (ft, m) A = cross-sectional area of flow at the specified location (ft2, m2) β1 = dimensionless adjustment coefficient for momentum at section 1 (Equation 2.15) β2, α2 = dimensionless coefficients that are functions of bridge geometry
Section 6.8
WSPRO Bridge Modeling
227
The variables α2 and β2 are related to the bridge geometry through expressions developed empirically by Kindswater, et al. (1953) and later modified by Matthai (1968): 1 α 2 = -----2 C
(6.20)
1 β 2 = ---C
(6.21)
and
The variable C is an empirical discharge coefficient and varies depending on the bridge opening type and the embankment slope. The references by Kindwater, et. al and Matthai, or Appendix D in the Hydraulic Reference Manual (USACE 2002) may be consulted for additional information on the selection of C. WSPRO friction losses from sections 2 to 4 (within HEC-RAS) are calculated by adding the losses from 2 to BD, BD to BU, BU to 3, and 3 to 4. Friction losses between each of the two locations are computed using Equation 6.18, with total conveyance used at the appropriate sections. Specification of WSPRO Computations. In HEC-RAS, WSPRO is one of the four methods available to compute water surface profiles through a bridge for Class A low flow conditions. As was the case for the use of the momentum and Yarnell equations, additional information must be supplied to implement the WSPRO method. On the Deck/Roadway Geometry Editor (refer to Figure 6.24), the embankment side slopes are specified, which are used for computation purposes in WSPRO only. After WSPRO is selected as a computation method on the Bridge Modeling Approach Editor (see Figure 6.39), the WSPRO Variables icon is selected. The WSPRO template opens, and the additional information necessary for using WSPRO is specified—abutments, wing walls, guide banks (spur dikes), and other data. Figure 6.40 shows the WSPRO data template with data items needed to model the bridge shown in Figure 6.29 in WSPRO.
Figure 6.39 Bridge Modeling Approach Editor specifying the use of WSPRO.
228
Bridge Modeling
Chapter 6
Figure 6.40 Additional WSPRO bridge hydraulic parameters editor for the example bridge.
6.9
Chapter Summary Proper modeling of bridges for floodplain hydraulic analysis requires significant time, effort, and judgment on the part of the modeler. Bridge modeling requires the engineer to simulate flood flows as they contract into the bridge, with the velocity accelerating through the bridge opening, and then to model the expansion of flow on the downstream side of the bridge, as the velocity decelerates. Effects on flow from obstructions within the bridge must also be evaluated. Flood flows through the bridge can be analyzed with the energy, momentum, Yarnell equation, WSPRO, pressure flow, weir flow method, or by a combination of methods. Flows through the bridge opening may be defined as either low flow (water surface elevation less than the low chord elevation) or high flow (elevation greater than the low chord value). The water surface elevations through the bridge reach may be subcritical, critical, or supercritical, requiring different computation methods to best define the resulting flood profile. Bridge modeling requires specifying the beginning of the contraction and the end of the expansion for the bridge, determining the proper lengths of contraction and expansion, making adjustments to the expansion and contraction coefficients and to the n value, as well as specifying the ineffective flow area elevations and locations on both the upstream and downstream sides of the bridge opening. The estimation and refinement of ineffective flow elevations and locations is a particularly vexing problem for many modelers, often requiring an iterative analysis before an acceptable solution is reached. Modeling the actual bridge requires the incorporation of bridge and approach geometry (roadway surface and low chord elevations), pier and abutment geometry, bridge width, various coefficients for pier shape and weir flow, and the specification of modeling computation procedures for both high and low flow scenarios. Special procedures may be necessary to model dual bridges, perched bridges, low-water crossings, a bridge and embankment that act as a dam, bridge crossings that have multiple openings and/or bridges on skews.
Problems
229
The FHWA’s WSPRO method can be used within HEC-RAS to compute profiles through bridges or to analyze bridge openings using FHWA methods. Procedures for WSPRO vary from those of the other bridge analysis techniques, especially in crosssection location and in better evaluating the effects of bridge opening features, such as spur dikes and abutments.
Problems 6.1 As part of a major development, a stream crossing must be constructed at river mile 14.785 of the lower reach of the East Grand Fork River, which is shown in the figure.
English Units – Cross-section geometry data for the reach without the proposed bridge is provided in the file Prob6_1eng.g01 on the CD-ROM accompanying this text. The channel discharge for the 100-year storm event between river miles 14.43 and 16.16 is 25,660 ft3/s. A tributary adds 3290 ft3/s at river mile 14.13. The flow regime is subcritical, and the starting water surface elevation at river mile 12.59 is 450.00 ft. For the existing condition (no bridge), answer the following questions. a. What is the computed water surface elevation at river mile 14.43? b. What is the average velocity in the main channel at river mile 15.73? c. How much head loss due to friction occurs between river mile 13.86 and 13.98? d. What are the left overbank, main channel, and right overbank conveyances at river mile 14.43? e. What is the energy grade elevation at river mile 13.03? f. What is the energy correction factor (α) at river mile 14.79?
230
Bridge Modeling
Chapter 6
SI Units – Cross-section geometry data for the reach without the proposed bridge is provided in the file Prob6_1si.g01 on the CD-ROM accompanying this text. The channel discharge for the 100-year storm event between river miles 14.43 and 16.16 is 726.7 m3/s. A tributary adds 93.2 m3/s at river mile 14.13. The flow regime is subcritical, and the starting water surface elevation at river mile 12.59 is 137.2 m. For the existing condition (no bridge), answer the questions above. 6.2 English units – Add the data describing the proposed bridge at river mile 14.785 to the channel reach from problem 6.1. The roadway deck elevation of the crossing will be 462.0 ft, and the low chord elevation will be 459.0 ft along the entire length of the bridge. The roadway deck will be 48 ft wide, and the distance from the deck to the upstream cross section should be taken as 1 ft. A weir coefficient of 2.6 should be used. Two 5 ft diameter circular piers will be used to support the structure, and they will be located at cross-section stations 320.0 ft and 433.0 ft. The structure will also have sloping abutments, which are described by the data in the following table. Assume that the bridge geometry is the same for the upstream and downstream ends of the structure. Left Abutment
Right Abutment
Station, ft
Elevation, ft
Station, ft
Elevation, ft
0
459
480
446
250
459
519
459
277
450
800
459
SI units – Add the data describing the proposed bridge at river mile 14.785 to the channel reach from problem 6.1. The roadway deck elevation of the crossing will be 140.8 m, and the low chord elevation will be 139.9 m along the entire length of the bridge. The roadway deck will be 14.6 m wide, and the distance from the deck to the upstream cross section should be taken as 0.3 m. A weir coefficient of 1.44 should be used. Two 1.5 m diameter circular piers will be used to support the structure, and they will be located at cross-section stations 97.5 m and 132.0 m. The structure will also have sloping abutments, which are described by the data in the following table. Assume that the bridge geometry is the same for the upstream and downstream ends of the structure. Left Abutment Station, m
Elevation, m
Right Abutment Station, m
Elevation, m
0.0
139.9
146.3
135.9
76.2
139.9
158.2
139.9
84.4
137.2
243.8
139.9
Left and right ineffective flow area boundaries must be defined for the cross sections immediately upstream and downstream of the bridge. It is recommended that the initial elevation of the upstream ineffective flow areas be taken as equal to the low point of the road, and the initial elevation of the downstream ineffective flow areas be taken as equal to the low chord elevation. Complete the work-
Problems
231
sheet below to select the stationing for the upstream and downstream encroachments assuming a 1:1 contraction ratio and a 3:1 expansion ratio. If there is a significant difference between assumed water surface elevations and computed water surface elevations (and thus a significant difference in top width of flow due to the sloping abutments), multiple iterations may be required to arrive at final encroachment stations. Upstream Side of Bridge
Left
Right
Left
Right
Distance from R.M. 14.79 cross section to bridge face Assumed water surface elevation at upstream bridge section Cross-section station where assumed water surface intersects bridge abutment Assumed encroachment stations Computed water surface elevation at upstream bridge section Final encroachment stations Downstream Side of Bridge Distance from bridge face R.M. to 14.78 cross section Assumed water surface elevation at downstream bridge section Cross-section station where assumed water surface intersects bridge abutment Assumed encroachment stations Computed water surface elevation at downstream bridge section Final encroachment stations
6.3 The agency responsible for floodplain management has stressed that the stream crossing from problem 6.2 must not cause any adverse affects to the hydraulics of the stream system. Perform analyses using each the following bridge modeling approaches and record the results in the table provided. a. Energy method b. Momentum method option c. Yarnellʹs equation Energy Method
Momentum Method (Cp = _____)
Yarnell’s Equation (K = _____)
Increase in water surface elevation at R.M. 14.79 (compared to Problem 6.1) Most upstream cross section showing increase in water surface elevation Velocity of water through bridge Energy loss through bridge Friction loss through bridge
6.4 The agency responsible for floodplain management of the stream has asked you to design a structure that produces no increase in the water surface elevation upstream of the bridge. Do you believe this is possible? If so, how might it be accomplished?
CHAPTER
7 Culvert Modeling
A culvert is a simple structure, often a pipe, projecting through an embankment to allow runoff to move from an upstream to a downstream area. A culvert consists of an entrance, an exit, and a barrel connecting the two. Although a culvert is a simple structure, the hydraulics of a culvert can be quite complex. The culvert may or may not flow full, the exit may or may not be submerged, the flow regime can be subcritical or supercritical, and the culvert’s capacity can be controlled by either the upstream or downstream flow conditions. The same culvert may switch from one condition to another as the discharge through the culvert changes. Because of all these conditions, correct modeling of culverts and the interpretation of the output can be a challenge. This chapter addresses basic culvert hydraulics and modeling procedures, along with using HEC-RAS to perform culvert modeling.
7.1
Terminology Culvert analysis uses a number of terms to describe the different parts of the system, as illustrated in Figure 7.1. A few of these terms were introduced earlier in this book and are reviewed here. • Headwater elevation – The elevation of the energy grade line at the culvert entrance (section 3). This can also be considered equal to the water surface elevation at the culvert entrance if the velocity head is assumed negligible. Figure 7.1 shows separate water surface and energy grade line elevations upstream of the culvert, as would be computed by HEC-RAS, since the model does not ignore velocity head. The water surface elevation at section 3 is designated WSU on the figure.
234
Culvert Modeling
Chapter 7
Figure 7.1 Culvert features and hydraulic terms.
• Headwater depth (HW) – The difference in elevation between the energy grade line just upstream of the culvert entrance (section 3) and the invert of the culvert entrance. Since the velocity head immediately upstream of the culvert entrance is normally quite small, the energy grade line elevation is often assumed to be equal to the water surface elevation. Therefore, the headwater depth is also assumed equal to the water surface elevation. This assumption gives a conservative (higher) solution for the headwater depth. • Tailwater elevation – The elevation of the water surface at the exit of the culvert. Figure 7.1 shows the tailwater elevation as WSD. • Tailwater depth (TW) – The difference in elevation between the water surface elevation at the culvert exit and the invert of the culvert at the exit. • Entrance – The opening of the culvert at the upstream end. • Exit – The opening of the culvert at the downstream end. • Barrel – The body of the culvert that connects the entrance and exit. • Culvert invert – The lowest interior elevation of the culvert at any selected point. On Figure 7.1, the entrance and downstream exit inverts are designated ZBU and ZBD, respectively. • Outlet control, tailwater control, or exit control – Outlet control exists when the culvert entrance is capable of passing more discharge than the barrel can convey. The headwater elevation resulting from a certain discharge is a function of downstream conditions. The flow in the culvert is subcritical or pressure flow. Under outlet control, the tailwater elevation at section 2 (or the water surface elevation at the culvert exit, section BD) is the governing factor in water surface profile computations through the culvert. In Figure 7.1, the entrance and exit of the culvert are submerged, indicative of outlet control
Section 7.1
Terminology
235
with pressure flow in the culvert resulting from the high tailwater elevation. Other examples of outlet control are presented in Section 7.3. • Head, culvert head, or culvert head loss – The difference between the headwater energy grade line elevation and tailwater (water surface) elevation, or the tailwater energy grade line if the velocity head at section 2 is not negligible. The more restrictive the culvert, the greater the head, and the higher the upstream water level caused by the culvert. Because the downstream velocity head for Figure 7.1 may not be negligible, the head represents the difference in the upstream and downstream energy grade lines (a value often very close to the difference in upstream and downstream water surface elevations). • Inlet control, headwater control, or entrance control – Inlet control exists when the culvert barrel is capable of passing more discharge than the culvert entrance can supply. A control exists near the culvert entrance and flow passes through critical depth at this point. The flow in the culvert is supercritical. The headwater elevation resulting from any discharge is a function of the entrance shape only. Examples of inlet control conditions are presented in Section 7.3. • Hydraulic grade line (HGL) – The sum of the datum (base elevation) and pressure head at a section. In open channels, the hydraulic grade is equal to the water surface elevation. The HGL is the line showing the hydraulic grade at any point on the conveyance element. Figure 7.1 shows the hydraulic grade line for a culvert under pressure, with the HGL above the top of the culvert. • Culvert velocity head – The average culvert velocity is used to obtain the culvert velocity head as V2/2g. The velocity head is a constant value for a culvert flowing full; therefore, the energy grade line and hydraulic grade line are parallel through the culvert, as shown in Figure 7.1. • Entrance loss – The entrance loss is the difference in the energy grade line elevation between section 3, just upstream of the culvert mouth, and section BU, just inside the culvert mouth. This loss of energy at the entrance is designated hen. The loss is computed by multiplying a coefficient representing the degree of streamlining of the culvert entrance by the culvert velocity head. • Friction loss (also called barrel loss) – The loss of energy through the culvert, between the sections just inside the upstream end (BU) and downstream end (BD) of the culvert. The friction loss through the culvert is computed in the same fashion as friction loss through a bridge. The friction loss is indicated by the symbol hf. • Exit loss – The difference in the energy grade line elevations between section BD, just inside the culvert exit, and section 2, just outside the culvert exit. This loss of energy is designated hex and is computed by multiplying the difference in velocity head at these two locations by a coefficient. For a conservative result, this coefficient is taken as 1 and is further addressed in Section 7.3. • Total loss – The total loss is the sum of the entrance, exit, and friction losses. Under outlet control, total loss and culvert head are used interchangeably. Total loss is indicated in Figure 7.1 by the symbol HL. Culvert shape or culvert cross section – The configuration or cross-sectional shape of the culvert structure. The most common culvert shape is circular; however, many other culvert cross-section shapes may be used, depending on the required flow capacity and the site and cover conditions. All shapes are defined in HEC-RAS by the rise and span, except for a circular pipe. Rise represents the vertical distance between
236
Culvert Modeling
Chapter 7
the top of the culvert and the base. Span represents the horizontal distance between the widest points of the culvert. Figure 7.2 shows the nine shapes available for modeling within HEC-RAS.
Figure 7.2 Cross-sectional shapes available in HEC-RAS.
7.2
Effects of a Culvert A culvert may cause an increase in upstream water surface elevations due to its restrictive cross section, similar to the effect of a bridge (discussed in Chapter 6). The opening of a culvert, however, is generally much smaller than the opening of a bridge and can therefore result in a greater increase in water surface elevations. Federal, state/provincial, and local laws often limit such increases. Velocities through a culvert operating under open channel flow conditions are typically high unless they are reduced by a higher tailwater elevation caused by downstream effects. High-velocity flows exiting the culvert may cause scour and erosion immediately downstream, which may require an energy dissipater to control erosion. If a culvert passes under a significant roadway embankment, the hydrologic and hydraulic effects can be similar to a dam with a conduit passing through the base. Upstream flood levels may be several feet (or meters) higher than they would be without the culvert and embankment. Higher flood levels can result in significant storage upstream of the embankment. High upstream ponding levels often require a hydrologic or hydraulic routing to properly analyze the effect of the culvert on the discharge hydrograph and to determine the correct peak discharge through the culvert. Section 7.8 discusses culvert routing. As shown in Figure 7.3, the hydraulic design of a culvert should focus on the effects on upstream flood levels, controlling downstream scour potential, and including adequate freeboard at the roadway for the design flood. Applicable laws may also require that environmental considerations, such as fish passage, be taken into account. Additionally, the analysis of existing culverts should include an evaluation of upstream floodplain storage caused by the culvert embankment to best predict the discharge through the culvert.
Section 7.3
Culvert Hydraulics – Inlet/Outlet Control
237
Figure 7.3 Objectives for culvert placement.
7.3
Culvert Hydraulics – Inlet/Outlet Control Flow through a culvert and the resulting headwater elevations are influenced by many factors. Although a full range of flows passes through a culvert, the culvert design is normally based on a selected flood peak discharge, such as the 25-year storm event. Calculations must determine whether the culvert is under inlet or outlet control during the design event. Computations are made for both inlet and outlet control conditions and the most conservative answer is selected (that is, the result that yields the highest headwater elevation for a given discharge, or the lowest flow rate for a given headwater elevation). If the higher energy grade line is produced by inlet control, HEC-RAS performs an additional analysis to ensure that the flow is supercritical throughout the culvert barrelʹs length. If a hydraulic jump occurs within the barrel, the culvert is assumed to flow full, with the headwater elevation computed under outlet control conditions. HEC-RAS, along with other programs such as Haestad Methods’ CulvertMaster and PondPack, perform both inlet and outlet control computations and choose the appropriate controlling scenario, unless the modeler specifies that the program use only inlet or outlet control.
Inlet Control When a culvert functions under inlet control (also called headwater control or entrance control), the flow through the culvert and the associated headwater depth upstream of the structure are primarily functions of the culvert entrance. The headwater depth must increase to force increasing discharges through the culvert entrance. The entrance capacity is determined primarily by the available opening area, the shape of the opening, and the inlet configuration of the entrance. Under inlet control, the culvert never flows full through its entire length. The discharge passing into the culvert occurs as weir flow (for unsubmerged entrance conditions) or orifice flow (for submerged entrance conditions). The entrance to a culvert is considered submerged when the headwater depth (HW) is about 20 percent greater than the vertical height (D) of the culvert entrance (Linsley et al., 1992). Generally, since the control section of a culvert operating under inlet control is at the upstream end of the culvert, barrel flows are supercritical and outlet velocities are determined using forewater computa-
238
Culvert Modeling
Chapter 7
tions for gradually varied flow profiles. Thus, inlet control is associated with culvert barrels that have a steep slope. Flow Conditions under Inlet Control. Under inlet control, the culvert barrel is capable of passing more discharge than the culvert entrance can allow. Therefore, improvements in culvert performance for inlet control situations concentrate on streamlining the entrance shape. A rounded, flared, or beveled entrance can significantly increase flow capacity, whereas adjustments to culvert slope, lining, or tailwater elevation have a minor effect, if any. The flow passes through critical depth near the culvert entrance and is usually supercritical throughout the culvert barrel. Depending on downstream conditions, a low-grade hydraulic jump may occur at the culvert exit. If needed, a water surface profile through the culvert can be obtained by either the direct step or standard step method, starting at critical depth near the entrance. Figure 7.4 displays the four culvert flow conditions that can occur under inlet control conditions. The possible solutions depend on whether the inlet and outlet are submerged or unsubmerged. Of the four possible types, profiles A and C are the most common.
Figure 7.4 The four culvert flow conditions that may occur under inlet control conditions.
Section 7.3
Culvert Hydraulics – Inlet/Outlet Control
239
With condition A, both the inlet and outlet are open to the atmosphere (unsubmerged). The culvert entrance acts as a weir, with flow passing through critical depth near the entrance. Figure 7.5 further illustrates this condition in a multiple-barrel culvert. The drawdown into the culvert indicates critical depth is probably occurring near the mouth of the culvert. The wave riding up each intermediate wall separating the barrels is indicative of supercritical flow. Condition A is addressed through the normal culvert analysis procedures within HEC-RAS.
Figure 7.5 A multiple-barrel culvert operating under condition A.
For condition B, the downstream tailwater elevation is sufficiently high to cause a hydraulic jump within the culvert barrel. Because the entrance is open to the atmosphere, the hydraulic jump location is relatively stable and the control remains at the entrance (flow passes through critical depth at the culvert mouth). This condition rarely occurs, but can be addressed with HEC-RAS using a mixed flow analysis (discussed in Chapter 8). For condition C, the inlet is submerged and the outlet is unsubmerged. The mouth of the culvert acts as an orifice, with flow passing through critical depth near the culvert entrance. Condition C is the most common inlet control situation encountered for design flow in culverts and is addressed with HEC-RAS culvert analysis procedures. Condition D rarely occurs. Since both the entrance and exit are submerged, a hydraulic jump forms within the culvert. If no source of air is available, the jump entrains and evacuates the air in the culvert, with the hydraulic jump moving upstream as the air is removed. The culvert eventually flows full, with the culvert condition switching from inlet to outlet control. For condition D, the storm drain inlet in the highway median is the source of air. The air introduced into the culvert stabilizes the location of the hydraulic jump and prevents it from moving upstream, maintaining inlet control at the entrance. This condition cannot be addressed automatically with HEC-RAS;
240
Culvert Modeling
Chapter 7
however, the modeler could specify that the program only use inlet control for this culvert, to prevent the program from selecting outlet control if the computed energy grade line elevation at section 3 is higher than that for inlet control.
Outlet Control Outlet control occurs when the culvert barrel is not capable of conveying as much flow as the inlet opening will accept. When a culvert functions under outlet control (also called tailwater control or exit control), the headwater elevation for a given discharge is a function of the downstream condition (the tailwater elevation). For the design discharge, the headwater elevation is usually found by computing the losses through the culvert and adding them to the downstream tailwater energy grade elevation. These losses are the sum of the entrance loss, the exit loss, and the friction loss through the culvert barrel. Using outlet control for the design discharge often assumes the culvert flows full over all or most of its length, with the structure acting as a pressure conduit. Culvert Flow Conditions for Outlet Control. Under outlet control, the headwater depths are found by adding the water surface elevation at the culvert exit to the losses through the culvert. Flow is either subcritical or under pressure through the structure. Increasing the culvertʹs performance is usually achieved by further streamlining the inlet geometry (reducing the entrance loss coefficient) and/or by using a culvert material with a lower value of Manning’s n. Under open channel conditions for outlet control, flow is subcritical within the culvert but often exits the culvert at or near critical depth, if the tailwater elevation is less than that of critical depth. Downstream protection against scour should be considered as part of the culvert design. Figure 7.6 shows riprap protection at the sides and invert of a culvert. For open channel flow through a culvert, a direct step backwater computation can be performed between the exit and entrance of the culvert to compute the headwater elevation. Figure 7.7 displays the five possible flow conditions for a culvert under outlet control. The most common types are D for design flow conditions and E for lower flows. The five types are based on whether the entrance and exit are submerged or unsubmerged. Condition A occurs only when the downstream channel and overbank capacities are less than the culvert capacity, thus submerging the culvert exit due to the high tailwater elevation. Condition A is often caused by a pond or lake immediately downstream of the culvert or a smaller downstream culvert causing upstream ponding. This condition is addressed through use of the HEC-RAS culvert analysis procedures. Condition B is normally transient and occurs infrequently at the discharge for which the culvert was designed. Tests have found that a culvert will not generally flow full unless the headwater depth exceeds the vertical height of the culvert by about 20 percent. This submergence level is not achieved under condition B, resulting in an unsubmerged condition at the culvert entrance. This is not handled in HEC-RAS culvert routines; when the computed depth equals the culvert height, the culvert is assumed to flow full for its full length. Condition C is often assumed to simplify the computations when a culvert analysis is done by hand; however, a large head is needed at the culvert entrance to cause a culvert to flow full all the way through to the exit. Although this situation is not often
Section 7.3
Culvert Hydraulics – Inlet/Outlet Control
241
Figure 7.6 Riprap protection at a culvert entrance. Note the significant vegetation in the channel that may dislodge the rocks and increase the water surface elevation by causing a higher n value.
encountered in the field, the advantage of assuming full-flow conditions through the culvert is that the tailwater elevation may be conveniently located at the top of the culvert exit. This condition is handled by the HEC-RAS culvert routines if normal depth in the culvert (for the discharge being analyzed) exceeds the vertical culvert height at the culvert exit. Condition D is the most typical situation for a culvertʹs design discharge. The culvert flows full for a significant portion of its length, but the water surface eventually breaks free of the culvert top at some point within the culvert barrel. Figure 7.8 shows a culvert under high submergence with the outlet flowing less than full. The water surface elevation at the culvert exit could range from nearly the full depth of the culvert to critical depth. In the absence of a computed tailwater elevation, FHWA research recommends that culvert computations use a tailwater depth equal to the average of the culvert vertical height (D) and critical depth (for the design flow). Since HEC-RAS computes a water surface elevation at the culvert exit, this tailwater elevation is used by the program to handle Condition D for a culvert under outlet control. Condition E is handled as open channel flow and a direct step computation is used to compute an elevation at the upstream end of the culvert, beginning at the tailwater elevation or the elevation of critical depth, whichever is higher. HEC-RAS uses vertical changes in depth of 0.05–0.1 ft (0.015–0.03 m) to compute a water surface profile for open channel flow through a culvert. Comparison between Inlet and Outlet Control. Table 7.1 summarizes the differences between inlet and outlet control. The following sections on inlet and outlet analysis further expand on these differences.
242
Culvert Modeling
Chapter 7
Figure 7.7 The five flow conditions that may occur for outlet control.
Table 7.1 Comparison of inlet and outlet control for the design discharge. Inlet Control
Outlet Control
Design Q is a function of the inlet geometry Design Q is a a function of the culvert losses Inlet capacity < barrel capacity
Inlet capacity > barrel capacity
Barrel does not flow full
Barrel can flow full
Culvert acts as an orifice or weir
Culvert acts as a pressure conduit
Culvert slope is primarily steep
Culvert slope is primarily mild
Normal depth < critical depth Culvert slope > critical slope
Normal depth > critical depth Culvert slope < critical slope
No influence on headwater elevation by water surface elevation at culvert exit
Water surface elevation at culvert exit is an important factor in calculating headwater elevation
Section 7.3
Culvert Hydraulics – Inlet/Outlet Control
(a)
243
(b) FHWA
Figure 7.8 Headwater (a) and tailwater (b) for a highly submerged culvert operating in condition D.
Analysis Summary. A culvert analysis must evaluate the culvert entrance and exit conditions for submergence, determine inlet or outlet control, and perform a unique set of computations depending on the controlling flow conditions. HEC-RAS can perform these analyses to accurately determine headwater and tailwater elevations. If the design discharge is required for a set of known headwater and tailwater conditions, a program such as Haestad Methods’ CulvertMaster would be more suitable. HEC-RAS does not compute discharge. Determining the proper flow condition at a culvert requires specific analysis procedures to arrive at the correct solution. Figure 7.9 displays the flowchart for computing culvert flow conditions as followed by HEC-RAS. The following section illustrates the computation methods used by the program.
244
Culvert Modeling
Figure 7.9 Flow chart for culvert computations in HEC-RAS.
Chapter 7
Section 7.4
7.4
Inlet Control Computations
245
Inlet Control Computations In the past, inlet control analysis relied on simple nomographs or a single-value orifice or weir coefficient applied to the general orifice equation (Equation 6.6) or to the general weir equation (Equation 6.7). However, laboratory studies with field verification (FHWA, 1985) have resulted in significantly improved equations for inlet control conditions. These studies found that two forms of an equation for weir flow were applicable for various inlet configurations under unsubmerged inlet control conditions and that an equation for orifice flow was suitable for submerged inlet conditions. For the unsubmerged inlet condition, Form 1 is the most complete solution. However, the coefficients for many culvert shapes have only been developed for Form 2, which is also computationally easier for solving by hand. The equations (U.S. standard units only) are as follows: Unsubmerged Inlet – Weir Flow
H D
- Form 1: ---------- = ------c + K -------------0.5 HW D
Q
AD
M
- Form 2: ---------- = K -------------0.5 HW D
Q
Q - ≤ 3.5 – 0.5S , -------------0.5 AD
M
Q
(7.1)
- ≤ 3.5 , -------------0.5
(7.2)
Q Q 2 HW - + Y – 0.5S , --------------- ≥ 4.0 ---------- = c -------------0.5 0.5 D AD AD
(7.3)
AD
AD
Submerged Inlet – Orifice Flow
where HW = headwater depth above the upstream culvert invert (ft) D = full interior height of the culvert (ft) Hc = specific energy head at the critical depth (ft) Q = discharge (ft3/s) A = full cross-sectional area of the culvert barrel (ft2) S = culvert slope (ft/ft) Y, M, c, K = coefficients describing the culvert inlet conditions For mitered inlets, substitute +0.7S for –0.5S in Equation 7.1 and Equation 7.3. A transition stage occurs in the range 3.5 < Q/AD0.5 < 4.0. There is a wide variety of inlet geometries, with the various combinations grouped and labeled with chart and scale numbers (FHWA, 2001). The chart number refers to the shape and material of the culvert and the scale number refers to the type of inlet edge. For each chart number, two to four scale numbers are possible. Table 7.2 shows the coefficients associated with various chart and scale numbers, as well as the applicable form of the equation.
246
Culvert Modeling
Chapter 7
Table 7.2 Chart and scale numbers with coefficients for inlet control design equations. Unsubmerged Chart Number
1
2
3
8
Shape & Material
Circular Concrete
Circular CMP Circular Rectangular Box
9
Rectangular Box
10
Rectangular Box
11
Rectangular Box
Rectangular 12
13
16–19
29
30
34
Nomograph Scale Inlet Edge Description
1
Square edge with headwall
2
Groove end with headwall
3
Groove end projecting
1
Headwall
2
Mitered to slope
Equation Form
1
1
Submerged
K
M
c
Y
0.0098
2.0
0.0398
0.67
0.0018
2.0
0.0292
74
0.0045
2.0
0.0317
0.69
0.0078
2.0
0.0379
0.69
0.0210
1.33
0.0463
0.75
3
Projecting
0.0340
1.50
0.0553
0.54
1
Beveled ring, 45º bevels
0.0018
2.50
0.0300
0.74
2
Beveled ring, 33.7º bevels
0.0018
2.50
0.0243
0.83
1
30º to 75º wingwall flares
0.026
1.0
0.0347
0.81 0.80
1
2
90º and 15º wingwall flares
0.061
0.75
0.0400
3
0º wingwall flares
1
0.061
0.75
0.0423
0.82
1
45º wingwall flare, d = 0.083D
0.510
0.667
0.0309
0.80
2
18º to 33.7º wingwall flare, d = 0.083D
0.486
0.667
0.0249
0.83
1
90º headwall with 3/4" chamfers
0.515
0.667
0.0375
0.79
2
90º headwall with 45º bevels
0.495
0.667
0.0314
0.82
3
90º headwall with 33.7º bevels
0.486
0.667
0.0252
0.865
1
3/4"
chamfers, 45º skewed headwall
0.545
0.667
0.0505
0.73
2
3/4"
chamfers, 30º skewed headwall
0.533
0.667
0.0425
0.705
3
3/4"
chamfers, 15º skewed headwall
0.522
0.667
0.0402
0.68
4
45º bevels, 10º–45º skewed headwall
0.498
0.667
0.0327
0.75
1
45º nonoffset wingwall flares
0.497
0.667
0.0339
0.803
0.493
0.667
0.0361
0.806
0.495
0.667
0.0386
0.71
0.497
0.667
0.0302
0.835
0.495
0.667
0.0252
0.881
0.493
0.667
0.0227
0.887
0.0083
2.0
0.0379
0.69
0.0145
1.75
0.0419
0.64
0.0340
1.5
0.0496
0.57
0.0100
2.0
0.0398
0.67
0.0018
2.5
0.0292
0.74 0.69
2
2
2
2
18.4º nonoffset wingwall flares
3
18.4º nonoffset wingwall flares, 30º skewed barrel
1
45º offset wingwall flares
2
33.7º offset wingwall flares
3
18.4º offset wingwall flares
2
90º headwall
3
Thick wall projecting
5
Thick wall projecting
Horizontal Ellipse, Concrete
1
Square edge with headwall
2
Groove end with headwall
3
Groove end projecting
0.0045
2.0
0.0317
Vertical Ellipse, Concrete
1
Square edge with headwall
0.0100
2.0
0.0398
0.67
2
Groove end with headwall
0.0018
2.5
0.0292
0.74
3
Groove end projecting
0.0095
2.0
0.0317
0.69
Pipe Arch, 18" Corner Radius C M
1
90º headwall
0.0083
2.0
0.0379
0.69
2
Mitered to slope
0.0300
1.0
0.0463
0.75
3
Projecting
0.0340
1.5
0.0496
0.57
Box, 3/4" Chamfers Rectangular Box, Top Bevels
C M Boxes
2
2
1
1
1
1
Section 7.4
Inlet Control Computations
247
Table 7.2 Chart and scale numbers with coefficients for inlet control design equations. Unsubmerged Chart Number
Shape & Material
Pipe Arch, 18" Corner Radius C M
1
Projecting
35
2
No bevels
3
33.7º bevels
Pipe Arch, 31" Corner Radius C M
1
Projecting
2
No bevels
3 1
36
41–43
Arch C M
Nomograph Scale Inlet Edge Description
Submerged
Equation Form
K
0.0300
1.5
0.0496
0.57
1
0.0088
2.0
0.0368
0.68
0.0030
2.0
0.0269
0.77
0.0300
1.5
0.0496
0.57
0.0088
2.0
0.0368
0.68
33.7º bevels
0.0030
2.0
0.0269
0.77
90º headwall
0.0083
2.0
0.0379
0.69
1
2
Mitered to slope
3
Thin wall projecting
1
1
Smooth tapered inlet throat
2
Rough tapered inlet throat
1
Tapered inlet, beveled edges
2
Tapered inlet, square edges
55
Circular
56
Elliptical Inlet Face
3
Tapered inlet, thin edge projecting
57
Rectangular
1
Tapered inlet throat
58
Rectangular Concrete
1
Side tapered, less-favorable edges
2
Side tapered, more-favorable edges
59
Rectangular Concrete
1
Slope tapered, less-favorable edges
2
Slope tapered, more-favorable edges
2
2 2 2 2
M
c
Y
0.0300
1.0
0.0463
0.75
0.0340
1.5
0.0496
0.57
0.534
0.555
0.0196
0.90
0.519
0.64
0.0210
0.90
0.536
0.622
0.0368
0.83
0.5035
0.719
0.0478
0.80
0.547
0.80
0.0598
0.75
0.475
0.667
0.0179
0.97
0.56
0.667
0.0446
0.85
0.56
0.667
0.0378
0.87
0.50
0.667
0.0446
0.65
0.50
0.667
0.0378
0.71
HEC-RAS automatically inserts these coefficients in the appropriate equation when the modeler specifies the chart and scale number. The headwater depth calculation is based on the discharge and the inlet geometry, with a slight correction factor for culvert slope. Tailwater conditions are not included or necessary for inlet control. The engineer should be aware that both the depth (D) and area (A) terms in the inlet control equations represent the full depth and area of the culvert, not the actual flow depth or area. The coefficients Y, M, c, and K have been found from laboratory studies on small-scale models of culverts.
Example 7.1 Analysis of a culvert under inlet control. A 5-ft diameter concrete culvert is 100 ft long, with upstream and downstream invert elevations of 501 and 496 ft, respectively. The entrance is a beveled ring (33.7° bevels). If the outlet is under free-flow conditions, compute the headwater elevation for flows of 125 and 250 ft3/s. Solution Assume that n for the concrete culvert is 0.013. The culvert invert drops 5 ft over a distance of 100 ft, for a slope of 5%. Paved slopes approaching 0.5% are typically supercritical, so supercritical flow is expected in this culvert and inlet control will dominate. A value of Q/AD0.5 must be computed to determine if the culvert is acting as a weir or an orifice. For the discharge of 125 ft3/s, the result is Q - = -------------------125 - = 2.85 -------------0.5 19.63 5 AD
248
Culvert Modeling
Chapter 7
Since this is less than 3.5, the upper limit for weir flow, the culvert is acting as a weir. For the type of culvert (Chart Number 3) and entrance conditions (Scale Number 2) described, Table 7.2 is used to select the appropriate coefficients for this culvert. From Table 7.2, Form 1 is the appropriate weir flow equation, with K = 0.00018, M = 2.5, c = 0.0243 and Y = 0.83. Form 1 of the weir equation for culverts requires that the specific energy at critical depth be included (Hc term). Critical depth and velocity may be determined by application of the Manning’s equation for a circular shape, by applying nomographs for a circular shape, or from using a program such as Haestad Methods’ FlowMaster to compute yc and Vc. Using any of these methods, critical depth is found to be 3.2 ft and critical velocity is 9.42 ft/s for the discharge of 125 ft3/s. Specific energy (y + V2/2g) for critical depth is thus 4.6 ft. Applying Equation 7.1 gives H Q M HW - – 0.5S ---------- = ------c + K -------------0.5 D D AD or 2.5 HW ---------- = 4.6 ------- + 0.0018 ( 2.85 ) – 0.5 × 0.05 . 5 5
Solving for HW yields a headwater depth of 4.6 ft and a headwater elevation (HW + culvert invert elevation) of 505.6 ft. For the discharge of 250 ft3/s, the Q/(AD)0.5 term must be computed to determine weir flow or orifice flow. For the higher discharge the term is 5.7 > 4.0 (the lower limit for orifice flow). Therefore, orifice flow exists for the discharge of 250 ft3/s. Using the orifice equation for culverts (Equation 7.3) gives Q 2 HW - + Y – 0.5S ---------- = c -------------0.5 D AD or 2 HW ---------- = 0.0233 ( 5.7 ) + 0.83 – 0.5 × 0.05 . 5
Solving for HW gives a headwater depth of 7.80 ft and a headwater elevation of 508.80 ft.
7.5
Outlet Control Computations For outlet control, computations focus on the losses experienced through the culvert. The losses are added to the downstream water surface elevation to determine a headwater elevation. Assuming that the culvert flows full for at least a portion of its length, these losses are found as follows. Entrance loss is given by 2
V h en = K en -----2g
(7.4)
where hen = the head loss between sections 3 and BU (from Figure 7.1), due to the entrance geometry (ft, m)
Section 7.5
Outlet Control Computations
249
Ken = the entrance loss coefficient (ranging from 0.2 to 0.9) V2/2g = the velocity head of the culvert flowing full (ft, m) Figure 7.10 shows four common entrance and exit conditions and the associated entrance loss coefficient for each. Table 7.3 lists entrance loss coefficients for a variety of culvert inlets.
Figure 7.10 Four common types of culvert entrances and exits.
Exit loss is given by 2
V 2 V TW h ex = K ex ------ – ---------- 2g 2g where hex = the head loss between sections BD and 2, due to the exit conditions (ft, m) Kex = the exit loss coefficient (normally equal to 1.0) VTW = the average velocity at Section 2 in the downstream channel (ft, m)
(7.5)
250
Culvert Modeling
Chapter 7
Table 7.3 Entrance loss coefficients for common entrance shapes under outlet control (FHWA). Culvert Type
Pipe, Concrete
Pipe or Pipe Arch, Corrugated Metal
Entrance Loss Coefficient, Ken
Entrance Type Projecting from fill, socket end (groove end)
0.2
Projecting from fill, square-cut end
0.5
Headwall or headwall with wingwalls Socket end of pipe (groove end) Square edge Rounded (radius = D/12)
0.2 0.5 0.2
Mitered to conform to fill slope
0.7
End section conforming to fill slopea
0.5
Beveled edges, 33.7° or 45° bevels
0.2
Side- or slope-tapered inlet
0.2
Projecting from fill (no headwall)
0.9
Headwall or headwall and wingwalls square edge
0.5
Mitered to conform to fill slope, paved or unpaved slope
0.7
End section conforming to fill slopea
0.5
Beveled edges, 33.7° or 45° bevels
0.2
Side- or slope-tapered inlet
0.2
Headwall parallel to embankment (no wingwalls) Square edged on three sides Rounded on three edges to radius of 1/12 barrel dimension or beveled edges on three sides
Box, Reinforced Concrete
Wingwalls at 30° to 75° to barrel Square edged at crown Crown edge rounded to radius of 1/12 barrel dimension or beveled top edge
0.5 0.2
0.4 0.2
Wingwalls at 10° to 25° to barrel, square edged at crown
0.5
Wingwalls parallel (extension of sides), square edged at crown
0.7
Side- or slope-tapered inlet
0.2
a. “End section conforming to fill slope,” made of either metal or concrete, are the sections commonly available from manufacturers. From limited hydraulic tests they are equivalent in operation to a headwall in both inlet and outlet control. Some end sections incorporating a closed taper in their design have a superior hydraulic performance. These latter sections can be designed using the information given for the beveled inlet.
For hand computations using Equation 7.5, the exit loss coefficient (Kex) is assumed equal to 1 and the tailwater velocity head is often assumed to be negligible, resulting in a conservative estimate of the exit loss. Equation 7.5 then reduces to the exit loss equal to the culvert velocity head. In HEC-RAS however, the tailwater velocity head is computed and then subtracted from the culvert velocity head. Friction loss is given by 2 2
n V L h f = ----------------2 4⁄3 k R
(7.6)
Section 7.5
Outlet Control Computations
251
where hf = the head loss due to friction through the culvert barrel (ft, m) n = the Manning coefficient for the culvert material (dimensionless) L = the length of the culvert (ft, m) R = the hydraulic radius of the culvert (ft, m) k = 1.486 for English units, 1.0 for SI Combining the entrance, exit, and friction losses (Equation 7.4 through Equation 7.6) yields the following equation for loss: 2 2 V h L = 1.0 + K en + 29.1n -------------------L- ------ . 4⁄3 2g R
(7.7)
Equation 7.7 is valid for English units. For SI units, replace the constant 29.1 with 19.6. Normally, the entrance loss is the only coefficient (other than n) required to solve Equation 7.7. This equation is mainly used in hand computations for outlet control analysis with both the tailwater and headwater velocity heads considered negligible. HEC-RAS does not use Equation 7.7, but rather Equation 7.4 through Equation 7.6 to compute individual losses under outlet control conditions and includes the tailwater and headwater velocity heads in the analysis.
Example 7.2 Analysis of culvert under outlet control A 6 ft wide by 4 ft high concrete box culvert is 100 ft long, with upstream and downstream invert elevations of 342 and 341.7 ft, respectively. The entrance consists of a headwall with 45° bevels. For a discharge of 200 ft3/s, compute the headwater elevation for a tailwater depth (a) two feet above the top of the downstream end of the culvert, (b) equal to the elevation of the top of the downstream end of the culvert, and (c) equal to 2 ft below the top of the downstream end of the culvert. Assume the headwater and tailwater velocity heads are negligible. Solution The culvert slope is 0.003 ft/ft. Paved slopes less than about 0.005 normally result in subcritical flow and outlet control is the expected flow condition through the culvert. Solving for both yn and yc in the box culvert (using the procedures in Chapter 2) for a flow of 200 ft3/s results in a critical depth of 3.26 ft and a normal depth of 3.78 ft for a Manning’s n = 0.013. Because the normal depth exceeds the critical depth, the flow will be subcritical, and outlet control will govern. For the entrance conditions specified, Table 7.3 lists the entrance loss coefficient (Ken) as 0.2. (a) TW elevation = 341.7 + 4 + 2 = 347.7 ft. For this tailwater, the culvert exit is submerged and the culvert will flow full (condition A for outlet control from Figure 7.7). The headwater elevation is computed and is compared to the elevation of the top of the culvert on the upstream end (346 ft). If the HW depth exceeds the vertical height of the culvert by at least 20 percent, the culvert will flow full and Condition A is confirmed. For full culvert flow, the flow area is 24 ft2 and the culvert velocity is 200/24 = 8.33 ft/s. The n value for concrete is assumed to be 0.013 and the hydraulic radius for full culvert flow is A/P = 24/20 = 1.2 ft. Applying Equation 7.7 for outlet conditions gives 2 2 2 2 8.33 V 29.1 × 0.013 × 100 h L = ------ K en + K ex + 29.1n -------------------L- = ------------------- 0.2 + 1.0 + ----------------------------------------------- = 1.71 ft 4 ⁄ 3 4 ⁄ 3 2g 2 × 32.2 R 1.2
252
Culvert Modeling
Chapter 7
The headwater elevation is found by adding the tailwater elevation (347.7 ft) and the head losses through the culvert (1.71 ft), yielding a headwater elevation of 349.41 ft and a headwater depth of 7.41 ft (HW elevation minus culvert invert elevation). The headwater depth exceeds 120 percent of the height of the culvert by 2.41 ft, confirming that full culvert flow is occurring and Condition A is the outlet flow situation. (b) TW elevation = 341.7 + 4 = 345.7 ft. Because the tailwater depth equals the height of the culvert, Condition B or C of Figure 7.7 could be appropriate. As for part (a), the headwater depth is computed and compared to 120 percent of the culvert height. For this tailwater condition, all the values computed in part (a) are the same except for the tailwater elevation. Therefore, the new headwater elevation is 345.7 + 1.71 ft = 347.41 ft. Thus, the headwater depth is 5.41 ft, which exceeds 120 percent of the vertical height of the culvert (4 ft), confirming that Condition C displays the correct profile. (c) TW elevation = 341.7 + 2 = 343.7 ft. The tailwater elevation is one-half of the culvert height, thus the culvert may not flow full. Also, the tailwater elevation is less than the elevation of critical depth at the outlet (341.7 + 3.26 = 344.96 ft), so critical depth at the culvert exit becomes the tailwater elevation and Condition D or Condition E from Figure 7.7 will occur. The water surface profile through the culvert must be computed starting at critical depth at or near the culvert exit. Because the culvert is prismatic, either the direct step or standard step backwater solution (presented in Chapter 2) may be applied to determine the flow depth at the culvert entrance. Performing a backwater computation similar to that in Example 2.12 gives a depth of 3.64 ft at the culvert entrance. Because this depth is less than the vertical height of the culvert, the culvert does not flow full, and Condition E from Figure 7.7 appears appropriate. The friction loss through the culvert (needed for the direct step and standard step methods) is computed by determining the average friction slope from the sf values at the culvert entrance and exit. These values are computed as 0.0044 at the exit and 0.00329 at the entrance, yielding an average friction slope value of 0.00383. Velocity at the entrance is 9.16 ft/s at a depth of 3.64 ft, and the critical velocity at the exit is 10.22 ft/s. Thus, the head losses through the culvert are 2
2
2 2 V en V ex 9.16 10.22 h L = K en -------- + s f L + K ex -------- = 0.2 ------------------- + 0.00383 × 100 + 1 ------------------- = 2.29 ft ave 2g 2g 2 × 32.2 2 × 32.2
The headwater elevation is found from adding the tailwater elevation for critical depth (344.96 ft) plus the head loss (2.26 ft) to obtain a headwater elevation of 347.25 ft at the culvert entrance. The headwater depth is therefore 5.22 ft, which exceeds 120 percent of D by 0.42 ft. Therefore, Condition D would initially appear to be appropriate for the culvert. This would be the end of the example for hand computations. However, although the entrance is computed as submerged, the water surface is below the top of the culvert immediately inside the upstream end of the structure, as determined by direct step backwater computations. This condition indicates that Condition E is correct. The initial simplification of assuming the headwater and tailwater velocity heads are negligible causes this conflict. In reality, these two velocity heads are not negligible for part (c) and are probably 0.3 to 0.6 ft (corresponding to 4–6 ft/s) if the geometry outside the culvert were known. These values for velocity head are significant to these computations. It is further noted that the exit loss for this computation (1.62 ft) is over 70 percent of the total loss through the culvert, again significantly affected by the negligible tailwater velocity assumption. If the tailwater velocity is 5 ft/s, the exit loss drops to 1.23 ft, using the full form of Equation 7.5. If the actual headwater and tailwater velocities and velocity heads were incorporated, as they are in a HEC-RAS computation, smaller entrance and exit losses would result, giving a smaller total loss and a headwater depth significantly lower than 347.22 ft. In addition, because velocity is neglected in this example, the computed HW depth is actually to the energy grade line. Subtracting the velocity
Section 7.6
Defining Cross-Section Locations and Coefficients
253
head would yield a lower water surface elevation. The headwater elevation is less than 347 and Condition E from Figure 7.7 is applicable for this example.
7.6
Defining Cross-Section Locations and Coefficients Approach and exit conditions at a culvert are modeled in HEC-RAS similar to bridges as described in Chapter 6. The approach (start of contraction, section 4) and exit (end of expansion, section 1) sections are placed at the same locations as they are for bridge modeling, as shown on Figure 6.1 on page 168. Two more sections are placed immediately outside the culvert at the upstream (section 3) and downstream (section 2) ends. Thus, four sections are typically used to model the flow contraction and expansion through a culvert reach.
Section Location The width of a bridge, parallel to flow, is nearly always much less than the width of the embankment between the embankment toes. This situation is different for culverts, because a culvert extends all the way through the embankment, with the culvert entrance and exit usually located at or beyond the embankment toe. Culverts are therefore normally much longer (parallel to the flow direction) than the bridge width at the same location. Sections 2 and 3 for culverts can be located 1 ft (0.3 m) or more outside the downstream and upstream ends of the culvert, similar to the locations of these sections for bridge modeling. However, while the modeler may choose a foot or so from the culvert entrance or exit to locate the sections, it is more appropriate to locate sections 2 and 3 a distance of 5 to 20 feet from the culvert face, as these locations typically better reflect the headwater and tailwater conditions. Sections 2 and 3 should comprise the full valley cross section, with ineffective flow area constraints specified. If the culvert has wingwalls at the entrance and end walls at the exit, typical locations are just downstream of the end walls for section 2 and just upstream of the wingwalls for section 3. Two more cross sections are needed to appropriately model a culvert: one at the beginning of the contraction into the culvert and a second at the end of the expansion out of the culvert. These locations are based on the modelerʹs judgment and supplemented by the equations for expansion and contraction reach length or ratios discussed in Chapter 6. Historically, the rule of thumb calling for 1:1 contraction and 1:4 expansion ratios described in Chapter 6 has been used to locate these sections, although a lower estimate of the expansion ratio is now more appropriate. Expansion ratios (ER) as small as 1:1 are sometimes applied for culverts between sections 1 and 2. This ER is also generally used for the distance between sections BD and 2. The nomographs and equations for expansion and contraction ratios presented in Chapter 6 were developed specifically for bridges. There have been no similar tests for culverts. However, the modeler could choose to assume that the ratios are also applicable to culverts. Figure 7.11 shows the location for the four culvert cross sections required of the modeler, using a 1:1 CR and an ER computed with an appropriate equation from Chapter 6 for Le or ER. The modeler should develop the appropriate CR or ER for each culvert in the stream reach being modeled.
254
Culvert Modeling
Chapter 7
Figure 7.11 Expansion-contraction reach for a culvert and crosssection locations.
Occasionally, culverts have formal energy dissipaters (further discussed in Chapters 11 and 12) constructed to prevent severe erosion at the culvert exit. These structures serve to control high velocities at the culvert exit and keep the hydraulic jump within the concrete structure or some other selected location. These structures result in flows with lower, nonscouring velocities leaving the energy dissipater. For a culvert with an energy dissipater, the end of expansion location for section 2 could be at or slightly downstream of the end of the dissipater, especially for culvert discharges that remain within the channel bank stations.
Section 7.6
Defining Cross-Section Locations and Coefficients
255
Coefficients Expansion and contraction coefficients for culverts can be selected based on the modelerʹs judgment or, alternatively, from the values found for bridges, as presented in the previous chapter. When the cross section of a culvert represents a small portion of the overall channel cross section, abrupt expansion and contraction coefficients should be considered. As shown in Table 5.7 on page 146, abrupt contraction and expansion coefficient values are 0.6 and 0.8, respectively. Figure 7.12a illustrates a culvert for which these values may be appropriate. When the culvert opening represents a large percentage of the channel width (Figure 7.12b), the typical bridge coefficients shown in Table 5.7 (0.3, 0.5) are more likely to be appropriate. Section 6.4 on page 183 presented methods for computing reduced bridge coefficients. Unfortunately, similar studies have not been performed to determine whether these methods and values are appropriate for culverts. It would seem to be a reasonable assumption that contraction and expansion coefficients for culverts should be greater than for bridges. However, the modeler can choose to use the new procedures presented in Chapter 6 to estimate expansion/contraction values at culverts or use the coefficients presented above in conjunction with best judgment.
Figure 7.12 Examples of possible expansion and contraction coefficients for culverts.
In the absence of actual laboratory tests and/or field studies to derive specific equations for contraction and expansion coefficients at culverts, minimum values of 0.3 and 0.5 for the contraction and the expansion coefficients, respectively, are offered as general guidelines for culverts.
256
Culvert Modeling
Chapter 7
Adjustments to Bounding Cross Sections 2 and 3 Specification of ineffective flow area stations and elevations at the bounding cross sections and any necessary modification of the channel and overbank geometry and/or n values should be made to accurately model culvert reaches. Ineffective Flow Areas. Ineffective flow areas upstream and downstream of culverts are required for proper modeling of the flow in and around culverts. The information on this subject given in Section 6.5 is applicable for culverts. Figure 7.13 demonstrates the use of the ineffective area option in HEC-RAS at the downstream face of a circular culvert. Typically, culverts are more restrictive to flow than a bridge and the downstream ineffective flow area elevation at culverts is often considerably lower than the upstream constraint elevation. Culverts under high fill may have 10 ft (3 m) or more of head difference between the headwater and tailwater elevations. The downstream ineffective flow area constraint elevations are initially estimated, then adjusted up or down based on computer runs to determine the final, adopted constraint elevations.
Figure 7.13 Example of placing ineffective flow area station-elevation constraints downstream of a culvert.
Section 7.7
Culvert Modeling Using HEC-RAS
257
The locations and initial constraint elevation estimates for culverts are summarized as follows: • Ineffective flow area locations for section 3 – Determine the offset distance from the left and right edges of the culvert by multiplying the selected CR times the distance between section 3 and BU. For example, for a CR of 1:1 and a distance between section 3 and BU of 10 ft, the ineffective flow area stations on section 3 are 10 ft to the outside of both edges of the culvert. • Ineffective flow area elevations at section 3 – The left and right constraint elevations are equal to or slightly greater than the low roadway elevations to the left and right sides of the culvert. The selected value for each side of the culvert should generally represent the elevations when significant weir flow occurs over the roadway to the left and right of the culvert. • Ineffective flow area locations for section 2 – Determine the offset distance from the left and right edge of the culvert by multiplying the selected ER times the distance between section 2 and BD. For example, for an ER of 1:2 and a distance between section 3 and BU of 10 ft, the ineffective flow area stations on section 3 would be 5 ft to the left and right of the left and right culvert edge. • Ineffective flow area elevations for section 2 – The left and right constraint elevations at section 2 are often more uncertain than those for a bridge. An initial assumption for the left ineffective flow area elevation can be an average of the low roadway elevation on the left and the top elevation of the culvert. The right initial constraint elevation can be estimated similarly. These elevations are refined after review of the initial computer runs and inspection of the profiles through the culvert. Geometry and n values. Sections 2 and 3 represent full valley cross sections and should not include any portion of the roadway or the embankment in the cross-section data. An intermediate section could be considered if there are large changes in Manning’s n between sections 1 and 2 or between sections 3 and 4. Sections 2 and 3 often require geometric modifications, especially if a new road crossing is being analyzed with multiple culverts. The total width of the culverts may be larger than the width of the existing channel. For example, in the culvert design shown later as Figure 7.15, the multiple box culverts under consideration require trapezoidal channel sections for sections 2 and 3 and are more than double the width of the preculvert channel condition. Although HEC-RAS will operate without a modification of the bounding section’s geometry, the losses will not be properly analyzed without correcting the model to reflect the two sections’ revised geometry. For significant channel geometry changes between sections 1 and 2 or between 3 and 4, an intermediate section should be considered at the stream location where the preculvert channel meets the postculvert channel.
7.7
Culvert Modeling Using HEC-RAS Data for the culvert structure is entered on two templates in HEC-RAS: the Deck/ Roadway Editor for roadway information and the Culvert Editor for the physical data defining the culvert.
258
Culvert Modeling
Chapter 7
Roadway Geometry Roadway geometry (station and roadway surface elevation) is defined in the same manner as in bridge modeling. Figure 7.14 shows the Deck/Roadway Data Editor with sample data used to model a culvert and Figure 7.15 shows the plot of the data in the Bridge/Culvert Editor.
Figure 7.14 Entering deck and roadway data for a culvert in HEC-RAS.
No low-chord data appear in the Deck/Roadway Editor shown in Figure 7.14 because the culvert data and the opening through the embankment are entered into the Culvert Data Editor, shown in Figure 7.16. The width of the roadway and the distance to the upstream cross section that must be supplied on the Deck/Roadway Editor can be different for culverts than for bridges. The length of the culvert can be entered in the Width field on the Deck/Roadway Editor or the actual width of the roadway over the culvert can be used. Similarly, the Distance (distance between upstream cross section, section 3, and deck/roadway) on the Deck/Roadway Editor can be entered as the distance from the upstream face of the culvert (BU) to section 3 or as the distance from the upstream edge of roadway to section 3. HEC-RAS computes the distance from the downstream roadway edge to section 2 by summing the Width and Distance values and subtracting the result from the distance between sections 2 and 3, part of the data entered for the geometry of section 3. This calculation must result in a positive distance for the program to run. Although not required for culvert computations, the modeler may also choose to enter embankment side slopes for the upstream and downstream embankment faces, U.S. Embankment SS and D.S. Embankment SS, respectively, on the Deck/Roadway Data Editor. The sloping embankment is used for graphical purposes on the cross-section plots. In Figure 7.14, a value of 2 has been entered for both embankments, specifying a 1:2 (vertical to horizontal) embankment side slope. On Figure 7.16, displaying the Culvert Data Editor, the Culvert Length is shown as 80 ft and the Distance (from BU) to Section 3 is shown as 5 ft. HEC-RAS computes the
Section 7.7
Culvert Modeling Using HEC-RAS
259
Figure 7.15 Plot of culvert cross sections in HEC-RAS.
Figure 7.16 Culvert data editor.
distance from the culvert exit to section 2 by subtracting the sum of the culvert length and the distance to the upstream cross section (80 + 5 = 85 ft) from the distance between cross section 2 and 3 taken from section 3 input data (90 ft). The difference (5
260
Culvert Modeling
Chapter 7
ft) is the distance from the downstream culvert face (section BD) to section 2. Again, this computation must result in a positive value for the program to run.
Inlet Control Data The primary information specific to inlet control analysis is the inlet geometry, with the corresponding chart and scale numbers. When a specific culvert shape is selected in HEC-RAS, the program automatically chooses and displays the first set of FHWA chart and scale numbers that correspond to that shape, shown in Figure 7.16 as Chart 61 and Scale 3 for the Conspan Arch shape. The modeler may accept these numbers or select different values from the list provided (under the drop-down menu adjacent to the chart and scale number fields). Culvert slope, cross-sectional area, and height are also needed for an inlet control analysis, but these data are generated from other general information (diameter or rise and span) entered into the Culvert Data Editor. Culvert slope is not directly entered but is computed based on the upstream and downstream invert elevations and the culvert length previously specified.
Selecting Tailwater Elevations without Downstream Profile Data Designing a culvert without first performing a backwater analysis to establish a reasonable tailwater elevation is not recommended. The most defensible method of design is to start well downstream of the culvert site and use a water surface profile analysis to develop a tailwater rating curve at the culvert for a full range of discharges. Because one or more profiles will be computed, it is easy to obtain a tailwater value when using HEC-RAS. But what procedure should be used when no downstream profiles are being computed for the culvert analysis? If the funding is unavailable to obtain the necessary cross sections and operate HEC-RAS, the engineer must fall back on less desirable methods to determine a design tailwater elevation. These choices include the following: • Locate past reports that include the site, such as a flood insurance study, to provide flood elevation and discharge information that can be used for the culvert design. • Use a highwater mark from a past flood at the culvert site. • Use the highest value found for the tailwater from the following three options: –Highest channel bank elevation at the culvert site.
–The elevation corresponding to the top of the culvert. –After computing a normal depth rating curve for the full downstream cross section at the culvert site, use the elevation corresponding to the design discharge for the culvert. There may be situations for which the use of a sophisticated, data-intensive tool such as HECRAS in a potentially low-risk situation, such as a small culvert through a low embankment, may not be justified. However, the engineer should consider the risks inherent in a simplified tailwater decision, especially as a worst-case scenario. If the risk of structure overtopping is significant and potential damages from this occurrence are high, a tailwater elevation should be developed with HEC-RAS or a similar tool. Obtaining necessary cross-section data and using HEC-RAS may be much cheaper than greatly increasing the culvert capacity to pass the design discharge for a chosen tailwater elevation through one of the simplified methods listed above. The engineer should feel certain that a defensible tool was used to develop the design tailwater elevation for the particular situation.
Section 7.8
Special Culvert Modeling Issues
261
Outlet Control Data The entrance loss coefficient is required along with the Manning’s n value for the culvert material for an outlet control analysis. HEC-RAS allows different Manning’s n values for different portions of the culvert cross section. A table similar to Table 7.3 is present within the program (click on the question mark button next to the Entrance Loss Coeff. box) to assist the modelerʹs selection of the appropriate entrance loss coefficient. The exit loss coefficient defaults to 1.0, but the modeler has the option to adjust this parameter. However, there is no reliable information at present to indicate that a value other than 1.0 is appropriate. A tailwater elevation is not required; this is computed by HEC-RAS as part of the downstream water surface profile calculations. However, a tailwater elevation must be estimated if hand computations are to be performed, or if a culvert design program is used that does not compute a downstream water surface profile.
7.8
Special Culvert Modeling Issues The modeler may encounter a variety of special problems when analyzing culverts. The following sections describe some of the most common situations.
Flow Attenuation A significant issue that may be overlooked by modelers is the flow attenuation that may occur due to large floodplain storage upstream of a culvert location. A culvert through a large roadway embankment often resembles a dam with a low-flow opening, as shown in Figure 7.17. Culvert designs are often based on discharges calculated from a regional frequency equation, as described in Chapter 5. The calculation of peak discharge is based on drainage area, stream slope, and other definable variables, but not on the local site characteristics. With a high embankment in place, there is usually significant storage for the reach upstream of the culvert. To properly analyze the peak flow through the culvert requires either a hydrologic or hydraulic routing, thereby taking into account the flow attenuation caused by the floodplain storage upstream of the embankment. This type of hydrologic routing operation is similar to that for a reservoir and takes place outside of HEC-RAS, using a hydrologic program with input from HEC-RAS. This type of analysis is further discussed in the following paragraphs as well as in Chapters 8 and 14. Hydraulic routing is performed using HEC-RAS in an unsteady flow mode and is further described in Chapter 14.
Figure 7.17 Culvert through a high embankment.
262
Culvert Modeling
Chapter 7
Cross sections and/or topographic maps are used to determine the storage for the reach upstream of the embankment. Surface areas are calculated for selected elevations or contour intervals, ranging from the culvert invert to the top of the roadway embankment (see Figure 7.18). The surface area and elevation information is converted to an accumulated storage versus elevation relationship. In a separate analysis, various discharges are used to compute water surface elevations just upstream of the culvert with a multiprofile backwater analysis using HEC-RAS. This latter operation gives a discharge versus elevation relationship just upstream of the culvert. The elevation-accumulated storage and discharge-elevation relationships are then linked to form an accumulated storage versus outflow relationship for the culvert and the upstream storage reach, shown in Figure 7.19. This relationship is used to route the selected hydrograph(s) through the constriction caused by the culvert, typically using the Modified Puls (or level pool routing or the storage indication method) routing procedure found in many hydrologic programs, such as HEC-HMS and Haestad Methods’ PondPack. Routing determines the actual peak outflow from the culvert, which is often a much smaller value than first computed with a regional equation. Figure 7.20 shows an inflow and outflow hydrograph representing the culvert and upstream storage of Figure 7.18. As shown in Figure 7.20, the routing operation results in a significant reduction in the peak discharge passed by the culvert at location B (Figure 7.18) when
Figure 7.18 Elevation contours upstream of a culvert crossing.
Section 7.8
Special Culvert Modeling Issues
263
Figure 7.19 Schematic to develop storage-outflow relationship for a hydrologic routing.
Figure 7.20 Typical inflow hydrograph at A and outflow (routed) hydrograph at B for a culvert through a high embankment.
compared to the peak at location A. Location A reflects the peak discharge at the beginning of the storage reach created by the culvert embankment, prior to the routing operation. In developing final water surface profiles, the attenuated peak discharge is used in the HEC-RAS model to compute the profile through and upstream of the culvert, as depicted in Figure 7.21. The reduced flow often lowers profiles for some distance downstream of the culvert structure, depending on the stream
264
Culvert Modeling
Chapter 7
Figure 7.21 Profile of culvert reach. Applicable peak discharges are shown at the cross sections indicated.
topology. The peak discharge at A and for some distance upstream is the peak discharge from the inflow hydrograph, prior to routing. A reduced discharge for the sections in the storage reach (between locations A and B) in Figure 7.21 would be interpolated. The modeler should always be on the alert for flow attenuation when designing or analyzing culverts through significant embankment fills. For this situation, regional frequency equations, which yield only a peak discharge, are usually inadequate to properly analyze or design the culvert. Hydrograph routing (or hydraulic routing) should be incorporated to develop the best and most defensible solutions for the design discharge at a culvert. The data development and mechanics of the hydrologic routing process for culvert analysis are nearly identical to that for reach routing and are further discussed and demonstrated in Chapter 8. Minimum Energy Loss Culverts. Minimum energy loss (MEL) culverts have been successfully used in Australia. They feature very streamlined entrance and exit conditions to minimize the losses, while maximizing the discharge through the culvert structure. Figure 7.22 provides a typical plan and profile view. A MEL culvert is more costly than a standard culvert design but may be appropriate for a replacement structure that is limited in width and must pass a higher design discharge than was required of the older structure. A MEL culvert passes the design flow through the structure at or near critical depth, thus maximizing the capacity. Because the highly streamlined entrance and exit conditions minimize energy losses, outlet control is the expected culvert regime. The MEL structure may be most applicable for straight rectangular channel sections where the velocity distribution is as uniform as possible. Design guidance and additional detailed information on the use of the MEL method for culverts and bridges is given by Apelt (Apelt, 1983) and by Chanson (Chanson, 1999).
Section 7.8
Special Culvert Modeling Issues
265
Figure 7.22 Minimum energy loss culvert plan and profile views.
Sediment and Debris Restrictions caused by culverts can result in unfavorable flow conditions resulting from sediment deposition upstream of the structure, debris blockages at the culvert mouth, or both. The stream conditions giving rise to these occurrences should be evaluated as part of the design process. If the stream carries considerable sediment or debris, culvert features should be incorporated as part of the culvert design to prevent a blockage of the culvert entrance. Sedimentation. A culvert’s opening usually represents a small percentage of the upstream flow area that would exist under natural conditions. This often causes lower velocities in the upstream approach reach to the culvert than before the culvertʹs construction. These lower velocities result in deposition of sediment carried by the flow, especially in the channel section for some distance upstream of the culvert. Where the stream carries a significant sediment load, considerable deposition may be encountered following every runoff event. Figure 7.23 shows sediment deposition in a concrete-lined channel following one moderate thunderstorm event. At locations where significant sediment deposition is expected, provisions must be made to periodically remove the sediment to maintain the full, unobstructed culvert capacity. If multiple culverts are proposed, locating the invert of one culvert lower than the rest will often ensure that most sediment stays in suspension for low flows and passes through the culvert. The inclusion of debris or sediment basins to catch and settle out most of the floating material may be necessary for channels located within steep, mountainous terrain. More information can be found on sediment/ debris basin design in “Sedimentation Investigations of Rivers and Reservoirs” (USACE, 1995).
266
Culvert Modeling
Chapter 7
Figure 7.23 Upstream deposition in concrete-lined channel following a moderate runoff event.
Sediment deposition may also occur within the barrel of the culvert. Sensitivity tests using HEC-RAS can evaluate the performance of the culvert with a specified depth of sediment for the full length of the culvert. The field labeled Depth Blocked in the Culvert Data Editor (Figure 7.16) is for specification of this information. When a value is entered into this field, the culvert is completely blocked up to the depth specified. This blocked-out area persists the entire length of the culvert. For example, if a value of 2 were entered into the Depth Blocked field, the first 2 feet of the culvert area would be removed from the culvert flow computations. The n values corresponding to the deposited material and to the balance of the culvert surface would also be specified in the Culvert Data Editor.
Section 7.8
Special Culvert Modeling Issues
267
Debris. Debris can be a major consideration in maintaining unobstructed flow through the culvert. Debris may consist of large cobbles, boulders, leaves, brush, trash, tree limbs, and/or full trees. In urban areas, tires, old appliances, and other trash dumped in the stream can further increase the debris level. Automobiles swept into the stream can also be part of the debris load carried by a stream during a large flood. Figure 7.24 shows a total blockage of four large corrugated metal pipe culverts through a levee following a large runoff event. Upstream land clearing left a great quantity of felled trees and other debris available for flood flows to carry and deposit at the culverts.
Figure 7.24 Total blockage of four 84 in. (2.13 m) corrugated metal pipes by debris.
The likelihood that significant debris will be carried during a flood event at the culvert site should be available from any previous flood history, or from observing the amount of potential debris in and adjacent to the stream. Where debris potential is known or is believed to be significant, the integrity of the culvert opening should be ensured through use of a debris basin or other means. Debris basins are essentially detention ponds for the settlement of debris. These structures provide more cross-sectional area than the channel and slow the velocity, thereby causing the debris to settle out of the flow. These basins are common in mountainous terrain at the point where a milder sloping reach is encountered, such as an alluvial fan at the mouth of a canyon. More information on debris basin design can be found in “Hydraulic Design of Flood Control Channels” (USACE, 1991). A more common solution for milder sloping terrain is the presence of a debris barrier a few feet upstream of the culvert mouth, which can help prevent the debris from sealing the culvert opening. This solution could require the removal of accumulated debris after every significant runoff event. Figure 7.25 and Figure 7.26 show two debris barriers employed for culvert crossings. Bar spacing should be about one-third to one-half of the least culvert dimension (Linsley et al., 1992). The debris barrier
268
Culvert Modeling
Chapter 7
should never be directly on the culvert entrance because that location allows debris to collect in the culvert entrance and ensures that the full capacity will not be available for the runoff event. Additional information on debris barriers can be found in HEC-9, “Debris Control Structures” (Reihsen and Harrison, 1971).
American Iron and Steel Institute
Figure 7.25 Debris barrier at a culvert.
Figure 7.26 Debris rack located near culvert mouth.
Section 7.8
Special Culvert Modeling Issues
269
Scour at Culvert Outlets Velocities at the culvert outlet can be very high and may therefore result in erosion of channel materials. Figure 7.27 shows supercritical flow exiting a multiple-barrel culvert with a low-grade hydraulic jump just downstream of the exit. HEC-RAS can compute the depths and velocities for the geometry entered in this example; however, the design of an energy dissipation structure at the culvert outlet would be performed outside of the program. If such a structure is not provided, the erosion can undermine the culvert exit and cause the structure to fail.
USACE
Figure 7.27 High-velocity flow exiting a multiple box culvert.
Exit velocities during the culvert design should be checked and appropriate scour protection included. Protection is most often graded riprap but could include more complex designs, such as concrete energy dissipaters. Several references, including FHWA’s “Hydraulic Design of Energy Dissipators for Culverts and Channels,” HEC No. 14 (Corry et al., 1983); “Hydraulic Design of Reservoir Outlet Works” (USACE, 1980); and “Hydraulic Design of Flood Control Channels” (USACE, 1991) are available to aide in the design of outlet scour protection. Horizontal Bends in Culverts. Although most culverts are uniform in shape, size, and slope from the upstream to downstream end, there are exceptions. A culvert can have one or more horizontal bends between its entrance and exit to bypass utility lines or other in-place items. Bends can result in additional losses for culverts operating under outlet control. If the bends are less than 15 degrees and are at least 50 ft (15 m) apart, the additional losses are considered insignificant and can be neglected (FHWA, 1985). When bends do not meet these criteria, there are additional culvert losses. Bend losses (vertical or horizontal) can be estimated using
270
Culvert Modeling
Chapter 7
2
V h b = K b -----2g
(7.8)
where hb = the loss in each bend (ft, m) Kb = the bend loss coefficient (dimensionless) V = culvert velocity under full conduit flow (ft/s, m/s) The bend loss coefficient is a function of the angle of the bend and the size of the culvert. Table 7.4 lists estimates of Kb for culverts flowing full. The cross-sectional area of noncircular shapes may be used to compute an “equivalent diameter” for that shape. Table 7.4 Bend loss coefficients for culverts flowing full (Linsley et al., 1992). Equivalent Diameter, ft
Angle of Bend, deg. 90
45
22.5
1
0.50
0.32
0.25
2
0.30
0.22
0.15
4
0.25
0.19
0.12
6
0.15
0.11
0.08
8
0.15
0.11
0.08
Example 7.3 Bend losses in a culvert. A 5 ft diameter culvert is 250 ft long and has a 30° bend at a point along its length. For a discharge of 150 ft3/s, compute the bend loss, assuming that the culvert is flowing full. Table 7.4 is used to linearly interpolate a bend loss coefficient of 0.117, rounded to 0.12, for the culvert diameter and bend angle. The velocity in the pipe, assuming full pipe flow, is V = Q/A = 150/19.63 = 7.64 ft/s. The bend loss is then determined with Equation 7.8 to be 2
7.64 K b = 0.12 ------------- = 0.11 ft . 2g In HEC-RAS, bend losses are not part of the information entered into the Culvert Data Editor. Therefore, to include this bend loss in the culvert data, 0.12 could be added to the entrance loss coefficient.
Vertical Bends in Culverts. Vertical bends are most often employed to avoid excavating into rock or for designing a culvert as an inverted siphon, or sag culvert (see Figure 7.28a). These situations may require additional analysis outside of most hydraulic programs to determine the control and the headwater elevation. Sedimentation in the inverted siphon is a potential problem that should be addressed by the designer, with these structures mainly used to carry irrigation flows under an existing stream or roadway. For the inverted siphon of Figure 7.28a, the structure is designed to flow under pressure for outlet control. Bends in an inverted siphon would be modeled by adding a bend loss using Equation 7.8, if necessary.
Section 7.8
Special Culvert Modeling Issues
271
With the additional vertical bends within the “broken back” culvert of Figure 7.28b, there can be a control at one of these bends rather than at the entrance or exit, as is normally the case. The upstream bend may transition the flow from subcritical upstream to supercritical downstream, with the flow control occurring at the bend. Control by the downstream bend is unlikely, but the modeler can include bend losses at this point (for outlet control), if deemed necessary. In addition to the application of the normal culvert routines within HEC-RAS, a flow profile through a culvert with vertical bends should also be computed with the culvert operating in open channel flow. In this method, the culvert routine is not used. Cross sections upstream and downstream of the culvert and at close intervals throughout the culvert, especially at each bend, model the culvert as a series of normal cross sections. Using HEC-RAS in mixed-flow mode (discussed in Chapter 8) and modeling the culvert as a prismatic channel with a lid provides the best estimate of conditions through the culvert, as well as a determination of the control location. The solution from this analysis is compared to the standard headwater-tailwater computations in the culvert analysis to determine the controlling criteria.
Figure 7.28 Culverts with vertical bends.
Changing Culvert Shape Occasionally, the modeler may encounter a long culvert that has a shape change. If the culvert is flowing full throughout its length under outlet control, separate friction losses can be computed for each segment and added together. A separate expansion or contraction loss from the upstream to the downstream culvert segment may also be
272
Culvert Modeling
Chapter 7
needed. If the culvert flows less than full, it could be modeled by a series of cross sections under open channel flow, with closely spaced sections at and near the change in shape, as described in the preceding subsection. If the culvert is operating under inlet control, the effect of the downstream shape change may be negligible, unless the culvert size decreases. If the downstream culvert segment has open channel flow, water surface profiles should be computed with HEC-RAS in mixed-flow mode (discussed in Chapter 8) and with closely spaced cross sections. However, if the downstream culvert segment is pressurized, causing outlet control in this segment, but the upstream culvert segment is not pressurized, separate computations may be necessary to first establish the headwater elevation at the upstream end of the smaller segment, and then a similar analysis to compute a water surface profile for the upstream culvert segment.
Changing Discharge within a Culvert A lateral pipe carrying storm sewer flow may enter the culvert along its length. For culverts operating under outlet control, the additional losses at the junction are computed with the following equations, developed by FHWA (1979), and added to the other losses. Head loss is given by
h j = y' + h ν1 – h ν2
(7.9)
where hj = the head loss through the junction in the culvert (ft, m) yʹ = the change in hydraulic grade line through the junction (ft, m) hv1 = the velocity head in the upstream culvert (ft, m) hv2 = the velocity head in the downstream culvert (ft, m) The change in hydraulic grade line, yʹ, is given by
Q 2 V 2 – Q 1 V 1 – Q 3 V 3 cos θ J y' = ------------------------------------------------------------------0.5g ( A 1 + A 2 )
(7.10)
where Q1 and V1 = the discharge (ft3/s, m3/s) and velocity (ft/s, m/s), respectively, in the downstream culvert Q2 and V2 = the discharge and velocity, respectively, in the upstream culvert Q3 and V3 = the discharge and velocity, respectively, in the lateral pipe A = the area of the respective culvert segment (ft2, m2) θj = the angle between the lateral pipe and upstream culvert segment If the culvert is operating under inlet control, no additional losses are associated with the junction. However, proper hydraulic design should be incorporated at the junction to minimize the effects of added flow in a supercritical flow situation and to avoid potentially significant roll waves created by the flow addition. Guidance for designing junctions for supercritical flow is given in “Hydraulic Design of Flood Control Channels” (USACE, 1991).
Section 7.8
Special Culvert Modeling Issues
273
Changing Materials within a Culvert The culvert material may change along the culvertʹs length or, more typically, the culvert section may be composed of different materials around the perimeter. For corrugated culverts carrying acidic runoff, it is common for the lower portion to be coated with asphalt and the upper portion to be left as corrugated steel. For a culvert consisting of two lengths of different materials, friction losses are computed separately in each and combined, similar to the method described in the section, “Changing Culvert Shape.” For a culvert section composed of different materials around its perimeter, a weighted n value should be computed. The suggested method within HEC-RAS for computing a weighted n is
Σ ( Pi n3i ⁄ 2 )
2⁄3
n c = -------------------------P
(7.11)
where nc = the composite coefficient of roughness (dimensionless) Pi = the wetted perimeter of each culvert segment (ft, m) ni = the coefficient of roughness for each culvert segment (dimensionless) P = the wetted perimeter of the entire culvert (ft, m) In Open Channel Hydraulics (Chow, 1959), Chow describes other procedures for computing a weighted n. Other references may also be consulted to estimate n for mixed culvert materials. In HEC-RAS, input for multiple n values is included in the fields “Manning’s n for Top,” “Manning’s n for Bottom,” and “Depth to Use Bottom n,” as shown in Figure 7.16. This feature would be used in the previous example where the lowest 2 ft (0.6 m) of a corrugated-metal culvert is asphalt coated (n = 0.013 or higher) and the remainder of the culvert is bare metal (n = 0.021 or higher).
Example 7.4 Culvert consisting of different materials. An 8-by-8 ft concrete box culvert has a uniform layer of 1 ft of gravel (n = 0.032) along its length to encourage fish passage. If the culvert carries water at a depth of 5 ft, compute a composite n value. Solution Assume that the value of n for concrete is 0.013, and then use Equation 7.11 to compute a composite n value: 2⁄3
N
∑
1.5 Pi ni
i=1 n c = -----------------------P
1.5
1.5
1.5 2 ⁄ 3
4 × 0.013 + 8 × 0.032 + 4 × 0.013 = --------------------------------------------------------------------------------------------------4+8+4
0.0606 = ---------------18
2⁄3
= 0.024
In HEC-RAS, a depth of 1 ft and the two n values would be specified in the Culvert Editor, as described in the previous subsection titled “Sedimentation.” The area corresponding to the 1-ft depth is removed from the culvert cross section and the weighted n is computed by HEC-RAS.
274
Culvert Modeling
Chapter 7
Drop Culvert When a culvert is required to operate under inlet control at a site having little available cover between the top of the culvert and the roadway, a drop culvert, or drop inlet at the upstream culvert entrance, is often employed, as illustrated in Figure 7.29. For the culverts operating under inlet control, a design headwater depth is computed from Equation 7.1, 7.2, or 7.3. If the culvert entrance is lower than the upstream channel invert, the computed headwater depth is still valid at the culvert entrance. Thus, additional headwater depth for passage of the design flow can be obtained by lowering the culvert and its upstream inlet, without increasing the allowable water surface elevation upstream of the culvert. The site topography must be such as to allow lowering the culvert and inlet and still maintain inlet control through the culvert. Design of a drop, or sump, inlet is presented in HDS 5, “Hydraulic Design of Highway Culverts” (FHWA, 1985).
Figure 7.29 Drop culvert under inlet control. Note the streamlined wingwalls to improve headwater flow efficiency.
Fish Passage In the past, culverts were designed for the single purpose of passing a flood discharge. With modern environmental concerns, incorporating a fish passage as part of culvert design is becoming equally important. Culverts can be oversized and partially filled with stream material (see Figure 7.30) to facilitate fish migration (State of Washington, Department of Fish and Wildlife, 1999). The culvert must be considerably oversized for the design discharge so that bed material can be placed along the full length of the culvert and fill one-third to one-half of the culvert depth. For high-velocity flow, the lower portion of the culvert may be lined with revetment to prevent scour of the bed material. The irregular surface of the revet-
Section 7.8
Special Culvert Modeling Issues
275
ment also provides holes and depressions, serving as temporary resting places for migrating fish. The scenarios depicted in Figure 7.30 suggest that the culvert width at the surface of the bed material should be 20 percent wider than the upstream channel width plus an additional 2 ft. In addition, slots or narrow grates between the top of the culvert and the roadway surface can be added to allow daylight into the culvert, if needed, to encourage fish passage. For box culverts, baffles may be inserted in the culvert bottom in lieu of stream bed material, again requiring an oversized culvert, to provide resting places for fish traveling through high-velocity culvert flows (see Figure 7.31). If the culvert is made with mixed materials, a corresponding n is required and can be computed with HEC-RAS. The cross-sectional area of the bed material is removed from the culvert by the program, the baffles can be incorporated with a user-supplied estimate of a weighted n, or the modeler can remove the height of the baffle from the culvert cross-sectional area with HEC-RAS. Design procedures for fish baffles are described in Chang and Normann (1976) and several other manuals have been written on the design considerations of fish passage. Where fish passage is required, the
Figure 7.30 Fish passage designs.
276
Culvert Modeling
Chapter 7
Figure 7.31 Plan view showing a baffle arrangement for fish passage.
modeler should consult with local fisheries’ biologists to determine the most amenable solution for the types of fish in the stream where the culvert will be located.
Replacing Bridges with Culverts Where roads are to be widened to provide additional lane and shoulder width, bridge replacement is an expensive solution. An alternative to total replacement of an existing bridge is to build multiple culverts through the bridge opening, with upstream and downstream headwalls, and grout or other porous material filling the spaces between the bridge and culvert. Figure 7.32 shows such a replacement. This may be a practical solution for situations where the original bridge design discharge is greater than the design discharge applicable today or where any upstream lands adversely affected by the replacement culverts are in public ownership, or owned by the party constructing the culvert. Although this solution is usually economical, the engineer should carefully analyze the flood profile with the culverts compared to the bridge. Flow capacity with culverts is typically less than that of the original bridge and the losses are greater. Upstream flood heights may be significantly higher with the culvert installation than for the same flows with the bridge in place. Flood profiles for a full range of events should compare profiles for both the bridge and the replacement culvert structure. To avoid litigation, the replacement culvert design should result in little or no increase in upstream water surface elevations.
Section 7.9
Chapter Summary
277
Figure 7.32 Replacing bridge piers with multiple culverts.
7.9
Chapter Summary A culvert is a simple structure compared to a bridge; however, culvert hydraulics can be complex. A culvert can flow full or partly full; it can be under inlet or outlet control; it can experience supercritical or subcritical flow; the culvert entrance, exit, or both can be submerged or free-flowing; or the culvert can act as a pressure conduit, an orifice, or a weir. Culvert hydraulics are subdivided into inlet control, which incorporates four possible flow conditions through the culvert, and outlet control, which includes five possible flow conditions. Inlet control results in the culvertʹs capacity being governed by the culvertʹs inlet geometry, with flow depth computed by either the orifice or weir equation at the culvert entrance. Under outlet control, the culvert capacity is governed by the barrel capacity, with the upstream depth computed from the summation of losses through the culvert, usually consisting of entrance, friction, and exit losses. Modeling a culvert involves several concepts used in bridge modeling, including establishing the lengths of contraction and expansion, modifying the expansion and contraction coefficients, determining the geometry and/or n value in and near the culvert, and the specifying ineffective flow area elevations and locations at the culvert. Modeling the actual culvert is typically simpler than modeling a bridge structure. The roadway and approach geometry is included, similar to that for bridges, but all the remaining culvert information is entered in one Culvert Editor window in HEC-RAS. Special culvert situations abound and these problems often require work by the modeler outside of HEC-RAS. These situations include the culvert’s acting as a dam (requiring a hydrologic routing); sedimentation, scour, and debris at the culvert entrance; horizontal or vertical bends in the culvert; changes in shape, discharge, or n value along the culvert length; and fish passage, which might require adding natural channel material along the bottom of the culvert.
278
Culvert Modeling
Chapter 7
Problems 7.1 As part of an industrial development, a stream crossing must be constructed immediately upstream of river mile 9.33 in a given channel reach, which is shown schematically in the figure.
English Units – Cross-sectional geometry for the channel reach without the proposed stream crossing is provided in the file Prob7_1eng.g01 on the CD-ROM accompanying this text. The channel design discharge can be taken as 2200 ft3/s along its entire length. The flow regime is subcritical, and normal depth can be assumed as the reach’s downstream boundary (R.M. 5.0), where the channel slope is 0.0023. For the existing condition (no stream crossing), answer the following questions. a. What is the computed water surface elevation at river mile 6.0? b. What is the average main channel velocity at river mile 7.0? c. How much frictional head loss occurs between sections 7.0 and 8.0? d. What are the left overbank, main channel, and right overbank conveyances at river mile 9.33? e. What is the energy grade elevation at river mile 9.33? f. What is the energy correction factor (α) at river mile 5.0?
Problems
279
SI Units – Cross-sectional geometry for the channel reach without the proposed stream crossing is provided in the file Prob7_1si.g01 on the CD-ROM accompanying this text. The channel design discharge can be taken as 62.3 m3/s along its entire length. The flow regime is subcritical, and normal depth can be assumed as the reach’s downstream boundary (R.M. 5.0), where the channel slope is 0.0023. For the existing condition (no stream crossing), answer the following questions. a. What is the computed water surface elevation at river station 6.0? b. What is the average main channel velocity at river station 7.0? c. How much frictional head loss occurs between sections 7.0 and 8.0? d. What are the left overbank, main channel, and right overbank conveyances at river station 9.33? e. What is the energy grade elevation at river station 9.33? f. What is the energy correction factor (α) at river station 5.0? 7.2 English Units – The stream crossing will be constructed immediately (assume 1 ft) upstream of river mile 9.33. The table provided contains data on the proposed vertical alignment of the 40 ft wide roadway crossing the stream. Assume that the cross-section immediately upstream of the crossing has the same geometry as river mile 9.33.
Station, ft
Roadway Elevation, ft
Station, ft
Roadway Elevation, ft
Station, ft
Roadway Elevation, ft
–1+80
937.6
0+20
935.1
2+20
935.8
–1+55
937.3
0+45
934.9
2+45
936.0
–1+30
937.0
0+70
934.9
2+70
936.1
–1+05
936.7
0+95
935.0
2+95
936.3
–0+80
936.3
1+20
935.2
3+20
936.4
–0+55
936.0
1+45
935.3
3+45
936.3
–0+30
935.7
1+70
935.5
3+70
936.8
–0+5
935.3
1+95
935.6
280
Culvert Modeling
Chapter 7
Add any cross sections necessary to model a culvert crossing. Assume that the topography is such that interpolation feature of HEC-RAS can be used to develop any additional geometry. Add the deck/roadway data to the stream system, insert two 10 ft x 8 ft box culverts at the crossing, and add ineffective flow areas as needed. The culverts will have 45° flared wingwalls with no bevels or chamfers. Answer the following questions. a. What is the water surface elevation at river mile 9.33? b. How was this water level determined? c. What is the energy grade elevation immediately upstream of the culvert group? d. Is the culvert operating under inlet control or outlet control? e. What is the flow velocity in the culverts at the upstream and downstream ends? f. Do two 10 ft x 8 ft box culverts represent an acceptable design if the water surface elevation in the channel for the design flow may not increase by more than 1 ft? SI Units – The stream crossing will be constructed immediately (assume 0.3 m) upstream of river mile 9.33. The table provided contains data on the proposed vertical alignment of the 12.2 m wide roadway crossing the stream. Assume that the cross-section immediately upstream of the crossing has the same geometry as river mile 9.33. Roadway Roadway Roadway Station, m Elevation, m Station, m Elevation, m Station, m Elevation, m –54.9
285.78
6.1
285.02
67.1
285.23
–47.2
285.69
13.7
284.96
74.7
285.29
–39.6
285.60
21.3
284.96
82.3
285.32
–32.0
285.51
29.0
284.99
89.9
285.38
–24.4
285.38
36.6
285.05
97.5
285.42
–16.8
285.29
44.2
285.08
105.2
285.48
–9.1
285.20
51.8
285.14
112.8
285.54
–1.5
285.08
59.4
285.17
a. What is the water surface elevation at river mile 9.33? b. How was this water level determined? c. What is the energy grade elevation immediately upstream of the culvert group? d. Is the culvert operating under inlet control or outlet control? e. What is the flow velocity in the culverts at the upstream and downstream ends? f. Do two 3.0 m x 2.4 m box culverts represent an acceptable design if the water surface elevation in the channel for the design flow may not increase by more than 0.3 m?
Problems
281
7.3 Design a culvert system that will pass the design discharge without increasing water levels by more than 1.0 ft (0.3 m). a. Describe your proposed design. b. What is the resulting water surface elevation at river mile 10.0? c. What is the increased amount from the existing condition?
CHAPTER
8 Data Review, Calibration, and Results Analysis
All the survey data and discharge information have been developed, the field inspections for n values and flow patterns have been made, and all the input data have been encoded to HEC-RAS or a similar program. All that’s left is to let the program crank out the answer for the modeler to prepare the report—right? Wrong. The expression “garbage in—garbage out” still holds true. Almost anyone can stick numerical data into a program and eventually get a completed output, but that does not mean the output is accurate. A skilled modeler must produce an analysis with a hydraulic model that stands up to technical review by oneʹs peers or the client. While the program may run to conclusion, a lack of quality engineering input or a poor model calibration may be readily apparent with even a casual review. This chapter concentrates on model development, operation, calibration, and quality control, highlighting the checks of input data made by HEC-RAS. Debugging and calibration techniques are discussed as well as an explanation of how to evaluate production runs. It also details how to develop routing data to use in HEC-1, HEC-HMS, or other hydrologic programs such as PondPack.
8.1
Input Data Checking All input data comprising a hydraulic model of a stream reach must be correct and reasonable. The modeler and at least one other professional engineer should closely review the information to ensure that it is appropriate and defensible. In addition, HEC-RAS automatically performs many internal checks during data input and hydraulic computations.
284
Data Review, Calibration, and Results Analysis
Chapter 8
Checks Performed by the Modeler The modeler should check all data as it is input into HEC-RAS for correctness and reasonableness. The cross-section plot routines can be used to quickly determine whether some of the elevation or stationing data are obviously bad. Bridge and culvert data can be quickly checked by plotting the completed cross sections. The modeler can use these plots to readily spot incorrect constraint elevations or the absence of ineffective flow areas, as was presented in Chapters 6 and 7. The previously selected Manning’s n values (presented in Chapter 5) should be reviewed to confirm the validity of the values selected. In addition, the peak discharges that were developed to verify that the techniques used are commensurate with the accuracy requirements and physical features of the study watershed should be reviewed. The more care the modeler takes in preparing and entering the basic data, the fewer problems will occur during the initial operation and calibration of the model.
Checks Performed by HEC-RAS HEC-RAS performs several checks of model input before performing computations, unless the modeler chooses otherwise. The default is for HEC-RAS to perform the checks. The checks performed by HEC-RAS can be grouped into two general types. The first type is performed as the modeler is entering the data. Every time data is inserted into a field, the program performs various checks, including: • Alphanumeric checks – Most fields allow either alpha or numeric values, not both. The program checks the characters to ensure that the proper format is used. • Checks for stationing increase – Each station value inserted to define an individual cross section must equal or exceed the previous value. • Check of channel bank stations – The program reviews the specified channel bank stations and makes sure that the named stations are in the cross-section data. • Check of minimum and maximum ranges for variables – For example, if a value greater than 1 is mistakenly entered for an expansion or contraction coefficient, the program immediately indicates that 1 is the maximum allowable value. • Bridge deck geometry check – The program ensures that the deck/roadway data intersect with the ground data. • Deletion checks – If the modeler tries to delete data, the program issues a warning to see whether the data really are to be deleted. • File save checks – The program notifies the modeler to save the existing file before opening another or before closing the program. The second type of check performed by HEC-RAS occurs when the modeler begins the computation process. The program checks data completeness and consistency to determine whether all required data are present. Incomplete data errors include such items as a missing pier coefficient for bridges with piers, a missing n value at one or more locations, and an expansion or contraction coefficient that was not defined.
Section 8.2
Analyzing HEC-RAS Output
285
The program then checks to determine whether the data are appropriate for the type of computations being performed. These checks include comparing the number of profiles to be computed with the flow data supplied and determining if the appropriate boundary conditions have been specified. HEC-RAS does not perform computations until the modeler has supplied all required data.
8.2
Analyzing HEC-RAS Output The steady-flow output analysis features are extensive and useful in HEC-RAS. These features include messages supplied by the program at cross sections where potential problems are noted, graphical tools to allow a visual inspection of the output, and general and specific tables to easily compare changes in key variables from cross section to cross section.
Program Checks During the hydraulic computations, HEC-RAS supplies messages that describe any actual or potential problems encountered. These may include errors, warnings, or notes. Errors. Besides consistency and completeness errors that prevent the program from beginning the analysis, additional error messages are generated when the program cannot complete the hydraulic computations. An error message stops the program at the point where the error is encountered. The error message may or may not specify exactly what the problem is, but the modeler can determine the river reach and cross section at which the problem occurred. As computations progress through a river reach, HEC-RAS reports the river station, computed water surface, and energy grade line elevation for each cross section. Thus, the modeler should first look for bad data at the section following the last cross section that showed computed water surface and energy grade line elevations. The modeler should perform a detailed evaluation of this section, including the cross-section geometry, to determine the problem that caused the program to stop. Bridge or culvert modeling errors commonly halt HECRAS computations before completion. Many errors also occur with data imported from HEC-2 files, especially at bridges and culverts. Chapter 15 presents procedures and examples for checking data imported to HEC-RAS. Error messages from HEC-RAS are sometimes not helpful in determining what the problem is. If the modeler is unable to ascertain the source of the error after working through the suggestions in this chapter, he or she should consider consulting a more experienced HEC-RAS user or contacting the program vendor for assistance. On rare occasions, an error preventing the program from running to completion cannot be found with the usual methods of analysis. To help troubleshoot this type of error, HEC-RAS generates a log file showing each operation of the program and the modeler can use this information to trace through the computational process and determine where the error is occurring. Keep in mind that needing to use the log output file information is the exception rather than the rule and a modeler may use HECRAS for many steady-flow projects without having to review the log file. However, the log output file is commonly used as part of the debugging process for unsteadyflow computations.
286
Data Review, Calibration, and Results Analysis
Chapter 8
Notes. Notes are not typically an indication of a problem; instead, they state how the program is performing the computations. Examples of notes are messages indicating what method was used to compute bridge flow and whether multiple critical depths were found. A note may not require action by the modeler; however, if the note suggests a potential problem, then an inspection of the computations is in order. For example, if flow overtops a roadway embankment, the engineer might expect the bridge computations to be pressure and weir flow. However, assume the note for the bridge computation indicates that the energy equation was used. The modeler should review the bridge modeling method first, then possibly the bridge geometry input and the ineffective flow area elevations and stations. Any of the following could cause HEC-RAS to use the energy equation rather than weir flow for the computations: • The wrong bridge modeling approach (energy only) may have been specified as a default. • The bridge geometry may not correctly reflect the embankment overflow. • The ineffective flow area constraint elevations may significantly exceed the low roadway elevation. Warning Messages. Warning messages may or may not indicate a problem. A successful production run nearly always contains several warning messages. Even so, warning messages should be closely evaluated—especially during the initial model operation and debugging phase. The messages are often triggered by bad input data, cross sections that are spaced too far apart, drastic geometry changes between sections, or incorrect boundary data. The warning messages may include a suggestion about a possible solution. The following are examples of common warning messages from HEC-RAS: • The conveyance ratio is less than 0.7 or greater than 1.4. This may indicate the need for additional cross sections. This message results from the use of an average friction slope (based on cross-section conveyance) to compute the headloss between cross sections. The program issues this warning if the total conveyance at a cross section is less than 70 percent or more than 140 percent of the previous section’s conveyance. Changes outside these bounds could result in too large a difference in depth or velocity between cross sections, thus getting away from the gradually varied flow concept. The modeler should inspect the computed energy grade and water surface elevations at both cross sections, along with the actual conveyance ratio between them. If there are large differences (in excess of 1 ft or 0.3 m, for example), or if the actual conveyance ratio is far outside the range for issuing the warning, consider adding one or more cross sections between the two river stations. If the difference is less than 1 ft (0.3 m), or the actual conveyance ratio is only slightly outside the default limits, the computations are often acceptable, even with the warning. If desired, a sensitivity test, as described in Chapter 5, can determine if additional cross sections will result in a significantly different water surface profile. • The velocity head has changed by more than 0.5 ft (0.15 m). This may indicate the need for additional cross sections. If the average velocity head between two cross sections changes by more than 0.5 ft, the average velocity may have increased or decreased by more than 25 percent. Because depth and velocity changes should be gradually varied, these sections should be further reviewed to see if better cross-section modeling is needed (usually requiring additional cross sections). In response to this message, additional sections are
Section 8.2
Analyzing HEC-RAS Output
287
most often needed where the valley widens or narrows greatly between two cross sections. This message is also common at obstructions such as bridges and culverts, especially between sections 1 and 2 or between sections 3 and 4, as defined in Chapters 6 and 7. Although the message is common near bridges and culverts, additional cross sections are not normally added. Additional sections in these locations are necessary only if the reach length between the two river stations is very large. • The energy loss was greater than 1.0 ft (0.3 m) between the current and previous cross section. This may indicate the need for additional cross sections. Energy losses in excess of 1.0 ft may mean that the cross sections are too far apart. The modeler should examine the reach between the two cross sections, especially the reach lengths, to determine if additional sections are needed. If the distance between cross sections is greater than 1000 ft (300 m), additional sections are probably warranted. However, if the stream has a slope of about 0.002 (1 ft in 500 ft, or 0.3 m in 150 m) or more, this warning can appear any time that sections are more than 500 ft apart, simply due to the channel slope. For distances between sections of similar shape less than 1000 ft (300 m) apart on streams of mild slope, additional cross sections may not be needed. Again, a sensitivity test can determine the effect of added cross sections on the computed water surface elevations. • Any warning dealing with critical depth. The program relays critical depth information by displaying warnings or notes for particular cross sections. The appearance of this information may indicate a problem at that section for a particular flow. The program computes critical depth for a variety of situations, including: – As part of the starting water surface elevation computations at the downstream boundary for subcritical flow – At all sections with supercritical flow – When the subcritical flow depths are close to critical, the program computes the Froude number to ensure that the computed elevation is a subcritical solution. – When the program cannot converge to a valid subcritical answer, the modeler should always review the section generating the warning to ensure that bad data are not causing the problem. If the geometry of the problem cross section appears reasonable, as does the transition between the problem cross section and the adjacent cross sections, additional cross sections could be incorporated between them. If the critical depth message continues to appear after adding additional cross sections, the modeler should consider a mixed-flow run, as the reach may be exhibiting supercritical flow for the discharge being analyzed. Mixed-flow analysis is presented at the end of this section (page 294). • The cross-section end points had to be extended vertically for the computed water surface. This message appears when the elevation of the first and/or last station on the cross-section geometry was lower than the water surface elevation. The program adds sufficient height to the first and/or last cross-section point by extending the elevation vertically to contain the water surface profile. Because it is highly unlikely that the cross section has vertical walls in the field, the modeler should review the topographic data and add one or more
288
Data Review, Calibration, and Results Analysis
Chapter 8
points to the cross-section geometry to properly define the full cross section and correctly model the water surface elevation. • Divided flow computed for this cross section. HEC-RAS displays this note when the water surface is not continuous from one side of the section to the other. Section geometry could have high ground within the section (like a hill or an island) separating the water surface. Buildings in the floodplain that were coded as part of the cross-section geometry could have the same effect. The section should be checked to make sure that data error is not the cause. If a section has a point in the geometry file that protrudes above the water surface, the modeler should determine if this is representative of the reach between the next upstream and downstream cross sections. If it is not, then the modeler should consider adjusting the geometry data at that section to eliminate the high point. If divided flow is indicated for several consecutive cross sections, the modeler should consider performing a split-flow analysis (discussed in Chapter 12). Additional checks that can be performed by the modeler are to find changes in maximum depth of more than 10 percent between adjacent cross sections, top-width changes for active flow of less than one-half or more than double from the previous section, and channel distances in excess of 500 ft (150 m) between adjacent sections. While HEC-RAS will not perform these checks, these large changes are often noted by review agencies such as the U.S. Federal Emergency Management Agency, FEMA (Khine, 2002). In the majority of cases, a common solution for many of the warnings is to add additional cross sections to ensure that changes between sections are gradually varied. The cross-section interpolation feature in HEC-RAS is extremely valuable in these instances and is further addressed in Section 8.3. However, before adding cross sections, the modeler must ensure that the section exhibiting the problem is geometrically correct, as is the transition from this section to the adjacent upstream and downstream cross sections. Adding more cross sections will not correct the problem if the initial sections contain bad data or represent a poor model of the reach.
Graphical Output Review The graphical output capabilities of HEC-RAS are extremely useful for quickly catching bad data or pinpointing the source of a problem at a cross section. Cross Sections. Each cross section should be displayed on screen for a quick visual inspection after the data are entered. This usually makes any erroneous data readily apparent. Figure 8.1 is an example of bad geometric data in HEC-RAS that resulted in a “divided flow message” at a cross section. It is apparent that the original coding included an incorrect elevation for one data point. This type of error is easy to see from a plot, but might be time consuming to find through visual inspection of the input data (if it was found at all). Plots of bridge and culvert cross sections also quickly show any embankment geometry errors, normally the result of importing HEC-2 bridge data into HEC-RAS. If the bottom of the roadway embankment elevations outside the bridge opening is not lower than the floodplain elevations, the secondary openings for flow would be incorrect (refer to Figure 15.12). However, if the differences are small, they might not be noticeable in the bridge cross-section plot. Any gaps between the bottom of the roadway embankment and the floodplain elevations are more apparent if different colors are used for the floodplain and the bridge embankment.
Section 8.2
Analyzing HEC-RAS Output
289
Figure 8.1 Section plot showing bad data point (100 ft too high).
Profiles. A profile plot can be generated after the input data are encoded but before any computations. This plot shows only the invert profile, along with any bridge and culvert high- and low-chord elevations. Sharp changes in the bottom invert slope on the profile plot should immediately indicate that a data check is necessary and that additional sections around the slope break may have to be added. Adverse slope breaks should also be reviewed and confirmed. After computations, the profile plots for one or more water surface profiles should be evaluated for any sharp breaks or jumps in the water surface profile or energy grade line. HEC-RAS can include output data such as water surface elevations, energy grade elevations, and critical depth elevations in the profile plot. Figure 8.2 shows a zoomed-in segment of a HEC-RAS profile through a bridge for two flood discharges. The lower profile (25-year flood) passes through the bridge fairly smoothly. However, the larger flood (May 1974) has a 2.5 to 3 ft jump in water surface over the bridge, which could be an indication of a problem with the bridge geometry or the ineffective flow areas. While this large difference in water surface elevation happens to be correct for this example, the modeler should immediately note large elevation changes through a bridge or culvert for data checking. Three-Dimensional Plots. HEC-RAS has a three-dimensional plot routine that can often be valuable for a visual validation of data. Contraction and expansion of flow through bridges and culverts may be inspected. Any locations where active flow is confined between the ineffective flow area stations, but occupies the floodplain just upstream or downstream, will be readily apparent. Figure 8.3 is an example of the three-dimensional plot routine in HEC-RAS for the bridge in Figure 8.2. The ineffective flow area locations (arrows) can be easily seen, and the crosshatched areas on either side of the bridge indicate ineffective flow areas. The three-dimensional plot is especially useful in the development of floodways. Chapter 10 discusses three-dimensional plots in greater detail.
290
Data Review, Calibration, and Results Analysis
Figure 8.2 HEC-RAS profile plot through a bridge.
Figure 8.3 HEC-RAS 3D plot at a bridge.
Chapter 8
Section 8.2
Analyzing HEC-RAS Output
291
Tabular Output Review Although the first check of input and output data may be through the HEC-RAS graphical options, a detailed output review also requires HEC-RAS tables. The program has many predefined tables, as well as options to allow the modeler to set up his or her own table to show certain key variables. By Cross Section. Hydraulic data for each cross section can be reviewed section by section using HEC-RAS. A wide variety of computed values are available for inspection at each cross section, as can be seen in Figure 8.4. HEC-RAS provides all important variables computed at a specific cross section, including the computed water surface elevation, energy grade line, flow, conveyance, and velocities in the three main sections of the cross section. Hydraulic depth values, useful for developing expansion and contraction information at bridges, are also shown, along with hydraulic design data such as shear stress, friction slope, and stream power.
Figure 8.4 Detailed cross-section output.
By Profiles. Changes in certain parameters from cross section to cross section in the output are normally of more interest than detailed information at a particular cross section. HEC-RAS employs a series of standard tables that make reviewing changes between sections easy. Each table contains a different set of parameters, making it easy to scan an entire reach for large changes in key parameters such as energy slope, conveyance, velocity, and top width. When large changes between sections are found, the modeler can then review the data input for the two sections to determine if there are errors that could cause the differences. After any errors are corrected, the model is recalculated and again reviewed. If there are still significant differences, the modeler can add additional cross sections to better model the location under study.
292
Data Review, Calibration, and Results Analysis
Chapter 8
Figure 8.5 shows a profile output table from HEC-RAS. In viewing the data, the engineer may start at the bottom of the columns and work up, similarly to how the hydraulic computations are performed for subcritical flow. For the flood event documented in Figure 8.5, the changes in water surface (W.S. Elev), energy slope (E.G. Slope), and channel velocity (Vel Chnl) are gradual and appear reasonable. The only item that may need further investigation is the Top Width. The top width at river station 5.29 is slightly smaller than the previous section, but only 67 percent of the next section, just a few hundred feet upstream. The geometry data at these two locations should be verified. Further inspection of these two sections shows that the top width at Section 5.39 is immediately downstream of a bridge and most of the top width shown represents ineffective flow area. The active flow width at Section 5.39 is confined to a width just larger than the bridge opening width. Therefore the large change in top widths appears to be acceptable.
Figure 8.5 HEC-RAS Standard Table 1 output.
Bridges, culverts, floodways (encroachments), bridge computation comparisons, ice cover, weirs, and several other features can all be viewed in HEC-RAS through the use of standard tables. This chapter and later chapters further discuss the different types of tables available in HEC-RAS. Bridges. Output review often concentrates on obstructions, such as bridges and culverts. HEC-RAS has three standard tables for bridges and two for culverts. Figure 8.6 illustrates one of the bridge tables, which focus on the six cross sections needed to define any bridge, as was discussed in Chapter 6. The figure shows how easily comparisons of top width and the flow carried in each of the three areas of a cross section can be made. In this example, all computations through the bridge appear reasonable, except for the small top width at the first section (5.29). However, the section is only about 186 ft wide in the bridge opening (5.4 BR D on Figure 8.6). Because all flow is passing through the bridge opening (no weir flow), the width at section 5.29 is appropriate. Note that the top widths at sections 5.39 and 5.41 (the sections immediately outside of the bridge) are about 1600 ft. At first glance, this large difference with the 186-ft bridge width would seem to indicate an error. However, as mentioned earlier, the top
Section 8.2
Analyzing HEC-RAS Output
293
Figure 8.6 HEC-RAS profile output for the Standard Table featuring the six bridge cross sections.
width at the bounding sections includes the ineffective flow area width, since water would be present outside of the ineffective flow area stations. If this approximately 1600 ft top width included conveyance, the expansion and contraction would be far too great between the sections just inside and just outside of the bridge. Since there is no conveyance computed outside the ineffective flow area stations until the constraint elevations are exceeded, the average channel velocities at both the bounding bridge sections are only slightly less than the velocities in the bridge. Thus, the wide tops at the bounding sections are picking up the overbank storage but not any conveyance, and the flow appears to transition through the contraction and expansion at the bridge properly. If the engineer wishes, the HEC-RAS variable, “Active Top Width,” could be added to the table to show the top width used for the conveyance computation.
294
Data Review, Calibration, and Results Analysis
Chapter 8
Culverts. A standard culvert table for the six cross sections required for modeling contraction and expansion through a culvert, similar to the one shown in Figure 8.6, is available in HEC-RAS. An additional table is also available that shows the performance of just the culvert, including inlet and outlet control computations.
Mixed Flow Analysis If a note or warning states that critical depth was computed and that the critical water surface elevation has been used in the computed profile, the modeler should consider a mixed flow analysis. A critical water surface elevation may be computed in a bridge or culvert operating under low flow conditions or at a regular cross section. If the geometric data seem reasonable and additional cross sections do not result in a subcritical solution, one or more cross sections may actually be under a supercritical, rather than a subcritical, flow regime. This requires a mixed flow analysis. For a mixed flow run, computations are first performed for subcritical flow, with all locations of critical water surface elevation noted by HEC-RAS. Then a supercritical flow run begins at the cross section farthest upstream (note that an upstream boundary condition must be specified). Specific force at this section is compared to specific force for a subcritical flow solution—the higher value governs the flow regime. For example, if the section farthest upstream has a higher specific force for subcritical flow, then the subcritical profile solution is valid at this location. The specific force computations then move downstream to the first encounter with a critical depth computation determined during the subcritical run. If the specific force at this section is greater for supercritical flow, a supercritical profile analysis is continued for the downstream cross sections, comparing specific force values for both flow regimes at each cross section. When subcritical flow has the higher specific force at a cross section, the program assumes that a hydraulic jump has occurred between this point and the next upstream section, and then moves to the next critical depth computation at a downstream section. Reaches of subcritical and supercritical flow can be interspersed within the overall reach of stream. Figure 8.7 shows a profile plot in HEC-RAS for a mixed flow computation, based on a problem given in Open Channel Hydraulics (Chow, 1959). The reach has three segments, with two very obvious channel bottom slope breaks. For the discharge being analyzed, the reach from station 0 to station 1000 is on a critical slope, the reach from station 1000 to station 2500 is on a subcritical slope, and the reach from station 2500 to 3000 is on a supercritical slope. HEC-RAS was used in mixed flow mode and first computed a subcritical flow profile for the entire reach. The program noted any cross sections where critical depth was assumed during the subcritical analysis. The program then computed a supercritical profile, starting at the upstream boundary, comparing specific force for subcritical and supercritical solutions at all locations of critical depth found in the subcritical run. The mixed flow computations resulted in supercritical flow on the farthest upstream reach segment (S2 curve, as defined in Chapter 2), subcritical flow on the middle segment (M2 curve), and subcritical flow (C1 curve) in the downstream segment, possibly caused by a backwater effect from a downstream obstruction) converging to a critical depth profile (C2) near the upstream end of the downstream-most segment. A hydraulic jump occurs between the two cross sections at river stations 2500 and 2600 and a drawdown is present at the end of the mild channel where it converges back to
Section 8.3
Adjusting HEC-RAS Input
295
Hydraulic Jump
Figure 8.7 Water surface profile for a mixed-flow analysis.
a critical slope. If a more precise location of the hydraulic jump is needed, additional cross sections between river stations 2500 and 2600 will better define the start of the hydraulic jump. For any channel modification involving a lined channel, one should consider a mixed flow analysis to ensure that the channel is being designed for the proper flow regime. All ranges of flow should be so analyzed in the mixed flow run.
8.3
Adjusting HEC-RAS Input The modeler makes many adjustments to the data to improve the hydraulic modeling of the study reach. Unlike the older HEC-2 program, HEC-RAS makes data adjustments easy. Cross-section points may be added or deleted at any section, graphs and tables may be used to inspect the data and modify it directly, and templates are available to modify section identification, reverse section stationing, or to add cross sections. The following sections identify several areas where HEC-RAS simplifies the editing process.
Changing Station ID Identifying the river station ID by its distance in either ft (m) or mi (km) from a specific reference point (usually the mouth or confluence of the river) is good practice. Some engineers, however, may use an arbitrary numbering system (1, 2, 3 or a, b, c), possibly based on the cross-section number. This method may have been employed on older data sets that are imported from HEC-2. Cross sections with arbitrary numbering schemes cannot be easily located on a map by other users, thus modifying the stations to more meaningful ID values is worthwhile.
296
Data Review, Calibration, and Results Analysis
Chapter 8
Cross Section Points Filter The Tools tab on the Geometric Data Window containing the reach schematic includes many useful tools for data editing including the Graphical Edit tool. For example, modelers can develop geometry data by using GIS techniques with cross-section data developed from “cutting” the elevations from a GIS elevation reference map. When these techniques are used, elevation-station points can be included at close intervals across the section. For instance, cross sections cut from elevation reference maps may contain over 500 points but is desired that these be filtered down to 200 values. Profiles with extremely detailed geometry definition typically show little change compared to the same profiles using less detailed geometry data. As described in Chapter 5, 15 to 30 points describing the section geometry are usually adequate for hydraulic computations. Point filters are available within HEC-RAS to reduce the number of ground points to a more manageable level without sacrificing computational accuracy. For example, the Cross Section Points Filter tool enables the modeler to discard extraneous or near duplicate points within defined tolerances. A single cross section up to the entire reach may be run through the filter. The filter includes both horizontal and vertical tolerances for multiple points sited close together and for collinear points that fall nearly on a straight line along a portion of the section. The modeler can also limit the filter to only sections containing more than 500 points.
Reverse Stationing The modeler may have accidentally coded one cross section from right to left instead of from left to right (looking downstream), as first discussed in Chapter 5, or the modeler may need to use an old model where all the sections were mistakenly coded as right to left. Either direction will give acceptable answers if all sections are coded in one direction or the other, but left to right, looking downstream, is the accepted convention. HEC-RAS provides a tool for reversing cross-section stationing for a single section or all sections in the model. The modeler should closely review the reversed cross sections, especially at bridges, culverts, and other obstructions. If the stationing for the bridge or culvert embankment is different than that of the bounding cross sections, a cross-section reversal could result in the bridgeʹs or culvertʹs opening no longer coinciding with the channels in the bounding cross sections.
Cross-Section Interpolation Often, the best way to minimize errors and warnings in a model is to add additional cross sections to better meet the gradually varied flow criteria. The HEC-RAS crosssection interpolation feature lets the modeler add interpolated cross sections between two existing cross sections or to a whole reach. Results of the interpolation should be carefully reviewed to ensure that the new sections reasonably represent the actual field geometry between known surveyed sections. Interpolation is based on the five master chords connecting the two sections (first and last geometry points in each section, bankline stations, and lowest channel elevation). Figure 8.8 shows four interpolated cross sections created between two surveyed cross sections (sections 1 and 2 at a bridge) using only the five standard master chords. However, one problem in this example is the ineffective flow area at the upstream
Section 8.4
Calibration Procedures
297
cross section at the bridge. These interpolated sections would have to incorporate the ineffective area option to correctly transition from the full-width section at RS 5.29 (Section 1 for a bridge) to the section just downstream of the bridge at RS 5.39 (Section 2).
RS 5.39
Interpolated Sections
RS 5.29
Figure 8.8 Interpolated cross sections.
If points besides the five master chords appear in both sections and definitely should be connected, HEC-RAS has tools that add additional minor chord(s) to properly connect the points between the two cross sections. The modeler must determine an appropriate interval for interpolated cross sections for each instance of interpolation. It should be emphasized that interpolating more cross sections does not improve the computed profile if the initial cross-section definitions are poor. Interpolated cross sections every 100–200 ft (30–60 m) are often appropriate for steeper streams, with increased spacing as slopes become milder. The modeler should also not interpolate sections at very close intervals (say every 10–50 ft, 3–15 m), because excessive cross sections make it difficult for easy viewing and analysis. Interpolating hundreds or thousands of cross sections is also not desirable from a technical review standpoint. Technical reviewers have been known to make negative comments when excessive cross sections were interpolated for a floodplain study.
8.4
Calibration Procedures Any hydraulic model should be calibrated to the greatest degree of accuracy possible based on the available calibration and verification data. The required data and procedures are addressed in Chapter 5, but are further reviewed in this section.
298
Data Review, Calibration, and Results Analysis
Chapter 8
Adopting the Working Model Calibration cannot get underway until the modeler is satisfied that the model is performing properly and that the data are correctly entered and as error free as reasonably possible. Prior to calibration, all notes and warnings should be reviewed and handled by model adjustments where appropriate. These adjustments could include adding cross sections, changing the locations and elevations for ineffective area descriptions at obstructions, performing mixed flow analyses, correcting data input errors, and so on. It is good policy to use automated input data checking programs, such as those developed by FEMA. FEMA has separate programs for evaluating HEC2 (CHECK2) or HEC-RAS (CHECK-RAS) data and for highlighting potential errors and inconsistencies. While these programs were developed to check input and output for FEMA flood insurance studies, the checking programs are useful for any steady flow, floodplain modeling analysis. These programs are discussed in more detail in Chapter 9. Once the engineer feels that the model is properly handling the computations for several different discharges/profiles, the work sequence moves on to calibration.
Comparing Model Output to Actual Data Calibration discharges are obtained from actual streamgage data and/or from hydrologic model output based on historical storm data. Flood elevations are obtained from stream gage sites, highwater mark data obtained in the field, or past reports of historic floods. The HEC-RAS model operates with the actual or simulated discharges from a selected runoff event and the computed elevations are compared to the gage and/or high water mark data. The user can assign a highwater mark to the appropriate river station for the corresponding flood event. If the modeler has several different calibration events to be modeled, the HEC-RAS profile output for each can be compared with the highwater mark profile for each event. If the initial runs do not closely agree with the known data at all key locations (a common occurrence), one of the HEC-RAS parameters is modified, while still maintaining a reasonable estimate of the parameter. A new run is made, with the results again compared to the known data. This process is continued until the engineer is satisfied with the calibration or until further adjustments to meet the known data are considered unreasonable.
Adjustments to Model Parameters Calibration adjustments to HEC-RAS parameters are usually made in the following sequence. Manning’s n. As indicated in Chapter 5, Manning’s n normally carries the most uncertainty and a wide range of n values are possible for most natural channel and floodplain configurations. An upward or downward adjustment of 10 to 20 percent may be entirely appropriate and still within the maximum and minimum range shown in Table 5.5. The adjustment should be reasonable, however. A channel n of 0.08, for example, may result in a perfect match of all known data, but if all guidance indicates that the channel n should range from 0.03 to 0.05, the higher n would not be reasonable or defensible. Another factor besides n is likely causing the difference, probably the discharge’s being too great or not large enough.
Section 8.4
Calibration Procedures
299
Discharge. After n, discharge normally carries the most uncertainty. If no gaged discharges are available and the flow values come from the operation of a hydrologic model, the next step is often the modification of infiltration parameters to increase or decrease the discharge values. Again, these infiltration adjustments should be reasonable and defensible. If calibration requires the hydrologic model to have, for example, 99-percent runoff to get discharges high enough to hit highwater marks, this is probably not reasonable. (Note that observed high water marks could be old. Therefore changes in land use over time should be considered.) The percent runoff should always be checked for appropriateness. Actual runoff rates vary widely between geographical regions and even between flood events. The engineer may find useful information in other analyses and reports regarding runoff rates in the study area. Geometry. While adjusting the discharge and n values often results in an adequate calibration, geometric data are also sometimes modified. Geometry is considered the most accurate of all the key parameters, because it is based on surveyed cross sections and topographic maps. However, the geometry may be adjusted around bridges (where gages are normally located) to better model ineffective flow areas, the point where significant weir flow occurs over the embankment, expansion ratio, debris buildup, and other features. Also, the modeler should not rule out a survey bust. If the survey crew or technician referenced from the wrong benchmark, one or more cross sections could be off by several feet. Other Factors. Additional considerations during calibration could include: • Superelevation – The centrifugal force caused by flow around a curve results in a rise in the water surface on the outside of a bend and a depression of the surface along the inside of a bend. This phenomenon is called superelevation (USACE, 1994e). Highwater marks on the outside of a river bend could be affected by superelevation. The faster the velocity and tighter the bend, the greater the effect. Where this occurs, the computed water surface may be adjusted (upward on the outside of the bend and downward on the inside) to compare it with the highwater mark. The extent of superelevation in a channel is a function of the bend radius, top width, and velocity. An equation for computing superelevation is available in many open-channel hydraulic texts, including Linsley et al. (1992) and Hydraulic Design of Flood Control Channels (USACE 1994e). • Valley conveyance – The entire width of the river valley seldom contains moving water, yet cross sections are often entered in HEC-RAS without limiting the conveyance. The outer parts of the cross section could be primarily storage with little or no conveyance. Ineffective flow area constraints or high n values (n ≥ 0.5) may be appropriate for these storage areas to maximize conveyance in the active flow portions of the cross section nearer the channel. • Changed conditions – A bridge or culvert may have been replaced with a larger structure since the time of the flood when the highwater marks were recorded. Changes such as channel enlargements and floodplain encroachments all could give very different hydraulic conditions than existed during the historic flood event. Similarly, portions of the watershed could have undergone changed land use, such as urbanization. Changed land use often results in significantly altered channel and floodplain geometries, compared to those that existed for the historic flood event.
300
Data Review, Calibration, and Results Analysis
Chapter 8
• Looped rating curve – Rivers of low slope (less than about 0.0004, or about 2 ft/mile, 0.4 m/km) normally exhibit a looped rating curve (discussed in Chapter 3), where the stages for the same discharge are different on the rising limb of the hydrograph than on the falling limb. This feature results in the peak stage’s occurring at a different time than the peak discharge. Since a steady flow program computes the same water surface elevation for a specific discharge, the loop is not reflected in the stage-discharge relationship. The computed water surface elevation could be adjusted, based on the engineerʹs knowledge of the stream performance during past floods, before comparing it to the highwater mark. For streams exhibiting a looped rating relationship, an unsteady flow model should be considered in lieu of steady flow analysis. • Wave setup – For flooded areas having a significant reach exposed to the wind, wind-driven waves can result in debris lines significantly greater than the peak water surface elevation. This situation is particularly common in reservoirs. • Debris at bridges – Highwater marks considerably higher than the computed water surface elevation on the upstream sides of bridges and culverts may be due to partial clogging of the opening by debris. This occurrence is fairly common in urban areas, where the stream may be used as a dumping ground. Field interviews and newspaper file searches should be conducted to determine if this has occurred during actual floods. The debris simulation in HECRAS may be applied to handle this situation. • Backwater from other streams – Highwater marks at the downstream end of tributary streams may be caused by backwater from the receiving river and not from the tributary itself. Adjusting the starting water surface elevation to a lower level, based on the stage at the time of the peak tributary discharge, may result in a proper calibration of the tributary. Final adjustments to achieve calibration should be reviewed, preferably by another experienced engineer. A second opinion concerning selection of the values of key parameters is always useful. An engineer doing his or her first hydraulic model should keep in mind that all calibration points will never be hit exactly. As discussed in Chapter 5, there is some variation and error in the actual data being used for calibration. A rule of thumb used by USACE is based on the simulated elevationsʹ being within ±1 ft (0.3 m) of the measured elevations. FEMA guidance (FEMA, 1993) suggests a good calibration has a ±0.5-ft (0.15-m) tolerance. Figure 8.9, taken from USACE (1993b), shows the final calibration results (solid line) for an actual event and the observed highwater marks (stars). The dashed line represents the profile resulting from the initial estimates of channel and overbank n values. As seen, there are locations where the calculated profile is higher than the highwater mark data and other places where it is lower.
Verification Model verification is desirable following completion of the calibration step, though it may be difficult to perform due to lack of data. During the verification phase, no additional “tweaking” of model parameters is performed. The model is operated for an additional actual event not used in the calibration. If the calibrated model reasonably reproduces the actual elevation data from the verification event, the model is considered fully suitable for application to all other flood events. Chapter 5 further discusses the data needed for verification analysis.
Section 8.5
Production Runs
301
USACE
Figure 8.9 Calibration to a highwater mark profile.
Sensitivity Tests The smaller the watershed, the less likely that any gage data will be available. If there have been no recent flood events or if the stream is in a sparsely populated area, even highwater marks may be lacking. Chapter 5 presents some calibration techniques that can be considered in these situations; however, the lack of actual discharges or water surface elevations prevents a proper calibration. For this situation, the modeler should include sensitivity tests of key parameters, such as Manning’s n, to ensure that the model is producing reasonable and defensible results. Without actual discharge and high watermark data to calibrate n, the value of n simply represents the engineer’s judgment. Other engineers could easily estimate a different value of Manning’s n for the same stream reach. Sensitivity tests that vary n within a reasonable range should be performed to determine the sensitivity of the water surface elevation to the variation. Where no calibration data exist, the adoption of a conservative (higher) value of Manning’s n may be appropriate for flood studies. Where velocity is more important, such as in the design of channel protection or the evaluation of bridge scour, a lower value of Manning’s n could be used.
8.5
Production Runs After calibration and verification are completed, the modeler can finalize the existing condition profiles for the stream. This effort should focus on developing the hypothetical frequency profiles and stage-frequency relationships for all streams under study. Different study objectives require preparation of different profiles. Four or more profiles are often run simultaneously, since HEC-RAS has the capability to run as many
302
Data Review, Calibration, and Results Analysis
Chapter 8
as 500 profiles in a single run. If a flood insurance study is being performed, the production runs will typically feature the 10-, 50-, 100-, and 500-year profiles. A floodreduction study focuses on these and other events, including the 2-, 5-, 25-, and 200year floods. These profiles can be linked with economic data (river stage versus damage values) to develop average annual damage values for evaluating the effectiveness of flood reduction options. Other very rare events, such as the Probable Maximum Flood (the greatest flood reasonably possible for an area) could also be included, particularly when a dam and spillway are being designed or analyzed. Navigation studies may evaluate in-bank flows and concentrate on the lowest flows at which navigation is still possible. For whatever purpose the hydraulic model is to be used, production runs will be necessary for the various discharges selected. Even though the debugging and calibration process is complete, the development of water surface profiles for a wide range of flow events usually results in some additional modifications of the hydraulic input during the production runs. The events used during the calibration process are seldom as large as the hypothetical events to be studied, like the 100- and 500-year floods. Although the model agrees well for the calibration events, a few problems normally occur during the development of existing condition water surface profiles for large events.
Large Changes of Key Parameters Graphical and tabular output for all sections in the reach should be examined for sharp changes in important parameters. A modeler would expect a plot of all flood profiles to show reasonably parallel shapes. If one or more show sharp increases at certain locations, these cross sections should be reviewed further. Notes and warnings for higher flows not studied during the calibration process should also be reviewed. If there is a large elevation difference between the lowest and highest profiles being studied, consideration should be given to varying Manningʹs n in the vertical direction. For example, if the 5-year flood results in 1–2 ft (0.3–0.6 m) of water in the floodplain, but the 100-year event results in 20 ft (6.1 m) of water in the overbank areas, the overbank n for the rarer floods is probably smaller than that of the more frequent events. Adjusting Manningʹs n in the vertical direction can simulate this change. HEC-RAS allows the modeler to modify n for different ranges of elevation.
Constraint Elevations and Ineffective Flow Areas Bridges and culverts passing large flows should be reviewed again to ensure proper modeling. Even though the constraint elevations and ineffective flow area locations may have performed adequately during calibration, the production runs may have much larger flow values. Consequently, these higher flows may not be properly constrained upstream and/or downstream of the bridge or culvert and some modification of the constraint elevations may be necessary. A final review of the production runs by another experienced hydraulic engineer is recommended but not always possible. There is also automated model checking software available, such as CHECK-RAS and CHECK-2 available from FEMA’s website. These programs can be used to supplement manual review and can also be applied during the initial model development and calibration process. If a modeling project is going to be submitted to FEMA for their review and approval, they will most likely
Section 8.6
Developing Hydrologic Routing Data
303
use these programs to review the hydraulic work. It is worth the time and effort to use these programs before submitting work to FEMA, potentially avoiding future problems. CHECK-RAS (discussed further in Chapter 9) may be applied for any steady flow hydraulic study, not just FEMA work. The program will check roughness and expansion/contraction coefficients, cross-section input and output data, floodways, structures (such as bridges and culverts), and multiple profiles.
8.6
Developing Hydrologic Routing Data Many hydraulic studies require both a hydrologic and hydraulic model of the stream system. This section focuses on the hydrologic modeling aspects of the study. The hydrologic model aids in streamflow routing (the translation of outflow from a subarea to a point downstream) and computing peak discharges from the watershed for use in the hydraulic model. Although HEC-RAS is primarily a tool for hydraulic modeling, it can also be used to supply most of the routing information needed for the more popular routing procedures, such as the Modified Puls method. This method, which is included with HEC-1, HEC-HMS, and PondPack, requires storage and flow data for each routing reach. Running HEC-RAS for a full range of flows provides the required storage-outflow and hydrograph travel-time data needed for the routing computations. Alternatively, the unsteady flow capability of HEC-RAS (or any other unsteady flow program) can be used. In this case, the internal computations include hydraulic routing, which addresses changes in water surface elevation, velocity, and discharge over time and distance, eliminating the need for hydrologic routing. However, unsteady flow modeling does require storage and discharge information, similar to that needed for hydrologic routing.
Routing Reaches Hydrologic models of watersheds consist of subareas and the channels (known as routing reaches) that connect them. Runoff from a subarea is modeled with rainfall data; infiltration parameters reflecting land use, soil type, and other characteristics of the soil; and conversion mechanisms (often a unit hydrograph) to convert rainfall excess values (in/hr or mm/hr) into runoff (ft3/s or m3/s). The routing process translates the hydrograph in time to the next computation point downstream and modifies the hydrograph shape to reflect the storage in and the travel time through the reach. Figure 8.10 shows a typical inflow and outflow (routed) hydrograph. The variable K in t‘he figure is the incremental time between the hydrograph peaks and is an indication of the hydrograph travel time between the two locations along the stream. The main effect of the streamflow routing process is the translation of the inflow hydrograph in time to the reach outlet. Routing also decreases (attenuates) the peak discharge a small amount and broadens the time base, such that both the inflow and outflow hydrographs have the same volume. In summary, the routing simply modifies the shape and performs a time translation. Figure 8.11 is a schematic of a simple watershed. Routing reaches are normally established between major tributaries (major flow change locations). However, major bridges, gages, economic-damage computation points, levees, and reservoirs may also define the start or end of a routing reach. Additional information on the routing process is available in hydrology textbooks or in USACE, 1994d.
304
Data Review, Calibration, and Results Analysis
Chapter 8
Figure 8.10 Hydrograph routing through a river reach.
Storage-Outflow Values Each routing reach requires a determination of the storage volume (acre-ft or m3) for each outflow discharge (ft3/s or m3/s) that passes through the reach, from low flow to beyond the highest flow that will be studied. This type of information can be developed fairly easily for a reservoir, because the outflow is through a sluice or spillway (or both), and the pool profile is considered to be horizontal. The modeler can determine reservoir surface areas at selected elevations and then compute and sum the incremental volumes between each elevation. This procedure can also be used for stream reaches immediately upstream of a high embankment for a bridge or culvert that severely restricts flow, thereby acting as a reservoir. However, water surface profiles in a normal river reach are not horizontal, making the determination of volume more difficult. Fortunately, the volumes under the sloping profiles of rivers can be easily determined with software such as HEC-RAS. To develop accurate storage-outflow data for river reaches, the HEC-RAS data set must first be debugged for a full range of flows and then calibrated. The HEC-RAS geometric data must include the nonconveyance portions of all the cross sections, such as ineffective flow areas. Instead of just leaving these nonconveyance areas out of the cross sections altogether, the conveyance through them can be minimized by using high n values and/or ineffective flow areas. With this method, storage is computed regardless of whether flow is conveyed from one cross section to the next. Figure 8.12 shows a river reach that requires modeling for both storage and conveyance. After the geometric data are properly developed, a series of steady flow discharges (usually 5 to 7) are selected for which volumes are needed. For relatively short reaches, the selected discharges can be constant over the entire routing reach. But for
Section 8.6
Developing Hydrologic Routing Data
305
Figure 8.11 Watershed routing schematic.
longer reaches containing overbank storage, the routing process could result in significant attenuation (5 to 15 percent) of the peak discharge through the reach. The magnitude of this attenuation can be found from the hydrologic routing process performed in the hydrologic model. If the attenuation is significant, additional steady flow runs can be performed with the hydraulic model with the flow values modified at selected locations within the routing reach. This will result in revised storage-outflow values reflecting the degree of attenuation. Figure 8.13 shows the profiles developed for a range of flows in one routing reach, with the storage-outflow relationship plotted immediately below. Figure 8.14 is a plot of the final peak discharge versus distance along the channel developed with a water-
306
Data Review, Calibration, and Results Analysis
Chapter 8
Figure 8.12 River reach requiring modeling for storage and conveyance.
Figure 8.13 Multiple profiles for storage-outflow computations.
shed model like HEC-HMS. These flows represent the final discharge values that would be used in HEC-RAS to develop the corresponding flood profiles. A “sawtooth” pattern is typical, with large increases in discharge at major tributaries and discharge decreasing somewhat through the downstream routing reach due to
Section 8.6
Developing Hydrologic Routing Data
307
Figure 8.14 Final discharge values versus river mile.
attenuation. The information in Figure 8.14 would be used to insert the appropriate discharges into the HEC-RAS data set at locations just upstream and downstream of each major tributary and at additional locations within each routing reach, as specified by the modeler. To obtain the storage-discharge data, the modeler runs the series of steady flow profiles and examines the output with one of the standard tables. In addition, this process requires the variables for volume and time. Neither of these variables is defined in the standard tables. The modeler must modify one of the standard tables, adding “Volume” and “Average Travel Time” as table parameters. This can then be saved for future use in developing the routing parameters. HEC-RAS computes the volume under the profile continuously from the start of computations at the first cross section. For river hydraulic studies extending over long distances and through several routing reaches, the modeler must determine the incremental volume in each reach, because separate routings are performed for each reach. In addition, the modeler must reduce the discharge immediately upstream of each major tributary, reflecting the flow contribution of that tributary. In other words, a constant discharge should not be used from the beginning to the end of the river model for determining the storage in each reach, because it would not reflect an actual runoff event and would give erroneous storage-outflow information. The engineer could prepare a table of routing values for each routing reach that includes a reach discharge, the accumulated volume for that discharge at the upstream end of the reach, the accumulated volume for that discharge at the downstream end of the reach, the incremental volume (difference between the previous two volumes) for the reach, and the river stations that denote the start and end of each reach. HEC-RAS storage and discharge data for each routing reach are determined and then entered into the hydrologic model.
308
Data Review, Calibration, and Results Analysis
Chapter 8
Wave Travel Time In addition to storage-outflow data, the hydrograph, or wave, travel time (K), shown in Figure 8.10, must be determined. The hydrograph travel time is not available directly from the HEC-RAS output; however, it may be estimated from the output. The HEC-RAS table in Figure 8.15 includes the average travel time (distance divided by average velocity) from each cross section to the first cross section (displayed as “Trvl Time Avg”). Values are computed for each flow rate. This time does not represent the hydrograph travel time, but the average travel time based on the average flow velocity. The hydrograph actually moves through the reach somewhat faster than the average velocity. Therefore, the values given for “Trvl Tme Avg” have to be decreased to reflect the actual hydrograph travel times.
Figure 8.15 Storage-outflow travel-time data for routing.
A modeler can perform this adjustment by applying a conversion factor to adjust the average velocity (Vave) to the wave velocity (VW). Conversion factors for different channel shapes are listed in Table 8.1. Table 8.1 Ratio of wave velocity to average velocity (USACE, 1994d). Channel Shape
VW/Vave
Triangular
1.33
Wide Parabolic
1.44
Wide Rectangular
1.67
For natural channels, a conversion factor of 1.5 is often used as a rule of thumb, because the shape of a typical cross section of either the channel or the full floodplain
Section 8.6
Developing Hydrologic Routing Data
309
is normally between that of a rectangle and a parabola (see Table 8.1). To estimate the hydrograph travel time (K) for a routing reach, the modeler can use the equations Reach Length V ave = --------------------------------------------------------Average Travel Time
(8.1)
Vave = average velocity (ft/s, m/s) Reach Length = weighted distance between bounding cross sections of a routing reach (ft, m) Average Travel Time = time that water takes to move between the bounding cross sections (hr) for the average velocity (Vave) where
V W = 1.5V ave
(8.2)
where VW = velocity of the flood wave (ft/s, m/s) and Reach Length K = -----------------------------------VW
(8.3)
where K = hydrograph travel time (hr) Substituting Equation 8.1 and Equation 8.2 into Equation 8.3 yields Average Travel TimeK = -------------------------------------------------------1.5
(8.4)
One last problem is the initial selection of the average travel time. As shown in Figure 8.15, the average travel time is different for each discharge. Also, these times are for the peak discharge, while the hydrograph travel time should be more representative of the travel time for the average flow. Different estimation methods may be employed for determining a single representative travel time for Equation 8.1 or Equation 8.4. The lowest three discharges of Figure 8.15 represent flows within the channel, whereas the balance of the discharges represent flood flows. Some engineers use the travel time for bankfull conditions, and others use the time of the average flow from base to peak. Another method is to use the travel time for the average flood to be analyzed (say 10- to 25-year event if all floods from 2- through 500-year are to be examined). A weighted time can also be determined by multiplying the probability of each event by its travel time, although this method is slanted toward the more common frequencies. Another method is to choose different travel times for different flood events. However, this level of effort is seldom, if ever, necessary, as separate hydrologic models would be required. Varying the travel time for each event will also not typically result in any significant difference in peak discharge, compared to using a single value of travel time. Thus, one travel time is normally selected for convenience, based on the modelerʹs judgment and on which flood events are most important. For the example shown in Figure 8.15, assume that the average travel time is 6 hours, based on the highest three discharges that most represent the flows of interest for the study. Equation 8.1 through Equation 8.3 or only Equation 8.4 give an estimated hydrograph travel time (K) of 4 hours.<$endrange>velocity:average:in reaches
310
Data Review, Calibration, and Results Analysis
Chapter 8
Reach Routing Steps After the modeler develops the hydrograph travel time (K), one more item is needed for a volumetric routing: the number of routing steps. This value is determined by comparing the hydrograph travel time to the computation interval (∆t) for the hydrologic model. If the hydrologic computation interval is 1 hour and the hydrograph travel time is 4 hours, the routing cannot be done in a single 1 hour step. If it were, the hydrograph would move through the reach far too quickly. Therefore, the number of subreaches, or steps, to perform the routing is K NSTPS = -----∆t
(8.5)
where NSTPS = the number of steps in the reach routing ∆t = the time interval for computations in the hydrologic model (s) For the preceding example, the number of steps is four. Therefore, the routing computations would use one-fourth of the volume in each of the four time steps to perform the analysis. Figure 8.16 shows the storage-outflow and routing step data coded to the HEC-HMS template.
Figure 8.16 Storage routing data from HEC-RAS entered into HEC-HMS.
Modifications to Routing Data In floodplain models used to evaluate flood reduction modifications, such as channel enlargements or levees, the routing data are affected by these components. A channel enlargement or levee results in less storage for a range of discharges; therefore, these structures change the storage-outflow relation for the reach in which the structure is located. New HEC-RAS profiles are required to develop the modified storage-outflow and travel times for the new project conditions. The HEC-RAS geometry should be modified to reflect the addition of a channel enlargement or levee and a similar series of discharges should be run to develop the new routing data.
Section 8.7
8.7
Chapter Summary
311
Chapter Summary After the floodplain and channel data for a reach of river have been coded into HECRAS, a significant effort is still required before a satisfactory working model is obtained. The model input must be manually inspected by the engineer before initial operation. In addition, HEC-RAS conducts numerous data checks during the input and operation of the model. Several iterations of input review, operation, and HECRAS data checks might be required before a successful run of the model. HEC-RAS issues a variety of warning messages, notes, and sometimes error statements that the modeler should review. Error messages prevent the program from running to completion, while notes and warnings can require the modeler to consider adjustments in the model data. HEC-RAS graphical and tabular features are especially valuable for finding potential problems and errors during review of the hydraulic input and output. The cross-section, profile, and pseudo 3-D plots offer useful information that often quickly show data errors or incorrect modeling procedures that result in large changes in water surface elevations or top widths between sections. Similarly, the cross-section tables and a variety of predefined standard tables allow a ready comparison of changes in key parameters between cross sections in a problem reach of river. The cross-section interpolation routine in HEC-RAS is a powerful tool to address many of the warnings and notes from the program. Critical depth warnings and notes could indicate the presence of a change in flow regime from subcritical to supercritical. The mixed flow option in HEC-RAS allows this problem to be overcome and the correct regime and profile to be determined with minimum additional engineering effort. Following the successful operation and debugging of the HEC-RAS data, the data set should be calibrated and verified, if sufficient actual data are available. The most defensible calibration of a data set is the reproduction of known river elevations for known discharges in the actual river. Unfortunately, most studies do not have adequate recorded discharge and river elevation data to achieve a full calibration and verification. Adjustments to the data to achieve an acceptable calibration concentrate mainly on the estimates of Manning’s n, the parameter that carries the most uncertainty. Adjustments to discharge and occasionally to cross-section geometry can also be required for calibration. In the absence of sufficient calibration data, sensitivity tests are useful to determine the effect of varying estimates of n. Following the calibration process, the HEC-RAS model is ready for production runs and the development of existing condition water surface profiles. These profiles establish the depth and area of flooding for the study reach of floodplain and can serve as a base condition to compare the effect of changes in the system hydrology or hydraulics. For studies of structural flood reduction measures, such as reservoirs, levees, or channels, the with-project profiles are compared to the existing conditions profiles, with a reduction in flood levels serving as a measure of project benefits. If a hydrologic model is also being employed in the analysis, the HEC-RAS model may be used to generate storage-outflow relationships and aid in estimating hydrograph travel times for each routing reach in the hydrologic model. The application of the Modified Puls hydrologic routing method commonly features HEC-RAS to generate the routing information necessary for a hydrologic model.
312
Data Review, Calibration, and Results Analysis
Chapter 8
The existing condition water surface profiles serve as the base for nearly all floodplain hydraulic studies. The data gathering, data input to the model, debugging, calibration, operation, and production runs to establish existing, or base, conditions are normally where most of the hydraulic engineering time and effort are spent.
Problems 8.1 Geometry data for Otter Creek is provided in the files Prob8_1eng.g01 (for English units) and Prob8_1si.g01 (for SI units) on the CD accompanying this text (see figure). Set up a HEC-RAS steady-flow model incorporating this geometry data and the flow and boundary condition data provided in the table that follows. Assume that the flow regime is subcritical.
Profile Name
Upstream Flow Rate, ft3/s (m3/s)
Downstream WS Elevation, ft (m)
PF 1
2000 (56.6)
209 (63.7)
PF 2
8000 (226.5)
211 (64.3)
PF 3
13,500 (382.3)
212 (64.6)
a. Compute water surface profiles for the specified flows. Plot the computed profiles for all three discharge-levels on a single figure. Also include the energy grade elevation and critical depth elevation profiles. What are the water surface elevations at cross sections 12 and 18? b. Observe that ineffective flow areas are needed at the cross sections bounding the bridge and as cross sections 8 and 9. Use the cross-section editor to define
Problems
313
appropriate ineffective flow areas for the bridge and save the revised geometry data in a new file. Which ineffective flow areas, if any, should be permanent? c. Run the model with the modified bridge and cross section geometry data. Compare the resulting profiles with those obtained in part (a), and describe any differences. 8.2 Calibrate the Otter Creek HEC-RAS steady-flow model developed in part (c) of problem 8.1 using the observed high-water elevation data provided below. Update the steady-flow data for profile PF 3 to include the observed high-water data provided in the following table and recompute this profile.
Observation
Cross Section
Observed Highwater Elevation, ft (m)
1
18
220.9 (67.3)
2
14
217.9 (66.4)
3
11
216.9 (66.1)
Plot the computed profile PF 3 with the observed high-water levels. Adjust the Manning’s roughness coefficients for the channel using a constant multiplier to better match better the computed PF 3 profile with the observed highwater marks. Several iterations may be required to obtain an acceptable match. What multiplier value yields the best match? 8.3 Set up an HEC-RAS mixed (subcritical/supercritical) steady-flow model for Rapid Creek using the geometry data provided on the CD (Prob8_3eng.g01 or Prob8_3si.g01) and the steady-flow and the downstream boundary condition
314
Data Review, Calibration, and Results Analysis
Chapter 8
data provided for profiles PF 1 through PF 8. Specify critical depth as the upstream boundary condition for each profile.
Profile Name
Upstream Flow Rate, ft3/s (m3/s)
PF 1
1000 (28.3)
PF 2
2000 (56.6)
PF 3
3000 (85.0)
PF 4
4000 (113.3)
PF 5
6000 (169.9)
PF 6
8000 (226.5)
PF 7
10,000 (283.1)
PF 8
12,000 (339.8)
Downstream Boundary Condition
Normal Depth, S = 0.002
a. Enable the critical depth output option and compute the eight water surface profiles. Plot the computed water surface profiles and view also the computed water surface elevations on each cross section. Be sure to include critical depth elevation on these plots. b. In the supplied HEC-RAS geometry file, ineffective flow areas have not been defined for the Rapid Creek cross sections. Designate ineffective flow areas as necessary to confine the flow to the main channel when appropriate for particular profiles. Recompute and plot the water surface profiles. c. Check the summary of errors, warnings and notes for the run in part (b). How many hydraulic jumps occurred in profile PF 7? For profiles PF 1 and PF 8, count the number of cross sections where the program defaulted to critical depth.
Problems
315
d. Create a new subcritical flow regime plan using the same flow and geometry data. Compute water surface profiles under the new plan, and compare the profiles to those obtained previously. How do they differ? 8.4 Set up a steady-flow HEC-RAS model to investigate storage-discharge relationships for Deer Creek using the geometry data provided on the CD (Prob8_4eng.g01 or Prob8_4si.g01) and the flow and boundary condition data provided in the table. The flow regime is subcritical. a. Plot the computed water surface profiles and view also the computed water surface elevations on each cross section. b. Create and print a table containing storage-discharge information for each cross section. [Hint: Define a new profile output table containing only flow (Q) and volume data for every profile.]
Upstream Flow
Profile Name
Rate, ft3/s (m3/s)
PF 1
100 (2.8)
PF 2
200 (5.7)
PF 3
300 (8.5)
PF 4
400 (11.3)
PF 5
500 (14.2)
PF 6
600 (17.0)
PF 7
700 (19.8)
PF 8
800 (22.7)
PF 9
900 (25.5)
PF 10
1000 (28.3)
Downstream Boundary Condition
Normal Depth, S = 0.0015
CHAPTER
9 The U.S. National Flood Insurance Program
The U.S. National Flood Insurance Program (NFIP), created in 1968, has been instrumental in developing 19,000 flood insurance studies in the United States. These studies include most major rivers as well as creeks and streams throughout the country. Flood insurance studies feature one or more profiles showing the existing water surface elevation during various flood events and include information on the floodway, if one was developed for the stream, as well as a variety of other site-specific demographic and rainfall data. These studies provide communities with land use planning information that is used to regulate development in Special Flood Hazard Areas (SFHAs). HEC-2 and HEC-RAS enable modelers to easily compute a community floodway and are the most common programs used for these studies. This chapter focuses on the NFIP and provides tips and guidance for navigating through the floodplain compliance regulations. The chapter assists consulting engineers who are involved in site development and floodplain studies, as well as reviewers and local officials involved in floodplain management.
9.1
The U.S. National Flood Insurance Program Following the Great Flood of 1927 on the Lower Mississippi River, the U.S. Congress mandated a federal interest in providing flood protection along the nation’s rivers and streams. From 1930 to 1960, the United States saw the construction of hundreds of dams, reservoirs, levees, channel modifications, diversions, and pumping stations. With these structures in place, many populated areas enjoyed a high level of flood protection. Although flood reduction structures can reduce flood risk, they do not
318
The U.S. National Flood Insurance Program
Chapter 9
eliminate risk and many have led to the often unfortunate and mistaken assumption that these regions were safe from flooding. In addition, every year major flood damage still occurred in small towns and communities in low-lying, floodprone areas. In most cases, the cost of providing flood protection in these areas would have far exceeded the benefits. Consequently, a program focusing on nonstructural means of flood reduction and mitigation was needed to further address frequent flood damage in these floodprone areas. In 1968, the U.S. Congress passed the National Flood Insurance Act, creating the National Flood Insurance Program (NFIP). This act required the identification and mapping of all floodprone areas within five years and made government subsidized flood insurance available to communities that met floodplain management requirements, thereby limiting or preventing development in floodprone areas. Within the first year, it became evident that the time to develop the flood insurance studies would take longer than expected and there would be a delay in getting the floodplain information to communities. Therefore, the Emergency Program was created by the Housing and Urban Development Act of 1969. The Emergency Program provided insurance coverage at nonactuarial, federally subsidized rates in limited amounts during the period before the completion of a community’s flood insurance study (FEMA, 1995). The program was further expanded with the passage of the Flood Disaster Protection Act of 1973. The Act required that floodprone communities be notified of their flood hazards to encourage participation. This was accomplished through the publication of Flood Hazard Boundary Maps for all communities that were identified as having flood hazards (FEMA, 1995). The legislation also mandated the purchase of flood insurance for structures located within floodprone areas as a condition of federally related financing and it eliminated federal flood disaster assistance to those communities not participating in the program. These two pieces of legislation required communities to regulate development within the 100-year floodplain to ensure that developments did not cause adverse impacts on adjacent areas. Also, the development must be unaffected by flood levels up to and including the 100-year event. The program was originally administered by the Department of Housing and Urban Development (HUD) but was transferred to FEMA upon the agencyʹs creation in 1979. Although the flood insurance program was a success, its effect was limited up to the early 1990s. Many existing floodprone areas that experienced high development rates did not participate in the flood insurance program because of perceived economic hardships on the community. Instead, these communities relied on flooding incidents to cause enough damage to force the area to be declared a “disaster area” by the federal government, allowing for low-cost loans or outright grants to rebuild after a flood. By the early 1990s, it was estimated that only 10 to 20 percent of those eligible for flood insurance had purchased this protection. Following the Great Flood on the Mississippi River in 1993, several changes to the program were made through the National Flood Insurance Reform Act of 1994. The goal was to require more people or organizations to purchase flood insurance to reduce the high levels of disaster assistance. Changes implemented by the reform act include the following: • A lengthened waiting period between purchasing insurance and the time the insurance became effective (from 5 to 30 days) was implemented. • Farm buildings were no longer insured.
Section 9.2
Terminology and Concepts
319
• Lenders were required to review flood insurance maps when making mortgage loans. • Each community’s maps were required to be reviewed every five years and assessed for the need to implement map updates.
9.2
Terminology and Concepts This section provides definitions for key terms used in the NFIP.
Special Flood Hazard Area A Special Flood Hazard Area (SFHA) is the area of land that would be inundated by a flood having a 1% or greater chance of occurring in any given year. The 1%-chance flood is also referred to as the base flood or the 100-year flood and is the regulatory standard for FEMA. During a 30-year period, the risk of at least a 100-year flood in a SFHA is 26 percent. The Base Flood Elevation (BFE) is the water surface elevation of the 100-year flood at a selected location. The BFE is determined using a hydraulic program such as HECRAS.
Floodway The floodway consists of the stream channel plus that portion of the overbanks that must be kept free of encroachment (fill or obstruction) to discharge the 100-year flood without increasing flood levels over the 100-year water surface elevations (BFE) by more than an allowable height. FEMA criteria state that the maximum increase or surcharge is 1.0 ft (0.3 m); several U.S. states have more stringent criteria with a smaller allowable increase. Floodways must be developed with a computer program such as HEC-RAS, using the natural (unencroached) 100-year event as a base. Chapter 10 discusses floodway development in detail. Floodways are an integral tool for a community’s floodplain management because they designate the area that should remain free of obstructions to allow passage of large flood discharges. The rest of the floodplain, often referred to as the floodway fringe, can be developed at or above the BFE, and theoretically will not raise the WSEL by more than the calculated amount. If a stream does not have a designated floodway, it is not known where the “safe” development areas are located (that is, those areas where encroachments will not cause the water surface elevation (WSEL) to rise by more than the allowable amount). Figure 9.1 shows an example floodway in plan and cross-section view.
Flood Surcharge Flood surcharge is the water surface elevation difference between the 100-year base flood elevation and the floodway elevation at any cross section. For the computed floodway, the surcharge normally varies from cross section to cross section. Figure 9.2 illustrates the concept of surcharge. FEMA standards require that floodway surcharge not exceed 1.0 ft (0.3 m) at any location. This concept was developed in the belief that
320
The U.S. National Flood Insurance Program
Chapter 9
Figure 9.1 Floodway cross-section and plan view.
increases of less than 1 ft would not result in dangerous increases in flood flow velocity. However, since the studies developed using this concept did not account for watershed hydrology changes, such as increased runoff, use of the 1 ft rise floodway may allow for too much development in the flood fringe, reducing floodwater storage capacity and accelerating flood flow velocity. This could lead to actual flood increases of greater than 1 ft (0.3 m), as well as increased erosion and other detrimental effects. (ODNR, 2002). Several states have a more stringent surcharge limit, as shown in Table 9.1. Generally, the smaller the allowable rise, the larger the portion of the floodplain that is designated as the floodway.
Section 9.2
Terminology and Concepts
321
Figure 9.2 Illustration of surcharge. Table 9.1 Allowable state surcharge limits (as of 2003) State
Surcharge, ft
Illinois
0.1
Indiana
0.1
Michigan
0.1
Minnesota
0.5
Montana
0.5
New Jersey
0.2
Ohio
0.5 or 1.0a
Wisconsin
0.0
All other states
1.0
a. Depending on community
Floodway Fringe The area between the floodway boundary and the 100-year floodplain boundary is referred to as the floodway fringe, as illustrated in Figure 9.1 In theory, this portion of the cross section could be completely blocked, preventing all flow, without increasing the water surface elevation of the 100-year flood by more than the allowable surcharge. (Actual surcharge is determined through hydraulic modeling and is discussed in detail in Chapter 10. The actual surcharge can be less than or equal to the allowable surcharge.)
322
The U.S. National Flood Insurance Program
Chapter 9
Floodways are effective for floodplain management because they allow communities to develop in the floodway fringe if they so choose, but limit the future increases of water surface elevations to no more than the allowable surcharge. Therefore, some communities will allow the floodplain fringe to be zoned for development, as long as the design of such development ensures that the area is protected to at least the 100year flood level plus an appropriate factor of safety. Design options for development within the floodway may include elevating structures by placing fill material or constructing a levee to prevent floodwaters from entering the protected area. Other land uses that are compatible with occasional, short-duration flooding, such as parks, golf courses, and ball fields, may be permissible without any protection. Because the floodway is determined using the 1 ft–rise criterion, some have misinterpreted that to mean development in a floodway is permitted if it does not raise the BFE more than 1 ft. This is incorrect. As will be discussed later in this chapter, floodplain management regulations dictate that any rise in the BFE as a result of a floodway encroachment is unacceptable—even 0.001 ft (without a Conditional Letter of Map Revision, discussed later in this chapter, page 339).
9.3
Publications Used in the NFIP Since 1970, HUD/FEMA has been creating, storing, and updating flood hazard maps for communities participating in the NFIP. This section describes the maps and studies used in the NFIP, including how to read and interpret them.
Flood Hazard Boundary Map (FHBM) A Flood Hazard Boundary Map (FHBM) is based on approximate data and identifies the flood hazard areas within a community, but water surface elevations are not provided. It is used in the NFIP’s Emergency Program for floodplain management, as well as for insurance purposes. Only about one percent of all participating communities remain in this Emergency Program. FEMA’s goal is to convert all communities to the regular phase.
Flood Insurance Rate Map (FIRM) Flood Insurance Rate Maps (FIRMs) are official maps of a community on which FEMA has delineated both the areas of special flood hazard and the risk premium zones applicable to the community. FIRMs are the primary tool used by state and local governments to manage floodplain development and mitigate the effects of flooding. A FIRM is usually issued following a flood insurance study, conducted in conjunction with the communityʹs conversion to the NFIP’s Regular Program. Using the information gathered by the flood insurance studies, FEMA creates flood maps for the community. Figure 9.3 shows an example of a FIRM. Various entities other than community officials use FIRMs for assistance in planning and development. Private citizens, insurance agents, and real estate brokers use FIRMs to locate properties and buildings within flood insurance risk zones. When making loans, lending institutions and federal agencies use FIRMs to determine whether flood insurance is required. The purchase of flood insurance is required by law to receive secured financing with which to buy, build, or improve structures
Section 9.3
Figure 9.3 Example of a flood insurance rate map (FIRM).
Publications Used in the NFIP
323
324
The U.S. National Flood Insurance Program
Chapter 9
located in the 100-year floodplain. Flood insurance is available to any property owner located in a community participating in the NFIP. Flood Map Coverage. Flood maps illustrate, in detail, flood data for a given geographic area, such as a county. For identification purposes, FEMA assigns a six-digit Community Identifier (CID) to all active NFIP communities. Typically, coverage is too large to show on one map panel, so multiple panels are included, along with an index panel, which shows the total coverage of the FIRMs and the set of panels produced. Because coverage may be large, the index should be reviewed first to determine on which panel the area of interest is located. Map coverage can include counties/parishes, towns, townships, and/or cities. Flood maps may contain flood hazard information for one or multiple communities, identified by CIDs on the panels (see Figure 9.4). However, most flood maps cover only one jurisdiction. If that jurisdiction is the unincorporated part of a county, flooding information is shown only for areas under the jurisdiction of the county. Therefore, flooding information for incorporated areas, such as towns and cities, is not included on these flood maps. In this case, separate flood maps are prepared for incorporated areas. More recently, FEMA has produced countywide flood maps. These flood maps typically contain flooding information for all parts of a county. To determine the geographic coverage of a community’s flood map, contact the FEMA Map Service Center for assistance. Elements Found on FIRM Panels. Items that are typically displayed on FIRMs, such as the example in Figure 9.4, are defined in the following list. • Floodplain Boundary – The boundaries of the 100-year and 500-year floodplain limits are shown. Floodplains are determined by using flood elevations at cross sections within a hydraulic model, such as HEC-RAS, plotting them on the map, and interpolating between cross sections using topographic maps. • Hazard Area Designation – These are the shaded floodplain boundaries in Figure 9.3. The dark-gray shaded areas represent the 100-year flood boundaries, while the light gray shaded areas represent the 500-year flood boundaries. • Base Flood Elevation (BFE) – For areas that were studied in detail with a hydraulic model, the water surface elevations at certain cross sections along the stream are shown on the FIRM. Because of the scale limitations of these maps, the flood insurance study should be reviewed to determine a more exact BFE. • Cross-Section Symbol – Cross sections are a view of the streambed and floodplain taken perpendicular to the direction of flow at a given point. For a stream or reach studied in detail, the locations of some of the cross sections used in the model are designated with a letter and shown on the FIRM with the corresponding BFE at this cross section. • Floodway Boundaries – These boundaries show the limits of the floodway (cross-hatched area on Figure 9.3). The floodway width may be scaled off the FIRM to get an approximate value, but the actual widths should be determined using the floodway data table in the FIS.
Section 9.3
Publications Used in the NFIP
325
Figure 9.4 Typical FIRM panel cover.
• Zone Division Line – This line separates SFHAs with different zone designations, such as Zone AE and Zone X in Figure 9.3. These zones indicate the degree of flood hazards in a specific area. Section 9.5 further discusses zones. • Stream Line – This is the centerline of the stream, shown as a solid black line. Wider streams may have double lines to indicate stream boundaries. Typically, stream lines represent the water boundary at the time aerial photographs were taken and do no represent the stream banks.
326
The U.S. National Flood Insurance Program
Chapter 9
Flood Insurance Study (FIS) A Flood Insurance Study (FIS) is a report issued by FEMA that summarizes the analysis of flood hazards within a community. The FIS discusses the major findings from the hydrologic and hydraulic analyses, which are also used to prepare the FIRM. The key parts of the study are as follows: Introduction. Part one of the FIS is the Introduction, which includes • The communities studied. • Identification of the study contractor or government agency that performed the work to develop the FIS and FIRM. • The date work was completed by the study contractor or government agency. • Sources of additional information that may have been used in the FIS but were not contracted by FEMA. Area Studied. Part two of the FIS is the Area Studied, which includes • Scope of Study. This section often contains a map of the area studied, a list of newly studied and restudied streams, and a description of the streams studied under detailed methods versus approximate methods. A description of the community, including the geographic location, history, climate, and primary land uses, is also included. • Principal flooding problems within the community, such as past and historical floods, causes of floods, and any gage locations. • Flood protection measures present within the community, such as levees. Part three of the FIS discusses the engineering methods used in the study and is divided into a hydrologic section and a hydraulic section.
Section 9.3
Publications Used in the NFIP
327
Hydrologic Analyses. FISs are generally concerned with peak discharges in streams for the 10-, 50-, 100-, and 500-year flood events. This section describes the methods used to determine the peak discharges, such as regression equations or a software application such as HEC-HMS, and why they are appropriate for the area. It also lists the sources of data used in the analyses. A Summary of Discharges Table briefly summarizes the peak discharges and drainage areas at locations along the streams, generally at physical features shown on the maps, for easy cross-referencing. Hydraulic Analyses. This section describes the hydraulic analyses used to calculate the water surface elevations for each of the selected flood recurrence intervals. Typical information includes: • Cross sections – The BFEs at cross sections along the reaches studied are determined with a hydraulic model, such as HEC-RAS. A cross sectionʹs ground surface information is typically determined from field survey information, topographic maps, or both. This section of the report lists information about the cross sections, such as how they were determined, the date of the field survey, the scale, the contour interval, and the dates of the topographic maps used. At select intervals, the cross sections used in the analyses are labeled with a letter and shown on the FIRM and the flood profile and floodway data table in the FIS, as shown in Figures 9.3, 9.5, and 9.6, respectively. • Roughness Coefficients – This section lists the Manning’s n values used for the channel and overbanks in the hydraulic analyses. • Starting Water Surface Elevation – This section lists the starting water surface elevation used at the first cross section of the hydraulic model. FEMA generally recommends use of the slope-area method to determine the starting water surface elevation. Computations must start at a location that is sufficiently downstream so that any errors in starting water surface elevation converge to the correct value before the start of the detailed flood insurance study. Chapter 5 discusses this procedure in detail. • Methodologies – This section describes the methodology used to compute the flood elevations for this study. This is most commonly a backwater computer program, such as HEC-2 or HEC-RAS. Flood Profiles. A flood profile is a graph of flood elevations along the centerline of a stream. The profiles often show the 10-, 50-, 100-, and 500-year flood events obtained from the hydraulic analysis (as illustrated in Figure 9.5). Cross-referenced information from the FIRMs, such as the locations of lettered cross sections, street crossings, and hydraulic structures are also shown. Since the FIRM only shows BFEs rounded to the nearest foot (0.3 m) at select locations, the flood profiles should be used to determine a more accurate base flood elevation at any point along the stream. Profiles within the FIS, such as shown in Figure 9.5, are often created using a FEMAdistributed computer program called RASPLOT. RASPLOT has replaced the previous program FISPLOT, which was used in conjunction with HEC-2 and is not able to read HEC-RAS input and output. With the increased use of HEC-RAS in the NFIP, FEMA created RASPLOT to generate water surface profiles using HEC-2 or HEC-RAS data. The programʹs output is in Drawing Exchange Format (DXF). The RASPLOT program and user’s manual are available for download from FEMA’s web site.
328
The U.S. National Flood Insurance Program
Figure 9.5 A flood profile.
Chapter 9
Section 9.3
Publications Used in the NFIP
329
Floodway Data Table. The Floodway Data Table presents the numeric results of the base flood and floodway analyses determined by a hydraulic program, such as HEC-RAS. Data in the table are summarized at the lettered cross sections shown on the FIRMs, as illustrated in Figure 9.6. A common misconception is that these lettered cross sections are the only cross sections used in the hydraulic model; however, in essentially all cases, the hydraulic model was developed using many more cross sections.
Figure 9.6 Example of a floodway data table.
In the table, the Distance column lists the distance, measured in the upstream direction, of the cross section to some reference point (usually the confluence with another stream or the mouth of the stream itself). The Floodway Width, Section Area, and Mean Velocity columns are the output from the hydraulic model at these cross sections. The widths should match the widths of the plotted floodway on the FIRM. Under the Base Flood Water Surface Elevations, the Regulatory column lists the regulatory base flood elevation, which includes backwater effects, if any, from downstream receiving streams. The Without Floodway column represents the base flood elevation calculated without the influence of backwater from other streams. The floodway is developed using these elevations. However, the regulatory elevation is the value used to delineate the 100-year floodplain on the FIRMs and for flood insurance purposes. For example, in Figure 9.6, Cross Section A has a Regulatory BFE of 54.4 ft and a Without Floodway elevation of 44.2 ft. Footnotes indicate that the difference in these two elevations is caused by backwater effects from the Connecticut River. The effects continue to Cross Section E. The regulatory elevations used for floodplain management and flood insurance purposes are values from the model output of the receiving
330
The U.S. National Flood Insurance Program
Chapter 9
stream (Connecticut River), not the stream listed in this table (Waterworks Brook). The With Floodway column lists the floodway elevation for the Waterworks Brook— again, not taking into account backwater effects from the Connecticut River. The Increase column represents the flood surcharge and is the water surface elevation difference between the 100-year base flood elevation and the floodway elevation at any cross section. Obtaining Flood Insurance Studies and Maps. The FIS and FIRMs are available for review at local planning, zoning, or engineering offices or other community map repositories. Requests for printed copies of current FIRMs and FIS reports should be submitted to FEMA’s Map Service Center. Orders can also be submitted online at the Map Service Center web site. The hardcopy maps have been scanned and are available for viewing online at the Map Service Center web site at no cost. The images may also be ordered on CD-ROM or downloaded for a fee. The scanned maps are available for purchase at the individual community, county, and state levels. Map Modernization Plan. The goal of FEMA’s Map Modernization Plan is to upgrade the 100,000-panel flood-map inventory to a digital format, for all NFIP participating communities, by • Developing up-to-date flood hazard data for all floodprone areas nationwide to support sound floodplain management and prudent flood insurance decisions. • Providing the maps and data in digital format to improve the efficiency and precision with which mapping program customers can access this information. The creation of Digital Flood Insurance Rate Map (DFIRMs) involves converting the existing inventory of manually produced FIRMs to a digital format. The DFIRM will have GIS attributes linked to mapping data and stored in databases. This allows the creation of interactive, multihazard digital maps. Linkages will be built into a database to access electronic versions of the engineering backup material used to develop the map (for example, hydrologic and hydraulic datasets), flood profiles, floodway data tables, digital elevation models (DEMs), and structure-specific data, such as digital elevation certificates and digital photographs of bridges and culverts.
9.4
Criteria for Land Management and Use Part 60 of the NFIP regulations (Title 44, CFR, 99) provides the information necessary for a community to understand its responsibilities as a participating community in the NFIP. Part 60 defines the hazard area zone designations that appear on the FIRMs, as illustrated in Figure 9.3, and are described as follows: • Zone A – Areas of 100-year flood inundation as determined by approximate methods. Because detailed hydraulic analyses have not been performed, BFEs are not shown on the FIRMs. For help in developing BFEs in these areas, “The Zone A Manual: Managing Floodplain Development in Approximate Zone A Areas” (FEMA, 1995) is available on FEMA’s web site. Also available for download is Quick-2 (FEMA, 1999), software that can be used to compute BFEs in
Section 9.5
Revising Flood Studies and Maps
331
Zone A areas. Haestad Methods’ FlowMaster is another package that could be used to quickly calculate water surface elevations in Zone A areas. • Zone AE – Areas of 100-year flood inundation as determined by detailed hydraulic analyses. BFEs are shown at select intervals on the FIRM and are listed at lettered cross sections in the Floodway Data Tables of the FIS. Zone AE has replaced Zones A1–A30 on newer and/or revised maps. • Zone AO – Areas of 100-year shallow flooding (usually sheet flow on sloping terrain), where average water depths during the base flood event range between 1 and 3 ft (0.3 and 0.9 m). Average depths of inundation are shown on the map. • Zone AH – Areas of 100-year shallow flooding (usually areas of ponding), where average water depths are between 1 and 3 ft (0.3 and 0.9 m) and BFEs are shown. • Zone A99 – Areas subject to 100-year flood inundation to be protected by a federal flood protection system under construction (BFEs are not shown). • Zone AR – Areas of special flood hazard that result from the decertification of a previously accredited flood protection system now being restored to provide a 100-year or greater level of protection. • Shaded Zone X – Areas between limits of the 100-year floodplain and 500-year floodplain. This zone also includes areas protected by levees, 100-year floodplains where water depths are less than 1 ft (0.3 m), and areas with drainage areas less than one square mile (2.6 km2). Flood insurance is available in this zone, but is not required. Shaded Zone X has replaced Zone B on new and revised maps. • Unshaded Zone X – Areas of minimal flooding; land elevations exceed the 500-year flood level. Unshaded Zone X has replaced Zone C on new and revised maps. • Zone D – Areas where flood hazards are undetermined, but flooding may be possible. • Zone V – Areas of 100-year coastal flood with wave action. (BFEs have not been determined.) • Zone VE – Areas of 100-year coastal flood with wave action. (BFEs have been determined.)
9.5
Revising Flood Studies and Maps Existing FISs and FIRMs can be revised, as outlined in Part 65 of the NFIP regulations. This section discusses the various methods, including the differences between amendments and letter actions, for updating and/or revising FIS and FIRM data. The section also discusses engineering revisions in detail.
Identification and Mapping of Special Flood Hazard Areas Part 65 of the NFIP regulations outlines the steps a participating NFIP community must take to provide FEMA with up-to-date flood hazard identification. This part of
332
The U.S. National Flood Insurance Program
Chapter 9
the regulations also provides guidance for submitting new data and revising the maps and studies. Requirement to Submit New Technical Data. Section 65.3 of the regulations states that when a community’s BFEs increase or decrease as a result of physical changes within the floodplain, the community must notify FEMA by submitting technical or scientific data within six months of data availability. Because a community may allow development within the floodplain according to Paragraphs 60.3(c) and 60.3(d) of the regulations without prior consent or review by FEMA, this requirement ensures that the maps and studies are kept current. Paragraph 60.3 (c) states that until a floodway is developed for a mapped stream, no new construction or substantial improvement is allowed within the floodplain unless it is demonstrated that the cumulative effect of the proposed development, when combined with all other existing or proposed development, will not increase the BFE by more than one ft at any point along the watercourse. When a floodway has been established, Paragraph 60.3(d) applies, which prohibits encroachments within the adopted regulatory floodway unless it is demonstrated through hydrologic and hydraulic analyses that the proposed encroachment will not result in any increase in flood levels. Note that development may only take place in the floodway fringe, not the floodway itself, and the community must be in agreement with the changes that were made. However, many communities will not allow development anywhere within the floodplain; this varies from community to community, and the engineer should consult with the local planning agency before beginning a study within the floodplain. Right to Submit New Data. Section 65.4 of the regulations states that a community has the right to request changes to information shown on the FIRM even if the changes do not affect the flooding information, such as corporate limits, labeling, and so on. All requests for changes to effective maps, except for those initiated by FEMA, must be made in writing by the Chief Executive Officer (CEO) or CEO designee of the community. Revisions to the effective maps, except for error corrections, are subject to fees, as listed in Part 72 of the regulations. As the cost for revisions may change, the reader should consult the FEMA web site to view the latest fee schedule.
Revisions and Amendments FEMA has several procedures in place to change effective FIRMs and FISs based on new or revised technical data or more detailed topographic data. A Physical Map Revision (PMR) is a change to a map and reproduction of the effective maps and FISs. Changes can also be made by a Letter of Map Change (LOMC). The three categories of LOMCs are Letters of Map Amendment (LOMA), Letters of Map Revisions based on Fill (LOMR-F), and Letters of Map Revision (LOMR). The difference between a revision and an amendment is that a revision involves more complex map changes, is not lot or structure specific, typically involves hydrologic and/or hydraulic analyses, and requires submission of different forms with the request. A registered professional engineer must certify the submitted analyses for all of the revisions and the request must be signed by the CEO of the community.
Section 9.5
Revising Flood Studies and Maps
333
Letter of Map Amendment (LOMA). A Letter of Map Amendment (LOMA) is an official letter issued by FEMA to revise the SFHA boundary on a FIRM or FHBM, based on detailed elevations from surveying and/or topographic mapping of natural conditions. LOMAs are typically issued because of a mapping error due to topographic limitation—the base map used to prepare a FIRM has such a small scale that some areas will be inadvertently included in the 100-year floodplain. For a LOMA to be issued removing a structure from the SFHA, the lowest adjacent grade (the lowest ground touching the structure) must be at or above the BFE. To remove the entire lot, the lowest point on the lot must be at or above the BFE. When a LOMA is issued removing a building site from the SFHA, the mandatory flood insurance purchase requirement is lifted. A LOMA establishes that a specific property is not included in an SFHA but does not change the BFE or floodway in any way and is not available for lots or structures elevated by fill. Figure 9.7 illustrates a typical LOMA request situation.
Figure 9.7 Typical LOMA request.
To initiate a LOMA request, either the MT-EZ or MT-1 forms (depending on the extent of the request) must be submitted to FEMA along with other data to support the request to remove the property from a designated SFHA. The MT-EZ form is used to request removal of a single structure or a legally recorded parcel of land from the designated SFHA. The MT-1 form is used for requests by developers for those requests involving multiple structures or lots, for property in coastal high hazard areas (V zones), or for requests involving the placement of fill. The forms are available from all FEMA Regional Offices and can be downloaded from FEMA’s web site. There is no charge for a LOMA because it is based on natural conditions and corrects the FEMA map. However, the requester is responsible for preparing all data, including elevation information certified by a licensed land surveyor or professional engineer. MT-1 forms cannot be used for the following requests: • Changes to BFEs. • Changes to regulatory floodway boundary delineations. • Property and/or structures that have been elevated by fill placed within the regulatory floodway, channelization projects, or bridge/culvert replacement projects. • Changes in coastal high hazard areas (V zones). The community must submit these types of requests to FEMA on the MT-2 form, “Application Forms and Instructions for Conditional Letters of Map Revision and Letters of Map Revision.”
334
The U.S. National Flood Insurance Program
Chapter 9
A variation of the LOMA is a Conditional Letter of Map Amendment (CLOMA), a letter from FEMA stating that a proposed structure, not to be elevated by fill, would be excluded from the SFHA as shown on the effective map if built as proposed. This letter does not revise an effective NFIP map, but indicates whether the project, if built as proposed, will be recognized by FEMA. Letter of Map Revision Based on Fill (LOMR-F). When fill material is placed to raise a building site above the BFE, FEMA can remove the raised area from the boundaries of the SFHA, thus revising the FIRM. Letters of Map Revision Based on Fill (LOMR-F) are processed under this provision. NFIP regulations require that the lowest adjacent grade of the structure be at or above the BFE for a LOMR-F to be issued. The participating community must also determine that the land and any existing or proposed structures to be removed from the 100-year floodplain are “reasonably safe from flooding.” For an entire lot and structure to be removed, both the lowest point on the lot and the lowest floor of the structure, including the basement, must be at or above the BFE. As with the LOMA, the requester is responsible for providing all supporting information and submitting the MT-1 forms with the request. A fee is charged for a LOMR-F because the placement of fill is a man-made change to the floodplain. Scientific and technical data required to support a LOMR-F request, as outlined in Section 65.5 of the NFIP regulations, are as follows: • A copy of the recorded deed, including a legal description of the property and the official record information (deed book, volume, and page number), and bearing the seal of the appropriate recording official (County Clerk or Recorder of Deeds). • If the property is recorded on a plat map, a copy of the recorded plat, showing both the location of the property and the official record information (plat book, volume, and page number), and bearing the seal of the appropriate recording official. If the property is not recorded on a plat map, FEMA requires copies of the tax map or other suitable maps to help accurately locate the property. • A topographic map certified by a registered professional engineer or licensed land surveyor, or other information indicating existing ground elevations and the date of fill is required. FEMA’s determination to exclude a legally defined parcel of land or a structure from the area of special flood hazard is based upon a comparison of BFEs to the lowest ground elevation of the parcel or the lowest adjacent grade to the structure. If the lowest ground elevation of the entire, legally defined parcel of land or the lowest adjacent grade are at or above the BFEs, FEMA will issue a letter excluding the parcel and/or structure from the SFHA. • Written assurance by the participating community that they have complied with the appropriate minimum floodplain management requirements outlined in Section 60.3 of the NFIP Regulations. This includes the following requirements: – Existing residential structures built in the SFHA have their lowest floor elevation at or above the base flood. – The participating community has determined that the land and any existing or proposed structures to be removed from the SFHA are “reasonably safe from flooding” and that they have on file all supporting analyses and documentation used to make that determination.
Section 9.5
Revising Flood Studies and Maps
335
– The participating community has issued permits for all existing and proposed construction or other development. – All necessary permits have been received from those governmental agencies where approval is required by federal, state, or local law. • If the community cannot assure that it has complied with the appropriate minimum floodplain management requirements, the map revision request will be deferred until the community remedies all violations through coordination with FEMA. At that time, FEMA will process a revision to the SFHA using criteria within Section 65.5 of the NFIP. The community must maintain on file, and make available upon request by FEMA, all supporting analyses and documentation used in determining that the land or structures are “reasonably safe from flooding.” • Data to substantiate the BFE must be included. If FEMA completed a FIS, they will use these data to verify the BFEs. Otherwise, the community may submit data provided by an authoritative source, such as the U.S. Army Corps of Engineers, U.S. Geological Survey, Natural Resources Conservation Service, state and local water resource departments, or technical data prepared and certified by a registered professional engineer. If BFEs have not been previously established, FEMA may also request hydrologic and hydraulic calculations using a FEMA-accepted numerical model. • A revision of floodplain delineations based on fill must demonstrate that any such fill does not result in a floodway encroachment. Letter of Map Revision (LOMR). A Letter of Map Revision (LOMR) is an official FEMA letter revising an effective FIRM and/or FIS. Flood hazard zones, floodplain boundaries, floodway boundaries, and/or BFEs may be revised. The CEO of the community must make all requests for LOMRs to FEMA, since it is the community that must adopt any changes and revisions to the map. In the majority of cases, a LOMR request includes a hydrologic and/or hydraulic computer model to support the request. MT-2 forms must also be completed and submitted. LOMRs to Revise BFEs – The data that must be submitted to FEMA to support requests to revise BFEs are covered in Section 65.6 of the NFIP regulations. The general data requirements for a revision of BFE determinations are described below. • 65.6(a)(1). The requester must submit all data necessary for FEMA to review and evaluate the request. Supporting data generally include new hydrologic and/or hydraulic analyses and the delineation of new floodplain and floodways. Note: FEMA does not require or encourage the requester to perform new or revised hydrologic calculations in support of the request. • 65.6(a)(2). To avoid discontinuities between the flood data to be revised by the request and the effective flood data, the hydrologic and hydraulic analyses submitted by the requestor must ensure a logical transition between the revised flood elevations, floodplain boundaries, and floodways, and those areas not affected by the revision. Unless it would not be appropriate, the revised and unrevised base flood elevations must match within 0.5 ft (0.15 m) where such transitions occur. Many requesters argue that this “tie-in” of 0.5 ft (0.15 m) occurs well beyond the limits of their study and is not in the scope of their work. Although this may be true, FEMA still requires that the BFEs tie to
336
The U.S. National Flood Insurance Program
Chapter 9
the existing study and the floodplain and floodways have logical transitions when plotted on a map. • 65.6(a)(3). Revisions to effective maps and studies cannot be based on the effects of proposed projects or future conditions. Conditional Letters of Map Revision (CLOMR), discussed later in this chapter, cover conditional approval of proposed projects that may effect map changes when they are completed. • 65.6(a)(4). The datum and date of benchmarks, if any, to which the elevations are referenced, must be included. • 65.6(a)(5). Maps will not be revised when discharges change as a result of the use of an alternative methodology (or data for computing flood discharges), unless the change is statistically significant, as measured by a confidence limits analysis of the new discharge estimates. According to Guidelines and Specifications for Flood Hazard Mapping Partners (FEMA, 2002), a restudy of hydrologic analyses could be initiated for any of four reasons: • Longer periods of record or revisions in data • Changed physical conditions • Improved hydrologic methods • Correcting an error in the original FIS Examples of changed physical conditions are construction of hydraulic structures that have affected the effective FIS analyses or development within a watershed subsequent to the effective FIS analyses. Regardless of the reason for the restudy, the requester must provide detailed documentation of the changes addressed in the restudy and why discharges developed for the restudy are superior to the effective FIS. If the reason for the restudy is an improved method, the requester must provide documentation showing that the alternative method is superior to the original FIS and must obtain FEMA Regional Project Officer approval for the use of the improved method. • 65.6(a)(6). The computer model(s) used to support the request must be listed in “Numerical Models Accepted for Use in the NFIP,” which can be found on FEMA’s web site. • 65.6(a)(7), (8), and (9). Revised hydrologic and hydraulic analyses must include evaluation of the same recurrence intervals in the effective FIS. Flood studies typically include the 10-, 50-, 100-, and 500-year flood discharges. However, a hydrologic or hydraulic analysis for a flooding source without established base flood elevations may be performed for only the 100-year flood. The analysis should be made using the same hydraulic computer program used to develop the base flood elevations shown on the effective FIRM and updated to show present conditions in the floodplain. The requester may use a different program if the basis of the request is the use of an alternative hydraulic methodology or the requestor can demonstrate that the data used in the original hydraulic computer program are unavailable or inappropriate. Copies of the input and output data from the original and revised hydraulic analyses should be submitted. Note: There is an exception to this rule when HEC-RAS is to be used rather than HEC-2 for revisions or new studies. A memo from FEMA dated April 30, 2001 encourages the use of HEC-RAS over HEC-2, when appropriate (see “Using HEC-RAS in the NFIP” on page 338 for details and provisions).
Section 9.5
Revising Flood Studies and Maps
337
• 65.6(a)(10). A revision of floodplain delineations based solely on topographic changes must demonstrate that a floodway encroachment has not occurred. • 65.6(a)(11). Delineations of floodplain boundaries for a flooding source with established BFEs must provide both the 100- and 500-year floodplain boundaries. For flooding sources without established BFEs, only 100-year floodplain boundaries need be submitted. These boundaries should be shown on a topographic map of suitable scale and contour interval, but there are no specific guidelines on these. All requests are submitted to the appropriate FEMA Regional Office or to the FEMA Headquarters in Washington, D.C., accompanied by the appropriate payment, as listed in Part 72 of the Regulations. LOMRs for Floodway Revisions. Floodway revisions are covered in Section 65.7 of the NFIP Regulations. The following sections describe the procedures for floodway revisions that either include BFE changes or do not. Floodway revisions that include BFE changes. When a change to the floodway is requested in association with a change to the effective BFE, the information outlined in Section 65.6 must be submitted The following additional information is also required, summarized from Section 65.7(b) of the NFIP regulations. • 65.7(b)(1). Copy of a public notice distributed by the community stating the communityʹs intent to revise the floodway or a statement by the community that it has notified all affected property owners and affected adjacent jurisdictions. • 65.7(b)(2). Copy of a letter notifying the appropriate state agency of the floodway revision for those situations in which the state has jurisdiction over the floodway. • 65.7(b)(3). Documentation of the approval of the revised floodway by the appropriate state agency (for communities in which the state has jurisdiction over the floodway). • 65.7(b)(4). Engineering analysis for the revised floodway described as follows: – The floodway analysis must use the hydraulic computer model used to determine the proposed BFEs. – The floodway limits must be set so that neither the effective nor the proposed BFE (if less than the effective BFE) are increased by more than 1.0 ft (0.3 m), the amount specified under Section 60.3(d)(2). [As stated previously, some communities have a more stringent limit than 1.0 ft (0.3 m).] Copies of the input and output data from the original and modified computer models must be submitted. • 65.7(b)(5). Delineation of the revised floodway must be on the topographic map used for the delineation of the revised floodplain boundaries. Floodway Revisions without BFE changes. When a change to the floodway is requested without a change in the effective BFE, the criteria in Sections 65.7(b)(1), (2), and (3), as outlined above, must be followed, in addition to the following two criteria (from Section 65.7(c) of the NFIP regulations). • Engineering analysis for the revised floodway
338
The U.S. National Flood Insurance Program
Chapter 9
– 65.7(c)(2)(i). The original hydraulic computer model used to develop the effective BFEs must be modified to include all encroachments in the floodplain since the existing floodway was developed. If the original computer model is not available, an alternate hydraulic computer model may be used, provided the alternate model has been calibrated to reproduce the water surface profile from the original hydraulic program. The alternate model must then be modified to include all encroachments that have occurred since the existing floodway was developed. – 65.7(c)(2)(ii). The floodway analysis must be performed with the modified computer model using the desired floodway limits. – 65.7(c)(2)(iii). The floodway limits must be set so that the combined effects of past encroachments and the new floodway limits do not increase the effective BFEs by more than 1.0 ft (0.3 m). Again, some communities have a more stringent limit than 1.0 ft. Copies of the input and output data from the original and modified computer models must be submitted. • 65.7(c)(3). Delineation of the revised floodway on a copy of the effective NFIP map and on a suitable topographic map.
Using HEC-RAS in the NFIP On April 30, 2001, FEMA issued a memorandum that addresses the policy for use of HECRAS in lieu of HEC-2 for modeling flood hazards and performing flood mapping. The majority of existing Flood Insurance Studies used HEC-2 to calculate BFEs for flooding sources. Paragraph 65.6(a)(8) of the NFIP regulations states that a computer model used in support of a map revision must use the same computer model that was used in the original study. However, the exception is that HEC-RAS is preferred over HEC-2, since the U.S. Army Corps of Engineers (USACE) no longer supports HEC-2. The following guidelines should be met when using HEC-RAS under the new revised policy. New detailed Flood Insurance Studies: For FISs that are not already underway and for streams with no effective detailed study, FEMA encourages the use of HEC-RAS rather than HEC-2. Other models listed on the acceptable numerical models list may be used. Revisions to effective Flood Insurance Studies: For revisions or restudies, FEMA encourages conversion of the existing study from HEC-2 to
HEC-RAS. The procedures for such a model conversion are as follows: • The effective HEC-2 model should be rerun on the requester’s computer in HEC-RAS to create a duplicate effective model. Differences between the effective model (HEC-2) water surface elevations and the duplicated (HECRAS) water surface elevations should be documented and explained in the submittal. The HEC-RAS User’s Manual and Hydraulics Reference Manual, as well as Chapter 15 of this book, provide details on computational differences between the two models and guidance on simulating HEC-2 results. • When the duplicate effective model has been established, the corrected effective, existing, and post-project model may be created in HEC-RAS, using the duplicate effective as the base model. Section 9.7 further discusses these models. • The revised water surface elevations, developed in HEC-RAS, must agree with the effective water surface elevations at the limits of the study with an allowed variance of 0.5 ft (0.15 m), as stated in Subparagraph 65.6(a)(2) of the NFIP regulations.
Section 9.5
Revising Flood Studies and Maps
339
CLOMRs – Review of Proposed Projects NFIP maps are based on existing rather than proposed or future conditions. Flood insurance is a financial protection measure for real property owners and lending institutions must make their determinations based on actual conditions. However, as outlined in Section 65.8 of the NFIP Regulations, a community, or an individual working with the community, may request FEMA’s comments on whether a proposed project will justify a map revision. A Conditional Letter of Map Revision (CLOMR) provides documentation of FEMA’s formal review determining whether a proposed project meets the minimum NFIP floodplain management requirements and will justify a map revision. A CLOMR is not a building permit, although a CLOMR may often be required from the local planning office prior to obtaining a building permit. It is an official FEMA letter commenting on the effects of a proposed project that may or may not alter hydraulic and/or hydrologic flood characteristics. A common misconception is that a CLOMR is automatically required whenever there is proposed development within the floodplain. Individual communities have the authority to enforce more stringent policies, but FEMA only requires a CLOMR in two cases: • The proposed project is located in the floodplain where BFEs are established, but no floodways are designated, and the cumulative effect of the proposed project, when combined with all other existing and proposed development, will cause BFEs to increase by more than 1.0 ft.
340
The U.S. National Flood Insurance Program
Chapter 9
• Any development that is totally or partially in a floodway and that would result in any increase in the BFE. In Zone A areas, it is FEMA’s policy that proposed projects that will cause increases in the BFE greater than 1.0 ft (0.3 m) receive a CLOMR prior to construction and meet the same data requirements as the two cases listed above. The increase is determined by comparing the pre-project (existing conditions) profiles to the post-project (proposed conditions) profiles. The technical data required to support a CLOMR request generally involves detailed hydrologic and hydraulic analyses and are very similar to the data needed for a LOMR request, with the addition of the following data requirements, as listed in Section 65.12 of the NFIP Regulations: • A formal request and appropriate fees. • An evaluation of alternatives that would not cause a base flood elevation increase above that permitted (see cases when a CLOMR is required above), and an explanation of why these alternatives are not feasible. It is the authorʹs experience that prohibitive cost is generally not an acceptable reason for an alternative that causes no increase in BFEs to be eliminated. • Documentation of individual legal notice to all affected property owners within and outside of the community, explaining the effect of the proposed action on their property. • Concurrence of the CEO of any other communities affected by the proposed actions. • Certification that no structures are located in areas that would be affected by the increased base flood elevation. Upon receipt of FEMA’s conditional approval of map change and before approving the proposed encroachments, a community must provide evidence to FEMA of the adoption of floodplain management ordinances incorporating the increased BFEs and/or revised floodway reflecting the postproject condition. When the project is completed, as-built certifications must be submitted to FEMA to initiate a final map revision (LOMR based on an as-built CLOMR). Table 9.2 provides some answers to the question, “When is a CLOMR needed?” Table 9.2 CLOMR requirements. Project Location
Flood Zone(s)
CLOMR Is Required If
Floodway
A1–A30 or AE
Project results in an increase (0.01 ft or more) in the 1% annual chance WSEL at any point along the watercourse.
Floodway fringe
A1–A30 or AE
Not required.
Project results in an increase of 1.01 ft or more in 1% annual chance floodplain A1–A30, AE, AO, or AH the 1% annual chance WSEL at any point along with no floodway designated the watercourse.a 1% annual chance floodplain
A
BFE must first be determined if project results in an increase of 1.01 ft or more in the 1% annual chance WSEL at any point along watercourse.a
a. As shown in Table 9.1, some states have stricter increase allowances.
Project Built without CLOMR. If a project is built without a CLOMR when the proposed effects will be greater than those permitted under FEMA’s regulations, the
Section 9.6
Revision Submittal Steps
341
FEMA Regional office will become involved in determining whether a violation has occurred. Possible disciplinary actions may include mitigation of the increase, return of the floodplain and floodway to previous conditions, or possible probation/suspension from NFIP. Physical Map Revision (PMR). A Physical Map Revision (PMR) is an official republication of a community’s NFIP map, incorporating changes to BFEs, floodplains, floodways, and/or flood elevations. A PMR is similar to a LOMR, but a LOMR is a quicker revision than a PMR. The PMR revision is typically more extensive than a LOMR, taking up to two years to become effective. In addition, a LOMR is a more cost-effective means for FEMA and communities to revise a FIRM; FEMA uses the LOMR process as much as possible.
9.6
Revision Submittal Steps This section contains an outline of the steps required when submitting a request to FEMA for a LOMR and/or CLOMR. Regular communication with the local floodplain administrator is important throughout this process. FEMA has given local communities the authority to enforce more stringent guidelines if they so choose.
Step 1 – Obtain FIS, FIRMs, and Backup Data The FIRMS for a community are available for review at local Community Map Repository sites as previously described. These are typically local planning, zoning, or engineering offices. Requests for printed copies of effective FIRMs and FIS reports can be submitted to FEMA’s Map Service Center (http://www.msc.fema.gov). In addition, maps were scanned and are available in digital format for viewing at the Map Service Center web site. Backup data, such as the hydrologic and hydraulic models used to develop the current FIS and FIRMs, are available for a fee from FEMA’s Mapping Coordination Contractors (MCC). All requests for FIS data must be made in writing (or fax) to the appropriate MCC, listed in Table 9.3, depending on the region of interest (see Figure 9.8). Contact the appropriate MCC for a copy of the request form. Table 9.3 Mapping Coordination Contractor contact information Regions I-IV (Eastern States)
Regions V-VII (Central States) Regions VIII-X (Western States)
Flood Map Specialist Flood Insurance Specialist c/o Michael Baker, Jr., Inc. c/o PBS&J 3601 Eisenhower Avenue, Suite 600 12101 Indian Creek Ct Alexandria, VA 22304 Beltsville, MD 20705 FAX: (703) 960-9125 FAX: (301) 210-5435
Flood Insurance Specialist c/o Dewberry & Davis 2977 Prosperity Avenue Fairfax, VA 22031 FAX: (703) 876-0073
Step 2 – Revise Hydraulic Models The number of models submitted for a revision request depends on the quality of the backup data received, the request, and whether there is a proposed project involved that will cause encroachments. There are four possible models that may be submitted:
342
The U.S. National Flood Insurance Program
Chapter 9
FEMA
Figure 9.8 FEMA regions (for FIS data requests).
• Duplicate Effective Model – The Duplicate Effective model is developed when the effective multiple discharge (10-, 50-, 100-, and 500-year) and the floodway models obtained from the MCC are rerun on the submitterʹs computer. These results establish a base-line model. There may be instances when the duplicate effective model is slightly different from the effective model, such as when the requester is using HEC-RAS rather than HEC-2. If the original effective models are unavailable, the requester must generate models that duplicate the FIS profiles and the elevations shown in the Floodway Data Table in the FIS report to within 0.1 ft (0.03 m). No changes should be made to the Duplicate Effective model. • Corrected Effective Model – The Corrected Effective model corrects any errors that occur in the Duplicate Effective model, adds additional cross sections to the Duplicate Effective model, or incorporates more detailed topographic information than was used in the Duplicate Effective model. This model should not incorporate man-made changes that were made since the date of the Effective model. • Existing or Preproject Conditions Model – The Duplicate Effective or Corrected Effective model (depending on whether a Corrected Effective model was created) is modified to reflect any modifications that have occurred within the floodplain since the date of the Effective model, but before the construction of the project for which the revision is being requested. This output constitutes the Existing Conditions model. If no modification has occurred since the date of the Effective model, then this model is identical to the Corrected Effective or Duplicate Effective model. • Revised or Postproject Conditions Model – The Existing or Preproject model (or Duplicate Effective or Corrected Effective, as appropriate) is revised to reflect proposed or postproject conditions. This model must incorporate any
Section 9.6
Revision Submittal Steps
343
physical changes to the floodplain since the effective model was produced, as well as the effects of the project. When the request is for a proposed project, this model must reflect proposed conditions (that is, a CLOMR request). To avoid discontinuities between the revised flood data and the unrevised (effective) flood data, the requester must ensure that there is a logical transition between the revised flood elevations, floodplain boundaries, and floodways and those developed previously for areas not affected by the revision. Unless it is demonstrated that it would not be appropriate, the revised and unrevised base flood elevations must match within 0.5 ft (0.15 m) where such transitions occur (such as upstream limits of the project). Therefore, it will often be necessary to extend the modeling well upstream of the project limits to accomplish this transition.
Step 3 – Annotation of FIRMs, FIS, and Topographic Map An annotated FIRM panel at the scale of the effective FIRM should be included in the submittal package, showing the revised 100- and 500-year floodplain and floodway boundaries. If the Floodway Data Table changes as a result of this request, a copy of the table showing revised data for each cross section listed in the published Floodway Data Table in the FIS report should also be submitted. In addition, a certified topographic work map, showing all items that apply, such as revised floodplain/floodway boundaries and cross sections within the hydraulic models, must be submitted.
Step 4 – Fill Out MT-2 Forms MT-2 application/certification forms must be filled out, signed by a professional engineer and the CEO of the community, and submitted along with the other required data. MT-2 application/certification packages can be downloaded at FEMA’s web site. Current fees associated with map revisions can also be accessed on FEMAʹs web site.
Step 5 – Submit to FEMA Completed application/certification forms should be packaged with the appropriate enclosure following each form. A notebook style format is recommended, with the information as concise and detailed as possible. Since the reviewer will have no information about the project other than what is included in the submittal, the reviewer should not have to search around for missing information. The complete package is submitted to the appropriate FEMA Regional Office for forwarding to the appropriate MCC. A few submittal tips based on common mistakes are • Completely fill out MT-2 forms. • Make sure the MT-2 forms are signed by the CEO of the community. • Include hydrological and hydraulic simulation data sets on diskette or CDROM. • Address all comments found from CHECK-2 or CHECK-RAS (discussed in Section 9.7). • Make sure to include payment with the forms. FEMA will not begin their review until payment is received.
344
The U.S. National Flood Insurance Program
Chapter 9
Step 6 – Wait for a Response Under Section 72.4 of the NFIP Regulations, for CLOMR, LOMR, and PMR requests, FEMA is required to • Notify the requester and community within 60 days as to the adequacy of the submittal. • Provide the requester and the community with a LOMR, CLOMR, or other written comment within 90 days of receipt of the adequate information and fee.
Step 7 – Receive Letter or Request for Additional Data For CLOMR, LOMR, and PMR requests, FEMA must provide the requester and the community with a LOMR, CLOMR, or other written comment within 90 days of the receipt of the adequate information and fee. However, this process can often take much longer if data are not initially submitted or the revision requests are complex.
Example 9.1 Is a CLOMR needed? A developer has proposed building a new bridge across Atlee Creek that will have support structures located within the floodway. Atlee Farms forms the property boundary between the proposed site and the adjacent property owned by Mr. Green. On the effective FIRM, Atlee Creek is studied in detail and includes an adopted floodway. The developer is not sure if he needs to request a CLOMR before construction of the bridge can begin. He hires an engineer to study the projectʹs effects and to determine whether he needs to submit a CLOMR request. First, the effective model was obtained from FEMA’s MCC and rerun on the engineerʹs computer to create the duplicate effective model. Next, the existing conditions model was created by adding supplemental cross sections to better represent the project area and those cross sections necessary for bridge modeling (see Chapter 6 for more guidance). Finally, the bridge structure itself was added to create the proposed condition’s model. The following table lists the results of each model. 1. Does the developer need a CLOMR? 2. Does he have to notify Mr. Green about the changes in flood hazards that will occur, and does he have to do this before construction will be permitted? Water Surface Elevations, ft River Station
Effective
Existing
2000
321.30
321.30
Proposed 321.30
2200
—
321.80
321.75
2300
321.85
322.10
321.90
2400
—
322.25
322.50
2600
—
322.40
322.60
2700
—
322.50
322.65
2900
322.75
322.75
322.70
3000
322.80
322.80
322.80
Solution 1. Yes, the developer will need a CLOMR, since there will be increases in the BFE caused by the project at river stations 2400, 2600, and 2700. In the case of the proposed project,
Section 9.7
FEMA Review Software
345
the results of the postproject or proposed conditions model should be compared to the existing conditions model, not the effective model. The existing conditions model is used to incorporate any changes that have occurred but that are not reflected in the effective model. The effective BFEs and existing conditions BFEs will often be different, as in this example. Note: Had the proposed model BFEs turned out to be less than the existing model BFEs, the developer would not need a CLOMR. He could first obtain a LOMR to officially modify the BFEs, based solely on existing conditions. 2. According to Section 65.12 of the NFIP regulations, Mr. Green must be notified about the changes before construction. A copy of the notification should be included in the CLOMR request to FEMA.
9.7
FEMA Review Software FEMA has developed two software applications, CHECK-2 (FEMA, 1996) and CHECK-RAS (FEMA, 2000), to check the input and output of HEC-2 and HEC-RAS, respectively. Both of these applications are free and available for download at from FEMA’s web site. The modeler is strongly encouraged to run either CHECK-2 or CHECK-RAS, as appropriate, prior to submitting a revision request to FEMA. All comments and warnings generated by these checking programs should be addressed in the hydraulic model itself or an explanation should be provided in the written submittal.
CHECK-2 CHECK-2 is an automated HEC-2 review program and is extremely helpful for engineers revising flood studies that were created with HEC-2. Since USACE is no longer developing or supporting HEC-2, new studies will not be created using HEC-2; however, HEC-2 can be used to revise an effective study that is already in HEC-2. CHECK2 provides the following: • Detailed inspections of floodway runs. • Comparisons of important parameters among multiple profile runs. • Proposed solutions through use of the Help menu. • The ability to start, debug, and save a HEC-2 model.
CHECK-RAS CHECK-RAS checks the reasonableness of data from HEC-RAS files by verifying that hydraulic estimates and assumptions in the model appear to be justified, that data are in accordance with applicable FEMA requirements, and that data are compatible with the assumptions and limitations of the HEC-RAS program. The modeler will often find previously overlooked errors within the HEC-RAS model. Although HEC-RAS provides several warning messages, CHECK-RAS provides the following additional checks: • Categorizing floodplain modeling into five distinct areas for checking – roughness and transition loss coefficients, cross sections, structures, floodways, and profiles.
346
The U.S. National Flood Insurance Program
Chapter 9
• Providing a summary table and messages for each these areas. • Assessing the appropriateness of roughness coefficients and transition loss coefficients. • Assessing the suitability of starting water surface elevations. • Assessing bridge and culvert modeling techniques. • Assessing the results of the floodway analysis. • Comparing important parameters among multiple profiles. • Proposing solutions through the Help screens.
9.8
Chapter Summary Through the National Flood Insurance Program, FEMA maintains and updates Flood Insurance Rate Maps and Studies intended for use by communities participating in the program and individuals for flood insurance purposes. Because many of the maps are outdated, they will often not reflect existing conditions. In addition, many of the maps are at such a small scale that properties above the base flood elevation may be erroneously shown within the floodplain on the maps. Therefore, FEMA allows changes to the maps and studies through Letters of Map Change (LOMCs). These LOMCs can be an amendment to the map or an engineering revision approved by a formal letter. A Letter of Map Amendment is issued for properties that have been incorrectly included in the 100-year floodplain. For changes reflecting existing conditions, a Letter of Map Revision may be issued. When a proposed project will affect the flood insurance maps and/or studies, a Conditional Letter of Map Revision may be issued. These types of revisions generally require a detailed hydrologic and/or hydraulic analysis to determine the changes to the base flood elevation and the extent of flooding. FEMA’s regulations for floodplain management are the minimum requirements; a community may have more stringent regulations. Therefore, the reader should consult with the local floodplain administrator or FEMA regional office before beginning a revision request.
CHAPTER
10 Floodway Modeling
The floodway, as defined by FEMA, is “…the channel of a river or other watercourse and the adjacent land areas that must be reserved in order to discharge the base flood without cumulatively increasing the water surface elevation by more than a designated height.” The base flood for flood insurance studies is the 1-percent annual chance flood (100-year flood), and the designated height is usually termed surcharge. FEMA allows a surcharge value of 1.00 foot (0.305 m). Some U.S. states have more stringent surcharge values, as discussed in Chapter 9. The floodway provides land use planning information to a community to assist in floodplain management and to regulate development in floodprone land use areas. Left and right encroachment stations are developed as part of a floodway study and may be thought of as the floodway boundary locations at each cross section in the hydraulic model. A designated floodway allows areas outside of the encroachment stations to be used for construction, placement of fill, a levee, or any similar alteration of the topography that removes conveyance from the floodplain if a community chooses to do so but limits the future increases of flood hazards to no more than the surcharge value. HEC-2 and HEC-RAS are two of the programs that enable easy computation of a community floodway. Although determining a floodway may be straightforward, the final floodway must be fair to landowners on both sides of the channel and meet the future needs of the community as much as practical. This chapter describes the various concepts and terms associated with floodway development, presents the technical studies required to compute a floodway, and offers guidance on finalizing a new floodway as well as working with an existing floodway. The floodway analysis discussed in this chapter follows the procedures outlined in Guidelines and Specifications for Flood Hazard Mapping Partners, Appendix C (FEMA, 2002).
350
Floodway Modeling
10.1
Chapter 10
Methods of Performing an Encroachment Analysis Five methods for computing left and right encroachment stations to develop a floodway are available within HEC-RAS, and all result in a floodway width less than or equal to the unencroached cross section of the 100-year floodplain. With less crosssectional area available for the same 100-year discharge, water surface elevations for the floodway profile will be greater than the unencroached 100-year flood profile. A floodway therefore requires careful analysis to develop a fair floodway width that does not cause significant increases to flood levels, and that is equitable to landowners and political entities on either side of the stream. When modifying or starting a FEMA study, the modeler must compute accurate and reasonable profiles for at least the 100-year event, and often the 10-, 50-, and 500-year events, before initiating the floodway analysis. The 100-year profile is especially important because it is the basis for creating the floodway limits. It is important that the modeler carefully review this base flood using the guidance given in earlier chapters. Careful modeling of contraction and expansion through obstructions is critical, with gradual transitions in conveyance occurring from section to section. If a sound, 100-year profile is lacking, the floodway computations are often erratic, and undulating floodway widths result, a situation unacceptable to reviewers. The five encroachment methods available in HEC-RAS are • Method 1 – specify left and right encroachment stations; • Method 2 – specify floodway width; • Method 3 – specify percent conveyance reduction;
Section 10.1
Methods of Performing an Encroachment Analysis
351
• Method 4 – specify target surcharge to reduce conveyance equally; and • Method 5 – specify target surcharges for water surface and maximum change in energy. To develop the floodway, a 100-year floodway profile is created by duplicating the base flood discharges in the Steady Flow Data editor of HEC-RAS and specifying an encroachment method. As is discussed in detail in the proceeding sections, developing a floodway is an iterative procedure, and multiple floodway runs will most likely be required. Comparisons between the base flood elevation and the elevations of each floodway run must be made, in addition to other key variables such as conveyance, top width, and velocity.
Method 1: Specify Encroachment Stations Engineers often use Method 1 as the final procedure in a series of floodway computations. Method 1 specifies the exact location of the encroachment stations on either side of the channel so that the modeler can make small adjustments to individual cross sections, better defining the floodway. Figure 10.1 shows a cross section developed using Method 1 encroachments. For Method 1, as well as the other four methods, the computations for the floodway use only the cross-section geometry within the floodway. The “vertical walls” that bound either side of the floodway would be part of the wetted perimeter computations.
Figure 10.1 Method 1 – Specifying encroachment stations.
Method 2: Specify Floodway Top Width Method 2 sets a specific floodway top width for use in the computations. Method 2 can be used for a study where the community wants to set equal widths from the stream centerline to establish a floodway. The specified floodway width is centered on the stream centerline and the width may be varied at every cross section. A relatively
352
Floodway Modeling
Chapter 10
constant top width for a reach of river is desired, as long as the river has a reasonably uniform floodplain cross section. Figure 10.2 shows a cross section using a Method 2 encroachment. For Method 2, the top width is used as the floodway width and computations proceed accordingly, using the cross section geometry within the width specified. The reduced conveyance of the unencroached profile for the specified top width results in an increase in the water surface elevation for the encroached profile.
Figure 10.2 Method 2 – Specifying floodway top width.
Method 3: Specify Percent Conveyance Reduction Method 3 specifies a percent reduction in conveyance, one-half of which is applied to each side of the cross section. Figure 10.3 shows a cross section using a Method 3 encroachment. For Method 3, the program computes the total conveyance for the unencroached profile of the 100-year flood at each cross section and multiplies it by the percent reduction in conveyance specified by the modeler. One-half of the reduction in conveyance is subtracted from both the left and right of the unencroached 100year floodplain to determine the location of the encroachment stations. If one side of the cross section has less conveyance than the amount intended to be subtracted from it, the program will remove the balance of the conveyance from the opposite floodplain. If the conveyance to be removed exceeds the conveyance in both overbanks, the program sets the encroachment stations equal to the bank or offset stations. The program will not allow an encroachment to be located within the channel (inside the indicated bank stations). For Methods 3 through 5, the default solution is an equal loss of conveyance from each side of the section. If the default is turned off (refer to “Global Options” on page 356), the solution changes to a loss of conveyance proportional to the existing conveyance on either side of the channel. For example, if a cross section has twice as much conveyance in the left overbank as compared to the right overbank, two-thirds of the conveyance is removed from the left overbank area and one third from the right overbank area.
Section 10.1
Methods of Performing an Encroachment Analysis
353
Figure 10.3 Method 3 – Specify percent conveyance reduction (no target surcharge).
Method 4: Specify Target Surcharge with Equal Conveyance Reduction This method is similar to Method 3 except that a target increase in water surface elevation above the 100-year unencroached water surface elevation is specified. Using Method 4, a target increase [HEC-RAS defaults to 1 ft (0.3 m)] is specified by the modeler. The model then computes the conveyance at each cross section for the base flood (100-year) elevation (BFE) and for the BFE plus the target increase. One-half of the difference in conveyance between these two values is then removed from either side of the cross-section conveyance for the BFE plus target increase, such that the cross section conveyance within the floodway is equal to the conveyance of the cross section without the floodway. Additional computations are made at each cross section to estimate the location of the left and right encroachment stations, which maintain the preencroachment conveyance. The calculated elevation increase after running HEC-RAS is usually near the target, but a variation greater or less than the desired target increase is common. This method is most commonly used to develop the initial floodway for flood insurance studies. Multiple profiles using different target increases are made, evaluated, adjusted, and rerun with modified targets. This procedure is further discussed in Section 10.3. Final floodways are often developed by converting the results from Method 4 to input for a Method 1 analysis to further refine and modify encroachment station locations for selected individual cross sections. Figure 10.4 shows a cross section using a Method 4 encroachment.
354
Floodway Modeling
Chapter 10
Figure 10.4 Method 4 – Specify target surcharge with equal conveyance.
Method 5: Optimization with Two Targets Method 5 builds on Method 4 by adding a second target for allowable increase in the energy grade line elevation. This method includes an optimization algorithm that attempts to meet the water surface elevation target without exceeding the energy target. Up to 20 iterations per cross section can be used to satisfy the two targets. Only the energy grade line target will be met if both targets cannot be achieved. This method is often used for developing an initial floodway in lieu of Method 4 when the modeler is concerned about significant increases in velocity for a floodway. On those rare occasions when a supercritical flow regime exists and a floodway is to be determined, Method 5 should be used with an appropriate target for only the energy grade line change. Method 5 gives reasonable results when the stream reach under analysis for a floodway does not have large changes in cross-section geometry and where bridges and other obstructions cause small losses of energy. Although Method 5 produces an optimized floodway, it may not produce a floodway narrower than Method 4. It is suggested that the modeler also run Method 4 to compare the floodway widths. Figure 10.5 shows a cross section using a Method 5 encroachment.
10.2
Developing a Floodway in HEC-RAS The modeler develops a floodway by following a prescribed set of recommendations, as described in the following sections. These steps include the development of the base flood elevations when no floodway is present, performing multiple profile runs for varying floodways using Methods 4 or 5, modifying the floodway methods and/or target increases for portions of the reach, and finalizing a floodway, usually through Method 1.
Section 10.2
Developing a Floodway in HEC-RAS
355
Figure 10.5 Method 5 – Specify optimization with two targets.
Establishing Base Conditions For a flood insurance study, the floodway is typically the last technical hydraulic analysis performed. The work described in previous chapters is completed to provide the modeler with a reasonable and representative natural (unencroached) 100-year average recurrence interval flood profile. As part of the modeling efforts performed to this point, transitions between cross sections must be smooth, bridges must be modeled properly with correct ineffective flow area constraints included, gradual conveyance/ top width changes should occur between sections, and proper n values must be specified in the geometric file.
Creating a Steady Flow Data File Developing a floodway typically begins with specifying the flow data for the floodway profile(s) in the Steady Flow Data Editor. All floodway profiles will use the same discharges as the 100-year base flood. When performing a floodway analysis, the first profile in the Steady Flow Data is used as the base and should always be the 100-year event; HEC-RAS allows encroachment options to be applied only to the second and above profiles. Often times, the modeler will want to create more than one floodway run at a time. For example, there may be a total of four profiles if the modeler wishes to use Method 4 with target increases of (say) 0.6, 0.8, and 1.0 ft, as shown in Figure 10.6. Additional or fewer profiles may be used at the discretion of the modeler.
Downstream Boundary Conditions For floodway runs, the starting water surface elevation of the floodway profile should be equivalent to the starting water surface elevation from the unencroached profile plus the target increase. The only exceptions to this would be a study stream empty-
356
Floodway Modeling
Chapter 10
Figure 10.6 Steady Flow Data Editor in HEC-RAS for floodway profiles.
ing into an estuary or the ocean, or passing over a waterfall, in which the high water of the tidal elevation or the critical depth, respectively, should be used instead. Within the Steady Flow Data Editor, the modeler can choose to start the floodway profile using a set of known water surface elevations (which is the 100-year unencroached profile run plus the target surcharge value) or use the normal depth option. The same discharges as the 100-year base event should be used either way. With Method 4, using the normal depth as the starting condition for the floodway profile, with the same energy slope for all profiles specified, may be more appropriate than using the known 100-year water surface elevation plus the target surcharge. With this method, HEC-RAS will first compute the encroachment stations based on the target surcharge values specified in the encroachment window, as illustrated in Figure 10.7. The program then uses the normal depth method to find the starting water surface elevation for the floodway profile. The results may or may not be equal to the BFE plus the target surcharge value since this is an equal conveyance method. Using the unencroached water surface elevation plus the target surcharge as the starting water surface elevation may cause arbitrarily high starting water surface elevations for the floodway profiles, especially when the 100-year flood is contained within the channel.
Global Options Within the Encroachment Data Editor, the modeler accepts or declines the equal conveyance reduction option and specifies any offsets to be used. Specifying an offset tells the program not to allow the floodway to be closer than the distance specified from the channel bank stations. Offsets prevent an encroachment right up to the channel bank and preserve a buffer between the end of encroachment and the bank station. For the example in Figure 10.7, the default equal conveyance reduction option and a 25 ft (8 m) offset from each bank have been selected. HEC-RAS does not allow the modeler to encroach into the channel. If no offset is specified, the channel bank station will be used as the maximum encroachment.
Section 10.2
Developing a Floodway in HEC-RAS
357
Figure 10.7 The Encroachment Data Editor for defining the floodway.
Reach Options The modeler specifies the river and the reach (Dardenne Creek and Reach-1 in the example of Figure 10.7) on which to perform the encroachment calculations and selects the profile number applicable for the encroachment data entered. The range of river stations (14.255-17.132) for which a floodway will be computed is selected and the method (4) and target water surface change (1 ft) are entered. If more than one floodway profile is to be computed, similar information is entered on separate encroachment templates for each of the different encroachment profiles (varying the method and/or the target) being analyzed.
River Station Options When the same target and method are to apply between a range of river stations, the modeler selects the range of stations using the Upstream RS and Downstream RS fields. Next, the modeler should choose the Set Selected Range button to transfer the method and target water surface value to the selected river stations, which will then be displayed in the table in the Editor. In the example shown in Figure 10.7, Method 4 and the 1 ft water surface target have been transferred to each of the river stations. The modeler can then go into the table and make selected changes to the target surcharge values, section by section, if needed. Figure 10.7 shows all the values for clarity. When multiple floodways are to be analyzed, the modeler selects the downward pointing arrowhead next to the Profile field, selects the next floodway profile to be studied, and enters a modified set of data for this profile. This process is repeated for each separate floodway to be analyzed. For the initial floodway analysis, the base flood and three to five additional floodway runs are typically made, all using the same discharge for the base flood.
358
Floodway Modeling
Chapter 10
Computing the Floodway Plan After the encroachment data are entered for each of the floodway profiles, the user should create a new plan within the Steady Flow Analysis editor. The steady flow file that was created with the floodway profiles is specified in this editor and the plan is then computed.
10.3
Reviewing the Results The modeler examines the output from the floodway plan for each of the floodway profiles computed for target elevation increases, and changes in velocity, top width, and conveyance. It is not uncommon for the modeler to find, for example, that a specified target of 0.8 ft (0.25 m) produces an elevation increase close to 1.0 ft (0.3 m) for a specific river station, and a target of 1.0 ft (0.3 m) produces an elevation difference closer to the 1.0 ft (0.3 m) goal for the next river station. Specified targets greater than 1.0 ft (0.3 m) may also produce elevations at or below the goal, depending on crosssection topography. The discrepancy between BFE and floodway elevations compared to the target surcharge is possible for several reasons: • HEC-RAS uses a three-point quadratic curve (conveyance versus distance) to find the left encroachment station. The three points are the first cross section station, the left channel station, and an interpolated third point about one-half of the distance between these two locations. The encroachment station is then estimated based on the second-order equation found using these three points. The process is repeated for the right encroachment station (right channel station, last point in the cross section, and one interpolated point between the two). Consequently, the actual conveyance found from the calculated curve may not be equal to the desired conveyance due to inaccuracies in using a three-point, second-order curve fit. • During a floodway analysis, water surface elevations are computed by using the energy equation, the geometry associated with the encroached section, and the conveyance of the previous cross section. On the other hand, the conveyance computations to estimate encroachment stations are based solely on the single cross section under analysis. Therefore, even though the conveyance of the encroached cross section is equal to the conveyance of the unencroached cross section, there is no guarantee that the computed, encroached cross section water surface elevation will be equal to the specified target elevation increase since the energy gradient elevation and the conveyance from previous cross sections are not considered in the estimate of encroachment stations. • As mentioned previously, HEC-RAS will not encroach into the main channel to obtain the conveyance needed to achieve the target increase for Methods 3, 4, and 5. In some cases, the encroachment stations will be set equal to both the left and right bank stations. Obviously, in these circumstances the water surface elevation will not be equal to the target water surface elevation. The output from the run in Figures 10.6 and 10.7 is reviewed using HEC-RAS Standard Tables for Encroachments as well as the graphical tools. Within HEC-RAS, three encroachment tables are available for output analysis. Figure 10.8 illustrates Encroachment Table 1 for a floodway run. Note how the actual differences in depth
Section 10.3
Reviewing the Results
359
Figure 10.8 Encroachment table 1.
vary (column labeled “Prof Delta WS”) about the targets specified (0.6, 0.8, and 1.0 ft) for each of the three encroachment runs.
Additional Runs/Methods Following the review of the output described in the preceding section, the modeler begins to combine the results of the various runs into one or more additional floodway profile computations. Figure 10.8 illustrates the output from running four profiles: one for the unencroached base flood (100-yr base), and three encroached profiles with target increases of 0.6, 0.8, and 1.0 ft. Review of the various encroachment profiles presented in Figure 10.8 demonstrates that although the modeler may specify a target increase, the actual computed increase (“Prof Delta WS” column) may be less than or greater than this specified value. Cross section 14.729 is an example where the calculated surcharge is less than the target. From the figure it can also be seen that an increase in the target surcharge value will decrease the floodway width (“Top Wdth Act” column) and therefore increase the floodplain fringe areas. A larger floodplain fringe area may be undesirable because the available floodplain storage may be reduced with future development. The modeler may want to mix different targets at varying cross sections with Method 4 or 5 in one run over the study stream. The modeler should pay close attention to flow through bridges and culverts. Since structures generally reduce the available flow area, it may be necessary to initially adjust the target increase through the six cross sections used to model a bridge or culvert to obtain acceptable floodway water surface elevations through these structures. Obtaining a reasonably smooth floodway
360
Floodway Modeling
Chapter 10
through a bridge crossing may take several modifications and program iterations to achieve. A very useful tool for floodway visualization is the 3D plot feature within HEC-RAS, as illustrated in Figure 10.9. Reaches with severely undulating floodway top widths or abrupt top width changes along the reach length or at bridges can be easily seen on the plot shown in Figure 10.9. Zooming in on a few problem sections or modifying the plot to show only a problem reach allows inspection of the computed floodway and quick identification of problems. The modeler should keep in mind that the 3D plot is only an indication of the correctness of the floodway. The floodway cannot be finalized until it is prepared on the final work map and closely reviewed. This sequence is discussed in Section 10.5.
Figure 10.9 Using the 3D plot feature in HEC-RAS to evaluate the floodway.
Finalizing the Floodway with Method 1 Modelers generally use Method 1 to set the final floodway limits, regardless of the methods used previously. Finalizing the floodway with Method 1 has two obvious advantages: • Actual encroachment stations at selected cross sections can be easily increased or decreased a specific amount by the modeler. • HEC-RAS can automatically convert the encroachment stations determined by Methods 2 through 5 into a Method 1 file, which “locks in” the encroachment stations and allows for final adjustment by the modeler.
Section 10.3
Reviewing the Results
361
Prior to switching to Method 1, the modeler should have a floodway that is considered close to final. After the conversion is made, the modeler can adjust the encroachment stations at selected cross sections to enhance the appearance of the floodway, possibly at the expense of moving further away from the target elevation. The user should be careful not to place the encroachment stations within the channels or outside the 100-year floodplain when using Method 1 to adjust the floodway. Method 1 is often applied through bridge transitions to improve the floodway width changes while meeting the required target elevation change.
Guidance for Correcting Excessive or Negative Surcharge FEMA guidance (FEMA, 2002) indicates that an adequate floodway may be developed with elevation increases from 0.000–1.000 ft (0–0.305 m) in the absence of stricter standards. Negative increases are possible in the floodway computations due to constrictions that greatly increase the velocity, but negative surcharges are not allowable in the final floodway. Similarly, an elevation increase of even 0.001 ft (0.0003 m) above the legislated increase is unacceptable. The following subsections explain the conditions that can cause the surcharge value to be negative or greater than the allowable value and provides possible solutions to the problems. Negative Surcharge Values. Widening narrow floodways, correcting bridge modeling, narrowing wide non-optimized floodways, and inserting additional cross sections may eliminate negative surcharge values. If a negative surcharge occurs at a cross section, check the energy grade line elevation for the unencroached profile and floodway profile. If the energy grade line for the floodway profile is higher than the unencroached profile, the following conditions may create negative surcharge values: • The floodway is too narrow compared to the natural top width. A narrow floodway relates to a smaller area and higher velocity head, which, when subtracted from the energy grade elevation, can give a WSEL lower than the unencroached WSEL. The floodway should be widened in this case. • There are errors in the bridge modeling. Refer to Chapter 6 to investigate probable errors in bridge modeling. • The method of bridge modeling between the natural profile and floodway profile are different. For example, energy method is used for the natural profile, while a pressure/weir method is used for the floodway profile. If the energy grade line for the floodway profile is equal to or lower than the natural profile, the following conditions may create negative surcharge values: • The floodway is nearly as wide as the natural top width at the cross section downstream of the cross section with the negative surcharge value. Try narrowing the nonoptimized floodway at the downstream cross section. • HEC-RAS computes the WSELs based on the gradually varied flow assumption. Additional cross sections may be needed if one of the following conditions exist: the velocity head difference between the two cross sections is more than 0.5 foot; the conveyance ratio is less than 0.7 or more than 1.4; the depth ratio is less than 0.9 or more than 1.1; the top width ratio is less than 0.5 or more than 2.0; the distance between the two cross sections is more than 500 feet; and/or the discharge from one overbank area shifted to the other overbank area between the two cross sections.
362
Floodway Modeling
Chapter 10
• The channel bank stations are not located at the natural banks beyond which relatively flat overbank exists. Excessive Surcharge Values. The following paragraphs describe the conditions that can cause surcharge values to be greater than the allowable value, and offer possible solutions to lower the value(s): • The difference in the energy grade line elevation between the floodway profile and the natural profile at the cross section downstream of the first section with an excess surcharge is more than the allowable surcharge value. This normally happens at a section with a floodway that is too narrow or at a cross section with critical depth. The floodway at the section downstream of the one with excess surcharge (or at critical depth) should be widened. The floodway can be widened by reducing the surcharge target value with Method 4 or by manually adjusting the encroachment stations with Method 1. For a critical depth cross section, encroachment Method 1 can only be used to widen the floodway width. • The modeler did not specify an encroachment method at all cross sections. • The encroachment stations are set in such a way that the effective weir length at structures is too narrow. The effective weir length should be widened by reducing the target surcharge value at section 2 if encroachment Method 4 is used. The encroachment stations at the structure section and section 3 should be redefined to widen the effective weir length if encroachment Method 1 is used. The floodway width at section 3 should be at least equal to the floodway width at section 2. Also note that a wider floodway width may need to be defined at the structure section and section 3 when compared to the floodway width at section 2 by using Method 1 to eliminate excess surcharge value. • The conveyance of the floodway profile is less than the conveyance of the unencroached profile at the cross section with excessive surcharge or at a downstream cross section. This can cause the friction loss of the floodway profile to be higher than the unencroached profile. The floodway at this cross section or the downstream cross section should be widened to increase the conveyance. • The floodway may be too wide at a cross section if the velocity head of the floodway profile is less than the velocity head of the unencroached profile. In this case, the floodway should be reduced to increase the velocity head of the floodway profile.
10.4
Reviewing and Modifying Encroachment Output For each of the steps outlined in the preceding section, the modeler should perform a close review of all aspects of the computed floodway to determine the adjustments needed for the next run. This review is enhanced by the tables and graphical tools available within HEC-RAS.
Encroachment Tables Encroachment Tables 1, 2, and 3 are part of the Standard Tables available for inspection and review within the profile summary table option. These tables allow the mod-
Section 10.4
Reviewing and Modifying Encroachment Output
363
eler to review changes in key variables from cross section to cross section. A successful floodway run should not have large and abrupt changes between adjacent sections for key variables such as top width, conveyance, velocity, and friction slope. Each of these variables, and many others, can be viewed on the Standard Encroachment Tables, or the user can set up user-defined tables to include other variables.
Graphics Chapters 6 through 8 discuss HEC-RAS graphical tools. Most of these tools are also applicable for floodway review. An individual cross section can be plotted with the floodway in place for inspection by the modeler, as shown in Figure 10.10. The threedimensional plot previously mentioned is possibly the best of the graphical tools to determine whether the floodway width through a reach is reasonable. Figure 10.9 displays this graphical tool.
Figure 10.10 Encroached cross section.
Key Considerations Variables associated with the floodway calculations should be compared section by section to make decisions concerning further modification of encroachment stations. The key variables are top width and target surcharge, with changes in velocity also warranting consideration. Active Top Width. The active top width is the width of the actual floodway flow area, not including any ineffective flow areas. This variable is important in determining a final floodway. Encroachment stations and target elevations should be modified
364
Floodway Modeling
Chapter 10
to obtain a reasonably smooth floodway with a gradual change in active top width from section to section. The modeler should observe the rules regarding expansion/ contraction around obstructions. If the active top width of the floodway is contracting, a 1:1 ratio is a rule of thumb that can be used between adjacent cross sections and was shown to be a reasonable contraction by the bridge studies described in Chapter 6. Similarly, if the floodway is expanding, a ratio from 1:1 to 1:3 would likely be satisfactory, again based on the results of the studies described in Chapter 6. The active top width shows how the flow actually expands or contracts from section to section. The active top width is what will be plotted on the FIRM, not the water surface elevation as is the case with the base flood. An advantage of using the Encroachment Tables is that active top width (in HEC-RAS, this parameter is shown as “Top Width Act”) can be added to the standard variables, along with “Top Width” which includes ineffective flow areas. Elevation Targets. Increases in elevation of either the water surface or energy grade line elevations are the targets used in developing a floodway. However, significant variations from section to section often occur, especially if the topography of the floodplain varies greatly through the study reach. The final, adopted floodway may see a variation in surcharge from nearly zero to 1 ft (0.3 m) throughout a reach. The key determination is having a relatively smooth top width with good width transitions, while maintaining target increases no more than the applicable standard. The user may have to return to the original base flood profile and insert additional cross sections to better model the transition in elevation, if large topographic variations are present from cross section to cross section. Velocity. Normally, velocity increases are tolerable for the final floodway as compared to the base flood profile. However, hazardous velocities should not be induced by the proposed floodway. Velocity increases of 5–10 percent are not unusual for a floodway and are usually considered acceptable. The modeler may further adjust the floodway if much larger increases in the channel or floodplain velocities occur. Especially important is the prevention of critical depth at floodway cross sections or the creation of a supercritical flow condition for the floodway, as compared to a subcritical flow condition for the base flood event. Flow Distribution. The determination of how the total flow is distributed within a cross section may be needed for a floodway analysis if the cross section is at critical depth. In this case, only Method 1 can be used to alter the floodway. Knowing the conveyance values of different segments of the cross section will help the modeler in selecting the encroachment stations while maintaining the equal conveyance reduction concept. As discussed in Chapter 2, discharge is distributed in a cross section based on its conveyance. If the conveyance varies greatly from cross section to cross section, especially for situations where significant conveyance is found well away from the main channel, unacceptable undulations in floodway width may result. The flow distribution option is a tool to view conveyance distribution at a selected cross section. This option is turned on through the Flow Distribution option, accessed from the Steady Flow Analysis Editor. The flow distribution option may be selected for an entire reach or for an individual cross section. Floodways for complicated cross sections or through certain bridges may require the user to examine the flow distribution to determine the suitability of a computed floodway; this is especially true when the distribution of flow is far removed from the channel.
Section 10.4
Reviewing and Modifying Encroachment Output
365
Effects of Obstructions. Bridges, culverts, and other obstructions are the locations where the most modifications and adjustments to the model are typically required to develop a successful floodway. HEC-RAS will model encroachments through the bridge sections (2, BD, BU, and 3) when the energy method is used. For the momentum, Yarnell, WSPRO, and Pressure and/or Weir flow methods, the program uses the top width computed for section 2 just downstream of the bridge and applies this same width to sections BD, BU, and 3. Encroachments can also be turned off at any bridge or culvert. However, this approach is not recommended for flood insurance studies since HEC-RAS will help the modeler in selecting the encroachment stations while maintaining the equal conveyance reduction concept. Although the use of Method 1 will allow the user to set the encroachment stations within the bridge opening, it is generally better practice to maintain the existing opening width without encroachment, even though it may be wider than necessary for the floodway. Setting floodway limits at ineffective flow locations through the bridge is common practice.
Levee Requirements for FEMA Certification The presence of levees within a reach of river when performing a floodway analysis can greatly complicate the study. The level of protection offered by the levee will govern the type of floodway study required. Many large, federally constructed levees and floodwalls protecting urban areas provide a level of protection exceeding the 100-year flood level. According to the National Flood Insurance Plan (NFIP) regulation Section 65.10(b)(1)(i), a levee must have a freeboard of 3.5 ft (1.1 m) at the upstream end of the main levee tapered to a freeboard of 3.0 ft (0.91 m) at the downstream end of the main levee. The levee must also have a freeboard of 4.0 ft (1.2 m) for a length of 100 ft (30.5 m) upstream and downstream of a structure, such as a bridge or a closure structure. The freeboard is measured from the 100-year flood elevation. For FEMA to credit a levee as protecting the landside of the levee from the 100-year flood, the levee must meet the freeboard requirements as described previously. It must also meet the other requirements including embankment protection, embankment and foundation stability, settlement, interior drainage, and operation and maintenance plans as described under Section 65.10 (b) of the NFIP regulations. For flood insurance studies, two types of hydraulic analyses, with-levee and without-levee, are conducted for the existing and proposed levees. With-Levee Analysis. When performing a HEC-RAS floodway analysis for an area with adequate levee protection, the water surface elevations for the 10-, 50-, 100-, and 500-year floods should be computed with the levee option activated. The location and crest elevation of the levee at a cross section can be specified in HEC-RAS from the Cross Section Data window. In the XS Levee Data window, the levees can be specified on the left and right side of the stream channel. HEC-RAS will not consider the areas that are on the landside of the levees in the hydraulic computations if the computed water surface elevation is not higher than the levee crest elevation. If the computed 100-year water surface elevation (WSEL) meets the freeboard requirements, use encroachment Method 4 for new studies and Method 1 for revisions and restudies to determine the encroachment stations assuming any more encroachment is acceptable. If the 100-year WSEL is below the crest elevation of the levee, HEC-RAS will compute the encroachment stations only on the riverside of the levee when encroachment Method 4 is used. The computed encroachment stations may or may not be at the crest of the levee or on the side slope of the riverside of the levee. If the encroachment
366
Floodway Modeling
Chapter 10
stations are at those locations, FEMA requires mapping the floodway boundary at the landside toe of the levee, as illustrated in Figure 10.11a.
Figure 10.11 Base flood elevations and floodways with levees.
Without-Levee Analysis. If the levee does not meet one of the requirements under Section 65.10 of the National Flood Insurance Program (NFIP) regulations, the levee option from all the cross sections should be removed from the HEC-RAS model and the water surface elevations should be computed for the 10-, 50-, 100-, and 500-year floods. Without-levee analysis will include the areas that are on the landside of the levee in the hydraulic computations. The development on the landside of the levee should be properly considered by using the ineffective flow option, the blocked option, or high n-values so that the computed floodway will not include the already developed areas on the landside of the levee. The computed floodway from the without-levee analysis usually includes portions of areas from the landwater surface elevation side of the levee, as illustrated in Figure 10.11b. Credited Levees. If the levee meets all the requirements under Section 65.10 of the NFIP regulations, FEMA will credit the levee as protecting the landside of the levee from the 100-year flood. The set of flood profiles necessary for the credited levee and the water surface elevations for the 10-, 50-, and 100-year flood elevations along the main stream will be obtained from the with-levee analysis. The water surface elevation of the 500-year flood from the with-levee analysis will be plotted on the profile if it does not overtop the levee. Otherwise, it will be obtained from the without-levee analysis. The 500-year flood boundary for the landside of the levee (protected area) will be drawn from the 500-year flood elevation of the without-levee analysis and will be designated as shaded Zone X whether the 500-year flood overtops the levee or not.
Section 10.5
Adopting the Floodway
367
FEMA adopts this approach to emphasize that there is still a chance that floods larger than the 100-year may cause the levee to fail even though the landside of the levee is protected from the 100-year flood. The 100-year flood boundary on the landside of the levee is determined from the interior drainage analysis. Interior drainage analysis is one of the requirements under Section 65.10 of the NFIP regulations. A zone break line will be drawn on the map along the landside toe of the levee to separate the base flood elevations between the riverside and landside of the levee. Non-Credited Levees. If the levee does not meet one of the requirements under Section 65.10 of the NFIP regulations, FEMA will not credit the levee. Two sets of water surface profiles need to be created for non-credited levees. One set of profiles is for the entire stream and is obtained from the hydraulic model for without-levee analysis. The other set of profiles is only for the riverside of the leveed area and is obtained from the with-levee analysis. The water surface elevation from the withlevee analysis will be superimposed onto the water surface elevation from the without-levee analysis at the upstream end of the levee as the backwater caused by the levee. The above procedure of levee analysis is established by FEMA as a regulatory tool. It may not reflect the conditions during an actual levee failure. FEMA levee analysis is described in Section 65.10 of the NFIP regulations, FEMA Levee Policy (FEMA, 1981), MT-2 Form, and in Guidelines and Specifications for Flood Hazard Mapping Partners, Appendix H (FEMA, 2002). The reader should consult with FEMA regarding the latest policy on levee analysis. Effect on Hydrologic Routings. Chapter 8 discusses the use of hydrologic computer models for the upstream watershed to establish the peak flows for the profile calculations. If floodplain routings were used to establish the peak flows for stream reaches containing large amounts of flood storage, the effect of the lost storage volume outside the floodway encroachment should be evaluated. FEMA criteria require that storage-outflow relationships be redeveloped after the floodway has been established to determine the effect of lost storage volume and reduced travel time on the computed peak discharges. The procedures described in Chapter 8 would be adapted to the floodway run and the lower storage-outflow and travel time would be found for a range of discharges within the floodway. New routings would be performed to test the effect of the floodway in causing higher discharges. These higher flows would then be used in the floodway run to ensure that the target increase is not exceeded. In the author’s experience, the analysis of the effect of lost storage for a floodway has generally been confined to major rivers where new or higher levees are proposed, significantly affecting the reach storage and the existing floodway limits. For this scenario, a comprehensive floodway analysis over a long reach of river, requiring the evaluation of the floodway’s effect on reach storage relationships, could be very expensive.
10.5
Adopting the Floodway A floodway cannot be adopted until it is transferred from the HEC-RAS output to the work map. After transfer of the data, the modeler may find that a few sections need additional modification. The floodway should meet community needs, if technically possible, and should be logical and easily enforceable by the local planning agency. The following sections discuss items that the modeler should consider.
368
Floodway Modeling
Chapter 10
Floodways and Mississippi River Levees Development of a floodway for a large river can be complex, especially a river that has numerous levees of varying height lining the stream. The Mississippi River reach near St. Louis, Missouri, is one such example. For 120 miles (193 km) upstream of St. Louis and for 180 mi (290 km) downstream, levees of varying height protect highly developed urban areas, small towns, and agricultural areas. These levees are both federal and nonfederal/private and provide protection ranging from as little as a 5-year average recurrence interval flood to an estimated 500-year recurrence interval. In the 1980s, FEMA funded the St. Louis District (SLD) Corps of Engineers to compute and map a floodway for the entire 300 mi (483 km) reach of the Mississippi River within the SLD. At that time, only the HEC-2 program was available to perform such a study. Additionally, funding only allowed for a steady flow analysis. The major problem was determining how to model the levees and where to locate the floodway in relation to the levees. A further complication was differing policies between the states of Illinois and Missouri, which border the 300 mi (483 km) study area. Illinois required a floodway encroachment with a 0.1 ft (0.03 m) target, while Missouri accepted the Federal standard of 1 ft (0.3 m). In some reaches, there were levees on only one side of the river. A floodway was developed and mapped for this reach of the Mississippi River using the following guidelines: a. Because the two states could not reach agreement, FEMA mandated a 0.5 ft (0.15 m) surcharge value for the computed floodway. b. Where a federally built levee existed on only one side of the river, no encroachment was allowed on the leveed side; all the encroachment took place on the unprotected side. c. At St. Louis, where levees gave protection against the 100-year flood plus 3 ft (0.9 m) of
freeboard, the floodway was located on the levee itself, generally on the riverside levee toe. d. Upstream of St. Louis, where levees gave less than a 25- to 50-year protection, the floodway was computed by encroaching from the bluff line behind the levee. In many instances, this resulted in the floodway being several thousand feet landward of the levee. e. Downstream of St. Louis, where levees protecting primarily agricultural areas gave a 50year level of protection, engineering judgment was used to evaluate potential conveyance behind the levee during the 100-year event. With freeboard, these levees were typically equal to or slightly higher than the 100year flood profile elevation. Although the levees might not survive a 100-year flood, it was apparent that a levee breach would result in the creation of an off-channel storage area behind each levee and would not result in any significant conveyance behind the levee. Hence, a floodway well landward of these levees seemed unjustifiable and not realistic. Consequently the floodway was located on the landside toe of the levee, to discourage future increases in levee height, and the area behind the levee was shown as flooded by the 100-year event. This decision was confirmed in 1993 when four of seven levee units designed for the 50-year flood plus 2 ft (0.6 m) freeboard were breached. Although the interior areas filled with water, no significant conveyance occurred in the levee interior. It should be emphasized that the solution outlined in section e does not reflect current FEMA policy, which is to compute the floodway on the landside of the levee, assuming the levee does not exist. However, in the 1980s, when the actual study was performed, the assumption was judged reasonable and appropriate for floodway development.
Section 10.5
Adopting the Floodway
369
Satisfying Community Needs Even before the hydraulic analysis is begun, the modeler should consult with community planners to discuss future development plans for areas located within the floodplain. Where development is possible or planned with adequate flood protection, the modeler should attempt to develop a floodway consistent with these plans. Satisfying community needs may require that a narrower floodway be developed for the proposed development area (but not resulting in exceeding the legislated maximum elevation increase), with wider floodways upstream and downstream to compensate. If development in these areas is proposed, it should be limited to the floodway fringe areas so that a ready escape route during floods is available.
Mapping the Floodway Although HEC-RAS tools have been used to evaluate and select the floodway, the final decision on the floodway alignment can only be made after it is carefully drawn on a scaled work map. USGS maps enlarged to a suitable scale, aerial mapping, or orthophoto maps can be used for the final work maps showing the 100- and 500-year flooded areas, floodway, cross-section locations, and other information. The modeler prepares a working map within a GIS or CAD application that will eventually be transferred to the FIRMs or simply transfers the hydraulic data manually to the map by using an engineer’s scale. First, the flood elevations for the 100-year and 500-year profiles are plotted along the appropriate topographic contours at each modeled cross
370
Floodway Modeling
Chapter 10
section. Next, the floodway is sketched from section to section using the determined encroachment stations and top widths—not the floodway water surface elevations. The 100-year and 500-year flood elevations and floodway width should be interpolated between modeled cross sections, always ensuring a smooth transition. Floodway top widths, encroachment stations, and the 100- and 500-year flood water surface elevations are carefully checked during the FEMA technical review. Guidelines and Specifications for Flood Hazard Mapping Partners (FEMA, 2002) outlines the items most often found to be in error during a quality assurance review. One of the simplest ways to plot the floodway is to use the data from Encroachment Table 2 (see Figure 10.12), a standard table in HEC-RAS. The variables “Dist Center L” and “Dist Center R” are the left and right floodway limits, respectively, measured from the center station of the cross section. HEC-RAS defines the center station as the average of the left channel bank station and right channel bank station. Encroachment width is equal to the sum of the “Dist. Center L” and “Dist. Center R” values. If the stream is shown as a single line on the map, then one can assume that the crossing of the stream line and the cross section line can be considered as the center station. The modeler can then plot the left encroachment station and the right encroachment station by measuring the “Dist. Center L” and “Dist. Center R” from the center station, respectively.
Figure 10.12 Encroachment table 2.
Section 10.5
Adopting the Floodway
371
Note that “Encr WD” (encroachment width), not the “Top Wdth Act” (top width active), is used as the floodway width for the flood insurance studies and is what is shown on the FIRM and the Floodway Data Table in the FIS. If the 100-year flood is contained within the channel, “Top Wdth Act” represents the water surface width within the channel. According to FEMA’s definition of a floodway, floodway width should at least be equal to the channel width. In this case, “Encr WD” will be equal to the channel width, which is wider than “Top Wdth Act.” If the stream is represented by two lines on the work map, then the center station is assumed to be located in the middle of the two lines and “Dist. Center L” and “Dist. Center R” are measured from this midpoint to locate the left and right encroachment stations, respectively.
Enforcing the Floodway The modeler should be aware that the enforcement of appropriate zoning ordinances and development in the floodway fringe may be handled by nonengineers who may not have the technical background to fully understand the analysis. Consequently, the modeler should ensure that the floodway is reasonable, defensible, understandable, and enforceable. For example, if the dotted line showing the initial undulating floodway on Figure 10.13 were adopted, it would be difficult to explain why a structure would not be allowed at Site A that might be several hundred feet (m) from the river, but the same structure at Site B, located much closer to the river, would be. The floodway width should be relatively smooth with gradual transitions, and it should result in fair treatment on both sides of the river, even though the study may only be along one side. If possible, the floodway boundary should be located along recognizable features as much as practical, such as on streets, fence lines, or at the rear property line of lots.
Figure 10.13 Enforcing the floodway.
372
Floodway Modeling
10.6
Chapter 10
Working With an Existing Floodway Because floodways have been developed for the majority of major rivers and urban streams throughout the United States, there are limitations on any future floodway modifications, as was discussed in Chapter 9. The purpose of the floodway is to show the area where no additional obstructions or encroachments may take place. Over time, however, changes and modifications may be necessary to allow needed features to be placed in the floodway.
Placing Obstructions in the Floodway Obstructions that might be proposed within a floodway include piers for a new or replacement bridge, low mounds for golf course greens, decorative features for a park area, picnic shelters, boat docks, ball fields, and so on. Any feature proposed to be located within an existing floodway must undergo a hydraulic analysis to either show the feature has absolutely zero effect (an increase of 0.001 ft or 0.0003 m is too much), or that additional conveyance can be gained elsewhere in the floodway to offset the effects of the obstruction. Showing a zero effect on the BFE by a proposed obstruction is usually termed a no-rise certification. If the addition of a feature also involves modification of cross-section topography or roughness, the analysis can often show a no-rise result. For example, piers for a new bridge will have an adverse effect within the floodway, because cross-sectional area in the floodway is lost by the space occupied by the piers. However, if the upstream face of each pier is streamlined or if, as part of the normal bridge maintenance procedures, the existing vegetation beneath and near the bridge is regularly removed (lowering Manning’s n through the bridge), or the bridge-opening area is maintained by designing a longer span, the hydraulic modeling of the new piers will often result in a norise finding. Similarly, creating fills to elevate greens for a golf course will result in unacceptable increases in the base flood upstream of the area, unless the fill for each green is a minimum obstruction to the flow and if additional conveyance is excavated along the reach containing the fill. Additional conveyance through excavation has to extend over a sufficient length to actually obtain the flow area and conveyance needed to replace the lost cross-sectional area elsewhere in the floodway. Rules of thumb of five to ten times the length of the fill for the excavation length are sometimes employed. The excavation is best obtained as a high cutback berm in the main channel. Figure 10.14 shows an example. Provisions for maintaining the additional conveyance through clearing vegetation and removing sediment deposits must be included as part of the routine maintenance for the area. If the effect of the proposed floodway obstruction can be entirely mitigated by a solution not requiring regular maintenance (for example, streamlining the bridge piers instead of regular removal of undergrowth), the nonoperational alternative should be chosen. Although adverse effects caused by obstructions can be mitigated by providing additional conveyance, some state regulations have attempted to use compensatory storage, rather than conveyance, as a means of mitigation. Compensatory storage involves excavating a similar volume of material in the floodway at least equal to the volume proposed for placement in the floodway. In theory, this method may seem adequate; however, compensatory storage does not necessarily yield any additional conveyance with which to offset the loss of conveyance from the obstruction. Using Figure 10.14
Section 10.7
Chapter Summary
373
Figure 10.14 Replacing lost floodway conveyance.
as an example, if compensatory storage were the choice to offset the proposed fill in the floodway, the additional conveyance excavated along the channel bank would not be provided. Rather, a depression within the floodway would be excavated that would at least equal the volume of fill material for the proposed floodway obstruction. Although the storage volume may be preserved, the excavation would give little, if any, additional conveyance. Compensatory conveyance, rather than compensatory storage, should be the required solution for any significant floodway fill.
Changes to a Floodway Once BFEs and floodway limits are established, they become difficult to change without an appreciable engineering effort, unless it can be shown that there were errors in the original work. With additional topographic data normally acquired for a new development, a higher level of accuracy in hydraulic computations is often gained over the original study, which may allow for a slightly modified floodway. When further encroachments to an existing floodway are proposed, the modeler must address and satisfy many FEMA regulations. The reader is encouraged to refer to Chapter 9 where floodway and BFE modifications in terms of meeting FEMA regulations are discussed in detail.
10.7
Chapter Summary The first eight chapters of this book guide the engineer through developing a floodplain model that provides water surface profiles for the existing, or base, conditions of the study river reach. The floodplain hydraulic studies discussed in this chapter evaluate the impact of changed or proposed conditions on the water surface profiles. The most common of these changed condition studies in the United States is a floodway analysis for a flood insurance study. Floodways have been computed for rivers and streams throughout the United States since the 1960s. These studies are typically the least difficult of any hydraulic studies to determine the impact of watershed changes on flood profiles. A floodway simply determines the amount of encroachment (narrowing of the width of flow) that can be tolerated during the base flood without causing a water surface elevation increase that exceeds the legislated standard. In the absence of stricter local standards, the federal requirement for a maximum increase of 1.0 ft (0.3 m) over the 100-year event (base flood elevation). HEC-RAS provides five methods for computing floodways and encroachments. These methods can be used individually or in combination with other methods within the
374
Floodway Modeling
Chapter 10
same floodway analysis run. The most commonly used methods are Method 1, Specify Encroachment Stations, and Method 4, Specify Target Surcharge with equal conveyance reduction concept. A typical floodway analysis will use Method 4 with varying targets and several iterations to hone in on a reasonable floodway, and then convert these results to Method 1 to finalize the floodway boundaries by making small adjustments to floodway widths at individual cross sections. Floodway analysis requires little additional data beyond that needed for base conditions and is relatively easy to specify in HEC-RAS. Specific HEC-RAS features are used to evaluate the suitability of the floodway, including graphical and tabular output. Three standard tables are available for floodway analysis and the 3D plot is especially useful for floodway evaluation. For the hydraulic analysis, a final, adopted floodway must not exceed the target water surface elevation increase (1.0 ft or 0.3 m or less) and must exhibit a reasonable transition in floodway width from section to section. HEC-RAS output for the adopted floodway must be carefully transferred to a working map for use in the flood insurance study. In addition to meeting the target elevation increase standard and having a reasonable top width along the study reach, the floodway must meet community needs, if possible, as well as be politically defensible in enforcing floodway rules for regulating or preventing development within the floodway or floodway fringe.
Problems 10.1 English Units – Use HEC-RAS to develop a floodway for the river geometry given in the file Prob10_1eng.g01 or Prob10_1si.g02 on the CD accompanying this text (see figure). The 100 yr discharge is 2000 ft3/s and the starting water surface at the downstream boundary is 162.8 ft. The flow regime is subcritical.
Problems
375
a. Use Method 4 to establish encroachment limits that do not cause the water surface elevation to increase by more than 1.00 ft above the unencroached condition. Apply the same target increase at all cross sections. For the encroached profile, use a downstream boundary condition 1.00 ft higher then the boundary condition for the unencroached profile. What is the highest multiplier value that does not result in a water surface increase of more than 1.00 ft at any cross section? b. Convert the encroachment method from Method 4 to Method 1. Complete the results table provided. Cross Section
Unencroached Left Right WS Encroachment Encroachment
Encroached WS
Delta WS
4 3 2 1
SI Units – Use HEC-RAS to develop a floodway for the river geometry given in the file Prob10_1eng.g01 or Prob10_1si.g02 on the CD accompanying this text (see figure). The 100 yr discharge is 56.6 m3/s and the starting water surface at the downstream boundary is 49.6 m) The flow regime is subcritical. a. Use Method 4 to establish encroachment limits that do not cause the water surface elevation to increase by more than 0.305 m above the unencroached condition. Apply the same target increase at all cross sections. For the encroached profile, use a downstream boundary condition 0.305 m higher then the boundary condition for the unencroached profile. What is the highest multiplier value that does not result in a water surface increase of more than 0.305 m at any cross section? b. Convert the encroachment method from Method 4 to Method 1. Complete the results table provided.
CHAPTER
11 Channel Modification
Channel modification, also referred to as channelization, may seem like an obvious solution in many water resource projects, including flood reduction, drainage, and irrigation. Changing the geometry, slope, and/or roughness of a channel, however, often has far-reaching effects upstream and downstream of the channel alteration, as well as on tributaries. A major channel modification requires more than just an open channel hydraulics study to determine the appropriate channel dimensions for a design discharge. Sediment transport analyses are often necessary to address the effects of channelization, as well. Channel modification can also result in undesirable impacts on aquatic species if not carefully considered. This chapter provides an overview of the engineering considerations related to channelization and directs the reader to sources of more detailed reference material for sedimentation and channel design, each worthy of a separate book. Various channel design features that may need study are covered, as well as the input, output, and hydraulic results for channel modifications using HEC-RAS.
11.1
Channel Stability A successful channel design must address the interaction between the water discharged and the sediment carried by the stream. This relationship determines whether or not the proposed channel will be stable; that is, without significant erosion or deposition problems. The stability is of course dependent on the channel bed material (dirt and gravel bottoms will have more sediment transport than channel beds composed mainly of cobbles and boulders). There are many examples of channel modifications causing great damage to the stream system while failing to achieve the objective for which they were built. Channel modifications often disturb the (near)
378
Channel Modification
Chapter 11
History of Channelization The earliest water resource projects were built more than 5000 years ago and featured channel diversions from a water surplus area to an area of water shortage. Using diversion weirs and open channels, the farmers of ancient Egypt diverted some of the Nile River’s flow to irrigate crops located far from the river's edge. Growing cities needed channels to bring water for their needs while other channels carried sanitary waste away from populated areas. Creeks and streams in these developing areas were eventually buried in pipes or tunnels or confined to a lined channel. In the United States, the extensive development of land for agricultural purposes entailed farmers, drainage districts, state agencies, and the federal government modifying stream geometry to pass more flood flow at lower water surface elevations and reclaim land for agricultural usage. However, until the past 50 years, little consideration was given to channel
design, outside of estimating required channel dimensions using the Chézy or Manning equations (discussed in Chapter 2). Unforeseen and adverse results often occur from channelization. In the United States, there are many examples of channel modifications built prior to World War II that are now several times larger than the original dimensions and still increasing. The Cache River diversion project in southern Illinois is a prime example and is presented in more detail in Section 11.2. During the second half of the twentieth century, engineers and scientists gradually came to understand that changing a stream’s geometry could create greater problems than existed before the channelization. Major channel modifications must be done with caution and only after careful study of the modification’s impact on the sediment regime and vice versa.
equilibrium condition of a stream and may have far-reaching effects both upstream and downstream of the new channel boundaries. These potentially severe and adverse effects must be evaluated and addressed as part of the channel modification design.
A Stream in Equilibrium Over time, natural streams tend toward an equilibrium condition between the water discharge and the sediment discharge. Linder stated, “Once disturbed, a stream channel begins an automatic and relentless process that culminates in its reaching a new state of equilibrium with nature. The new equilibrium may or may not have characteristics similar to the stream’s original state” (Linder, 1976). An equilibrium condition means that the stream alignment, geometry, and slope approximately balance the sediment load entering a reach of stream with the sediment load leaving the reach. This condition can be thought of as a dynamic equilibrium, because some erosion and deposition still occur within the reach. A meandering stream erodes the outside of its bends and deposits the material in downstream point bars (the sandbars that extend into the channel from the inside of a bend) and crossings (the portion of the channel where the main flow moves from one side to the other), but the total load moving through the reach is in approximate balance. Figure 11.1 shows a stream in dynamic equilibrium. All streams carry sediment. Total sediment volumes moved by the stream can be subdivided into wash load (normally clays and silts that stay in suspension), suspended bed material load (particles such as fine sands found in the stream bed that are carried
Section 11.1
Channel Stability
379
Figure 11.1 A stream in approximate equilibrium.
in the water column) and bed material load or simply bed load (coarser particles such as coarse sands and gravel). The bed material load generally moves in contact with the streambed, but some may be carried in suspension at higher velocities. The bed load is a major factor determining channel geometry, in that the quantity of this material increases with increasing velocity and decreases as velocity lessens, resulting in erosion and deposition over a length of stream channel. Based on extensive field observations, E. W. Lane formulated a qualitative expression for stream equilibrium (Lane, 1955):
Q w s o ∝ Q s D 50 where Qw so Qs D50
(11.1)
= water discharge (ft3/s, m3/s) = channel slope (ft/ft, m/m) = bed material discharge (tons/day) = average particle size (50 percent) of the bed material (ft, m)
The bed material sediment discharge (Qs) includes the coarser material that generally moves by rolling or bouncing along the stream bed and the lighter bed material that can be carried in the water column. Units of Qs are tons/day in both the English and SI systems. The average particle size (D50) of the bed material is the effective particle diameter at which 50 percent of the bed material is finer and 50 percent is coarser. Units of D50 are in. or ft for English units and mm or m for SI. The proportionality (shown in Equation 11.1) can be used to illustrate the effect of a change in one parameter on one or more of the remaining parameters. For example, on a short reach of river, the particle size (D50) and water discharge (Qw) will be fairly uniform. However, as the bed slope increases or decreases from cross section to cross section, an increase or decrease in the bed material transported, respectively, will result. The application of this expression is further demonstrated later in this section. When Lane’s Formula (Equation 11.1) is approximately balanced, there is no net gain or loss of sediment material within a river reach. A meandering river, one that twists and turns as it moves downstream, can be an example of a river in equilibrium. This “mature” river still has small changes in velocity occurring along its reach. These changes cause the friction slope to increase or decrease with the normal result being an increase or decrease in the amount of bed material being transported. A meandering stream cuts the outer bank of a meander loop because the velocity along the outside of the bend is higher due to the centrifugal force of the mass of water. As the
380
Channel Modification
Chapter 11
stream enters a crossing or relatively straight reach, flow becomes more uniformly distributed across the channel, and the velocity is lower, thus reducing the friction slope and depositing some of the material in transit. Figure 11.1 represents a meandering stream in a dynamic equilibrium condition. When a stream is not in equilibrium, there is either a net gain or loss of material moving through the reach. If the stream can transport more material than enters the upstream reach boundary, additional material is removed from the bed and/or banks; the river is said to be in a degradation phase. The river widens and/or deepens its channel as additional sediment is transported. Erosion reduces the slope and often exposes coarser material. Given enough time, the river may reach an equilibrium condition; however, many decades, centuries, or millennia may be required for this to occur. If the stream receives more sediment than it can carry downstream, deposition occurs in the channel and in the floodplain during flood flows. Sediment deposition within the channel describes a stream in an aggradation phase. A braided stream is an example of a river in aggradation. This type of river is fairly wide and shallow, with multiple channels flowing around low islands of deposited sediment that may be inundated during a flood. As the river deposits material, slopes are steepened and bottom elevations raised, which results in smaller channel cross sections. The consequences of modifying a stream are best visualized with Lane’s equality, often depicted as a “sediment balance,” as illustrated in Figure 11.2. The volume on the balance pan represents sediment discharge, and the bucket represents water discharge. The balance arms represent the bed material size and the friction slope. If all are in balance, the needle points downward to an equilibrium condition. As shown in the figure, if any of the four terms are out of balance, the needle swings into a degradation or aggradation condition. This balance is very useful to visualize the consequences of modifying a river, as illustrated in the following paragraphs.
Lane, 1955
Figure 11.2 Lane’s sediment balance.
Section 11.1
Channel Stability
381
A Nonequilibrium Condition—Urbanization Figure 11.2 can be used to illustrate some common watershed responses to change. For instance, when a basin is urbanized, a large percentage of the watershed is paved, resulting in significant impervious areas. The impervious areas result in increased runoff volumes, with higher discharges occurring more frequently. On the balance, the Qw term (the bucket) may increase by a factor of two or more. Consider the situation in which the pre-urban stream is in equilibrium. A larger bucket represents more water discharge due to urbanization. The larger discharge causes the needle to swing into the degradation area, meaning more sediment discharge must result. The Qs term increases greatly, and scour and erosion may take place all along the urbanized stream. The scouring of the channel will tend to flatten the slope. Material that is scoured may expose coarser material beneath it, increasing the bed material size. Thus urbanization may be expected to cause a large increase in water discharge, which results in a large increase in sediment discharge, which in turn, causes a reduction in the slope and may cause an increase in sediment size. These changes are significant initially but generally reduce over time as the natural system moves toward equilibrium. Eventually, the system reaches a new equilibrium condition, which may be very different from that prior to urbanization. One can observe this response in many urbanized areas, where the channel after urbanization is much larger than the channel before development.
A Nonequilibrium Condition—Channelization Channelization often has an even more extreme effect than urbanization. When channel modifications are constructed, typically the intent is to lower water surface elevations, thus reducing the risk of flooding. To reduce the water surface elevation while maintaining conveyance, the velocity must increase. To lower the water surface elevation, designers can do the following: • Reduce the channel roughness (Manning’s n). A smaller n in Manning’s equation for velocity causes a higher velocity, thus a lower water surface elevation. • Increase the channel’s cross-sectional area. A modified channel cross section normally will result in a larger cross-sectional area and smaller wetted perimeter, in turn giving a larger hydraulic radius. A larger hydraulic radius term in Manning’s equation for velocity causes a higher velocity and a lower water surface elevation. • Make the slope steeper. A steeper slope in Manning’s equation for velocity causes a higher velocity and a lower water surface elevation. A channel modification could include any or all of these changes. Upstream Modified Channel. The resulting higher velocity can cause scour and erosion, especially at the upstream point where the original channel meets the portion being modified. A drawdown (M2 curve, covered in Chapter 2 on page 46) exists at the beginning of the modification, and higher velocities are experienced upstream from the start of the channel modification. Higher velocities carry scoured material into the modified reach and increase the bed material carried. The erosive effects may be experienced far upstream, depending on the magnitude of the channelization project.
382
Channel Modification
Chapter 11
Increasing the reach slope moves the discharge “bucket” shown in Figure 11.2 further out on the friction arm, causing the needle to swing into the degradation area, which means that coarser sediments are likely to be exposed. This latter situation moves the sediment pan further out on the balance arm, and the sediment discharge (volume on the pan) is increased. An equilibrium condition, where all four elements are back in balance, is eventually reestablished. Erosion caused by a channelization project often generates a “headcut” that may work its way upstream for many miles. A sharp dropoff or slope increase in the channel bottom, usually caused by downstream channel modifications, increases the approach velocity in the upstream channel, thus increasing channel erosion. This erosion works the dropoff upstream over time and is known as an advancing headcut or knickpoint. The resulting degradation may be a problem for only the upper portion of the modified channel and the unmodified, upstream reach. The downstream reach may instead experience aggradation. HEC-RAS has hydraulic design features that can analyze a proposed channelization project for channel stability—one that neither significantly deposits or scours the bed material. These features are addressed later in this chapter. Downstream Modified Channel. The additional eroded material from the upstream reach will travel downstream through the modified reach until it approaches the end of the modified channel. The downstream unmodified channel may have less cross-sectional area, a milder channel slope, a higher n value, or combinations of all three compared to the upstream, modified channel. These factors cause backwater at the joining of the new and old channel geometry. When the velocity decreases as a result of the backwater at the unmodified channel, sediment deposits in the lower portion of the modified channel and in the unmodified channel. This deposition results in aggradation in the lower reach of the improved channel and can continue downstream. Figure 11.3 shows a plan, profile, and cross-sectional view of the changes that generally occur in response to a channelization project. Note that by shortening the flow path (represented by the dashed line in the figure), the points labeled A and B are now much closer together. The elevation difference between A and B now occurs over approximately one-half the distance, thereby doubling the slope, which then drives the erosion process. Constructing a significant channel modification will almost always cause an immediate response in the stream’s sediment regime—degradation upstream and deposition downstream. This condition usually results in the need for fairly continuous channel maintenance to retain the channel’s design capacity. An upstream erosion control structure, such as a stabilizer or drop structure, will likely be necessary. Periodic channel dredging and vegetation removal may be required, as well. Annual channel maintenance is often a significant expense associated with a channel modification project. The engineer must estimate the frequency and degree of required channel maintenance to include an appropriate annual cost in the project formulations. The short case study on Harding Ditch described in Chapter 3 on page 93 includes one procedure (the use of the HEC-6 sediment transport model) with which to estimate the frequency of channel dredging. Not all channelization projects are subject to these sedimentation problems, depending on the erosion potential of the sediment in the channel and the severity and extent of the channel modification.
Section 11.1
Channel Stability
383
Figure 11.3 The effects of channelization.
Lane’s formula and the sediment balance concept are extremely useful for visualizing the consequences of various water resource alternatives. The application of the sediment balance concept can be applied to a reservoir, a diversion, or a levee to determine the effects of the sediment regime on the structure and vice versa. Chapter 13 further discusses these types of projects and the resulting sediment effects.
Developing a Stable Channel Modification The best design is one that meets its goals while simultaneously having a minimum impact on the stream and its sediment regime. Therefore, a channel modification should work with the existing stream alignment and cross-section geometry as much as is practical. The following list offers guidelines for a major channel modification project. These guidelines are further discussed throughout this chapter:
384
Channel Modification
Chapter 11
• Follow the existing alignment. The engineer should follow the existing stream alignment as much as practical, especially if a meandering pattern exists. Straightening a meandering stream can shift the stream’s sediment regime from equilibrium to degradation. A meandering stream is inherently more stable, aesthetically more pleasing, and environmentally less damaging than other alignments. For proof, one need only examine natural streams, which never run straight over a significant distance. For a flood reduction project using channelization, a straight alignment greatly increases channel maintenance and requires extensive channel protection. For multichannel (braided) streams that deposit significant sediment, solutions other than channel excavation (usually levees) are generally recommended. • Prevent headcutting. Incorporate one or more drop structures, stabilizers, or hard points to prevent upstream degradation caused by upstream progression of erosion due to the steeper slope of the modified channel. Section 11.3 discusses these features in detail. • Minimize deposition. If the drainage area upstream of the modified channel includes very steep terrain and if the runoff carries a significant amount of gravel, cobbles, and larger material into the stream, check dams or debris basins immediately upstream of the modified channel should be considered during the channel design. Debris and large sediment entering the modified channel can quickly deposit, accumulate, and drastically reduce the channel’s carrying capacity. Debris dams or basins are typically necessary where runoff leaves mountainous areas and enters a modified channel. The modified channel design for less steep terrain should include a low flow channel to facilitate sediment movement and limit deposition for normal (nonflood) flows experienced throughout the year. Section 11.3 further discusses these structures. • Use as much of the existing, undisturbed channel cross section as possible. The existing geometry is likely to be far more stable than any enlargements made. Recognize the environmental benefits of minimizing the work done within the channel. The next section discusses a wide variety of possible solu-
Section 11.1
Channel Stability
385
Fluvial Geomorphology and Channel Design There has been a great deal of work applying fluvial geomorphology to channel design in recent years, as evidenced by the number of publications in the field (ASCE, 2000; Brookes and Shields, 1996; Copeland et al., 2001; Fed-
eral Interagency Stream Corridor Working Group, 2001; Hayes, 2001; Knighton, 1998; Nunnaly, 1978; Richards, 1982; Shields et al., 2003; USACE, 1989; Yang, 1976).
tions. Where a radical channel modification is required, design for low-flow situations as well as high-flow situations. • Incorporate channel protection. Although a meandering stream is stable, it still erodes its banks and attempts to shift around in the floodplain. Channel protection is almost always necessary for portions of the modified channel.
Environmental Issues A complete realignment of an existing channel, including an enlargement of the channel cross section, is probably the most environmentally harmful solution one can employ to address a flood or drainage problem. The days of realigning, enlarging, and lining a creek for single-purpose flood reduction are largely over. However, channel modifications can still be carried out if the environmental impacts are minimized and mitigated. The engineer should consult knowledgeable environmental personnel before proceeding with a major channel design and adapt the design to include fish, wildlife, and aesthetic goals. A major modification of the stream channel can do the following: • Increase water temperature by removing vegetation and trees along the bank that would otherwise provide shade. • Increase the scour potential of the stream by increasing the velocity. • Reduce the water quality by increasing the sediment and turbidity. • Smother bed dwelling organisms with sediment deposition. • Reduce aquatic plant populations due to a reduction in sunlight (from penetrating turbid waters). • Remove fish resting or nesting habitat and food by eliminating slackwater (low velocity) areas. • Degrade water chemistry through frequent dredging of the channel to maintain capacity or through the exposure of formerly buried organic channel materials to the flowing water. • Increase downstream peak discharge by the acceleration of flow (lower travel time) through the channelized reach. • Create a sterile appearance, especially for concrete-lined channels. • Affect the overall food chain by altering the natural environment. A channel modification must address all these issues and more before the project is begun.
386
Channel Modification
Chapter 11
Positive Effects of Channelization The preceding sections describe some of the negative effects of channelization. However, the engineer proposing a channelization project is not trying to make a situation worse; he or she is trying to solve a serious problem, usually frequent flooding of adjacent properties. A well-designed and maintained channel project, reflecting a high level of environmental awareness, has far more positive impacts than negative ones. A significant level of flood reduction can be gained through channel modification and, if properly designed for the environment, can also improve upon the condition of the stream prior to the project. Figure 11.4 illustrates a levee and channel modification project that balances both flood reduction and environmental objectives by incorporating selected plantings in the overflow berm area, improving stream aesthetics and yielding recreational and wildlife benefits. The channel area, defined by the solid cross-section line, is larger than needed to allow for vegetation growth and other obstructions. The cross-sectional area defined by the dashed line represents the flow area needed to pass the design discharge.
USACE
Figure 11.4 Channel design incorporating environmental objectives.
Designers of stream realignment projects associated with highway construction have become far more environmentally aware. The U.S. Department of Transportation (USDOT) has incorporated environmental objectives in stream alignment projects associated with highway construction for more than 20 years (USDOT, 1979). The USDOT offers recommendations on a wide variety of restoration measures to improve fish habitat and aesthetics, and to result in a relocated stream that improves the original condition.
11.2
Channel Modification Methods The smaller the change to the existing channel during channelization projects, the smaller the effect the modification has on the environment and the fewer the problems that occur from erosion and deposition. The structural flood control methods described in the following sections are listed in order of least to most in terms of their impact on the stream environment.
Section 11.2
Channel Modification Methods
387
Levees Levees are seldom equated with a channel modification because, in most cases, they are constructed well away from the channel. However, a levee on one or both sides of a stream represents a new and higher channel bankline for flood flows. Levees confine the flood to a smaller cross section of the floodplain and thus serve to channel flood flows downstream. Figure 11.5 shows a valley cross section with levees on either side of the channel. The benefits of levees are that they have the least impact on the stream environment of any of the structural flood reduction alternatives, and they are nearly always the most effective and least expensive method of reducing flooding to the protected area.
Figure 11.5 A floodplain with levees.
The drawbacks of constructing a levee are that doing so requires land for both the levee alignment and for borrow material used as the levee embankment. In addition, levees typically cause increased backwater effects for a short distance upstream. Another consideration for constructing levees is the lack of protection to the area when the design flood is exceeded (that is, when the levees are overtopped and breached). Other solutions, such as channel modifications and reservoirs, continue to function and provide flood protection even after the design flood has been exceeded. Levees can be easily modeled within HEC-RAS; Chapter 12 discusses modeling levees in detail.
High-Flow Diversion Channel and Weir A high-flow diversion channel and weir refers to a formal control structure that diverts some amount of flow (can vary from a portion to most of the higher flows) out of the river and into a separate channel, usually moving the diverted flow along a different flow path or to a different watershed. The diversion of flow results in increased flood protection for land and communities downstream of the flow split. The diverted flow often rejoins the existing stream farther downstream. The benefits of using this method are that no modifications are made to the river channel, and the diversion often takes place well upstream from the protected area, improving visual aesthetics (as opposed to when a levee or channel modification is constructed to protect the area).
388
Channel Modification
Chapter 11
Useful Channel Design References The engineer performing a major channel modification must address a wide variety of engineering and environmental issues for which a detailed discussion is beyond the scope of this chapter. However, many valuable references exist to aid the engineer in this type of design. The following references should prove useful to an engineer tasked with a major channel modification design. The U.S. Army Corps of Engineers engineering manuals (EM) are available on the USACE publication web site: www.usace.army. mil/inet/usace-docs/eng-manuals/cecw.htm. These references are certainly not the only sources of information. The modeler should perform a literature search to locate additional useful publications dealing with channel modifications, sediment transport, and river engineering. EM1110-2-1418 Channel Stability Assessment for Flood Control Projects (USACE, 1994f) – This publication provides guidance for the design of stable channels, incorporating features to handle design problems, needed information for stability analyses, and methodologies for the evaluation and design of a stable channel. Numerous tables, procedures, and design guides are included, as well as many examples of successful and unsuccessful channel designs. EM1110-2-1601 Hydraulic Design of Flood Control Channels (USACE, 1994e) – This publication provides information on both lined and unlined channel design, including hydraulic theory, design of channel linings and special features, as well as determining n values for channel conditions, including vegetated channel design. Riprap design is covered in detail. Numerous design charts and procedures appear in the reference's appendices. This reference is
included as a PDF file on the CD accompanying this book. EM1110-2-1205 Environmental Engineering for Local Flood Control Channels (USACE, 1989) – This publication gives guidance on incorporating environmental considerations in channel modification projects, including environmental effects associated with different types of projects, environmental design procedures, and environmental data collection and analysis. EM1110-2-4000 Sediment Investigations of Rivers and Reservoirs (USACE, 1995b) – This publication provides guidance and engineering procedures for river sedimentation investigations, including channel modifications. Staged sediment studies are discussed, including a sediment impact analysis to determine the likelihood of needing more detailed sediment analyses to address the proposed stream modification. This reference is included as a PDF file on the CD accompanying this book. Channelized Rivers (Brookes, 1988) – This book is devoted entirely to river modification issues, including traditional methods; the physical and biological impacts; downstream consequences of channelization; recommendations for revised construction procedures; and mitigation, enhancement, and restoration techniques. Watson, Biedenham, and Scott; Waterways Experiment Station, Channel Rehabilitation: Processes, Design and Implementation (USACE, 1999) – This publication addresses the rehabilitation process, rather than enlarging or constructing new channels. It covers the design process, fluvial geomorphology and channel processes, channelization impacts, and the selection and design of channel rehabilitation methods.
Drawbacks to diversions include the costs associated with the additional land acquisition required for the diversion channel, the weir structure (possibly gated) to regulate the diversion of flow, and sediment deposition problems in either the diversion channel and/or main river. Although a certain flow is diverted into another channel, the sediment is usually not diverted in the same proportions with the water discharge. Either the diversion channel or the river (usually the river) experiences deposition during diversions. Figure 11.6 illustrates a cross section of a main channel and a diversion channel.
Section 11.2
Channel Modification Methods
389
Figure 11.6 Main channel with a diversion channel.
Figure 11.7 is a view of the Morganza Diversion Structure adjacent to the Mississippi River near New Orleans, Louisiana. The Morganza Spillway is a gated structure that allows up to 600,000 ft3/s (17,000 m3/s) to be diverted out of the Mississippi River to bypass New Orleans. The spillway is 3900 ft (1190 m) long and goes into operation only when flows exceed 1,500,000 ft3/s (42,500 m3/s). The diversion ensures that the downstream flow in the Mississippi River does not exceed this total. New Orleans is protected by levees and three major diversions that remove more than 1,500,000 ft3/s (42,500 m3/s) from the Mississippi River and divert the flow to the Gulf of Mexico via separate diversion channels. Chapter 12 further discusses modeling diversion channels with HEC-RAS.
High-Flow Cutoff/Diversion Channel A high-flow cutoff/diversion channel differs from a high-flow diversion channel/weir in that a gated weir structure is not needed at the diversion channel entrance; the diversion channel is smaller, and the diversion flow path is shorter—often just the distance across the neck of a meander loop. Figure 11.8 illustrates this type of solution. In this figure, all normal flows follow the tree-lined meandering channel. During higher flows, the diversion channel allows a portion of the flow to follow a shorter, more efficient flow path. The advantages are that the existing channel remains unaffected and additional capacity is provided during higher flows. As with the previous channel modification types, the disadvantages are the land costs required for the diversion channel, the loss of this land for other purposes, and the need for erosion control structures at the upstream and downstream diversion boundary. Because the diverted flow follows a shorter path downstream, the diversion channel flows experience higher velocities, potentially resulting in erosion. During prolonged flood events and without erosion control, the shorter path can erode and gain additional capacity. If left untreated, more flow than the diversion channel was designed for would divert from the river and the diversion would eventually become the main channel for all flows, cutting off the meander loop. A high-flow diversion can be modeled as a lateral weir or as a split-flow computation. Chapter 12 addresses both of these types of computations.
390
Channel Modification
Chapter 11
USACE
Figure 11.7 Morganza diversion spillway.
USACE
Figure 11.8 A high-flow diversion.
Section 11.2
Channel Modification Methods
391
Clearing and Snagging Clearing and snagging involve removing vegetation from the channel sides and along the bankline (clearing) and removing trees, debris, and stumps from the channel (snagging). The channel geometry and alignment usually remain unchanged with this solution, with the modification simply resulting in a lower Manning’s n value. Clearing and snagging is therefore modeled in HEC-RAS by reducing the channel n value. However, significant environmental effects may result from this solution. Fish habitat and cover are removed, the shade given by vegetation is lost, and bottom sediments are resuspended by the snagging. This solution is usually short-lived, as much of the vegetation will reestablish within one or two growing seasons. Studies by Wilson (1973), Pickles (1931), and Burkham (1976) for streams in Mississippi, Illinois, and Arizona, respectively, found Manning’s n increasing from 50 percent to more than 300 percent in the next few years following clear and snag operations. Therefore, to be effective, fairly frequent clearing and snagging operations are necessary. Figure 11.9 shows a cross section before and after clearing and snagging have occurred.
Compound Channels Construction of a compound channel, also referred to as a high-cutback channel, involves changing the geometry of the existing channel to gain channel capacity. The additional channel capacity is gained by adding flow area in the upper portion of the channel cross section, leaving the main channel relatively undisturbed. The elevation of the cut is key to the design’s success. A cut that is made too high up on the section will not offer the required capacity, while a cut that is made too low will be inundated frequently, possibly resulting in excessive deposition in the cut area. The additional area must receive adequate maintenance, especially limiting unwanted vegetation and deposition to maintain the design capacity. This type of solution has been used to incorporate environmental goals, such as planting selected vegetation in the cut area. Vertical variation in the roughness values may be necessary to properly model such a channel and this capability is available in HEC-RAS. The modeler should carefully review Hydraulic Design of Flood Control Channels (USACE, 1994e) for guidance on this type of design and to assist in estimating n value changes in the vertical direction. Also, considerable research has been performed on flow resistance for a wide variety of vegetation types, especially by Freeman, Rahmeyer, and Copeland (1999). This information will eventually be incorporated in future updates of Hydraulic Design of Flood Control Channels (USACE, 1994e). Figure 11.10 displays a potential channel modification using a compound channel. Section 11.4 discusses modeling a compound channel with HEC-RAS.
Clearing and Enlarging One Side of the Channel This technique combines clearing and snagging with cutting, but only on one side of the existing channel. Additional capacity is gained from the enlargement and clearing of part of the channel. The same environmental negatives and potential problems exist for this solution as for the clearing and snagging and compound channel options, but only for one side of the channel. Figure 11.11 shows an example of this method. This solution is modeled in HEC-RAS by adjusting both the geometry and the n value.
392
Channel Modification
Figure 11.9 Clearing and snagging within a channel.
Figure 11.10 Creating a compound channel for additional flow capacity.
Chapter 11
Section 11.2
Channel Modification Methods
393
Figure 11.11 Clearing and enlarging one side of a channel.
Widening the Upper Channel and Using the Original Channel for Low Flow Widening the upper channel and using the original channel for low flow involves clearing and enlarging both sides of the existing channel. The lowest (deepest) portion of the existing channel is left as undisturbed as possible to act as a low flow channel during regular small events. Sedimentation in the cut areas along with vegetative growth will make maintaining the new capacity of the modification difficult. Figure 11.12 shows this channel modification solution. This can be modeled in HECRAS similarly to clearing and enlarging one side of the channel.
Realigning the Channel When a channel is realigned, portions of the original channel may be abandoned, as the modified portions follow a new flow path for at least part of the reach. If the total modified channel length is shorter than the original channel length, a steeper invert slope will occur. This will ultimately result in faster velocities, and may significantly increase scour and deposition problems along the realigned reach. One or more erosion control structures are usually necessary for this method. Realigned channels can be modeled in HEC-RAS by locating the centerline station for the new channel and
Figure 11.12 Wider channel, with the original channel for low flow.
394
Channel Modification
Chapter 11
adjusting the channel and overbank reach lengths. The realignment may also include increased cross-sectional area and a reduced n value. If significant environmental effects do not result, the old channel may be filled in if it will no longer be effective in conveying discharge. Figure 11.13 shows the major channel realignment undertaken on the Lower Mississippi River in the 1930s. Sixteen major river cutoffs were made, shortening the river by approximately 160 mi (258 km). This reduction was made to increase the river’s slope and velocity, thereby reducing flood levels and lowering required levee heights by as much as 10 ft (3 m). However, much channel stabilization work has been required as a result of the cutoffs and a significant channel monitoring and maintenance program will be necessary for the Lower Mississippi indefinitely.
Constructing a Paved Channel In urban areas where the cost of land is high, a paved channel can be constructed for conveyance of flood flows, thus minimizing the need to acquire land. Such channels are usually rectangular or trapezoidal and lined with concrete or other protective materials. Paving eliminates much of the maintenance requirements associated with excavated channels; however, paved channels essentially eliminate all aquatic and terrestrial habitats and result in extreme variations in water temperatures. Downstream sedimentation is often lower for paved channels, as well. These channels may be considered an improvement over the original channel, because naturally occurring channels in urbanized areas often experience significant erosion and are frequently of poor aesthetic quality. Modeling paved channels in HEC-RAS involves a lower Manning’s n, geometry changes, and reach length adjustments. Figure 11.14 shows a major channelization project under construction. This rectangular concrete flood reduction channel was constructed to protect the City of Cape Girardeau, Missouri, from floods along Cape la Croix Creek, which flows through the main business district of the city. The channel is 75 ft (23 m) wide and about 14 ft (4.3 m) deep. The channel bottom is sloped downward at one percent, toward the centerline, to facilitate low flow. Bridges were designed to span the new channel, thus eliminating the effects of piers. HEC-2 was used for the channel design. The project has been in operation for several years and has successfully passed many floods, including one that approached the channel’s design capacity.
New Channel An entirely new channel may be necessary, especially if its purpose is drainage or irrigation. Important aspects for the design of a new channel include the erodibility of the soil, generally avoiding straight channels, channel invert slope and side slopes commensurate with the erosion potential of the soils exposed by the new channel, the use of a gradual alignment, and adequate protection of the channel where needed. New channels can be modeled in HEC-RAS by using the Channel Modification tool, or by creating them directly as a series of individual cross sections. Figure 11.15 shows a concrete channel that was built in the Los Angeles, California, area to convey supercritical flows from the mountains to the Pacific Ocean. An entirely new, lined channel was needed to minimize the land-acquisition costs of the project.
Section 11.2
Channel Modification Methods
395
Figure 11.13 Channel realignment on the Mississippi River through the use of cutoffs.
Channel Rehabilitation An increasingly popular aspect of classic channel rehabilitation is the integrated improvement of the channel’s environmental characteristics as part of the overall rehab. Channel rehabilitation with integrated environmental improvements can include adjustment of the constructed channel alignment to mimic more natural conditions; selection of native plantings, vegetation, and trees along channel sides and banks in lieu of mowing; and placement of large rocks, brush piles, and so on to pro-
396
Channel Modification
Chapter 11
Figure 11.14 Constructing a paved channel in Cape Girardeau, Missouri.
USACE
Figure 11.15 Supercritical flow channel in Los Angeles.
vide resting places and habitat for fish and other aquatic life. Channel Rehabilitation: Processes, Design, and Implementation by Watson, Biedenharn, and Scott (USACE, 1999) and similar guidance materials should be closely reviewed while planning channel rehabilitation projects. The engineer must take care when designing these improvements to ensure that the flow capacity of the original channel is maintained. Rehabilitation projects can be modeled in HEC-RAS, but the value for Manning’s n must be carefully estimated and adjusted to account for the vegetation and obstructions placed in the channel and
Section 11.2
Channel Modification Methods
397
along the bankline. Varying Manning’s n vertically as the flow depth increases may well be required to best model the rehabilitation project.
The Perils of Shortening a Stream Channel modifications can incorporate widening, deepening, and shortening the stream, and lowering its roughness. However, significant changes to any of these variables may bring about unwanted changes to the waterway’s flow regime. A major modification to the Cache River in southern Illinois is a prime example. The original Cache River watershed was 740 mi2 (1917 km2) in area, and much of the main channel flowed through an old, abandoned channel of the Ohio River a few miles (km) north of the current channel of the Ohio River (USACE, 1992). The Cache eventually emptied into the Ohio River at Cairo, Illinois, close to the junction of the Ohio and Mississippi Rivers. Just prior to World War I, local farmers decided to perform a major change to the flow patterns of the Cache River. The change involved the diversion of 380 mi2 (984 km2) of runoff from the upper portion of the basin away from the frequently flooded croplands along the lower Cache River. The Lower Cache roughly paralleled the current path of the Ohio River. The diversion of the Upper Cache through a newly constructed cutoff channel required only about 4 mi (6.5 km) of excavation to reach the Ohio River. The farmers diverted the Upper Cache into the newly dug channel in 1915 so that the mouth of the new channel entered the Ohio about 20 mi (32 km) upstream of its original location. This operation resulted in shortening the Cache’s route by nearly 90 percent, from almost 40 mi (64 km) down to 4 mi (6.5 km). The excavated diversion channel was initially about 30–50 ft (9–15 m) wide and about 4–5 ft (1.2–1.5 m) deep.
Although the engineering technology of 1915 probably could not have foreseen the ramifications, a huge impact in the Upper Cache’s sediment transport capabilities quickly became apparent. Over the ensuing decades, the steep slope of the new diversion channel resulted in a great increase in velocity, scouring a much larger channel. In some places, the diversion channel is now 250–300 ft (76–91 m) wide and 60–70 ft (18–21 m) deep. Several bridges have been destroyed in the process, rebuilt, and destroyed again. The scour has proceeded to bedrock in some locations and has proceeded far upstream of the original start of the diversion. The erosion has also extended up all tributaries of the eroded Upper Cache and diversion channel. To reduce further upstream migration of the headcut, the State of Illinois is in the process of constructing channel stabilization weirs more than 10 mi (16 km) upstream of the original start of the diversion channel. The State of Illinois and the U.S. Army Corps of Engineers are also studying the feasibility of a major drop structure on the Upper Cache as a permanent solution to the continuing channel erosion problem. Major cutoffs such as the Cache are less common today, due to the resulting environmental problems and the environmental opposition to such projects. However, even the original cutoff could have been successful if an adequate grade control structure was constructed at the start of the diversion and one or more additional stabilization structures were included along the length of the diversion channel.
398
Channel Modification
Chapter 11
Channel Modifications for Corte Madera Creek The Corte Madera Basin is a 28 mi2 (73 km2) watershed that drains runoff from the communities of Corte Madera, Larkspur, Kentfield, Fairfax, San Anselmo, and Ross in Marin County, California. The stream flows into San Francisco Bay, about nine miles north of the Golden Gate Bridge, and has a history of flooding. Following a large flood in 1958, the U.S. Army, Corps of Engineers was asked to study flood reduction methods for the basin. A channel modification was designed to carry the runoff from a Standard Project Flood, estimated as a 250-year flood event. The project featured approximately 3 miles (5 km) of trapezoidal earthen channel (slope of 0.0007, subcritical flow) from San Francisco Bay to the city of Kentfield. Upstream of Kentfield, a 33 ft (10 m), U-shaped concrete channel was constructed on a slope of 0.0038 to provide for supercritical flow in this reach. A stilling basin was constructed at the junction of the concrete and earthen channel to control the hydraulic jump occurring there and reduce the potential for erosion. Design discharges for the project ranged from 9000 ft3/s (255 m3/s) at the downstream end to 7800 ft3/s (221 m3/s) at the upstream terminus.
channel capacity was exceeded during the flood and average flood depths of 2.5 ft (0.8 m) occurred in the overbank areas, resulting in an estimated 2.2 million dollars in damage. Surveys following the flood found that extensive sediment and gravel had been deposited over much of the concrete-lined channel before and during the event, increasing the roughness enough to cause a hydraulic jump and subcritical flow in the supercritical channel (Williams, 1990). The lack of an upstream sediment trap caused the malfunction of the channel and allowed flows less than the design discharge to exceed the channel capacity.
The project, completed in 1971, was only the first three units of what was originally conceived as a six-unit project. During the construction, Fairfax and San Anselmo (Units 5 and 6) opted out of the project because of economic concerns. Property litigation delayed the construction of Unit 4, and then environmental opposition and lack of public support prevented its construction. The lack of a sediment basin at the entrance to the supercritical flow channel was an unfortunate oversight in the project design. Without a sediment basin, any runoff event would bring sediment and debris directly into the new channel.
Following the flood, the Marin County Superior Court ordered the project to be completed. However, intense environmental opposition required the Sacramento District of the Corps of Engineers to develop an Environmental Impact Statement and several different designs, in an attempt to satisfy all concerns. The accepted design results in about a 30-year level of protection and minimizes the impact to Corte Madera Creek. The project will be extended as an earthen channel through Unit 4. An existing small sediment trap, maintained by the City of Ross, will be deepened and slightly widened within the existing channel boundaries to trap the coarser sediment particles just upstream of the end of Unit 4. The walls of the existing concrete channel will be raised to contain the design discharge (design peak flow of 5400 ft3/s or 153 m3/s) within the channel if subcritical flow occurs. Some sediment will likely remain in the concrete channel at all times. A bypass channel (buried culverts) will be incorporated near the upstream end of the project to minimize channel modifications in Unit 4. Recreational features will be retained and fish passage will be included at the end of the project.
The impact of sediment entering the supercritical flow channel was dramatically illustrated when a 32-hour rainfall in January 1982 dropped an estimated 13 in. (33 cm) of rainfall on the Corte Madera watershed. Peak discharge during this event reached 7200 ft3/s (204 m3/s), an event rarer than the 100-year flood peak, but less than the channel’s design capacity. However, the
The Corte Madera Creek Project illustrates the need to evaluate the sediment load, as well as the flow discharge, entering a supercritical flow channel. HEC-RAS assumes the flow is clear water, but the reality is that flowing water contains sediment, and the deposition of this sediment can change the channel properties and cause the channel to function improperly.
Section 11.2
Channel Modification Methods
399
The Kissimmee River Restoration Project To date, the largest environmental project involving channelization in the United States is the Kissimmee River Restoration Project (USACE, 1991) in central Florida, south of Orlando. Following a 1947 hurricane which caused severe flooding in newly developing areas, the State of Florida requested that the U.S. Congress authorize a plan for flood protection in the area. Congress responded by authorizing the Central and Southern Florida Project for flood reduction in 1948. The Kissimmee River portion of the project was initiated in 1954. By 1960, the Corps of Engineers had planned and designed this part of the overall project, with construction taking place between 1962 and 1971. The Kissimmee River was channelized for 56 mi (90 km) and impounded by a series of five navigation pools with locks for the passage of small boat traffic. The new channel was approximately 30 ft (9 m) deep and 300 ft (90 m) wide, eliminating about 35 mi (56 km) of natural stream. Six water control structures and canals in the upper portion of the basin regulate the water flow into the Kissimmee River. Natural fluctuations in water levels during lower flow events no longer occur and, over time, much of the adjoining floodplain was drained and associated wetlands eliminated. The elimination of river and floodplain wetlands severely impacted the Kissimmee ecosystem, especially fish and other wildlife. By the 1990s, bird populations in the basin had greatly decreased. Low dissolved oxygen levels in the Kissimmee led to the loss of sport fish like the
largemouth bass. The stable water levels largely eliminated the fish spawning and foraging habitat. During the 1970s and 1980s, environmental concerns increased in the Kissimmee Basin. The Water Resources Development Act of 1992 authorized a partial restoration plan for the Kissimmee that would result in regaining over 40 mi2 (104 km2) of river and associated wetland surface areas. The remaining areas associated with the original Kissimmee project would remain in place to provide flood protection for the existing development. The plan, now under construction, will ultimately feature the filling in of 22 mi (35 km), or about 40 percent, of the new channel and will remove two of the five navigation pools within this reach. A portion of the historic, abandoned channel, as well as 9 mi (14 km) of new channel, will be used to reestablish the historic meandering pattern of the Kissimmee River. Storage will be increased in two lakes in the upper Kissimmee River Basin to provide continuous inflows and some fluctuations in water levels for fish and wildlife enhancement. The $518 million project includes significant amounts of land acquisition, with all land inundated by the 5-year flood event to be purchased and a flowage easement acquired for lands between the 5- and 100year flood elevations. The land acquisition is intended to maintain the existing level of flood reduction in the basin and limit new development in potential floodprone lands. Construction is scheduled for completion in 2010.
Permitting Requirements Before developing a channel design, the engineer must research the permit requirements for the locale and the nature of the project. Even short reaches of relocated channel will likely require a state or provincial permit. In the United States, modifications of streams often require permits from federal agencies such as USACE, as well as the U.S. Environmental Protection Agency (EPA) and local conservation commissions. For small modifications, such as a minor channel relocation for bridge or culvert construction, a simple Environmental Assessment (EA) may be adequate. For any major channel work, a full Environmental Impact Statement (EIS) is likely required. If the channel modification is in an area where a Federal Emergency Management Agency (FEMA) floodway has been established, a “no-rise” certification (discussed in Section 10.6) is needed for construction.
400
Channel Modification
Chapter 11
The hydraulic and hydrologic analyses associated with completing the permit process and addressing all questions on proposed and alternate solutions are often quite extensive. The overall permit process, from initial application to final approval, is typically complex and time-consuming. The design engineer should meet with permit personnel of all presiding agencies as early as possible in the analysis process. Some potential solutions may be eliminated due to the extensive environmental studies required. The permit process must be initiated and often times completed well in advance of any construction. Often a year or more is needed before starting construction to have the permit reviewed and to collect comments from all affected parties, as well as to resolve any conflicts. In some cases, permits for projects may be denied, and the project may be permanently halted. Proceeding with the project without required permits can result in complete restoration of any work at the contractorʹs expense as well as significant financial penalties.
11.3
Channel Design Considerations Channel modifications require considerably more engineering effort than just simply determining a revised channel geometry. Some of the required tasks involve using HEC-RAS, and others must be evaluated outside of the program. This section describes many of the design considerations associated with channel modifications.
Flow Regime/Mixed Flow Subcritical flow is the typical regime used in design for both natural and man-made channels. However, efficient channel shapes, steep slopes, and low Manning’s n values associated with channel modifications all work to speed the flow through an improved reach, potentially creating a supercritical regime. Supercritical flows are especially likely if the channel is paved with concrete or asphalt and the channel slope approaches 0.5 percent. For steep slopes in urban areas, channels may be designed to be supercritical, because high discharges may be passed through a relatively small cross-sectional area. Regardless of whether the channel is designed for a subcritical or supercritical flow regime, the modeler should consider conducting a mixed flow analysis by using the HEC-RAS program, as discussed in Chapter 8. HEC-RAS adopts the correct regime based on the greatest specific force at each cross section. However, the modeler should also evaluate the performance of the design if the opposite regime occurs, as compared to the design regime. During flood events in supercritical flow channels, sediment, debris, and trash can enter the channel and may impact the selected Manning’s n value. Studies have demonstrated that gravel, moving as bed load in a concrete channel, can increase Manning’s n by up to 10 percent (Stonestreet, Copeland, and McVan, 1991.). If sufficient material enters a supercritical flow channel and is deposited on and/or covers the concrete bottom, the Manning’s n value is typically considerably higher than a “clean” channel. The Corte Madera Creek Project discussed in Section 11.2 is an example of sediment deposition drastically changing the channel characteristics in a supercritical flow channel. Later studies of the Corte Madera phenomena by the Waterways Experiment Station found that the sediment inflow and deposition caused the Manning’s n
Section 11.3
Channel Design Considerations
401
value for the channel to increase from approximately 0.013 to 0.028 (Copeland and Thomas, 1989). Figure 11.16 shows a plot of normal depth versus Manning’s n for a 10 ft (3 m) wide, rectangular, concrete-lined channel on a 1 percent slope with a constant discharge of 1000 ft3/s (28.3 m3/s). Although the flow is clearly supercritical when using the normal Manningʹs n value for concrete of 0.013, the flow changes to subcritical if n exceeds a value of about 0.020. The importance of preventing significant deposition in a supercritical flow channel is readily apparent.
Figure 11.16 Normal depth versus Manning’s n.
Air Entrainment In supercritical flow channels, the high flow velocity tends to trap or entrain air in the moving water. Accumulation of air in the flow causes “bulking” and results in a specific weight of water less than 62.4 lb/ft3 (1000 kg/m3). Thus, air entrainment causes greater depths for supercritical flow. Physical model tests have formulated adjustment equations to account for the bulking of flow in the supercritical regime. For Froude numbers of 8.2 or less the water depth is given by the following equation (USACE, 1994):
D a = 0.906De
0.061Fr
(11.2)
For Froude numbers greater than 8.2, the equation is as follows (USACE 1994):
D a = 0.62De where Da D Fr e
0.1051Fr
(11.3)
= water depth with air entrainment (ft, m) = water depth without air entrainment (ft, m) = Froude number (dimensionless) = 2.718282
HEC-RAS automatically uses these equations to compute an adjusted flow depth to account for air entrainment when the Froude number indicates supercritical flow. However, the air entrained depth will not be displayed in a table or profile unless the user adds the variable “WS Air Entr.” to the tables, as a user-defined option.
402
Channel Modification
Chapter 11
To see the effects of air entrainment, consider a supercritical channel with a depth of 2 ft (0.6 m) and a Froude number of 8; the air entrained depth from Equation 11.2 would be nearly 3 ft (0.9 m), or a depth increase of about 50 percent. However, more often than not, Froude numbers are less than 3 for a supercritical flow channel. A Froude number of 3 and a flow depth of 2 ft (0.6 m) will give Da = 2.17 ft (0.66 m), a minor increase, that would be unlikely to require additional freeboard height for bulking. When designing freeboard heights for supercritical flow conditions, one should consider the bulking phenomena.
Linings From a construction cost, installation, and maintenance standpoint, an earthen or grass-lined channel is desirable. However, more elaborate linings may be necessary, depending on the channelʹs characteristics and the flow situation. Trapezoidal channels may be lined with riprap to provide erosion protection. Figure 11.17 shows a reach of stream where the entire channel has been protected with riprap. EM1111-21601, Hydraulic Design of Flood Control Channels (USACE, 1994e), included on the CDROM that accompanies this book, provides extensive coverage of riprap design methodologies and techniques.
Figure 11.17 A riprap-lined channel.
Paved drainage channels are common in urban areas, where the modified stream must be placed in a tight space to avoid relocating homes and businesses. Higher velocities are caused by the limited cross section and may require a concrete or asphalt lining along the invert and lower portion of the channel cross section to prevent scour of the channel as well as to facilitate maintenance; the upper portion may be grass-lined. Irrigation or water supply channels often have a membrane liner to prevent significant seepage losses during the transfer of water to a remote location. The need for linings is predicated on site-specific conditions as well as cost constraints. Where a mix of linings is used, the resulting channel’s Manning’s n must
Section 11.3
Channel Design Considerations
403
reflect a weighting of the different n values appropriate for each material. Equation 7.11 on page 273 illustrates a procedure for determining a weighted Manning’s n for varying channel roughness coefficients.
Freeboard All engineering projects should incorporate a factor of safety in their design. For water resources projects, the hydraulic design includes a freeboard applied to the height of a dam, levee, or channel. Freeboard is a design consideration, quantified as an additional vertical height above the design water surface elevation for the uncertainties in the hydraulic analysis. Freeboard includes factors that cannot be reasonably computed and incorporated in the design. These factors may include temporary upward shifts in the stage-discharge relationship, unexpected settlement of the embankment, unforeseen changes in channel vegetation, accumulation of debris in the channel, variations in the accuracy of the design flood estimate, and unexpected hydrologic phenomena. Freeboard does not represent protection greater than the design level but accounts for uncertainty in the basic hydraulic analysis, such as in the estimate of Manning’s n. Freeboard is often set by agency policy. In the United States, the U.S. Army Corps of Engineers uses a minimum requirement of 1 ft (0.3 m) freeboard for low-velocity channels in primarily rural areas. For supercritical flow channels or for most levees and floodwalls, a minimum of 3 ft (0.9 m) of freeboard is the standard. Freeboard of 2.0 to 2.5 ft (0.6 to 0.75 m) is used for other types of channel and flow conditions. EM 1111-2-1601, Hydraulic Design of Flood Control Channels (USACE, 1994e), gives additional guidance and information. The U.S. Bureau of Reclamation has developed design curves for use in setting freeboard heights for irrigation canals (U.S. Bureau of Reclamation, 1963). The Bureau recommends that freeboard be increased as discharge increases and that the amount of freeboard should vary depending on whether the channel is earth-lined, is a hard surface, or uses a membrane liner. Freeboard should be determined using a program such as HEC-RAS to evaluate different scenarios for flood events exceeding the design event; a uniform depth increment should not simply be added to the final water surface elevation. Freeboard amounts should incorporate the following: • Sensitivity tests for varying Manning’s n in the channel and floodplain • The consequences of exceeding the channel design • Trash and debris buildup at bridges and culverts • Superelevation around bends • The impact of tributary inflows • Channel transitions • Drop structures and hydraulic jumps • Forcing the initial levee overtopping to occur at a selected location to minimize the resulting damage Waves and local increases in water surface elevation may also occur, particularly in supercritical flow regime channels. Waves are initiated at obstructions and may dic-
404
Channel Modification
Chapter 11
tate the need for additional freeboard for some distance upstream or downstream (or both) of the wave-initiation point. ETL 1110-2-299, Overtopping of Flood Control Levees and Floodwalls (USACE, 1986a), describes the design of levee freeboard, including an example of such an analysis. The reader should note that the U.S. Army Corps of Engineers and other U.S. agencies are gradually changing from using freeboard and instead are using risk and uncertainty analyses to establish the necessary height of protection, such as the levee crown elevation. The entire concept of freeboard has already been replaced by risk and uncertainty studies for levee projects planned and designed by the U.S. Army Corps of Engineers. In these studies, the discharge-frequency, stage-discharge, and stagedamage relationships are developed for a given project location along with estimates of the uncertainty (confidence limits) of these relationships. A Monte Carlo simulation randomly generates thousands of trials, each giving a possible value of a river elevation. Values from these trials become a probability function and are used to estimate project risk and reliability (chance of passing a certain level of flood) for different heights of levee. The result will yield a numerical estimate of the reliability of the project (for instance, a levee of crown elevation 435 ft. has a 97.8 percent chance of passing the 100-year flood without overtopping). Increasing the height of protection increases the project costs, but also decreases the associated risk of exceedance. Analysis procedures and details are provided in EM 1110-2-1619, Risk-Based Analysis for Flood Damage Reduction Studies (USACE, 1996).
Channel Transitions The cross-sectional geometry of a channel modification is seldom uniform over long reaches. The cross section increases as additional flow enters the channel, and the channel shape may change from trapezoidal to rectangular or the reverse to fit the channel modification to the available area and topography. A properly designed transition is needed to minimize energy losses associated with expansion or contraction of the flow as well as to minimize possible wave creation and propagation in supercritical flow regimes. In supercritical flow channels, small changes in channel shape often cause large waves downstream of the change. Figure 11.18 illustrates the three most common types of transitions for use in supercritical flow transitions or transitions between subcritical and supercritical flow. Table 11.1 (USACE, 1994) shows common expansion (Ce) and contraction (Cc) coefficients for channel transitions in subcritical or supercritical flow. For supercritical flow, the cylindrical quadrant, shown in Figure 11.18, is normally used for changes from subcritical (trapezoidal section) to supercritical (rectangular section) flow. For changes in rectangular geometry within a supercritical flow reach, a straight-line transition between the two rectangular shapes is used with a long wall flare. Flares range from 1:10 for velocities less than 15 ft/s (4.5 m/s) to 1:20 for velocities of 30 to 40 ft/s (9 to 12 m/s). A square end or abrupt contraction or expansion (no transition between different channel shapes) may be used in subcritical flow. The lower cost of a square end transition may offset the high transition losses (and high upstream water surface profiles) resulting from this transition.
Next Page
Section 11.3
Channel Design Considerations
405
Figure 11.18 Three most common types of supercritical flow transitions. Table 11.1 Channel transition loss coefficients. Transition Type Warped Cylindrical quadrant
Cc
Ce
0.1
0.2
0.15
0.2
Wedge
0.3
0.5
Straight line
0.3
0.5
Square end
0.3
0.75
Junctions Tributary inflows should generally join the main channel at a small angle relative to the direction of main channel flow to achieve desirable flow patterns. This is extremely important in supercritical channels as large waves can be created at a junction if the joining of flows is not as smooth as possible. For supercritical flow, USACE suggests an angle as close to zero as possible between the tributary and main channel, with a maximum allowable angle of 12 degrees (USACE, 1994e). Figure 11.19 shows an example of a well-designed junction in a lined channel. Figure 11.20, however, shows an example of a poorly designed junction in a subcritical channel. Note the displacement of riprap just below the outlet structure, within the main channel. This riprap was designed for the main channel velocities, but the discharge from the tributary occurred when the water level in the main channel was well
Previous Page
406
Channel Modification
Chapter 11
Figure 11.19 A well-designed channel junction.
below the outlet floor elevation. Consequently, tributary flow velocity likely exceeded critical velocity on the outlet structure and was high enough to cause a partial failure of the downstream riprap. Where tributary flows are quite small as compared to main channel flow, the confluence angle is not overly important for subcritical flow. These junctions could be through open channels, pipes, chutes, or baffle spillways. However, for supercritical flow, a smooth transition, even for small tributary flows, is important. Small flows may enter through an underwater pipe placed at the lowest elevation possible on the main channel or over a side weir into the main channel. The design should minimize the disturbance and the waves created by the additional flow into the main channel. Junction design details for small inflows are given in EM1111-2-1601, Hydraulic Design of Flood Control Channels (USACE, 1994e).
Channel Protection In channels designed to convey flood flows, some amount of channel protection is nearly always necessary. Even channels on low slopes with small velocities experience scour in certain locations, typically along the outside of bends or at obstructions such as bridges and culverts. A wide range of materials are available for use in channel protection. Riprap, gabions, used tires, wired blocks, fences, steel jacks, dikes, concrete aprons, and drop structures have all been successfully applied. The selection of an appropriate material is based on its availability, cost, and aesthetic considerations. In urban areas, gabions (wire baskets filled with rock and fastened together) are a popular solution. Figure 11.21 shows a rather elaborate channel modification using gabions. Gabions are most commonly used along the outside of channel bends and on approaches to bridges or culverts. An excellent publication for evaluating and selecting protection materials, especially for the nonengineer, is available through the Waterways Experiment Station, WES (USACE, 1983).
Section 11.3
Channel Design Considerations
Figure 11.20 Main channel riprap displaced by supercritical tributary flow from a pipe.
Figure 11.21 An elaborate gabion-lined channel.
407
408
Channel Modification
Chapter 11
In areas where high-quality rock is available and velocities are not excessively high, rock riprap is often the most economical material for channel protection. Past designs for riprap protection have often focused on a maximum permissible velocity or on an allowable shear stress for determination of appropriate rock diameters. Although these simpler methods are still useful, they have largely been replaced by actual test data. Extensive physical model testing of actual riprap at WES has resulted in the development of procedures and design equations with which to determine appropriate riprap sizing and gradation. Chapter 3 of EM1110-2-1601, Hydraulic Design of Flood Control Channels (USACE, 1994e) deals extensively with riprap design for channel protection. The modeler should follow the steps and guidelines in this reference for the design of riprap protection. Petersen has also published a useful reference on river engineering studies, specifically dealing with channel linings (Petersen, 1986).
Low Flow Channel The channel geometry determined as necessary for a selected design discharge is needed only when that flow actually occurs, which may be for a short duration every 10 to 50 years, on average. For the other 99 percent of the time, the channel is oversized for its day-to-day flows. Hence, there is a need for a channel modification that can successfully handle small to medium flows as well as flood flows. For a typical rectangular or trapezoidal channel modification, low discharges can spread out across the bottom of the channel and are very shallow, moving at a low velocity. The coarser sediment and small debris that are carried by these flows quickly settle out, and over a relatively short time, consolidation takes place and vegetation is established, which further encourages deposition. To resolve this, channel modification projects should shape the lower portion of the proposed channel for low flows, if possible. For a lined channel, a low-flow trapezoidal or rectangular channel within the overall modified section should be included, or the channel invert could be shaped as a shallow V to concentrate low flows. The use of the existing low flow channel as a pilot channel within the larger cross section was presented previously in the chapter and is shown in Figure 11.12. Figure 11.22 shows a supercritical flow channel in the Los Angeles, California, area with a low flow channel incorporated into the overall channel design.
Superelevation Although one-dimensional, steady flow analysis assumes a constant water surface elevation across the section, water flowing around a bend will not have a constant elevation. The centrifugal force caused by water turning through a specific radius of curvature causes the mass of water to concentrate along the outside of the bend, resulting in higher elevations on the outside and lower elevations on the inside of the bend. For subcritical flow moving through a channel bend of moderate to large radius, the superelevation is negligible. However, for short radius turns and especially for supercritical flow regimes, the superelevation is often significant and must be included in the design height of the affected channel wall. As is shown in Figure 11.22, the top elevation of the outside wall is considerably higher than that of the inside wall. Note also that the channel floor is banked, similar to the design for a high-speed highway through a turn. The difference in elevation across the channel through a curve may be estimated from the following equation:
Section 11.3
Channel Design Considerations
409
2
V W ∆y = C -----------gR
(11.4)
where ∆y = difference in water level between the channel centerline and the outside of the bend (ft, m) C = dimensionless coefficient based on regime, channel shape, and type of curve (simple circular, spiral transition, or spiral banked) V = average channel velocity (ft/s, m/s) W = channel width (water edge to water edge) at the centerline water surface elevation (ft, m) g = gravitational constant (32.2 ft/s2, 9.81 m/s2) R = radius of curvature at the channel centerline (ft, m)
USACE
Figure 11.22 Supercritical channel with a low flow channel.
Table 11.2 lists values for C. If the total increase in water surface elevation (including any waves) is less than 0.5 ft (0.15 m), no additional freeboard, invert banking, or special spiral transitions are normally required. HEC-RAS does not address water surface elevation changes caused by superelevation. The modeler must address this feature separately; however, width, velocity, and hydraulic radius parameters are available from the individual cross-section output table. Table 11.2 Superelevation formula coefficients (USACE, 1994e). Regime Subcritical
Supercritical
Channel Cross Section
Type of Curve
C
Rectangular
Simple circular
0.5
Trapezoidal
Simple circular
0.5
Rectangular
Simple circular
1.0
Trapezoidal
Simple circular
1.0
Rectangular
Spiral transitions
0.5
Trapezoidal
Spiral transitions
1.0
Rectangular
Spiral banked
0.5
410
Channel Modification
Chapter 11
Curved Channels In realigned channels, limits on minimum radii should be adopted. For subcritical flow, the radius of curvature should be no less than three times the channel top width (Shukry, 1950). For channel curves in supercritical flow regimes, allowable radii should be much greater to avoid wave development through the bend. Minimum radii, determined from prototype studies of spiral-transitioned, curved supercritical flow channels built by the Corps of Engineers in the Los Angeles area found that a minimum radius should be 2
4V W r min = --------------gy
(11.5)
where rmin = minimum radius at the curved channel centerline (ft, m) y = flow depth (ft, m) Further design details regarding curved channels can be found in EM1110-2-1601, Hydraulic Design of Flood Control Channels (USACE, 1994e).
Drop Structures/Stabilizers When a channel’s length is to be significantly shortened, or if a major widening along the existing alignment is proposed, a method of controlling upstream erosion and the potential for headcut is usually required. Control features can range from a significant construction feature, such as the large drop structure shown in Figure 11.24, to a fairly simple, low-cost drop structure, such as the one shown in Figure 11.23. Drop structures dissipate energy by reducing the velocity, thereby preventing erosion upstream or downstream of the structure. Although HEC-RAS can be used to model drop structures, optimal design may necessitate physical model tests to obtain the best hydraulic performance at the least construction cost. Section 12.5 further discusses these structures.
Figure 11.23 Small drop structure.
Section 11.3
Channel Design Considerations
411
USACE
Figure 11.24 Large drop structure.
A drop structure serves as a “hard point” that prevents the upstream migration of a headcut. When the difference between invert elevations at the junction of an existing and modified channel is small, a rock weir or channel stabilizer may be all that is needed. Driven sheet pile with rock on either side, as shown in Figure 11.24, is typically employed for larger elevation differences. Figure 11.25 shows a typical stabilizer (USACE, 1994e). A rock weir with a preformed scour hole for energy dissipation may also be successful protection in streams having a low drop at the new or old channel junction. A drop structure or similar feature must force all flows to pass through it. Flanking of the structure by high flows often quickly causes failure of the structure and possibly portions of the downstream channel. Figure 11.26 shows a trapezoidal, concrete-lined channel that was destroyed when large flood flows flanked a drop structure immediately upstream, shown in Figure 11.27. The resulting high velocity flow caused scour behind the channel side slope, undermining it and collapsing the channel wall into the scour hole.
USACE
Figure 11.25 Channel stabilizer.
412
Channel Modification
Chapter 11
USACE
Figure 11.26 Destruction of a concrete-lined channel from the flanking of a drop structure immediately upstream of this site, Brays Bayou, TX.
USACE
Figure 11.27 Drop structure (steel sheet piling) has been blocked by sediment while flow overtopped the right tie-back wall and flanked the structure on the right. Downstream channel on the right side was destroyed by scour action.
Debris Basins For channel modifications carrying flow from areas known to produce large amounts of coarse sediment and debris, check dams or debris basins are usually recommended. Channels carrying runoff from steep, semimountainous areas are often candidates for these structures. Check dams or debris basins serve to settle out the gravel, cobbles,
Section 11.3
Channel Design Considerations
413
boulders, and other large debris moved by high velocity flows exiting steep areas before the materials are carried into the channel and deposited. Significant quantities of debris will drastically increase the Manningʹs n value and obstruct flow through the modified channel, often resulting in a great loss of flow capacity during flood events. Debris basins built by the U.S. Army Corps of Engineers have been a requirement of channel modification projects receiving flow from the mouths of canyons in Southern California and Hawaii. Similar areas in other parts of the world should also consider the use of check dams or debris basins. EM1110-2-1601, Hydraulic Design of Flood Control Channels (USACE, 1994e), includes additional information and a plan/profile view of a typical debris basin design for Southern California.
Bridge Piers As presented in Chapter 6, bridge piers partially obstruct flow and tend to catch debris during flood events. Where debris content is known to be high, the channel design should include a pier shape that minimizes the accumulation of debris. For subcritical flows, a triangular-shaped or well-rounded upstream face minimizes the potential for the pier’s catching debris. For supercritical flows, an upstream extension should be used on the pier nose to split flow around each pier as smoothly as possible. Figure 11.28, adapted from EM1110-2-1601, Hydraulic Design of Flood Control Channels (USACE, 1994e), shows an extended pier that minimizes both supercritical impacts and debris problems. These piers may extend 30 to 50 ft (9 to 15 m) upstream from the bridge face. For subcritical flow situations, this length would not be needed. The design dimensions of a pier extension in supercritical flow would normally be addressed outside of HEC-RAS, although the program will compute the maximum water depth (b on Figure 11.28) for use in determining pier dimensions.
USACE
Figure 11.28 Extended pier to minimize supercritical impacts and debris problems.
414
Channel Modification
11.4
Chapter 11
HEC-RAS Input Data for Channel Modifications HEC-RAS has powerful features that allow the modeler to easily evaluate channel modification alternatives and compare various water surface profiles to the existing channel conditions. The effect of channel modifications in terms of lowering the design water surface elevation can be readily seen both in graphical and tabular formats.
Study Watershed/Channel Boundaries Before channel modification studies are begun, a hydraulic model of the study stream must be developed, which should also include upstream and downstream reaches outside the boundaries of any channel modification. For a channel modification that features a significantly shorter channel reach, an enlarged channel geometry, or both, effects on water surface elevations may propagate a significant distance upstream of the end of the project. Therefore, the HEC-RAS model should be extended upstream appropriately. Similarly, the downstream boundary in the HEC-RAS model should be far enough from the start of the project that the impact of any error in starting water surface elevation is dampened well before the channel modification. Cross sections at close intervals should be included at the upstream and downstream boundaries between the unmodified and modified channel.
Channel Modification Features HEC-RAS enables the modeler to quickly and easily size a channel and determine the flood reduction effects. This is a great improvement over the similar capability in HEC-2. The channel modification feature is primarily used for channel sizing; more detailed hydraulic designs can also be analyzed with the program, but the engineer still needs to perform much channel design work outside the program for many of the design items discussed in Section 11.3. Key features that can be handled in the channel modification option in HEC-RAS include: • Applying up to three cuts simultaneously to a channel. For example, the compound channel after the cuts have been made may consist of a low flow channel, a medium-flow channel, and the full channel for high flows. Each of the three cuts can have a different bottom width and elevation. • Using different n or k values for each of the three cuts and a different side slope for the right and left sides of the channel. • Determining different reach lengths with the new channel. • Locating the centerline of the new channel anywhere within the cross section. • Filling in the old channel. • Computing cut and fill quantities for the new channel.
HEC-RAS Channel Improvement Template Data needed to describe the proposed channel is entered in the Channel Modification data editor, which is shown in Figure 11.29. The input data needed for channel modifications consist primarily of the new channel geometry. The cross-sectional dimensions of the channel modification must be specified, along with Manning’s n values, reach lengths (if different from the existing channel), side slopes of the new channel, and the centerline location of the new channel.
Section 11.4
HEC-RAS Input Data for Channel Modifications
415
Figure 11.29 Channel Modification data editor.
The Channel Modification editor is divided into three parts. The upper part specifies the stream and reach to be modified. If multiple reaches are to be examined for channel modifications, the data for each reach is entered in separate templates. The Set Range of Values boxes are where the modeler specifies the start and end stations for the channel modifications within this reach. When the Channel Modification editor is initially opened, only the farthest upstream cross section will be displayed in both the “Upstream Riv Sta” and “Downstream Riv Sta” boxes. After the modeler enters the correct upstream and downstream river stations, the cross sections comprising the full reach are displayed on the schematic. The schematic for the reach is shown in the editor, along with the cross sections defining the reach. The balance of the options in the editor (Modified Geometry, Cut and Fill Areas, Compute Cuts, and so on) are used to describe the modified channel geometry. The middle portion of the Channel Modification editor is where geometry data is specified for the modified reach—new cross-section data, roughness values, side slopes, and invert slope. Suppose that three trapezoidal cuts are to be made: a 5 ft (1.5 m) wide concrete low flow channel, a 30 ft (9 m) wide earthen channel, and a 60 ft (18 m) wide earthen channel with selected vegetation. Note that the side slopes and Manning’s n values are different for each channel segment. If the old channel were to be filled and not used for conveyance, this option would be specified in the box located in the middle portion of the editor. The channel modification feature cannot be used to directly reflect variations in Manning’s n values with increasing water surface elevations. However, this feature may be needed to evaluate the use of selected vegetation within the modified channel to achieve environmental goals, as described earlier in this chapter. When the channel
416
Channel Modification
Chapter 11
cross-section geometry is close to final, the modeler can open the revised channel geometry file. If the variation of n in the vertical direction results in a design water surface profile that exceeds the channel modification geometry, the modeler can adjust the geometry and select an average n value that more accurately reflects the likely vegetation in the channel and perform further iterations. Three options are available for inputting slope information. A constant slope over the length of the modified channel may be specified, beginning at either the upstream or downstream cross section. If the existing channel slope is intended to remain the same under the proposed condition, the modeler can specify this condition by selecting the “Same cut to all sections” option. For this example, a constant slope of 0.00353 is specified, beginning with the invert elevation at the downstream-most cross section (RS 1.267). Selecting the “Apply Cuts to Selected Range” button transfers the modified channel onto the existing cross sections. The program automatically fills in the information in the table at the bottom of Figure 11.29. The modeler can also enter or change the channel modification data directly in the lower table. An option that is normally accepted as a default is the “Cut cross section until cut daylights once” option. If this button is not selected, the channel side slope is projected to infinity, and the cut computations can include cuts (and additional excavation quantities) above the floodplain elevation. For example, if the button is not selected, the cut for a new channel near the bluff of the floodplain could be extrapolated into the bluff, removing a part of it in the cut computations.
Section 11.5
Stable Channel Design Using HEC-RAS
417
HEC-RAS automatically computes cut and fill quantities by comparing the modified channel geometry to the base geometry. This information can be viewed by selecting the “Cut and Fill Areas” button or it can be output as a table for the report. Last, the modified geometry file should be saved. The Channel Modification editor is then exited, and the modified cross sections of the new geometry file may be viewed using the Cross Section Data editor.
11.5
Stable Channel Design Using HEC-RAS Hydraulic design and computations outside of HEC-RAS will likely be required of the engineer for channel modification projects. However, the program may be used to compute parameters giving normal depth, stable channel, or sediment transport information. Uniform flow and stable channel design are presented in this section, while the computation of sediment transport relationships will be addressed in Chapter 13. HEC-RAS also computes and makes readily available several important design parameters that are needed as input for the engineer to solve for channel design, riprap analysis, or sediment transport procedures outside of those covered by the program. These variables, also discussed in this section, are available in the detailed tabular output for each cross section or may be added through a user-defined table.
Uniform Flow Analysis The concepts of uniform flow and normal depth were first presented in Chapter 2. Uniform flow is a condition in which depth and velocity do not change with distance and the invert slope, water surface slope, and energy grade line slope are all parallel. Although this situation never occurs in natural channels, it may be approached in a man-made channel. Uniform flow is a useful tool for approximating a water surface elevation for a given discharge and slope. Uniform flow analysis has been added to the HEC-RAS program as a hydraulic design option. Manning’s equation for discharge requires information on depth, width, Manning’s n, and slope to solve for a discharge. A unique value for any one parameter can be found if the others are specified. In addition, uniform flow principles may be applied at any cross section to estimate a value of one of the parameters. Although Manning’s n will most often be used for a uniform flow analysis, HEC-RAS also allows roughness to be computed by five other methods. These methods are the Keulegan equation, Strickler equation, Limerinos equation, Brownlie equation, and the Soil Conservation Service equations for grass-lined channels. Each is briefly discussed in the following paragraphs: • Keulegan equation – This technique (Keulegan, 1938) is applicable for rigid boundary channels and requires an estimate of the Nikaradse equivalent sand grain roughness (ks) to apply the method. The ks value (ft, m) is taken from an estimate of the D90 grain size of the streambed material, which represents a size for which 90 percent of the bed material is finer (smaller). As first presented in Equation 5.5 on page 155, ks reflects additional considerations besides grain size, especially the bed form (dunes, plane bed, antidunes, and so on, shown in Figure 11.30) to arrive at the best estimate of a roughness height. The Keulegan method originally computed a value of the Chézy roughness coefficient (C) based on ks and the hydraulic radius. Later modifications of Keuleganʹs work found that Froude Number also impacted the estimate of the
418
Channel Modification
Chapter 11
Figure 11.30 Examples of channel bed forms.
Chézy C and Fr is now also included in the method. HEC-RAS computes the Chézy C using the Keulegan equation and then converts C to an equivalent value of Manning’s n. A major attraction of this method is the ability to directly compute changes of roughness as the depth increases or decreases. This method is valid for a Froude number range from 0.2–8 and where R/ks is greater than 3. Unless the modeler has specific information on ks for the stream under study, other methods (primarily estimating Manning’s n directly) to compute a roughness value are preferable. The Hydraulic Reference Manual (HEC, 2002) provides additional detail on this method. • Strickler equation – Like Keulegan, the Strickler method to compute roughness also uses ks and hydraulic radius (R) to estimate Manning’s n. However, the Strickler equation is much easier to apply and is given as
R 1⁄6 n = φ ---- k s ks
(11.6)
where ΦR/ks = Strickler function = 0.0342 for natural channels and for velocity and stone size calculations in riprap design = 0.038 for discharge calculations in riprap design
Section 11.5
Stable Channel Design Using HEC-RAS
419
The Strickler method is appropriate for uniform flow calculations and where the R/ks ratio is greater than 1. The main drawback to this method is the need to derive a valid estimate of ks. • Limerinos equation – As mentioned in Chapter 5, the Limerinos method (Limerinos, 1970) has a narrow range of applications, primarily for very coarse sands through cobbles on steeper streams. A bed material gradation is necessary to apply this method. Grain sizes for D84, D50, and D16 (the sediment size for which 84 percent, 50 percent and 16 percent, respectively of the bed material is finer) must be supplied to HEC-RAS to use Limerinos. This method is also only applicable to the upper flow regime, which encompasses the bed forms for antidunes, chutes and pools, and plane bed. These bed forms are illustrated in Figure 11.30. Bed slopes in excess of 0.006 are always considered to be an upper flow regime. These bed forms typically reflect Froude numbers approaching or exceeding a value of one and are most often found in mountainous or hilly terrain. The equivalent n value for the Limerinos method is a function of the hydraulic radius and the D84 values. An advantage of the Limerinos method is its inclusion of a bed form roughness, with the major disadvantage being the narrow range of bed material for which it is applicable. Details of the Limerinos equation may be found in the Hydraulics Reference Manual (HEC, 2002). • Brownlie equation – The Brownlie equation (Brownlie, 1981) uses the Strickler equation and multiplies it by a bed form roughness factor. The Brownlie roughness is a function of hydraulic radius, bed slope, and the sediment gradation. The same gradation information is supplied to the program as for the Limerinos method. Unlike that method, however, Brownlie is applicable for both the upper and lower flow regimes and thus has a wider applicability. HEC-RAS will solve for a roughness value for both an upper and lower flow regime and then query the modeler to select the appropriate regime. The lower flow regime reflects bed forms of ripples or dunes, while the upper regime represents a plane bed through chutes and pools (Figure 11.30). A rule of thumb for steep streams is to assume that the rapidly rising limb of the hydrograph reflects an upper flow regime, while the rapidly falling limb represents a lower flow regime. Figure 11.31 illustrates this situation for actual data collected at a stream gage site. As shown in the figure, when a transition from the lower to the upper regime occurs, a large increase in velocity (and consequently discharge) occurs for very little increase in depth. This is due to the washing out of the dunes, changing the bed form to plane bed, resulting in an increase in conveyance and discharge. See the Hydraulics Reference Manual (HEC, 2002) for further details on the Brownlie method. • SCS Grass Cover equations – The Soil Conservation Service (SCS, 1954), now National Resource Conservation Service, developed five curves of Manning’s n versus the product of average velocity and hydraulic radius, called VR. Each curve represents a type of grass cover and its condition (primarily stem height). The curves are applicable for grass-covered channels with a range of velocity times hydraulic radius of 0.1–0.4 < VR < 20. Following the input of the discharge and geometry data, the modeler only needs to specify the appropriate curve letter and the program will compute the desired parameter for uniform flow. A table of grass types and condition, and a figure showing Curves A–E is available in the Hydraulics Reference Manual (HEC, 2002).
420
Channel Modification
Chapter 11
Figure 11.31 Illustration of upper and lower regime, with a transition.
The Uniform Flow Analysis tool (shown in Figure 11.32) is accessed from the main project window in HEC-RAS. In the figure, the Uniform Flow tool was used to compute a water surface elevation (bolded) by inserting the channel slope (0.00085) and discharge (1000 ft3/s) in the appropriate boxes on the lower left corner of the dialog box. The bolded water surface elevation (420.08 ft NGVD) appears in the last box, below the slope and discharge boxes. For a natural cross section, the program will compute discharge, slope, water surface elevation, or Manning’s n, given the other three variables. This tool can also be used to compute a channel bottom width for a selected design discharge, given the other required channel parameters of side slope, depth, and Manning’s n. On the upper left of Figure 11.32, the tab labeled Width is selected instead of the default tab (S, Q, y, n—for slope, discharge, depth, roughness, respectively). This selection opens the window shown in Figure 11.33. Under the Width tab, side slopes of 1V:3H were inserted, along with estimated widths from the channel centerline to the left (WL) and right (WR) toe of the side slope of 25 ft, a channel height of 10 ft and invert elevation of 410 ft NGVD. The discharge, channel slope, and water surface elevation data were inserted into the appropriate boxes (left center), and
Section 11.5
Stable Channel Design Using HEC-RAS
421
Figure 11.32 Uniform Flow Analysis tool used to compute a water surface elevation and discharge.
the Compute button was clicked. The required bottom width is computed (45.3 + 45.3 = 90.6 ft) and inserted into the data under the Width tab and the revised cross-section geometry is plotted. The channel elevation and station data for the computed bottom width is also shown in the geometry data file on the lower left, along with a default value of 0.03 for Manning’s n. Once the data have been entered and the results computed, the modeler can use the program to insert the revised channel geometry into the geometric data file for future use. If needed, the modeler may adjust the Manning’s n value and recompute the required bottom width. Figure 11.33 shows a single trapezoidal shape; however, the Uniform Flow tool may be used for a compound channel composed of up to three trapezoidal shapes—a low flow channel, a normal flow channel, and a high flow channel. Programs such as FlowMaster (Haestad Methods, 2003) can be used to perform uniform flow analysis, as well.
Stable Channel Design HEC-RAS includes a hydraulic design tool to analyze the stability of a natural or modified channel. Channel stability may be defined in various ways, but it generally indicates that the bed material is not being removed and no erosion of the channel is occurring. Stability also generally reflects that the sediment in transit into the reach under study is about equal to the sediment out of the study reach. There is no net gain or loss of sediment through the study reach. Three methods for evaluating channel stability are available: the Copeland Method, the Regime Method, and the Tractive Force Method. Copeland and Regime are used for sand-based streams and Tractive Force is applied to gravel-based (or coarser) streams. The following sections provide an overview of each.
422
Channel Modification
Chapter 11
Figure 11.33 Computing a bottom width for a trapezoidal channel using the Uniform Flow tool.
Copeland Method. The Copeland Method (Copeland, 1994) was developed at the USACE Waterways Experiment Station through physical model testing and field studies of trapezoidal-shaped channels. It is used to determine a stable channel depth and slope for a selected channel bottom width. The sediment concentration (parts per million or ppm) must be known or computed for the stream reach. The concentration may be determined by HEC-RAS as part of the Copeland procedure. The Copeland method incorporates Brownlieʹs equations of depth prediction (Brownlie, 1981) to solve for a stable channel depth and slope, given the channel bottom width. Details and equations utilized in the Copeland method are given in the Hydraulic Reference Manual (HEC, 2002). Figure 11.34 shows the results following a computation using the Copeland Method. To apply the method, the user must insert values for several parameters for the section under study and for the reach upstream of the study section. These parameters include the following:. • Discharge, side slope, and roughness coefficient of the trapezoidal section • Reach bottom width, height, side slope, and energy slope • Manning or Strickler equation • Actual sediment concentration or direct the program to compute the concentration • Gradation size (D84, D50, and D16) for the bed material Optional input includes the approximate bottom width of the trapezoidal channel and the valley slope. Running the analysis results in the computation of the sediment
Section 11.5
Stable Channel Design Using HEC-RAS
423
Figure 11.34 Default screen (Copeland Method) for channel stability computations.
concentrations and, for that concentration, a table of bottom widths for the selected discharge with various computed parameters for each width (see Figure 11.35). As shown in the figure, the program generates information for 19 other bottom widths, bracketing the initial user-supplied estimate of 25 ft (7.6 m). The user has the option of selecting any bottom width value and plotting a stability curve for that width. Selecting the initial width estimate of 25 ft (7.6 m) from Figure 11.35, a stability curve is generated and shown in Figure 11.36. In Figure 11.36, the curve represents a stable situation for various combinations of stream slope and bottom width. For the Copeland Method, stability is defined as the inflowing sediment volume being about equal to the outflowing sediment volume, with no net gain or loss of sediment within the study reach. The further away the intersection of any two x-y points from this line, the more severe would be the degradation or aggradation in the modified channel. At the intersection of the current stream slope of 0.00085 and a proposed bottom width of 25 ft (7.6 m), the relationship shows the proposed channel to be well into a degradation condition, based on the accuracy of the input data and the calculated sediment concentration. For a stable channel, the slope should be about 0.0005 for the proposed bottom width of 25 ft (7.6 m), or the bottom width should be about 8 ft (2.4 m) for the existing stream slope of 0.00085. A second stability plot of depth versus slope is also available in HEC-RAS. For this example, a discharge of 2000 ft3/s (57 m3/s) was used, which represents the approximate capacity of the channel. The best estimate of discharge for stable channel design is not firm, however, and other values should also be examined. In the HECRAS documentation, discharge suggestions include the bankfull discharge (used in this example), the 2-year discharge for perennial streams (often about equal to a bank-
424
Channel Modification
Chapter 11
Figure 11.35 Stable channel output using the Copeland Method.
Figure 11.36 Stability curve for a 25 ft bottom width channel (Copeland Method).
Section 11.5
Stable Channel Design Using HEC-RAS
425
full condition), the 10-year discharge for ephemeral streams, and the effective discharge (that flow which carries the most bed load sediment). A range of sediment concentrations and water discharges should be evaluated prior to reaching a final decision on channel stability. The Copeland Method is limited to sand bed streams. Table 11.3 gives the maximum and minimum range for application of the Copeland Method based on both field- and laboratory-measured data. Table 11.3 Application range for the Copeland Method. Location
Velocity, ft/s
Depth, ft
Slope
D50, mm
Concentration, ppm
Field
1.2–7.95
0.35–56.7
0.00001– 0.001799
0.085–1.44
11.7–5830
Lab
0.73–6.61
0.11–1.91
0.000269– 0.01695
0.085–1.35
10.95–39,263
Regime Method. The Regime Method has long been used to estimate channel stability. It is an empirically based technique originally using actual data gathered by British engineers for irrigation canals in India. A stream is stable at the design discharge when there is no gain or loss of sediment through the reach under study. Many different regime equations have been formulated over the past 100 years or so, with most producing equations to estimate depth, slope, and channel width of a stream knowing the discharge and a representative grain size of the bed material. From the many equations associated with the Regime Method, HEC-RAS uses the Blench Regime Method (Blench, 1970). Blench developed separate expressions for depth, slope, and channel width as functions of discharge and D50 bed material size. Blench stipulates several limitations of the equations, including steady water flow, steady sediment flow, dunes as the bed form, noncohesive bed load (no silts or clays), and bed width at least three times the depth. Few streams would incorporate all of these limitations; however, the modeler could apply the method to sand-based streams to evaluate the stability of a proposed channel modification. The results of the Regime Method are only approximations of the depth, width, and slope; the actual data upon which the Regime Method is based do not reflect a unique relationship but display a significant scatter when plotted. Technical details of the Regime Method may be found in the Hydraulics Reference Manual (HEC, 2002). To apply the Regime Method in HEC-RAS, only discharge, median grain size (D50), and sediment concentration need be supplied. Default values for water temperature and a side factor (indicator of channel bank soil properties) can be accepted or modified, at the discretion of the modeler. Supplying the same data as were used/computed for the Copeland Method gives the calculated values for depth, width, and slope shown in Figure 11.37 for the Regime Method. As shown in Figure 11.37, the depth (2.76 ft, 0.8 m), width (209.1 ft, 64 m), and slope (0.000415) are very different than those computed with the Copeland Method. Large variations between methods are not unusual. Different regime equations can also yield significant differences in the computed parameters. Results from regime equations should be considered less representative than the other methods of evaluating channel stability.
426
Channel Modification
Chapter 11
Figure 11.37 Channel stability computation using the Regime Method.
Tractive Force Method. Unlike the Regime Method, the Tractive Force Method is analytically based. Channel stability is achieved as long as the actual shear stress on a selected particle size of the bed material is less than the critical shear stress (that which just initiates motion of the selected bed particle size). Both actual and critical shear stress values for a selected discharge are dependent on values for channel depth, width, slope, and a representative grain size of the channel bed material. Selecting two of these four parameters allows the program to compute values for the remaining two. The Corps of Engineers and others used the Tractive Force Method for riprap design for some time. It is most often used for the larger particle sizes in open channel analyses (gravel, cobbles, and rock riprap). The actual shear stress on a particle is found from the hydraulic radius, slope, and unit weight of water using Equation 11.7 presented in the next section on Design Parameters. Shear stress is automatically computed by HEC-RAS and shown in the cross-section output. The critical shear stress can be found by any of three different methods in HEC-RAS: the Lane Method, the Shields Method, or a user-supplied estimate. The Lane Method computes critical shear as a function only of the particle size (D75) found by Lane to best represent the start of movement of the bed material. The Shields Method is a more complex procedure, resulting in an estimate of critical shear as a function of water depth, slope, representative particle size (D50), and physical properties of the bed material or riprap and water. Shields has been the most widely used method to compute critical shear. However, the Shields Method has been found to sometimes overestimate the critical shear stress, computing a critical shear resulting in permanent movement of all the particles in the bed rather than just the start of motion of a
Section 11.5
Stable Channel Design Using HEC-RAS
427
few particles. Therefore, a third option for specifying a user-defined value of critical shear is also available. The Hydraulic Reference Manual (USACE, 2002) gives the technical details and theoretical basis for the method. Figure 11.38 shows the Tractive Force Method dialog in HEC-RAS.
Figure 11.38 Channel stability analysis with the Tractive Force Method.
The following parameters have been entered: • Discharge (2000 ft3/s) • Angle of repose for the bed material (40° – from an appropriate reference or from Figure 12.9 of the Hydraulics Reference Manual, USACE, 2002) • Side slope (3 for 1V:3H) • Manning’s n for the bed/bank material (estimated as 0.03) • Specification of the Lane, Shields, or user-supplied critical shear method • Average particle size for the specified Shields method (a D50 of 6 in. or 150 mm) • One of the following three parameters: depth, width, or slope Default values for water temperature and specific gravity may be used or modified by the engineer. Inserting a bottom width of 8 ft (2.4 m) and running the analysis allows depth and slope (both bolded) to be calculated. For this analysis of riprap stability for a 6 in. (150 mm) average stone size, the computed depth (about 6.5 ft or 2 m) is for uniform flow conditions for a computed stream slope of about 0.0085. For a design discharge of 2000 ft3/s (57 m3/s), depths in excess of 6.5 ft (2 m) or slopes in excess of 0.0085 could result in particle movement and the potential loss of the riprap protection.
428
Channel Modification
Chapter 11
For riprap analysis, both higher and lower discharges should be evaluated to best determine a proper riprap design. The stone size determined should also be analyzed with the other methods for computing shear stress. For this example using the Shields Method, Lane’s Method could then be applied as a performance check of the riprap size. While the Tractive Force Method may be used for riprap analysis or design, it should be emphasized that more modern and accurate techniques are now available for riprap analysis. Chapter 3 of Hydraulic Design of Flood Control Channels (USACE, 1994a) describes the method currently considered most appropriate for riprap analysis and design.
Design Parameters Numerous design parameters are available as part of the HEC-RAS output for use in any required computations outside of the program. This output can be used for riprap design, for sediment transport equations not covered in HEC-RAS, for comparison of different plans, or other hydraulic design procedures. Average Channel Velocity. Average channel velocity is needed for stable channel computations or for determining whether the velocity is excessive for the channelʹs soil and vegetation conditions. Channel design can be checked by comparing the average channel velocity from the program to tables of velocities that are appropriate for various soil types. For example, from Table 2.5 in Hydraulic Design of Flood Control Channels (USACE, 1994a), a straight earthen channel consisting of clay is stable for average velocities up to about 6 ft/s (1.8 m/s), but the same channel consisting of fine sand may only withstand a maximum average velocity of about 2 ft/s (0.6 m/s). A table of maximum allowable average velocities for soil types can be found in most open channel hydraulics texts. A comparison of velocities between plans or a plot of velocity versus river station (both can be performed within HEC-RAS) is often useful, as well. Large increases or decreases in average velocity for the same discharge between the base condition and the modified channel condition, or from location to location, often signal potential erosion or deposition problems. Hydraulic Radius. The hydraulic radius is used to compute shear stress for stable channel designs and for riprap analyses. The hydraulic radius for the full cross section (Hydr Radius), channel only (Hydr Radius C), or for the left/right floodplain only (Hydr Radius L or R) is available by selecting the appropriate variable to add to a user-defined output table, as was presented in Chapter 8. The hydraulic radius for a subsection of the channel or overbank can be computed by the modeler outside of HEC-RAS or obtained with the flow distribution option described in Chapter 10. Subsection area and wetted perimeter values are given in flow distribution tables and can be used to compute the hydraulic radius. Subsection hydraulic depth is also available through the flow distribution tables. Froude Number. The Froude number is a key variable for evaluation of channel projects and the expected flow regime under various flood conditions. The modeler should not allow a Froude number to approach 1.0 for the project. Comparisons of Froude number between base geometry and channel modification plans are useful and Froude number is one of the default parameters in Standard Table 1 in HEC-RAS. The variable is also used to compute depth with air entrainment for supercritical flow conditions.
Section 11.6
Analyzing Results
429
Shear Stress. Shear stress is sometimes employed in riprap design through the Tractive Force Method and other methods to determine channel stability. HEC-RAS displays shear stress for the right and left overbank areas and for the channel. Shear stress is computed with the following equation:
τ = γRs f where
(11.7)
τ = shear stress (lbs/ft2, N/m2) γ = unit weight of water (62.4 lb/ft3 or 1000 kg/m3) R = hydraulic radius (ft, m) sf = friction slope (ft/ft, m/m)
Stream Power. Stream power is primarily used in formulas to compute a sediment transport relationship (water discharge versus sediment load in motion). Stream power is determined by multiplying average flow velocity times shear stress, giving units of lbs/ft-sec (N/m-sec). HEC-RAS data tables for individual cross sections display stream power for the main channel portion and for the right and left overbank areas. Freeboard. Freeboard is the difference between the elevations of the water surface and the top of protection, either the elevation of the top of the levee or the channel bank elevation as described in earlier sections. The variables L. Freeboard or R. Freeboard display the difference between the water surface elevation and the top of the left or right channel bank elevation, respectively. The variables L. Levee Frbrd. and R. Levee Frbrd display the difference between the top of the left or right levee, respectively and the water surface elevation. The computed values of freeboard at each cross section thus allow an easy determination of whether adequate freeboard is present for the design flood event. Depths. Actual depth and critical depth can be displayed in a user-modified table. With a user-computed normal depth, the modeler can use these two values to determine profile shapes (discussed in Chapter 2 on page 45) or to determine the flow regime. By comparing actual depth to normal depth for mild slopes, insights can be gained into areas of potential erosion (actual depth < normal depth indicates an M2 curve with increasing velocity in the downstream direction) or deposition (actual depth > normal depth indicates an M1 curve with decreasing velocity in the downstream direction).
11.6
Analyzing Results Most modelers concentrate on modifications of the water surface elevation associated with the design discharge in the newer modified channel. It is important to also consider other variables in the program output. Velocity, friction slope, and top width are important parameters with which to evaluate the performance of the new channel. Froude number and freeboard are also important, as have been addressed previously in this chapter.
430
Channel Modification
Chapter 11
Velocity The average velocity in the channel is as important a parameter as the design water surface profile. Ideally, velocity in a modified channel should not cause erosion, but should be sufficient to keep most of the sediments entering the reach in motion. The engineer should review velocities across a full range of inflow events, including low flows. The modified channel should be designed to adequately handle both low and high flows. Low flows can often be addressed by incorporating a low flow channel within the overall channel modification, as discussed in Section 11.3. A low flow design event could be a base flow or an average monthly discharge during the low flow season. A low flow design may also be obtained from a rainfall runoff model using a rainfall event reflective of, for example, a one- or two-month frequency for a selected storm duration. Graphs of discharge versus velocity should be prepared for both base and modified channel geometries and compared. It is highly desirable, for minimizing scour and deposition, to have the two relationships as close as practical.
Energy Grade Line Slope Changes in energy grade line slope are particularly useful when evaluated at the channel modification boundaries. Large changes in EGL slope through the upstream or downstream channel modification boundary, indicate significant increases or decreases in velocity, leading to erosion or deposition at these locations.
Top Width Top width should be as consistent as possible through the modified reach; that is, the design discharge should remain within the channel boundaries throughout. Similarly, the low flow discharge should be contained within the low flow channel limits throughout. Top widths exceeding the modified channel width at one or more locations pinpoint areas where further work on cross-section geometry may be necessary.
Sensitivity of Manning’s n For the final channel design, additional iterations should be run with varying values of Manning’s n. Even if the modified channel does not receive environmental treatment, the channel’s roughness may change with time if regular maintenance procedures are not employed. For an earthen channel, the lowest value of Manning’s n occurs when the project first goes into operation. Sediment deposition/scour, vegetation, and debris serve to increase Manning’s n over time. The performance of the channel should be evaluated for various design discharges, assuming that major channel maintenance is performed infrequently and a higher Manning’s n value exists at the time of the flood.
Sensitivity of Scour/Sediment Deposition on the Design Profile The modeler may also want to perform a sensitivity test on general scour or deposition along the length of a modified channel. The modeler using HEC-RAS can adjust the modified channel elevations by a constant, selected change (positive or negative),
Section 11.6
Analyzing Results
431
or vary the change along the channel reach, reflecting deposition or erosion. The model is then rerun to evaluate the effect of deposition on the water surface profile and other variables of interest. By selecting different values of deposition, the modeler can estimate the average depth of sediment in the modified channel that is allowable before dredging is necessary to regain the design capacity in the channel. Modelers often use HEC-RAS to study the effect of sediment deposition along tie-back or flank levees, which is discussed in more detail in Chapter 12.
Channel Effects Outside of a Modified Reach The variables covered in the preceding sections should also be examined at several sections immediately upstream or downstream of the end of the modified channel. Comparison of velocities between base and modified plans will indicate any erosion and scour potential. Similarly, top widths for the channel design flood should smoothly constrict into the new channel and smoothly expand out of the new channel downstream. The modeler must identify any adverse impacts to properties upstream or downstream of the modified channel and minimize or mitigate these changes.
Effects on Hydrographs A modified channel may yield a wider and deeper channel with a lower Manning’s n and a steeper bed slope. Any of these variables result in a faster velocity and shorter travel times through the modified reach. By confining the design discharge to the channel, channel modifications may change the storage within the reach. Therefore, a shorter reach travel time and less storage for the same discharge, compared to base conditions, will change the downstream hydrology (faster moving hydrograph with a higher peak discharge). For channel modification projects of limited length (a few thousand ft, several hundred m), the increase is probably not significant. However, as the project reach length becomes larger, the downstream impacts become more severe. These changes must be identified and addressed, usually through routing of the modified reaches in the watershed hydrologic model. Analyzing the discharge, storage, and travel times for hydrologic routing is presented in Section 8.6.
Plan Comparisons With HEC-RAS, the modeler can easily compare the effect of channel modifications on water surface elevations with and without the modification by comparing different plans. Comparing the existing conditions model (base geometry) with the modified channel geometry model, can be easily done by comparing the output for each plan in HEC-RAS. Profiles, rating curves, cross sections, and 3D plots for specified plans can be overlaid and compared, and tables of selected variables can also be compared for different plans using Standard Tables or user-developed tables. Figure 11.39 shows profile plots of a base geometry scenario and of a modified channel. Figure 11.40 shows the same information in table form. The effect of the channel modification can easily be seen on the profile plots of Figure 11.39. More-detailed hydraulic information can be viewed in Figure 11.40, where differences in water surface elevation, top widths, Froude numbers, and so on are available for comparison.
432
Channel Modification
Figure 11.39 Plan comparison of profiles for base versus modified geometry.
Figure 11.40 Standard Table 1 showing the plan comparison.
Chapter 11
Section 11.7
11.7
Channel Maintenance Requirements
433
Channel Maintenance Requirements The importance of adequate maintenance for a channel modification project cannot be overemphasized. One cannot build such a project and expect it to perform over the years without proper care. Maintenance may include the following: • Annual or semiannual inspections • Periodic dredging to remove deposition and regain design channel capacity • Mowing or treatment of unwanted vegetation to maintain the design Manning’s n value • Removal of snags and debris • Immediately addressing any significant upstream erosion or downstream deposition of the modified channel boundaries • Repair and protection of eroded channel slopes The modified channel should be periodically surveyed, using established monuments near the stream to locate the precise alignment for a channel survey. The amount of scour or deposition in the channel may then be tracked by cross sections taken on the same alignment over a set time period. The channel should also be observed during flood events to identify problem areas.
11.8
Chapter Summary Of the main structural flood reduction measures (reservoirs, levees, and channels), channel modification is the most widely applied by municipalities or developers for local flood problems and mitigation. However, channel modifications can lead to undesirable environmental impacts as well as have major effects on a stream’s sediment regime. Over time, the performance of a channel modification may decrease greatly due to scour and deposition along the length of the modified channel. Major channelization projects require channel stability studies and an adequate analysis of the changed sediment transport conditions. Following construction of a channel modification, regular maintenance is required to ensure the channel performs as intended over time. Lane’s expression is a useful tool to visualize the effect of a channelization project on the sediment regime of a stream. This expression is most often used as a sediment balance, where the water discharge, stream slope, sediment discharge, and average sediment size must be in approximate balance for a stream to maintain an equilibrium condition. When any one of these four variables is modified, the stream can move from equilibrium to a condition of aggradation (sediment deposition) or degradation (erosion and scour). Channel modification projects must attempt to seek an equilibrium condition as much as practical. A wide range of possible alternatives fall within the channel modification umbrella, including levees, diversions, clearing and snagging, adding a high-flow berm to the channel, modifying one side of the channel, modifying both sides of the channel, channel realignment, channel lining or paving, and constructing an entirely new channel. All solutions have positive and negative attributes and environmental concerns are a high priority for channelization projects. Of the listed alternatives, levees tend to have the least environmental impact and total enlargement, realignment,
434
Channel Modification
Chapter 11
and/or paving have the greatest environmental impact. Because of these environmental concerns, the permit process through local, state, provincial, or federal agencies can be lengthy and costly for a major channel modification project. Besides simply determining modified channel dimensions, many additional issues must be addressed and adequately analyzed for channel projects. These issues include ensuring that the proper flow regime (subcritical or supercritical) occurs during various flow conditions and that appropriate freeboard, geometric transitions, junction design, channel protection against erosion, drop structures, debris basins, and bridge pier design are present. HEC-RAS allows the modeler to quickly and easily evaluate basic channel design using the Channel Modification Editor. When new channel geometry, Manning’s n values, reach length, and other variables are entered, the program modifies the existing geometry file to reflect the new channel. The effect of the new channel dimensions on flood profiles can be quickly analyzed and compared to the base conditions to determine the reduced flooding conditions along the modified channel reach. The program can compute parameters for uniform flow and allows an evaluation of channel stability using the Copeland, Regime, or Tractive Force Methods. HEC-RAS also provides several design variables, such as average velocity, hydraulic radius, Froude number, shear stress, stream power, and friction slope, that may be used to analyze design requirements for riprap or scour potential outside of the HEC-RAS program. Sensitivity tests on the effect of changing Manning’s n or on sediment deposition or erosion in the channel over time can also be easily made with HEC-RAS.
Problems 11.1 Use the Channel Modification option in HEC-RAS to enlarge an existing channel. The existing channel geometry is provided in the file Prob11_1eng.g01 (English units) or Prob11_1si.g01 (SI units) on the CD accompanying this text. The river reach contains four cross sections. The design discharge for this project is 800 ft3/s (22.7 m3/s). Use a downstream boundary condition of normal depth with a channel slope of 0.0015. The flow regime is subcritical. a. Compute the water surface profile for the existing condition and record the results in the table provided. b. Enlarge the channel through the entire reach using the following trapezoidalshape channel characteristics: Bottom width = 60 ft (18.3 m) Side slopes: 4 horizontal to 1 vertical. Channel modification starts at Section 1 with a bottom elevation of 158.00 ft (48.2 m). The trapezoidal cross section is projected upstream at a constant slope of 0.0015. Record the resulting water surface elevation for each cross section and the change in water surface elevation due to the modifications in the results table.
Problems
Cross Section
WS Elevation from Part (a)
WS Elevation from Part (b)
435
Change in WS Elevation
4 3 2 1
11.2 The geometry for an existing channel is provided in the file Prob11_2eng.g01 (English units) or Prob11_2si.g01 (SI units). The channel must be modified to reduce the water surface elevation at cross section 4 by 0.8 ft (0.24 m) for a discharge of 1500 ft3/s (42.5 m3/s). The flow regime is subcritical and the downstream boundary condition is normal depth for a slope of 0.0015. a. Compute the water surface profile for existing conditions and record the results in the table provided. b. Modify the channel to reduce the water surface elevation at cross section 4 by 0.8 ft (0.24 m) for the design discharge. The invert elevation of the channel may not decrease, but the locations of the bank stations may be adjusted. Describe the modifications and plot the proposed cross sections. Record the resulting water surface elevations in the table. Cross Section 4 3 2 1
WS Elevation from Part (a)
WS Elevation from Part (b)
CHAPTER
12 Advanced Floodplain Modeling
In open channel analysis, many hydraulic features require special consideration. These features may be a part of the initial model development or they may be developed as a proposed solution to a water resources problem. Chapter 11 introduces channel design and analysis; this chapter describes special features. These include flood reduction structures, such as levees, diversions, and dams, and special modeling problems arising during the development of base conditions, such as junction modeling, split flow diversion analysis, and the evaluation of building and ice effects on water surface profiles.
12.1
Levees Levees are an effective solution for reducing flood damage and have been employed throughout the world for centuries. They are probably the most often used flood reduction feature because they are usually the easiest to build and the least expensive to construct and maintain. Of the major flood reduction projects, levees are the easiest for the public to implement. For example, an individual landowner can construct a reach of levee, but a major reservoir, diversion, or channel modification project is generally beyond the ability of landowners to construct, operate, and maintain.
Levee Characteristics As discussed briefly in Chapter 11, a levee simply closes off a portion of the floodplain from floodwater inundation until the levee crest is exceeded. Figure 12.1 contains two views of levees along the Mississippi River near St. Louis, Missouri. Figure 12.1a shows a flank levee paralleling a small Illinois creek that empties into the Mississippi
438
Advanced Floodplain Modeling
Chapter 12
River across from and south of downtown St. Louis. The pipes in the foreground are discharge lines from a stormwater pumping plant located just landside (right) of the levee. The height of the levee is based on the Mississippi River flood levels along the levee. Figure 12.1b is a view of a mainline riverfront levee paralleling the Mississippi River near the joining of the Mississippi and Missouri Rivers. The road passing through the levee incorporates a gate closure to prevent the river from entering through the roadway opening during a flood. As shown in both figures, a levee is a trapezoidal structure built from local borrow materials. Clay is the most desirable levee material, since it is the least porous of all available earthen materials. However, clay is not always available in sufficient quantities. Levees have been successfully constructed of silts, sands, clays, and combinations of these materials. Many levees along the Mississippi River are constructed of dredged river sand, covered on the riverside with clay. Figure 12.2 shows a typical cross section of a levee along the Lower Mississippi River for the reach from the mouth of the Ohio River to the Gulf of Mexico. The base of a levee along a major river is often more than 100 ft (30 m) wide, depending on the levee side slopes required for stability. Standard levee side slopes generally range from 1V:3H to 1V:4H but can be as much as 1V:10H.
(a)
USACE
(b)
Figure 12.1 Levees along the Mississippi River.
Modified from Linsley, et al.
Figure 12.2 Typical levee cross section, Lower Mississippi River (Ohio River to the Gulf of Mexico).
Section 12.1
Levees
439
Floodwalls are also included within the overall levee classification. Floodwalls are much more expensive to build than levees and can be justified only where existing land development prevents the use of levees, due to prohibitive real estate costs. Because the land required for a floodwall is a small fraction of that needed for a levee, floodwalls are used to protect highly developed areas along an urban riverfront. Figure 12.3 shows a cross section of the floodwall that protects St. Louis, Missouri and Figure 12.4 shows the same floodwall near the crest of the Great Flood of 1993 in the Midwestern United States.
USACE
Figure 12.3 Typical floodwall, Mississippi River.
Figure 12.4 St. Louis floodwall during the 1993 flood.
Of all the possible structural solutions to a flood problem, a levee has the least environmental effect (discussed in Section 11.2); it seldom changes the existing channel or the adjacent floodplain. The main environmental effect is the creation of drier condi-
440
Advanced Floodplain Modeling
Chapter 12
tions and less flood risk for land behind the levee. Levees can cause some level of induced flooding upstream, with a potentially smaller effect downstream. By removing conveyance from the floodplain area, the levee requires flood flows to pass through a smaller cross-sectional area than before the levee was built. This results in higher water surface elevations for floods along, and for a certain distance upstream of, the levee. The levee only causes this increase locally and any adverse effects return to the prelevee condition as one travels further upstream. Figure 12.5 shows the resulting effect on flood levels at and just upstream of a levee. Identifying any adverse effect is a key feature of any levee project. Flooding within the protected area can happen due to inadequate drainage through the levee, especially when a high river level blocks culvert flow through the levee. Therefore, an interior flood reduction analysis is required for levee construction. Interior channels, culverts through the levee, interior ponding areas, and pumping stations are often needed to limit interior flooding. Interior flood reduction studies are often more difficult and complex than the levee analysis. Additional information on these studies can be found in EM 1110-2-1413, Hydrologic Analysis of Leveed Interior Areas (USACE, 1987). In the United States, planners must meet FEMA and state regulations regarding water surface increases (discussed in Chapters 9) for the 100-year recurrence-interval flood when proposing a new levee or raising the height of an existing one. Other FEMA cri-
Figure 12.5 Levee effects on flood levels.
Section 12.1
Levees
441
teria for levees include freeboard, levee stability, maintenance, and additional design issues (FEMA, 1990). Also, adverse downstream effects can result if the levee removes a large volume of storage from the floodplain, compared to the volume of a major flood on the river. A major loss of overbank storage could affect the hydrologic routing, as discussed in Chapter 8, increasing the downstream peak discharge. Although this downstream increase in peak discharge is possible, the effect of the construction of an individual levee, or even several levees, is seldom sufficient to cause a measurable increase in the downstream stage. A major flood protection system proposal along a long reach of river, such as constructing numerous levees along both sides of the river, should consider the lost storage potential through appropriate hydrologic or unsteady flow modeling. Although levees have the least effect on the environment when compared to other structural measures and often give a higher level of protection to the interior area, they are less desirable from a safety aspect. When a levee’s design is exceeded and the levee breaks, it no longer offers any protection. Other measures, such as channels and reservoirs, provide benefits even when their design is exceeded. Figure 12.6 shows a 1979 breach of a low levee along the Illinois River in the United States. When the levee breached from underseepage at a river elevation of about 1 ft (0.3 m) below the levee crest, the area protected by the levee eventually reached the same water level as the exterior river. The only exception to a lack of protection upon levee breaching is when the levee break is at the downstream end of a long levee. This causes fewer problems than a break at the upstream end of the riverfront or upstream flank levee. A flank levee is the portion that connects the riverfront levee with high ground. Levees typically have upstream and downstream flank (or tie-back) levees in addition to the riverfront levee, as illustrated in Figure 12.7. As shown, a levee should be designed to break or overtop at the downstream end.
Figure 12.6 Levee breach, Illinois River, 1979.
442
Advanced Floodplain Modeling
Chapter 12
Figure 12.7 Riverfront levee with flank levees.
The protected area at the upstream limits of the levee may still receive protection if the interior backwater at the levee break is insufficient to back up into the entire protected area. In designing a levee, it is therefore appropriate to select the point where the levee overtopping will take place when its design is exceeded. The design of the levee at this point ensures that overtopping occurs in the least damaging location; that is, the initial overtopping will not be allowed to occur at a subdivision, industry, water treatment plant, or interior stormwater pumping plant. The area may still be flooded, but it will not be subject to the potentially high velocities associated with flow at a levee overtopping or through a breach. This location is often at or near the downstream-most point along the riverfront levee. See “Levee Freeboard Design” on page 443 for more information.
Section 12.1
Levees
443
If a levee break occurs at the upstream end, water from one or more levee breaches will flow through the formerly protected area and pond at the downstream end. Once the interior fills, the water passes over the downstream flank levee and could, in turn, overtop and fail the next downstream levee unit, similar to the toppling of a row of dominos. Levee design must also incorporate interior flood reduction measures, including drains through the levee and ponding and/or pumping plants to handle interior runoff during times when the river blocks the drains. Road access through the levee, as shown in Figure 12.1b, may be necessary, with road closure structures for use when the river elevation is high.
Levee Freeboard Design For many past levee projects, the design water surface profile was computed and then a selected freeboard added. This freeboard may result in a levee that is 2–3 ft (0.6–0.9 m) higher than the design water surface. Many levees designed and built in the United States before about 1980 generally followed this procedure, resulting in a rather uniform freeboard for the entire levee unit. However, levee freeboard should be designed, rather than determined by applying some arbitrary uniform increment of vertical height to the design water surface. Floods exceeding the design event often result in very different profiles, compared to the levee crest profiles, and could cause a significant increase in the water surface elevations along the riverfront levee. Overtopping of a levee unit at the upstream end is the worst possible situation, because floodwaters can rush through the interior, potentially sweeping away all in the path of flow, ponding at the lower end, and then overtopping the downstream end of the levee from the inside out. Water surface profiles for several floods that exceed the design event should be studied to assist in determining levee freeboard. ETL 1110-2-299, Overtopping of Flood Control Levees and Floodwalls (USACE, 1986 further discusses the possible levee freeboard studies that should be considered. The design of a levee should include a conscious decision by the design team about the least damaging location for levee overtopping and then designing the levee to overtop at that point. This concept thus results in a variable freeboard, where the overtopping location may have 1,000 ft (300 m) or more of levee with 2 ft (0.6 m) of freeboard, with the rest of the levee having more
than 3 ft (0.9 m) of freeboard. The intent is to have the entire interior of the protected area filled with floodwater before the upstream end of the levee is overtopped. The least damaging location for overtopping is often found at the downstream end of the riverfront levee; however, this will obviously depend on the development, if any, on the inside of the levee at that point. Similarly, adjacent levees or levees on either side of the river may have freeboard designed to give one levee superiority over the other. Levee superiority means that one levee has more freeboard than the other, even though both levee units may be designed for the same flood event. A typical example is a levee protecting a community on one side of the river compared to a levee protecting crops on the other side. A value judgment would indicate that, when the design flood is exceeded, the levee protecting the agricultural area should be the first to overtop, possibly saving the levee protecting the urban area. Levees on either side of a tributary stream flowing across the floodplain of the main river should also have different freeboard levels to ensure that the upstream levee is overtopped first. The levee downstream of the tributary could have an additional foot (0.3 m) or more of freeboard, compared to the upstream levee, insuring that overtopping occurs first for the upstream levee and not at the worst possible location (upstream end) for the downstream levee. The example on page 450, describing the fight to save the Prairie du Rocher levee during the 1993 Mississippi flood, further discusses the problems that can occur when superiority is not part of the design for adjacent levees.
444
Advanced Floodplain Modeling
Chapter 12
In the United States, levees and floodwalls protect most cities along rivers from major flood events. New Orleans, St. Louis, Kansas City, Sacramento, and many other communities enjoy high levels of flood protection from their levee systems. Figure 12.8 shows an aerial view of the levee and floodwall system protecting portions of the metropolitan St. Louis area during the 1993 flood. If the system had not been in place, the area to the right of the river would have been under 15 ft (4.6 m) or more of water. Only an additional narrow strip along the left side of the river would have been flooded had the St. Louis floodwall not been in place, but this small area of industrial and commercial properties would have experienced nearly one billion dollars in damages. The peak discharge of this flood, estimated at about a 200-year event at St. Louis, was 83 percent of the design event for the levee/floodwall system and peaked about 4.5 ft (1.4 m) below the floodwall crest (Dyhouse, 1995). Freeboard (the difference between the top of the levee or floodwall and the design water elevation) for this levee was designed at 2 ft (0.6 m), less than required by today’s engineering standards.
USACE
Figure 12.8 Mississippi River at St. Louis during the 1993 flood.
Modeling Procedures Levees are fairly easy to model with HEC-RAS. The modeler must specify a centerline location for the levee at each cross section along with the elevation at which the levee is no longer effective in excluding the flood discharge. Cross-Section Locations. Accurately defining the levee height and its effects on flood levels requires an adequate number of cross sections. For the evaluation of a single levee project, such as that shown in Figure 12.5, cross sections should begin at the downstream point where flow occupies the entire floodplain and proceed far enough upstream of the levee terminus to ascertain the magnitude of any induced flooding on
Section 12.1
Levees
445
upstream lands. A geometric model for the base (existing) conditions, without the proposed levee or without modifications to an existing levee, should first be developed. A second geometric model, reflecting the proposed levee, is then developed from the base condition model. The with-levee model should reflect the proper conveyance contraction into and expansion out of the leveed reach to determine the levee effect. The general rules of 1:1 for contraction and 1:1 to 1:3 for expansion (discussed in Chapter 6) may be appropriate, but the modeler should evaluate the specific situation before selecting the proper variables. Locations for cross sections to model a levee should include: • At the end of the expansion reach, downstream of the levee. • Just upstream and downstream of the downstream end of the levee. • At low points along the levee alignment. • At any major changes in floodplain width on the riverside of the levee. • At any road crossings (bridges and culverts). • Just upstream and downstream of the upstream end of the levee. • At the beginning of contraction, upstream of the end of the levee. • Far enough upstream to fully capture any adverse effects of the levee on flood heights and allow the with-levee profile to return to the pre-levee profile. The milder the stream slope, the farther upstream the cross sections will generally extend. Levee Location and Elevation Data. Modeling a levee in HEC-RAS requires only the location and effective elevation of the levee at each cross section affected by the levee. These data are entered in HEC-RAS for each cross section with the Cross Section Data Editor, shown in Figure 12.9. Alternatively, levees may be defined for all cross sections concurrently by using the Levees table accessed within the Geometric Data editor. Levees can be specified on either or both sides of the river. The cross-section station corresponding to the levee centerline is specified along with the water surface elevation at which the existing levee can no longer be considered effective in preventing flooding. This elevation may be slightly higher than the design flood level, but it is not normally appropriate to set it equal to the levee crest elevation. When the water surface elevation is in the levee freeboard range, the reliability of the levee becomes suspect. Although the levee may prevent flooding for events exceeding the levee design, this situation cannot be guaranteed. As stated in Chapter 11, freeboard is an allowance for the uncertainties that cannot be reasonably quantified. It is not a claim that the levee will give a higher level of protection than the design flood. By default, levees are modeled in HEC-RAS as a vertical wall rather than as a trapezoidal shape. The vertical wall is included in the wetted perimeter computation. This results in slightly more cross-sectional area and slightly less wetted perimeter than if the levee were modeled as a trapezoid. The Manning’s n value for the levee is taken from the n value associated with the floodplain at the levee location, unless the modeler substitutes an estimated n for the portion of the floodplain containing the levee. The inaccuracies associated with these techniques result in negligible differences compared to modeling the levee as a trapezoid with an n value representing the levee. However, if the levee alignment is known in advance, the modeler may choose a trapezoidal shape as the cross-section geometry with the n appropriate for the levee. The elevation data on the Levee template then correspond to a point below the levee crown approximately equal to the design flood elevation. Figure 12.10 shows an
446
Advanced Floodplain Modeling
Chapter 12
Figure 12.9 Selecting the Levee option in HEC-RAS.
example of this situation. The Levee option is still needed to specify a limiting elevation(s) even when the actual geometry of the levee is used, unless the modeler wants the program to consider the levee as preventing flooding up to its crown elevation. For flood insurance studies, the modeler can use HEC-RAS to compare the existing levee crest elevation to the base flood (100-year) elevation at every cross section. The program subtracts the elevation of the water surface profile from the elevation of the top of the levee to calculate freeboard at each cross section. If the levee has at least 3 ft (0.9 m) of freeboard at every cross section, the levee meets FEMA height requirements for protection from the base flood. If the levee has less than this freeboard, FEMA may require that the levee be removed from the flood profile computations. See Section 10.4 for additional information on levee analysis for FEMA studies and also the National Flood Insurance Program Regulations, Paragraph 65.10 (FEMA, 1990). For studies that involve proposed (new) or replacement (higher) levees, the height of the proposed levee is often initially assumed to be sufficient that no overtopping will occur for the design flood. Following the establishment of this profile in HEC-RAS, the levee freeboard is determined and the levee crest profile developed. The proposed levee crest elevation data may then be inserted at the appropriate cross sections, using the procedures and levee template of Figure 12.10. The modeler should then have the program compute and confirm the adequacy of freeboard, as discussed previously. Evaluations of levee effects on floods exceeding the levee design and flooding of the protected area could then be performed using the hydrologic procedures discussed below or with unsteady flow modeling. Hydrologic procedures will only yield estimates of the maximum water level, while hydraulic modeling will yield the complete stage and discharge hydrographs.
Section 12.1
Levees
447
Figure 12.10 Levee defined as a trapezoidal shape, on the right floodplain.
Modeling Conveyance on the Landside of the Levee. Where the floodwaters are excluded from the leveed area, no special consideration is required for the n values associated with the protected area behind the levee, since no flow will occur in this area. A dilemma may result, however, when the floods under study exceed the levee design and the interior area is flooded. Levees are usually modeled with steady flow assumptions to determine the maximum water level with or without the proposed levee. For steady flow simulations, as soon as the effective elevation specified on the levee template is exceeded, the entire area behind the levee is considered filled with floodwaters and available for conveyance. Of course, this is not realistic. When a levee is overtopped or breached, the floodwaters enter the leveed area, spread out and fill the interior area over time. For example, during the 1993 flood in the Midwestern United States, leveed areas that were flooded took 12 to 72 hours after the initial breach to fill to the exterior river elevation. While the areas are filling, there is no true conveyance through the area behind the levee. In fact, there may be no conveyance in the interior area even when completely full of water. For the levee breach shown in Figure 12.6, the leveed area simply filled with water and no outflow from the flooded interior area occurred until the river elevation started to drop, allowing the ponded water to return to the river through the levee breach. This scenario cannot be adequately modeled as steady flow, since steady flow simulations do not reflect changes with respect to time. However, a steady flow model can be used to compute the maximum water levels if conveyance (or lack of) is correctly modeled for the flood event under study. For significant conveyance behind the levee, water must be able to move through the interior area and exit at the lower end of the levee, flowing on downstream.
448
Advanced Floodplain Modeling
Chapter 12
Levee Overtopping in the 1993 Flood A levee breach or overtopping and the corresponding effects on nearby river stages can be modeled in different ways, depending on the relationship of the height of the levee to the height of the flood. The engineer needs to determine if the area behind the levee acts as a storage area, with no conveyance, or as an extension of the river, with significant conveyance. Until the river essentially submerges the entire levee and flows over nearly the entire length of the levee, the area behind the levee serves as off-channel storage with no conveyance. The Missouri River between Kansas City and St. Louis, Missouri (about 375 mi or 604 km) and the Mississippi River from St. Louis to Cape Girardeau, Missouri (about 130 mi or 209 km) are examples of both situations. In the 1993 flood, there was a succession of several continuously higher peaks. On the Missouri River, the early peaks overtopped and breached nearly all the levees between Kansas City and St. Louis. These levees were almost all privately constructed and generally gave a low level of protection, usually less than a 20-year frequency. For the early portion of the 1993 flood, these
units did not allow additional conveyance, but only served as storage areas. However, by the time of the maximum crest on the Missouri River in late July, these units were submerged, in some cases by several feet. The area behind these levees now became effective for conveyance. Unsteady flow modeling was required on the Missouri River to allow the change from storage to conveyance for these levees and to determine the river elevation at which this change took place (USACE, 1994b). On the Mississippi River between St. Louis and Cape Girardeau, the levees were much higher, giving protection to at least the 50-year event. Although four major levees providing protection from the 50-year flood to agricultural areas were overtopped or breached, there was no significant conveyance behind any of the levees. All mainly served as off-channel storage areas. Unsteady flow modeling was simpler for the Mississippi River than for the Missouri River. It should be noted that, for only the peak discharge, a steady flow model can also be applied to compute peak stage, as long as conveyance (or the lack of conveyance) was properly determined throughout the two reaches.
To simulate near-zero conveyance in the interior area for a steady flow analysis, the modeler can assign an abnormally high value of n to the floodplain landward of the levee. Values of 0.99 for n are often used, but lower or higher values have also been applied. These high n values cause the velocity landward of the levee to approach zero. Essentially all the conveyance to pass higher flood flows will still be riverward of the levee, even though the levee is no longer effective in preventing flooding. This situation is what actually occurs for most levees overtopped or breached during a flood. There is usually no significant conveyance behind the levee until the levee is completely overtopped and submerged throughout its full length. High values of n in the floodplain thus allow the appropriate conveyance to be maintained riverward of the levee, while allowing the landside storage to be estimated for hydrologic or hydraulic simulations of the effects of the levee break on the discharge and stage hydrographs. When the levee becomes greatly submerged, such that it represents a small cross-sectional area to flow, more appropriate n values may be substituted for the abnormally high ones. However, this situation is dependent on the reach characteristics of the river and the engineerʹs judgment. For example, low farm levees often give protection from common floods (10-year or more frequent) and are included in the geometry information, but normal n values are used behind the levee. These levees are typically submerged by 5 ft (1.5 m) or more
Section 12.1
Levees
449
during superflood events, such as the 100-year and rarer, and normal conveyance behind the levee is assumed during these events. However, a situation for which portions of the levee are submerged by only 1 ft (0.3 m) or so would probably see little effective conveyance behind the levee. Since an individual levee varies in height due to uneven settlement or other reasons, the latter situation often sees much of the levee still at or above the water level that resulted in initially overtopping the levee at one or more low points. Simulating Levee Breaches with an Unsteady Flow Model. A hydrologic model such as HEC-1 or HEC-HMS cannot accurately estimate the effects of a levee break on the riverʹs discharge or stage hydrograph because the shape of the hydrograph is based only on hydrologic routing through storage. The storage-discharge relationship for the hydrologic routing through the leveed reach would show a large increase in available storage for a flow just slightly greater than the levee design. This would indicate that the entire area behind the levee was essentially filled instantaneously, immediately after the levee design flow was exceeded. Obviously, it takes significant time to fill the area behind a levee. Also, when a levee is overtopped or breached, momentum forces become important, particularly changes with respect to time. Therefore, where the situation demands an accurate estimate of the levee break’s effect on the river stage and discharge hydrographs over time, the modeler should select an unsteady flow hydraulic model. Unsteady flow modeling in HEC-RAS includes a levee filling and emptying algorithm and can analyze the resulting effects on the exterior stage and discharge hydrographs. For more details on unsteady flow modeling, see Chapters 14. In rare situations where flow patterns behind the levee following a breach are important, a two-dimensional unsteady flow hydraulic model is necessary. For example, to study a high roadway embankment with an interstate highway crossing the floodplain behind the levee with one or more relief openings to prevent roadway flooding upon levee failure, defining the interior flow paths and water surface elevations requires a multidimensional model. A multidimensional model gives depth and velocity information at selected points throughout the leveed interior. This detail may be required if the modeler needs to determine the discharge that left the river through the breach, as well as the interior depths and velocities as the floodwaters flowed through the interior, possibly exiting through a second downstream levee break. The need for a multidimensional model to study flows behind a levee occurs infrequently. Most levee analyses can be adequately performed with one-dimensional steady flow techniques, as indicated in Chapter 4. The key hydraulic issues in levee analysis are how high to build the levee and the magnitude of the upstream change in water level. Steady flow analysis addresses both of these satisfactorily. A one-dimensional steady flow model identifies only the maximum water surface elevation for the existing and the confined (with levee) plans. The maximum water surface elevations with and without a levee are often all that is needed for an analysis of the effects of a levee. However, if the full hydrograph is required for stage changes with time, a one-dimensional, unsteady flow model is required. HEC-RAS can model one-dimensional steady and unsteady flow regimes. If it becomes important to compute the velocities and water surface elevation for different locations on the same cross section, a multidimensional, unsteady flow model is needed. Unsteady flow models are needed only to address situations that cannot be evaluated properly under steady flow assumptions and where a trace of the change in river elevation with time is needed, as is discussed further in Chapters 14.
450
Advanced Floodplain Modeling
Chapter 12
The Need for Variable Freeboard on Levees The levee system that protects the Middle Mississippi River for over 150 mi (241 km), from near the mouth of the Missouri River upstream of St. Louis, Missouri to downstream of Cape Girardeau, Missouri, was designed and constructed in the 1950s and 1960s. Standard design for levees at that time was generally for a uniform 2 ft (0.6 m) of freeboard and all eleven separate levee units in this reach were designed to this standard. Seven of these levees protected primarily agricultural areas and the height of each levee was equal to the stage of the 50-year flood plus 2 ft (0.6 m) of freeboard. Three of these levees were located in series on the Illinois floodplain, separated by small creeks discharging hillside drainage to the Mississippi River. The levee crests on both sides of each tributary were the same elevation. This and the uniform (rather than variable) freeboard led to disastrous, or near disastrous, consequences during the Great Flood of 1993. The upstreammost of the three in-line levees, the Columbia Drainage and Levee District, was overtopped between 8:00 and 9:00 A.M. on August 1, 1993, near the upstream end of the riverfront levee (USACE, 1994g). The levee height was 15– 20 ft (4.5–6.1 m) and protected an area containing about 14,000 acres (5,670 hectares), including about 65 farm homes. The unfortunate location of the breach, resulting from the use of uniform freeboard, allowed water to flow through the length of the district and pond inside the downstream end of the district levee. The area quickly filled with floodwater and the interior depth eventually exceeded the height of the downstream levee. The ponded interior overtopped the Columbia levee and flowed into the small tributary stream between the Columbia District and the next district downstream, the Harrisonville Ft. Chartres Stringtown District (HFCSD). Because the Mississippi backwater in the tributary was only inches below the top of the HFCSD levee, the additional inflow from the Columbia District interior caused the HFCSD levee to overtop at its upstream end during the night of August 2, 1993. The HFCSD is a very large district, protecting over 46,500 acres (18,800 ha), including the town of Valmeyer, Illinois. The district stretches about 30 mi (48 km) along the Mississippi River. Because of the great size of the district, it would take two to
three days to fill the interior, pond inside the downstream end, and eventually overtop the downstream levee. If overtopping were to occur, this would again affect the next downstream unit, the Prairie du Rocher District, including the historic small town of Prairie du Rocher. The overall situation is similar to that of a row of dominos, where tipping over the first one affects the second, which topples the third. In the 48 to 72 hours available, every attempt was made to prevent the loss of the Prairie du Rocher levee in this fashion. The primary method was to quickly excavate an opening at the downstream end of the HFCSD riverfront levee, basically constructing a weir in the levee to let the oncoming waters from upstream flow back out to the river. Construction equipment was deployed by August 3 to excavate a 400 ft (122 m) section of the levee to a depth of 4–5 ft (1.2–1.5 m) below the levee crown. Local levee district officials also set off explosives on the levee to further open flow passages from the flooded interior back out to the river. The entire operation was a success, although interior floodwaters did overtop the downstream HFCSD levee and threatened to attack the Prairie du Rocher levee. The floodwaters were within inches (cm) of the top of the Prairie du Rocher levee at the flood crest, but did not overtop it. Although the Prairie du Rocher levee was only intended to protect against a 50year flood, it successfully prevented flooding from an event of at least a 100-year recurrence interval. The disaster may have been prevented if the upper portion of the HFCSD levee had been 1 ft (0.3 m) or so higher than that of the Columbia District levee, normal practice today. The lack of variable freeboard and the inability to force overtopping at the least damaging location (downstream end of the levee) played a significant part in the loss of the HFCSD levee and nearly resulted in the loss of the Prairie du Rocher levee. Today's modern design would require 3 ft (0.9 m) or more of freeboard over most of the levee, with possibly 2 ft (0.6 m) at the point chosen for levee overtopping. The upstream flank levee for the HFCSD should be higher by 1 ft (0.3 m) or more than the Columbia levee to prevent the “domino” effect. Also, the upper flank levee of the Prairie du Rocher levee should be at least 1 ft (0.3 m) higher than the lower flank of the HFCSD levee.
Section 12.2
Modeling Obstructions
451
Design for Closure of Levee and Floodwall Openings Many levees and floodwalls have openings for highways, roads, and railroads where it is impractical or too costly to ramp these transportation paths over the line of protection. Where these openings exist, the design of the levee or floodwall must include an evaluation of the ease of closure of each opening and the time required to make the closure. There must be adequate time to make all closures before the river enters the protected area through the opening, making a forecast of river stages doubly important to the successful operation of the levee or floodwall project. The roadway elevation at each opening through the line of protection should be known and related to an appropriate river stage. The opening should be closed when the river stage reaches a threshold elevation (likely 2 ft, or 0.6 m, or more) below the roadway elevation. The threshold elevation must be based on the time to activate the work crew, reach the site, and make the closure, along with how fast the river can rise during the flood. Closures can range from a swing gate (shown in Figure 12.1b) through constructing a preformed barrier across the opening. Closure of a swing gate could take place in 30 minutes or less, from the time notice is received to close the site. Total closure time includes the period from the initial notice that closure is required to the point of full closure, including travel time to the site. Wide openings, such as a double-track railroad or multilane highway, may require removing barriers from storage, transporting them to the site, then assembling and installing them at the site.
12.2
For the St. Louis Flood Protection Project, 31 gate closures are either single or double swing gates. A single swing gate requires 15 to 20 minutes to close, while a double swing gate, shown in Figure 12.1b, requires 30 to 90 minutes, depending on the procedure used to brace the gates. Small crews of from two to seven personnel are dispatched to make the swing gate closures. Single swing gate closures are used for openings up to about 22 ft (6.7 m) high and 20 ft (6.1 m) wide. Double swing gates are employed for opening widths of 20 to 40 ft (6.1 to 12.2 m) and heights up to 16 ft (4.9 m). Seven-panel closures are required for openings exceeding 40 ft (12.2 m) wide. A crew of 12 to 20 personnel is necessary to construct the framework for the panels. A single row of seven panels is about 6 ft (1.8 m) high and requires 8 to 12 hours to erect. Higher rows of panels are installed as forecasts show higher river levels. These reinforced aluminum panel closures are used for heights up to 20 ft (6.1 m) and for openings of 40 to 70 ft (12.2 to 21.3 m). If the project safety depends on simply sandbagging the opening, still more time is usually necessary. Obviously, the more openings through a line of protection, the more personnel are required and the more important timely and accurate river forecasts become. A community protected by a levee with several roadway openings must have adequate manpower on call to ensure that the line of protection is completed and secured before rising floodwaters reach the opening.
Modeling Obstructions The engineer may decide to include the effects of groups of buildings or even an individual building on the floodplain in the model geometry. This decision should be made only after both field and map inspections of the area containing the obstruction. The modeler must determine how effective the area around the landfill or buildings is at providing conveyance for overbank flows. For a subdivision in which homes are located at relatively even intervals and the streets run at right angles to the flow of the stream, there may not be much effective conveyance between individual structures. Fences, garages, outbuildings, vegetation, vehicles, and other obstructions between homes may limit the effective conveyance until depths are sufficiently large to cover
452
Advanced Floodplain Modeling
Chapter 12
all the obstructions. For a similar situation, in which the subdivision streets parallel the direction of the stream, the streets may offer significant conveyance for river overflows. If the buildings are modeled as part of the cross-section geometry, recall from Chapters 5 that the geometry for each cross section should be representative of onehalf the reach upstream and downstream to the next cross sections. Sections at close intervals are often required to model buildings. Expansion and contraction of flows around the obstructions should also be evaluated and modeled. If reach storage is to be computed, the flood storage within individual structures should be incorporated. HEC-RAS offers two methods for modeling buildings by adding either obstructions or abnormally high n values to represent the buildings, depending on whether or not the storage through the structures is important.
Without Storage Considerations If storage is not important, a building or floodplain fill can be modeled as a solid obstruction that blocks the flow (a blocked obstruction). This technique simply subtracts the obstructionʹs area from the overall cross-sectional area and includes the wetted perimeter of the obstructionʹs surface in contact with the water. Two options are available for entering obstructions in HEC-RAS, accessed through the options pulldown menu within the Cross Section Data Editor. The normal obstructions option allows definition of a left station and elevation and a right station and elevation. With this option, the areas to the left of the left station and to the right of the right station are completely blocked out. An example of this type of obstruction is shown in Figure 12.11.
Figure 12.11 Use of blocked obstruction to model floodplain fill.
Section 12.2
Modeling Obstructions
453
The second option is to model multiple blocked obstructions. Figure 12.12 shows a cross section with multiple obstructions, each representing a building or some other obstruction. For multiple blocks, the beginning and end stations of each obstruction are entered in the Blocked Obstruction Areas menu, along with the top elevation of the blocked obstruction, as shown in Figure 12.12. Contraction and expansion of the flood flow around the obstruction(s) should be included, as shown on Figure 12.13. HEC-RAS would give a divided flow warning message for the multiple blocked obstructions of Figures 12.12 and 12.13; however, this is the correct flow situation for this scenario. Where rows of structures are modeled, as in a subdivision, sections at fairly close intervals are necessary to model the contraction between structures, then the expansion downstream of the structures (Figure 12.13). Fences and other semiporous structures that lie perpendicular to the direction of flow can be modeled by increasing the n value between the structures. Blocked obstructions can be used to model buildings when the flood storage within the building is not needed or is judged insignificant. The use of blocked obstructions is most appropriate and practical when one or two large buildings in the floodplain, such as a manufacturing facility, are being modeled.
With Storage Considerations Where both storage and conveyance are to be addressed with a hydrologic model, the structures can be modeled by defining the structure boundary as an abnormally high n value that doesn’t block the flow. Chapter 8 describes how HEC-RAS can be used to obtain routing information (storage-outflow data) that can then be input into a hydrologic model. Rather than blocking the area of each building on the cross-section geometry, each structure is modeled with a high value of n, such as 0.99. As with the area behind a levee, this large n value reduces velocity through the structure to near zero, simulating the obstructive effect and also including the flood storage within each structure as part of the computation. With this technique, the boundary of each obstruction is located within the cross section, as shown in Figure 12.14. Modeling each structure with a high n value allows storage, but no flow through the structure, rather than preventing both storage and conveyance by blocking out the structureʹs cross section.
454
Advanced Floodplain Modeling
Chapter 12
Figure 12.12 Multiple blocked obstructions in the floodplain (buildings).
Figure 12.13 Plan view of flow around buildings, showing effective/ineffective flow areas and cross section locations.
Section 12.2
Modeling Obstructions
455
Figure 12.14 Simulating obstructions with high n values.
When structures are fairly well lined up in the direction of flow, the same cross section, or cross-section sets, can be repeated throughout the reach containing the buildings. When the structures are staggered, the modeling is more complicated. One potential solution is to compute a weighted overbank n value outside the program and incorporate a single value of overbank n to represent this more complicated situation through the reach containing the structures. This can be accomplished by selecting one or more representative cross sections containing the buildings and performing a hand calculation for the overbank Manning’s n using Equation 7.11 or equivalent. This technique is commonly used for a floodplain consisting of numerous structures. HEC-RAS also computes a weighted n value for each overbank section at every cross section. In lieu of hand computations outside the program, the engineer can include the cross sections with buildings and the appropriate n value at each location for the program to perform the weighting of n during normal computations. The engineer can then evaluate the weighted n computed at sections featuring the buildings, select an appropriate value of n, and use this value for future runs of the program. For extremely large flood flows that would essentially submerge most or all of the structures, more normal values of overbank n can be employed. When possible, the overbank n values should be calibrated against highwater marks and/or gage data to ensure that the high n values are representative of what actually occurs in the prototype.
456
Advanced Floodplain Modeling
12.3
Chapter 12
Modeling Tributaries and Junctions Most open channel hydraulic studies have a main reach with one or more tributaries, requiring computed water surface profiles upstream and downstream of the junction of the streams. These stream junctions are modeled by a separate data editor in HECRAS, but are easy to incorporate. When a new stream is to be added to an existing watershed schematic, the modeler draws the new stream on the schematic, in the direction of flow, and graphically connects it to the existing reach at the junction. Once the new reach is connected to the existing reach, the program prompts the modeler to enter a River and Reach identifier for the new reach. After entering the river and reach identifiers, the program asks if the existing reach should be “Split” into two reaches. If profiles are to be developed on the new reach, the modeler answers “yes” and is prompted to enter a Reach identifier for the lower portion of the existing reach and a Junction name for the newly formed stream junction. For example, in Figure 12.15, Long Branch is the name of the new river, added in the lower portion of the schematic, Tributary is the reach name, and the junction name is Long-Fall. Cross-section information must be added to model the flow movement at the junction. If no profiles are to be computed for Long Branch, the modeler answers “no” to the programʹs query about splitting the main river at the intersection of the new tributary. The new stream then appears on the schematic as a better representation of the stream system. No computations are based on the stream schematic; it is strictly for an illustration of the watershed.
Figure 12.15 Adding a new stream and junction to the schematic.
Section 12.3
Modeling Tributaries and Junctions
457
Cross-Section Locations Cross sections should generally be located as close to the junction as reasonably possible, normally within 100 ft (30 m) both upstream and downstream of the junction on both the main river and the tributary. It is desirable to locate cross sections close to the junction because there could be large changes in discharge from just upstream to just downstream of the junction. Placing sections close to the junction will thus minimize any error in computing the energy losses through the junction. Cross sections defining the junction should not overlap; that is, the same overbank flow area should not be in other cross sections identifying the two flow paths. Also, since the model is onedimensional, each cross section bounding the junction should be at a right angle to the direction of flow. Section 12.6 further illustrates this guidance for split flow analysis. Observing the flow patterns at the junction in the field can assist in locating the junction cross sections.
Computing Losses and Water Surface Elevations through a Junction HEC-RAS supports two methods for computing losses and water surface elevations through a junction: the energy method and the momentum method. Chapters 2 and 6 thoroughly discuss both of these methods. Engineers typically use the energy method, which is the program default. However, the momentum method is preferable when certain criteria apply, as discussed in the following sections. The Energy Method. The energy method computes the water surface elevations across the junction with the standard step backwater method (discussed in Chapter 2) for subcritical flow or forewater computations for supercritical flow. The sections just upstream and downstream of the junction often have very different total discharges. The elevation at the upstream section is based on friction loss and either an expansion or contraction loss occurs between the two sections. The friction slopes at both locations are computed using the appropriate discharge for that cross section, which is then used to compute the friction loss. The weighted velocity head is computed for development of either an expansion or contraction loss. These two losses are added to compute the change in the energy grade line elevation between both pairs of cross sections bounding the junction. The energy method is the default method at junctions in HEC-RAS and is appropriate for most situations when streams combine. If the streams join with a large angle between them or if the flow at the junction is supercritical, the momentum method is normally preferable. If the flow regime changes across the junction in the energy method calculation, the computations should be redone using the momentum method for the junction. Information about the stream junction is entered in the Junction Data Editor within the Geometric Data Editor. The distances from the sections just upstream of the junction to the cross section just downstream of the junction for each stream should be entered in the Length field, as shown in Figure 12.16. Note that in the cross-section data, the reach lengths for the first cross section of each reach upstream of the junction should be left blank or set to zero; HEC-RAS gets this distance data from the Junction Editor. Depending on where the new junction is located, compared to the existing cross sections on the main river, the modeler may need to add additional cross sections to the main river geometry file for the junction.
458
Advanced Floodplain Modeling
Chapter 12
Figure 12.16 Adding junction information using the energy method. Bounding cross sections would be added just upstream and downstream of the junction for Big River and on Long Branch. Additional cross sections are needed to compute water surface elevations on Long Branch.
The Momentum Method. The momentum method, discussed in Chapter 2, should be considered when a large tributary stream enters the main stream at a large angle with the main river. The momentum method should also be used to model tributaries entering the main channel at velocities high enough to cause great turbulence at the confluence, even when the flow is not supercritical at the junction. The momentum method is most appropriate for a supercritical flow condition on one or both of the streams. When the modeler chooses Momentum as the Computation Mode in HEC-RAS, the momentum method is applied between each pair of cross sections through the junction by a simultaneous balance of specific forces across the junction, assuming the water surface elevation is the same at both upstream locations. To use the momentum technique for a junction, the data required on the Junction Editor on Figure 12.16 are identical to that of the energy method, except for the selection of momentum on the radio button and including angles between each of the two streams upstream of the junction with the stream downstream of the junction. Because the angle of the main river upstream of the junction is normally zero, compared to the direction of the main river downstream of the junction, only an angle for the tributary is typically needed. For additional details on the momentum computation for junctions, consult Hydraulic Reference Manual (USACE, 2002).
Section 12.4
12.4
Inline Gates and Weirs
459
Inline Gates and Weirs It is not uncommon for a structure to be placed across a stream and its floodplain to partially regulate flows and stages in the river. These structures may include major dams and reservoirs, hydropower dams, locks and dams for river navigation, or lowhead dams for upstream irrigation diversions. All these examples normally consist of an overflow weir (spillway) and one or more openings, over or through the structure, controlled by gates. Figures 12.17, 12.18, and 12.19 show three examples of stage- and flow-control structures using inline gates and weirs. All may be modeled using the inline weir option in HEC-RAS.
USACE
Figure 12.17 Lock and Dam 25, Mississippi River, Missouri.
Figure 12.18 Flow control structure in Anchorage, Alaska.
460
Advanced Floodplain Modeling
Chapter 12
Figure 12.19 Bagnell Dam spillway, Osage River, Missouri.
Types of Weirs and Gated Openings HEC-RAS can model broad-crested and ogee weirs. Broad-crested weirs are common for navigation dam structures; ogee weirs are more typical of major multipurpose reservoirs. (See Chapter 6 for additional information on these types of weirs.) HEC-RAS can model both sluice (vertical-lift) gates and radial (tainter) gates. Figure 12.20 illustrates the two types of weirs and the two types of gates normally used for inline structures. Both types of gates are found on a variety of structures, with radial, or tainter, gates probably being the most frequently used of the two types. Figure 12.21 shows one of the tainter gates installed for the Melvin Price Locks and Dam, on the Mississippi River near St. Louis, Missouri. The majority of all inline, gated weirs can be successfully modeled with these weir and gate selections.
Figure 12.20 Types of gates/weirs for modeling in HEC-RAS.
Section 12.4
Inline Gates and Weirs
461
Figure 12.21 Radial (tainter) gates, Melvin Price Locks and Dam, Mississippi River.
Governing Equations The equations used to model weir and gate flow are similar to those previously discussed for bridges and culverts operating as a weir and an orifice or sluice gate. However there are some differences from the earlier equations. Lift (sluice) Gates. Discharge under a free-flowing sluice gate unaffected by the downstream tailwater, illustrated in Figure 12.22, is computed with
Q = CWB 2gH
(12.1)
462
Advanced Floodplain Modeling
where Q C W B g H
Chapter 12
= the discharge under the gate (ft3/s, m3/s) = the discharge coefficient, normally 0.5–0.7 (considered dimensionless) = the width of the gate opening (ft, m) = the height from the spillway invert to the bottom of the gate (ft, m) = the gravitational constant (ft2/s, m2/s) = the head from the spillway invert at the gate to the upstream energy grade (ft, m)
Figure 12.22 Flow under a lift (sluice) gate, free flow or submerged flow.
The downstream tailwater elevation begins to affect the discharge (flow under the gate is no longer free flow) when the tailwater depth on the spillway, divided by the headwater energy—called the submergence value—exceeds 0.67. HEC-RAS then computes the discharge for partially submerged conditions (submergence ratio between 0.67 and 0.79) with the transition equation:
Q = CWB 2g3H
(12.2)
where H = the difference between the downstream water surface elevation and the upstream energy grade line elevation (ft, m) When the tailwater/headwater ratio reaches a submergence value of 0.80, the program switches to the orifice equation:
Q = CA 2gH
(12.3)
where C = the orifice coefficient, typically taken as 0.8 (considered dimensionless) A = the gate opening area (ft2, m2) This equation was previously introduced as Equation 6.6, for a bridge opening that acts as an orifice. Radial (Tainter) Gates. Figure 12.23 shows a tainter gate operating under both free flow (no effect by tailwater on the discharge under the gate) and submerged flow conditions. For a free-flow condition, the flow under the gate is given by
Section 12.4
Inline Gates and Weirs
Q = C 2gWT where Q C W T TE B BE H HE
TE BE
B
H
HE
463
(12.4)
= the flowrate (ft3/s, m3/s) = the discharge coefficient, usually 0.6–0.8 (considered dimensionless) = the flow width under the gate (ft, m) = the trunnion height from the spillway crest to the pivot point (ft, m) = the trunnion height exponent, typically about 0.16 (dimensionless). The default value in HEC-RAS is zero. = the height of the gate opening (ft, m) = the gate opening exponent, typically about 0.72 (dimensionless). The default value in HEC-RAS is 1. = the difference between the crest elevation and the upstream energy grade line elevation (ft, m) = the head exponent, typically about 0.62 (dimensionless). The default value in HEC-RAS is 0.5.
Figure 12.23 Flow under a radial (tainter) gate, free flow and submerged flow.
When the tailwater begins to affect flow under the gate (submergence ratio reaches 0.67), HEC-RAS switches to a transition equation that is nearly identical to Equation 12.4:
Q = C 2gWT
TE BE
B
( 3H )
HE
(12.5)
where H = the difference between the upstream energy grade line elevation and the downstream tailwater elevation (ft, m) The differences, compared to Equation 12.4, are the substitution of the H term with 3H and a revised definition of H, shown on Figure 12.23 for the tailwater condition for submerged flow. When full submergence occurs (submergence ratio reaches 0.8), the gate acts as an orifice and the flow computations use Equation 12.3. Low Flow Under Gates. When the gate is lifted free of the water (upstream water surface elevation is lower than the edge of the gate, shown in Figure 12.24), the opening acts as a weir. The weir equation, first presented in Chapter 6, is
464
Advanced Floodplain Modeling
Chapter 12
Q = CLH
3⁄2
(12.6)
where Q = the flowrate (ft3/s, m3/s) C = the weir coefficient, typically 2.6–4.0 (for English units, considered dimensionless) L = the length of flow over the weir (ft, m) H = the head on the weir (upstream energy elevation minus elevation of weir crest) (ft, m) The variation in the weir coefficient depends on the spillway crest shape (broad crested or ogee shaped) and depth of flow.
Figure 12.24 Flow under a gate.
Broad-Crested Weir. Figure 12.17 shows a structure having a broad-crested spillway shape, with crest submerged by the flow through the gates. For Equation 12.6, the spillway coefficient for a broad-crested weir ranges from about 2.50 to 3.08 (English units). For a spillway having a well-rounded approach onto the broad crest and a large depth of flow compared to the length of the broad crest, the values of 2.8 to 3.0 are typical. For roadway overflow, values of 2.5 to 2.7 are often applied to reflect the lower depths of flow, the longer length of the broad crest, and the effects of obstructions such as highway guardrails and debris. Ogee Weir. Figure 12.19 shows an ogee-shaped spillway. This spillway is more efficient than a broad-crested shape and passes more flow for the same headwater conditions. The weir coefficient (C) ranges from approximately 3.5 to 4.1 (English units), but the value varies with the discharge and the resulting head on the weir. The greater the depth of flow on the spillway, the higher the value of the weir coefficient. The actual ogee shape of the overflow structure is based on the head and the weir coefficient (CD) for the design flood. For heads less than or more than the design head, the corresponding C will have a lower or higher value, respectively, compared to CD. These variations in C for different heads on the weir are made automatically within HECRAS, based on criteria developed by the Bureau of Reclamation (USBR, 1977). The
Section 12.4
Inline Gates and Weirs
465
curve for adjusting the ogee weir coefficient for varying heads is found in HEC-RAS, Hydraulics Reference Manual (USACE, 2002). Additional information on a wide variety of weir shapes and corresponding weir coefficients is given in Handbook of Hydraulics (King and Brater, 1963). Uncontrolled Spillway Flow. A separate, ungated (emergency) spillway, as shown in Figure 12.25, may be incorporated within the inline structure. The weir equation is used to compute flow over the spillway for this feature.
USACE
Figure 12.25 Uncontrolled broad-crested spillway, 1993 flood, Painted Rock Dam, Gila River, Arizona.
Modeling Procedures Modeling inline weirs is very similar to modeling bridges. The contraction into and the expansion out of the inline structure must be defined, with the energy equation used to determine losses in the vicinity of the structure. Computations at the structure use the equations described in Chapters 6 and 7. Section Locations. The same four cross sections used for bridge and culvert modeling (Chapters 6 and 7) are needed to define the contraction and expansion through inline structures. Sections 1 and 4 are located at the points where the flow is fully expanded downstream and at the start of upstream contraction, respectively. Section 2 is located just downstream of the structure, reflecting the tailwater condition, and Section 3 is located just upstream of the structure, reflecting the headwater condition. Section 2 is located at or near the end of the energy dissipater, following the end of a hydraulic jump. Section 3 is usually located 50–100 ft (15–30 m) upstream of the structure, approximately at the beginning of the drawdown of the water surface into the spillway opening. The ineffective flow area option may be used at sections 2 and 3 to model the effective width of flow that is confined by the width of the gates or the spillway. The ineffective flow area option also defines the elevation at which a separate spillway would commence operation, as illustrated in Figure 12.26. The two vertical arrowed lines on Figure 12.26 are the locations for the ineffective flow area stations. All flows pass through the five gated openings until the water surface elevation exceeds the limiting
466
Advanced Floodplain Modeling
Chapter 12
Figure 12.26 Ineffective flow area stations/elevations for inline gates/weir.
elevation value of the right ineffective flow area station. At this elevation, water flows over the spillway on the right side of the structure. All of the cross-sectional area to the right of the right vertical arrowed line then becomes effective. As the flow continues to increase, the water surface elevation rises until the level specified by the left ineffective flow area constraint is exceeded. At this elevation, the entire inline structure has water flowing over it, making the entire cross section effective for flow. Structure Data. In HEC-RAS, the location and geometry of the inline weir or spillway are entered into the Inline Weir and/or Gated Spillway Data Editor, as shown in Figure 12.27.
Figure 12.27 Inline Weir and/or Gated Spillway Data Editor.
From the Inline Weir and/or Gated Spillway Data Editor, the Inline Weir Station Elevation Editor is opened, as shown in Figure 12.28. This editor is similar to the Bridge Deck Editor (but without low chord data).
Section 12.4
Inline Gates and Weirs
467
Figure 12.28 Weir/Embankment Editor showing the station-elevation data added and the plotted cross section of the dam and spillway.
In this template, the top of dam embankment and/or spillway is entered as a series of station/elevation points, the spillway type (ogee or broad crest) is specified, and spillway geometry is added. Elevations at the base of the dam or weir are taken from cross section 2 or 3, adjacent to the dam. A weir having a varying geometry along its length can also be modeled. The Inline Weir and/or Gated Spillway Data editor is also used to indicate whether a structure is gated. All information for the sluice or radial gates is entered in the template shown in Figure 12.29, including gate geometry and coefficients, centerline station for each gate, and number of gates. Weir data for the gates, which may be different from the main spillway, include type of weir, design weir coefficient, and height of weir or spillway. The height of the spillway crest above the approach channel and the design head on the spillway are needed to compute CD and to then determine the value of C for other higher or lower heads on the spillway(s). In addition, one or more gates may be linked as a “gate group.” This may be done to group two or more gates having common geometry or to specify the operation of certain gates during flow events. Each gate in a gate group is operated in the same fashion for a specific discharge. If all gates in the group are not operated the same way, separate gates or gate groups must be specified. For the example shown in Figure 12.29, there are two gate groups. The data for “Gate Group 1” are shown in the Inline Gate Editor in the figure, with each of the three identical gates identified by the gate centerline. Similar information is entered for the larger gates comprising “Gate Group 2,” shown on the cross-section plot of Figure 12.29.
Next Page
468
Advanced Floodplain Modeling
Chapter 12
Figure 12.29 Gate Editor for inline weir showing the gate data for a sluice gate and the resulting cross-section plot of the gates.
Discharge Data. Discharge data are supplied by actual gage data or from a hydrologic model. Where a significant inline weir and upstream reservoir are present, a hydrologic routing of the hydrograph through the reservoir is necessary to determine the proper peak discharge exiting the structure. The reservoir attenuates and delays the inflow hydrograph, normally resulting in a significantly lower peak discharge leaving the inline structure than the peak flow that entered the upstream reservoir created by the dam. This operation is performed outside of HEC-RAS, using a hydrologic modeling program such as HEC-HMS. Modelers can use HEC-RAS to establish the reservoir storage-outflow relationship at the inline structure. If unsteady flow modeling is chosen, the reservoir routing will be performed as part of the hydraulic simulation. Not all structures acting as dams and reservoirs require the inline weir option. Chapters 6 and 7 discuss situations in which bridge or culvert openings that are very constricting and located under high roadway embankments can act as dams with small outlet structures. Normal bridge and culvert modeling procedures are more appropriate for these circumstances. Gate Settings. The amount that each gate is open or closed for every discharge being studied is specified in the Spillway Gate Openings editor, located within the Options menu of the Steady Flow Editor, as seen in Figure 12.30. The modeler can specify for each discharge how many gates are opened per gate group, and to what elevation they are opened. For the example shown in Figure 12.30, there are two gate groups, “Gate #1” and “Gate #2.” Each gate in the group must have an identical open-
Previous Page
Section 12.4
Inline Gates and Weirs
469
ing; Gate #1 has a maximum gate opening height of 3 ft and Gate #2 has a maximum height of 5 ft. For the 100-year discharge, all three gates in Gate #1 are open 3 ft (0.9 m), and two gates in Gate #2 are open, to a height of 5 ft (1.5 m). This information must be entered for all of the profiles being computed.
Figure 12.30 Gate opening editor, steady flow data, showing the number of gates open and the height of the opening for each gate group and for each discharge studied.
Output Analysis The output from a run incorporating an inline weir/gated spillway may be viewed graphically or in tabular form, as discussed in earlier chapters for bridges and culverts. Included within the Standard Tables is a special Inline Weir/Spillway Table, shown in Figure 12.31. The amount of discharge passing through the gates and over the weir for each flow is of particular interest in the output review.
Figure 12.31 Standard table for inline weir output.
470
Advanced Floodplain Modeling
12.5
Chapter 12
Drop Structures A drop structure operates as an inline weir with no gates. Its purpose is to pass the discharge to a lower elevation while controlling the high energy and velocity levels through the structure. Chapter 11 discusses several types of drop structures. These structures are often characterized as a vertical drop of several feet (m) onto a horizontal stilling basin to contain the hydraulic jump, dissipate the energy, and allow relatively low velocities (nonerosive) to exit the drop structure. Figure 12.32 shows an example of a large drop structure and Figure 12.33 gives a typical water surface profile through a different drop structure.
USACE
Figure 12.32 Example of a large drop structure.
USACE
Figure 12.33 Water surface profile through a drop structure.
While inline weirs are usually larger structures on major streams and rivers, drop structures are typically small and located on minor streams. They are often associated with channel modifications to prevent the upstream migration of a headcut, as discussed in Chapter 11, or to control upstream stages during a flow diversion. Drop structures can be modeled in HEC-RAS using either of two methods, depending on the hydraulic detail desired through the structure.
Section 12.5
Drop Structures
471
Modeling of a Drop Structure as an Inline Weir If the modeler is not concerned with a detailed water surface profile through the drop structure (the normal situation), it can be modeled as an inline weir, as discussed in the preceding section. Four cross sections (1 through 4, similar to the procedure for bridge modeling) are used to model contraction into and expansion out of the drop structure, with sections immediately upstream (headwater) and downstream (tailwater) of the drop. These four locations are the same as described for inline weirs in the previous section. The drop geometry, weir coefficient, and other data are specified on the Inline Weir Editor. No gate information is typically needed for an inline weir. The computations in HEC-RAS jump from the computed tailwater elevation at Section 2 directly to a computed headwater elevation at Section 3, after the program computes the head on the weir in the drop structure. The headwater (cross section 3) and tailwater (cross section 2) elevations shown in Figure 12.33 illustrate the two water surface elevations obtained with this technique. No additional water surface elevation information is computed between these two points. For most flood studies computing water surface profiles through a reach containing a drop structure, this method is the most appropriate.
Modeling of Drop Structure Using Cross Sections This method is seldom applied because it requires calibration of the model with recorded water surface elevations throughout the length of the drop structure for one or more large flow events. If this information is available, and a detailed profile through the drop structure is needed, the engineer may choose to model the structure with a series of closely spaced cross sections from the tailwater to the headwater location. For example, in the figure on page 472, the black dots along the invert of the structure represent possible locations for the cross sections. Where two cross sections are adequate to estimate the headwater elevation for an inline weir with the previous method, 20 or more locations may be needed to define the profile through the length of the drop structure.
472
Advanced Floodplain Modeling
Chapter 12
Profiles Through a Drop Structure It may seem questionable to model subcritical to supercritical to subcritical transitions through the drop structure with the energy equation, but tests of this technique were successfully conducted by the U.S. Army Corps’ HEC. The results from HECRAS were compared with the results of physical model tests for a large drop structure on the Santa Ana River in Orange County, California (USACE, 1994h). Cross sections of the drop structure were used at close intervals, including sections at each row of baffle blocks. Roughness values in the concrete stilling basin were increased to 0.05, through trial and error during the calibration process, to compute energy losses. Water surface profiles from the physical model tests matched rather closely the results of the HEC-RAS run, as shown in the figure, although there are some differences at the point of the hydraulic jump and at the spillway crest. Critical depth is always computed in HEC-RAS (or any program) at the brink, or crest, of the drop. However, in the actual drop structure, the location of critical depth occurs 3 to 4 times yc upstream of the drop. Also, a hydraulic jump takes a significant distance (possibly at least 50 ft or 15 m) to reach the subcritical sequent depth from the supercritical sequent depth. The development of the jump over this distance cannot be
directly computed in HEC-RAS. However, the figure does show that the computations with HECRAS do an adequate job of simulating the actual profile through the structure. Note that the actual profile in the stilling basin is turbulent and rough, as opposed to the smooth transition shown in the figure. Notice also the number of black dots along the invert profile, indicating the number of cross sections used to model the profile through the drop structure. The modeler would need some actual performance data on the drop structure to adequately apply this technique, especially an indication of the appropriate roughness values for the stilling basin to approximate the actual flow and profile data of the drop structure. The n value of 0.05 to simulate energy losses in the stilling basin for this example may not be appropriate for other drop structures. This method of computing water surface elevations through a drop structure can be used when water surface elevations for one or more actual discharges are known at locations throughout the length of the structure. The HECRAS model could be calibrated to the elevations measured for one or more of these discharges, then operated for other discharges for which no profiles through the drop structure are available.
USACE
Section 12.6
Split Flow
473
Sections at close intervals are needed to determine the location of the hydraulic jump, to model the transition from subcritical to supercritical flow, and to estimate the effect of any baffle (energy dissipation) blocks in the stilling basin. A mixed-flow regime run is required to establish the appropriate profile for the different segments of the drop structure. To compute a profile using the energy method, the roughness values must be increased to simulate the high energy losses in the stilling basin. Because the hydraulic jump results in a significant loss of energy, n values reflecting only the structureʹs surface roughness are inadequate for estimating the energy losses at a hydraulic jump. The momentum equation is used to determine the sequent depths bounding the hydraulic jump.
12.6
Split Flow Occasionally, the site topography of the river includes one or more channels for passage of the total discharge. Some of the flow is diverted, with two or more flow paths over a certain stream reach. The most common example of this situation is at an island in a river, which causes the flow to pass around both sides. The flow “splits” to pass around the obstruction, which is why this situation is referred to as split flow modeling.
Split Flow Situations Diversions, or split flows, can be either natural or man-made. At a split of flow around an island, most of the discharge follows the main river channel and the balance flows through a secondary channel or side chute, as illustrated in Figure 12.34. The flows recombine downstream of the island. Islands and side channels are fairly typical of large rivers. When the cross section extends through the obstruction, HECRAS displays a “divided flow” message. For example, if cross section 4 on the main channel of Figure 12.34 extended across the island and the side channel, a divided flow warning would appear for the section. The modeler should inspect the reach to determine if a split flow situation is truly present and should be modeled as such. Figure 12.34 includes a lateral weir, which is another split flow diversion.
Figure 12.34 Split flow diversions.
474
Advanced Floodplain Modeling
Chapter 12
A split flow situation occurs when a constant energy grade line elevation cannot be assumed at a cross section. For a short reach of split flow, there might not be a large difference between the secondary and the main channels’ energy grade lines and water surface elevations. However, the longer the flow path taken by the separate channel, the more likely a significant difference will appear between the separate channels, since there will often be a variation in the geometry, n, and reach lengths between the main channel and side channels. A large hill in the floodplain can also result in a split flow during floods. Flow can also be deliberately forced to move away from the main channel by a controlled or uncontrolled weir to bypass a potential damage center, as shown in Figure 12.35. By diverting a portion of all flood flows through the control structure and into the diversion channel (top figure), less flood flow passes through the city. Thus, the flood levels are reduced at the city (lower figure), compared to the condition before the diversion. Sacramento, California and New Orleans, Louisiana are both protected by major diversion projects upstream of the urban areas. Figure 12.36 shows the structure and diversion channel of the Bonne Carre Spillway, a lateral weir for bypassing flood flows away from the City of New Orleans. This structure is 7000 ft (2135 m) long and includes 350 gates, each 20 ft (6 m) wide. The structure is located about 33 mi (53 km)
Figure 12.35 Effect of a diversion.
Section 12.6
Split Flow
475
upstream from New Orleans and passes 250,000 ft3/s (7085 m3/s) from the Mississippi River to Lake Ponchartrain. The diversion is operated to prevent the peak discharge at New Orleans from exceeding the maximum allowable 1,250,000 ft3/s (35,425 m3/s). The gates on the structure are continuously opened as the river’s discharge increases. The Bonne Carre Spillway is one of three major diversion or bypass structures protecting New Orleans. Another outstanding example of a diversion is in San Antonio, Texas. The city is protected by a large diversion through a tunnel under the city, with diverted flows rejoining the river downstream of the populated area. HEC-RAS can model open channel diversions, but the program would not properly address the tunnel diversion under San Antonio.
USACE
Figure 12.36 Diversion channel for Bonne Carre Spillway, New Orleans, Louisiana. The structure is perpendicular to the flow path, about midway between the Mississippi River in the foreground and Lake Ponchartrain in the background.
The preceding examples represent instances requiring split flow analysis. True split flow during a flood event is the exception rather than the rule, however. Islands are the most common causes of split flow for normal discharges, but the islands may be submerged during significant flood events. A submerged island would likely not require a split flow analysis. The modeler should closely examine the study reach to determine whether split flow is possible and then to determine if a split flow analysis is really needed to obtain the best water surface profile computation commensurate with the objectives of the study. Another example of split flow is a long bridge embankment crossing a wide floodplain where the embankment has a main bridge opening across the river channel and one or more relief openings that might be located some distance from the main channel. HEC-RAS includes a Multiple Bridge Opening Analysis feature that essentially performs an iterative split flow analysis for a roadway embankment having several separate bridge openings. This feature was described in Chapter 6 and is not modeled with the split flow optimization option discussed here. An “island levee” is another
476
Advanced Floodplain Modeling
Chapter 12
example of split flow, where the flood flow passes around either side of the protected area and recombines downstream. Most modelers will never encounter a need for split flow analysis around an island levee, however.
Computational Procedures For the examples in the previous paragraphs, the water surface elevation for a cross section spanning both streams will be different for each of the two channels. Therefore, separate water surface profiles are computed around an obstruction causing a split, but the separate profiles must result in the same energy grade line elevation (within an acceptable tolerance) at the upstream split point. This analysis requires an iterative procedure with which different flow splits are tried, profiles computed, and energy grade lines compared. The iterative process continues until a balance in energy grade elevations (within a specified tolerance) is reached at the upstream split point. HEC-RAS’ split flow capabilities include junctions and lateral weirs and it incorporates a split flow optimization algorithm to determine the correct flow split.
Modeling Procedures for Separate Channel Splits Very little additional information is needed to perform a split flow optimization once the main and secondary channels are defined with cross sections. Cross Section Locations. Cross sections are placed and coded as described in Chapter 5 for the main and side channel and the junction is modeled as described in Section 12.3. At the junction where the flow split takes place, sections should be located as close to the split point as practical. Figure 12.34 shows a natural split flow junction with cross sections located near the upstream split point (Location A). Several additional cross sections (not shown on the figure) would have also been located on both the main river and the side channel throughout the split flow reach. Reach lengths for the first section upstream of the flow split (Section 11) can be left blank in the cross-section data for Section 11 because HEC-RAS reads these distances from the junction data. The first section downstream of the split point on the main and side channels (Sections 10 and 1.5 on Figure 12.34) is the energy elevation comparison point to determine the proper distribution of flow. At the downstream recombining point (Location B on Figure 12.34), a split flow optimization is not needed because the program knows that the discharges in both the main and side channels are simply added together to obtain the total discharge for the first cross section downstream of the end of the split flow reach. Sections defining the geometry (1, 1.1, and 2) should be located near the recombining point (B), however. Split flow analysis is also referred to as analysis of a looped network. Discharge Estimates. For each discharge being analyzed, the modeler must specify an initial estimate of the flows for both the main channel and side channel at junction A (Figure 12.34), downstream of the split. HEC-RAS uses this information to compute a profile on both streams, but it will not test for a proper split unless a split flow optimization is requested. If the modeler knows the proper split from gage records or from computations that were performed separately, no special analysis by the program is necessary. However, if the correct split is unknown, a split flow optimization should be performed. The flow entering the upstream junction should equal the flow leaving the downstream junction, thereby maintaining continuity (Q11 = Q10 + Q1.5),
Section 12.6
Split Flow
477
unless flow is added (tributary inflows) or removed (diversions) within the reaches around the island. Split Flow Optimization. For a split flow optimization, the modeler supplies an initial estimate of the total flow split in the main and side channel. For the stream network shown in Figure 12.34, assume a total discharge of 10,000 ft3/s (285 m3/s) at cross section 11, just upstream of junction A, and that no flow is diverted through the lateral weir. The modeler estimates that 8000 ft3/s (225 m3/s) will flow to the main channel and 2000 ft3/s (60 m3/s) to the side channel. HEC-RAS uses these initial flow estimates to perform backwater computations (for subcritical flow) from downstream to upstream on the main and side channels. The program then compares the energy grade line elevation for each of the two cross sections (1.5 and 10) immediately downstream of the split flow point (A). For the initial computation, suppose the energy grade line at cross section 10 on the main channel is 1 ft (0.3 m) higher than the same elevation at cross section 1.5 on the side channel. A higher EGL elevation on the main channel means that too much flow is passing down the main channel and not enough down the side channel. If this is the case, HEC-RAS adjusts the flow split, increasing flow in the side channel and decreasing flow in the main channel, then recomputes the profiles. The EGL elevation at each section is again compared and the flows adjusted. This process continues until the program achieves a flow split that results in the same energy grade line elevation at cross sections 1.5 and 10 within a specified tolerance (default is 0.02 ft or 0.006 m). The modeler may select a different tolerance.
Modeling Procedures for Lateral Weirs Modeling procedures for man-made diversions, including both lateral weirs and gated openings, are somewhat more complex than for the simple split flow example given in the preceding section. Lateral weirs divert a portion of the flow from the main river, often at a right angle to the river flow direction. This diversion normally takes place only above a certain threshold value of flood discharge in the river. Figure 12.37 shows the diversion channel and Low Sill and Overbank Structure, a major diversion structure along the Lower Mississippi River incorporating both gates and a weir. This and nearby structures allow the controlled diversion of approximately 750,000 ft3/s (21,250 m3/s) from the Mississippi to the Atchafalaya River in Louisiana during major flood events. For a lateral weir, the water surface elevation along and upstream of the weir may not be constant along the weir length, as is the case with an inline weir. Also, the weir crest may be sloped with the water surface profile. Therefore, weir flow could vary along the length of the weir, depending on the depth on the weir at each location. The weir may also include multiple gate openings of different types to control lower flows that do not overtop the main weir. Flow through gate openings along the lateral weir can also be simulated with HEC-RAS. Cross-Section Locations. A cross section should be located at or near the upstream and downstream boundaries of the lateral weir structure. Additional sections could be located along the length of the lateral weir, at the modeler’s discretion, to model changes in the weir crest elevation along the length of the structure or to capture the change in water surface elevation along the length of the weir. A maximum of eight cross sections can be used along the lateral weir alignment.
478
Advanced Floodplain Modeling
Chapter 12
USACE
Figure 12.37 Low sill structure (lateral weir), lower Mississippi River. The overflow weir is located on the far side of the channel.
Discharge Estimates. After entering the flows for each reach in the Steady Flow Data Editor, the modeler can let the program iterate until it finds the correct flow split for each discharge. If the program cannot reach a balance after 30 iterations, or if the flow entering the upstream point of diversion is not equal to the flow leaving the downstream point of diversion plus the diverted flow, the modeler can supply an initial estimate of the discharge (for each event studied) leaving the system through the lateral weir structure. This estimate of flow leaving through the diversion is entered from the Steady Flow Data Editor. The flows leaving the system that are specified by the modeler are used by the program for the initial iteration, and these initial values are adjusted after subsequent iterations. This option will often help the program quickly converge to a solution. If the correct splits are known from gage records and other data, this can be finalized outside of the program with no optimization by HECRAS. More typically, however, the flow split is calculated iteratively by the program, using the split flow optimization routine. Structure Modeling. For a lateral weir having gate openings, the HEC-RAS modeling procedure is the same as for an inline weir with gates. The only difference is that each gate could have a different headwater energy level. HEC-RAS computes flow through each gate separately, based on the gate centerline location and the interpolated energy head elevation at that gate. The program uses a modification of the basic weir equation to compute lateral weir flows for a sloping weir crest and a sloping water surface elevation. The equation for a straight line is used for both the weir crest profile and the water surface profile between each two cross-section points defining the weir. The equations are
Y WS = a WS X + C WS
(12.7)
Section 12.6
Split Flow
479
and
YW = aW X + CW whereYWS YW X aWS aW CWS CW
(12.8)
= the elevation of the water surface at a selected cross section (ft, m) = the elevation of the weir crest at the same location (ft, m) = the distance from the upstream cross section (ft, m) = the slope of the water surface (ft/ft, m/m) = the slope of the weir (ft/ft, m/m) = the initial elevation of the water surface (ft, m) = the initial elevation of the weir (ft, m)
The depth on the weir at any point is the difference between YWS and YW. This difference is then used in the basic weir equation to develop an expression for the discharge between two cross sections defining a sloping water surface and lateral weir. After data manipulation and rearrangement of terms, the equation becomes
Qx
1
– x2
2C 5⁄2 5⁄2 = -------- ( ( a 1 x 2 + C 1 ) – ( a1 x1 + C1 ) ) 5a 1
(12.9)
= the incremental discharge between two cross sections (ft3/s, m3/s) = weir coefficient (considered dimensionless) = aWS – aW = CWS – CWx1 = distance to cross section 1 from the start of the weir (ft, m) x2 = distance to cross section 2 from the start of the weir (ft, m)
where Q x – x 1 2 C a1 C1
Equation 12.9 is valid if a1 is not zero. A value of zero suggests that there is no difference in water surface elevation or crest elevation along the lateral weir, so for a1 = 0 the program reverts to the standard weir equation (Equation 12.6). The full derivation of Equation 12.9 can be found in HEC-RAS, River Analysis System Hydraulics Reference Manual (USACE, 2002). The data required to model the lateral weir are similar to that described for an inline weir, with a few exceptions. To model lateral weirs in HEC-RAS, the position of the lateral weir in relation to the main river must be defined, and the program can be told where the diverted water is going after leaving the weir. The weir’s position can be in the left overbank, next to the left bank station, next to the right bank station, or in the right overbank. A left or right overbank position is assumed to be at the far left or right of the cross section, while the other two positions are assumed to be immediately adjacent to the bank station. The position of the weir is an important factor to consider when computing the appropriate headwater energy for the lateral weir. With HEC-RAS, the modeler can specify either energy grade or water surface elevation as the headwater energy used by the lateral weir computations. If the weir is adjacent to the river, the flow is moving in the main river parallel to the weir, thus weir headwater energy equal to the water surface elevation, rather than the energy head, is normally more appropriate. If the weir is located well away from the river channel, at the extreme of the cross section, the floodplain velocity will likely be very low or the flow direction may be toward the weir rather than downstream. Consequently, the headwater energy grade elevation is
480
Advanced Floodplain Modeling
Chapter 12
normally more appropriate for this location. This is a major difference from the HEC2 program, which only used the energy head to compute diverted flow. After the diverted water leaves the weir, it can either reenter the main river, enter a different stream at a downstream location, or be completely removed from the system. If the flow reenters the stream system, the appropriate river, reach, and station are specified; if not, the flow is removed and does not return to the stream system (which is the default in HEC-RAS). Also, the program allows simulation of two weirs on opposite sides of the river between any two cross sections, as long as a unique river station is used for each. Data for defining a lateral weir and gated structure are entered in the Lateral Weir and/or Gated Spillway Data Editor, shown in Figure 12.38. Separate menus for gates and for the weir are used for the input data. Data describing the weir and gate characteristics are entered into the appropriate template as described for inline weirs and gates in Section 12.4.
Figure 12.38 Lateral weir and/or gated spillway data editor.
Flow Optimization. To optimize flow splits using HEC-RAS, the modeler may have the program compute a flow split at the diversion structure or he can supply an initial estimate of the diverted flow for each profile. If the modeler supplies an initial estimate of the flow leaving the system through the diversion structure shown on Figure 12.34, for example, the program subtracts the initial estimate of the diverted flow from the total flow reaching the diversion (cross section 6) to arrive at the remaining flow downstream of the diversion (cross section 4). HEC-RAS then computes a standard step water surface profile with the remaining discharge to calculate water surface elevations at cross section 4 and a water surface profile for the length of the weir, using the modeler-supplied flow splits. The program computes the flow passing through the gates and/or weir opening from the computed profile. This discharge is added to the discharge downstream of the diversion structure and com-
Section 12.6
Split Flow
481
pared to the total flow arriving at Section 6, just upstream of the structure. If the discharge at Section 6 is greater than the sum of the two discharges, insufficient discharge is being diverted; if the discharge at Section 6 is smaller than the sum of the two downstream discharges, too much flow is being diverted. The program revises the estimated diverted flow, recomputes a new value of the downstream discharge, and reiterates the computations until the flow comparison matches within a specified tolerance (2 percent is the default). For the final, optimized flow splits, the program then adjusts the downstream discharges to reflect the flow diversion. A split flow optimization normally requires numerous iterations to balance the energy elevations or discharge values. Once the modeler has determined the correct flow splits for each event of interest, the correct discharges could be entered into the Steady Flow Data Editor and the optimization no longer used. However, any changes by the modeler to flows or to the geometry of the structure or cross sections would result in computational errors. It is good policy to leave the optimization option on for all future runs and enter the optimized flow splits found by HEC-RAS into the Initial Split Flow Optimization table. With these values defined in this manner, the program will quickly iterate to the proper value, even if the modeler later changes some of the cross-section or diversion structure geometry. Output Analysis. The output from a lateral weir computation can be examined with the graphical and tabular methods previously discussed. A profile plot for the structure is useful, both to show that the structure has been modeled correctly and to see whether there are any abrupt increases or decreases in the profile through the diversion, as illustrated in Figure 12.39.
Figure 12.39 Profile plot for a lateral weir.
482
Advanced Floodplain Modeling
Chapter 12
Significant changes in the profile through the diversion indicate the need for a closer inspection of the input. The Standard Tables include one for profiles at lateral weirs and gates that should be reviewed, as illustrated in Figure 12.40. The tables for detailed cross-section information have two specifically for lateral weirs. The Lateral Weir/Spillway Output Table gives flow information on the weir and gates, gate openings, total flow entering and leaving the system, and other useful information, as illustrated in Figure 12.41. A second table provides a lateral weir rating curve.
Figure 12.40 Standard table for lateral weir computations.
Figure 12.41 Lateral Weir/Spillway Output Table.
The modeler should closely review the final flows and water surface elevations computed at the diversion structure and compare these values to any recorded flow and elevation data. Although the split flow optimization will give correct information, it will reflect the geometry data used by the modeler to describe the stream reach downstream of the diversion. If flows through the diversion are significantly different from actual flow records, the modeler should consider adjusting the downstream channel and overbank n values (within reason) to better match the actual data. Yet another option to improve calibration is a lateral weir rating curve. Rather than physically modeling the lateral weir and/or gated spillway, the modeler can supply a rating
Section 12.7
Ice Cover and Ice Jam Flood Modeling
483
curve of river stage versus discharge leaving the structure. For a major river structure, such as shown in Figure 12.37, gage data and/or physical model tests of the structureʹs performance would likely result in availability of a lateral flow rating curve, which could be used rather than a split flow optimization for the structure. Actual flow data would be needed to ensure that the rating curve is correct for all ranges of headwater elevations.
12.7
Ice Cover and Ice Jam Flood Modeling In cold climates, the presence of ice can have a significant effect on water levels. For rivers with an ice cover or an ice jam, severe flooding can result for flows that normally cause few problems under open channel conditions. In the Western Hemisphere, ice jam flooding occurs on most Canadian and Alaskan rivers, on many streams in the northeastern United States, and on some streams in other northern states. Ice conditions are normally associated with high latitudes and extreme winters, but they have occurred in more moderate climates, as well. However, if the ice jam is only possible during the nonflood season, ice modeling is unlikely to be necessary.
Effects on Water Surface Elevations Thus far, the coverage in this book has focused on free-surface flow. Where ice is involved, however, free-surface flow does not occur. Whether the river has a thin ice cover or a full-fledged ice jam, the wetted perimeter experiences a drastic increase. For a wide river, an ice cover effectively doubles the wetted perimeter. The ice cover also adds additional roughness to the boundary, although Manning’s n for ice may be larger or smaller than that for the channel and floodplain. If the ice has the same as or higher roughness than the channel, it will decrease channel conveyance by more than one-third. These factors cause additional energy losses that result in higher river stages for the same discharge, compared to a no-ice condition. Figure 12.42 shows a river cross section with an ice jam.
484
Advanced Floodplain Modeling
Chapter 12
Figure 12.42 Cross section with ice cover.
If an ice jam is sufficiently large, water upstream can pool, creating a reservoir effect. Even if this pool does not freeze, it can cause flooding upstream and reduce flows downstream of the jam. In addition, the ice levels and ice movement can cause severe damage to buildings and infrastructure along the river. In areas experiencing ice jam flooding, a 10-year frequency ice jam flood can produce flood levels in excess of a 100year event for open-water conditions. Ice cover can also affect sediment transport, causing scour or deposition, depending on local conditions under the cover. Significant scour of the bed can occur under thick jams, and the ice breakup during warmer weather can result in the ice floes’ striking channel protection or bridge piers, causing damage to these features.
Data Requirements for Ice Analysis If a hydraulic study requires an analysis for ice effects, it is almost certainly because ice was a factor in past floods at the study location. Consequently, the modeler should review past information on any ice jam flooding to glean valuable information about ice jam characteristics at the site and any physical data dealing with historic, local ice cover or jams. To model ice covers and the corresponding effects on water levels, the main items of information include the thickness of the ice throughout the length of the jam and the Manning’s n value associated with the underside of the ice cover. This type of information is best determined from studies and measurements taken during earlier ice jams in the study area or from similar nearby streams. The thickness and roughness value of the ice change with time. An increase in thickness seems to
Section 12.7
Ice Cover and Ice Jam Flood Modeling
485
have more effect on upstream water surface elevations than does an increase in ice roughness. Studies referenced by the Corps of Engineers indicate that an increase in ice roughness n from 0.04 to 0.05 produced an increase in water surface elevation of 0.13 ft (0.04 m) at a control section located 4000 ft (1220 m) upstream (USACE, 1996a). An increase in ice thickness of 0.54 ft (0.16 m), however, produced an increase in water surface elevation of 0.46 ft (0.14 m) at the same location. This example indicates the need for a sensitivity analysis to determine the effects of the two variables on flooding. There are two categories of ice modeling: floating ice covers and ice jams. Ice Cover. For an ice cover, the same thickness of ice is normally assumed throughout the river reach under study. Hydraulic characteristics are computed using a wetted perimeter that includes the top width to reflect the underside of the ice cover. For wide rivers, the wetted perimeter approximately doubles and the cross-sectional area decreases by the thickness of the ice. This results in approximately a 50-percent reduction in the hydraulic radius. An n value is estimated for the underside of the ice cover and weighted with the channel n to develop a composite roughness value. The Bleokon-Sabaneev formula for weighting n is typically used and is defined as 3⁄2 2⁄3
3⁄2
ni + nb n c = ---------------------------2
(12.10)
where nc = the composite roughness value ni = the ice roughness nb = the bed and bank roughness All variables in Equation 12.10 are dimensionless. This equation is used in HEC-RAS, but other equations may also give satisfactory solutions. Canadian, Swedish, and U.S. researchers have found that Equation 12.10 gives acceptable results (USACE, 1996a). Manning’s n varies depending on whether the river has an ice cover or an ice jam. Table 12.1 gives a range for the selection of roughness values based on the type of ice (sheet or frazil), its condition, and its thickness used in HEC-RAS. This table is applicable only for a floating ice cover and not a jam. Table 12.1 Manning’s n for the ice cover on rivers with a single layer of floating ice (USACE, 2002). Type of Ice Sheet Ice
Condition Smooth
0.008–0.012
Rippled
0.01–0.03
Fragmented single layer Frazil Ice
n
0.015–0.025
New, 1–3 ft thick
0.01–0.03
3–5 ft thick
0.03–0.06
Aged
0.01–0.02
Sheet ice is formed from direct contact between the water surface and the freezing temperatures of the air. Frazil ice is formed in turbulent, supercooled, open channel waters when the air temperature is well below freezing. Ice crystals are formed within the water column and carried in the open water. The crystals join together and grow and may eventually form large moving floes. When the floes enter a reach of river experi-
486
Advanced Floodplain Modeling
Chapter 12
encing low velocities, they can jam against the bankline or against bridge piers or other obstructions, forming a stationary ice cover. Over time, the cover can grow into a jam. Modelers use the standard step backwater equation to compute a water surface profile for an ice cover. It is assumed that the ice cover floats, which is appropriate because pressure flow under the ice sheet would exert sufficient pressure on the ice to crack it. With the ice thickness and an n value for the ice supplied by the modeler, the program reduces the cross-sectional area by the width of ice times the thickness times the density of ice ( B × t × 0.92 ) . Ice density is needed because ice weighs less than water and the computed flow area below the ice would be less than the actual area if no density adjustment were used. The channel wetted perimeter is increased by the width of the ice cover. A standard step backwater computation then determines the water surface elevations with ice cover. Ice Jams. If the ice cover enters a reach where the slope flattens or falls within the influence of backwater from another river, an ice jam may develop. With an ice jam, the thickness of the ice may no longer be considered relatively uniform along the length of the jam. The stability of an ice jam is determined by the thickness throughout the jam length along with the discharge passing under the jam. The computation process for a water surface elevation affected by an ice jam is iterative and more complex. After an ice jam forms, the effect on roughness increases with the type of ice, the thickness, and the duration of the jam. Table 12.2 gives a range of roughness values for ice jams. Table 12.2 Manning’s n values for ice jams (USACE, 2002). Ice type
Thickness, ft
Loose Frazil
Frozen Frazil
Sheet
0.3
—
—
0.015
1.0
0.01
0.013
0.04
1.7
0.01
0.02
0.05
2.3
0.02
0.03
0.06
3.3
0.03
0.04
0.08 0.09
5.0
0.03
0.06
6.5
0.04
0.07
0.09
10.0
0.05
0.08
0.10
16.5
0.06
0.09
—
Most ice jams modeled with HEC-RAS fall under the category of wide-river ice jams. A wide-river ice jam always has flow area under the ice (does not block the full channel) and normally forms in river reaches of low velocity or in backwater situations. These jams increase in thickness from the upstream to downstream end of the jam, and the thickness at each cross section must be solved iteratively as part of the water surface profile analysis. The hydraulic computations for wide-river ice jams use the energy equation to compute water surface elevations and a force balance equation to compute thickness of ice throughout the length of the jam. The latter equation balances the longitudinal stress in the ice cover and the stress acting on the banks with the external forces acting on the jam. These two external forces are the gravitational force attributable to the slope of the water surface and the shear stress of the flowing
Section 12.7
Ice Cover and Ice Jam Flood Modeling
487
water on the underside of the jam. The ice must have a certain thickness at each crosssection location to satisfy both the energy and force-balance equations. Because the energy equation is employed in the upstream direction and force balance is used in the downstream direction, finding a solution is an iterative process. HEC-RAS begins the solution by estimating the ice jam thickness and then computing a profile through the upstream end of the ice jam with the energy equation. The force balance equation is then applied, beginning at the upstream end of the jam, to recompute the ice thickness at each cross section. The application of the energy equation and force balance equation continues until the water surface elevations and ice thicknesses computed by both methods converge. The program default values for this convergence between iterations at the same cross section are 0.10 ft (0.03 m) or less for in ice thickness and 0.06 ft (0.018 m) or less for water surface elevation. The modeler may also supply different values for both tolerances. For more information regarding the force equations applied within the program, see the HEC-RAS, River Analysis System Hydraulic Reference Manual (USACE, 2002).
Ice Modeling Procedures with HEC-RAS The data needed to simulate ice conditions can be entered individually for each section through the Options menu in the Cross Section Data editor, supplying the data as shown in Figure 12.43. For long reaches of river with many cross sections at which the ice thickness varies, the same information can be entered for all cross sections concurrently in a table, located in the Options menu of the Geometric Data Editor. Ice cover in the channel and in the left and right floodplains can be included by indicating the thickness and associated n value for the ice. The modeler can choose to use the program defaults for the balance of the variables or actual data can be inserted, if available. For wide-river ice jams, reasonable values for maximum and minimum ice thickness and maximum velocity under the ice should be selected if the program defaults are not used.
Figure 12.43 Adding an ice cover to cross-section data.
488
Advanced Floodplain Modeling
Chapter 12
Output Review The computations for profiles with ice cover can be reviewed using the graphical and tabular tools discussed above. The profile plot, displaying both the water surface and ice cover profiles, may be reviewed, as can the individual cross sections. Figure 12.44 shows a computed profile with ice jam.
Figure 12.44 Profile with an ice jam.
The Standard Tables include one for Ice Cover, as shown in Figure 12.45. The table can be checked for ice-thickness variations from section to section for the channel and for the left and right overbank areas. During the calibration process, the model output should be compared with any actual data for ice thickness and water surface elevations to determine if the model output is reasonable and representative of actual conditions. The volume of ice is also displayed on the standard table.
Ice Modeling Assistance River ice engineering and modeling are still young disciplines and the modeler should contact other knowledgeable engineers to better understand the necessary information, analysis procedures, and problems and pitfalls that are associated with ice modeling. The Corps of Engineers Cold Regions Research and Engineering Laboratory (CRREL) in Hanover, New Hampshire is a good starting point and a source of useful information. Their web site includes an ice jam database for the United States and numerous papers and references dealing with ice jam analyses and studies. For FEMA studies involving ice jams, FEMA guidance (FEMA, 2002) should be reviewed. Documentation for FEMA studies is available at the FEMA website.
Section 12.8
Chapter Summary
489
Figure 12.45 Standard table for ice jam output.
The first-time ice modeler should study the three HEC-RAS Manuals and Example 14, “Ice-Covered River,” in the HEC-RAS Applications Guide should be operated and tested by the modeler. EM 1110-2-1612, Ice Engineering (USACE, 1996a), provides useful information on ice engineering and additional references on the subject.
12.8
Chapter Summary HEC-RAS can be used to analyze additional flood reduction measures, such as levees, dams, and diversion structures, to identify their effects on flood levels. During the establishment of existing, or base, conditions, the modeler may need to include junctions, split flows, buildings, and the effects of ice on flood levels. This chapter discusses these special features in detail. Levees are probably the most frequently used flood reduction measure at the federal level in the United States. These structures protect the area behind the levee, generally until flood levels exceed the top of the levee. Although levees have been successfully used along major U.S. rivers, such as the Sacramento, Missouri, and Mississippi, these structures can increase flood heights for a certain distance upstream of each levee. Levee analysis must identify the levee height needed for the design event and the magnitude and extent of any adverse effects on flood heights. The HEC-RAS program can model levees very easily, only requiring the levee location and height for each cross section containing a levee. A steady flow analysis of levees is normally satisfactory, but unsteady flow modeling is needed to identify changes in river stage with time, or to determine the effects on nearby river stages of a leveeʹs overtopping and breach. Inline gates and weirs can be used to model major dams and reservoirs or a simple low-flow weir across a small stream. These structures are modeled as either broadcrested or ogee weirs, and any gates can be modeled as vertical lift (sluice) or radial (tainter) gates with HEC-RAS. While the hydraulic effects of inline gates and weirs can be determined using a steady flow analysis in HEC-RAS, these structures also have effects on stream hydrology that must be determined outside of HEC-RAS, using programs like HEC-HMS.
490
Advanced Floodplain Modeling
Chapter 12
Buildings located in the floodplain may be modeled as a blocked obstruction, which captures the building’s effect on water levels but not on storage, or by the use of artificially high n values, which can capture both hydraulic and storage effects. Proposed landfills in the floodway fringe may also be modeled as blocked obstructions. To model a building as a blocked obstruction merely requires the cross-section stations of the building boundaries and adding the elevation of the top of the building to the cross-section data; this information is entered on a single template in HEC-RAS. Using high n values is a slightly more difficult way to model a building but is only needed if a hydrologic model, including a storage routing, is planned. When the main stem of a river and one or more of its tributaries are to be modeled within the same project file, the stream junctions can be modeled in HEC-RAS using either the energy or momentum method. The energy method is the program default, and momentum is typically used only when streams join at a severe angle or if the flow regime on one or both streams is supercritical. Cross sections are located close to the stream junction to minimize any errors in friction computation due to the potentially large changes in discharge across the junction. Split flow analysis may be needed when a portion of the discharge leaves the main river channel to flow downstream by a different path, such as around an island. Split flow studies are also needed to model an off-channel, or lateral, diversion structure. HEC-RAS includes a split flow optimization algorithm that allows an iterative analysis until the correct flow split is found. A split flow analysis requires that cross sections be placed as close to the split flow point as possible to minimize any errors in determining energy losses there. For a channel split of the flow, the optimization analysis continues until the energy elevation is nearly identical at the initial cross section downstream of the flow-split point on both the main and side channel. For a lateralweir split flow optimization, the iterative analysis continues until the diverted flow plus the flow downstream of the structure essentially equals the flow upstream of the structure, as computed by iterative water surface profile computations downstream of the weir location. Ice modeling is confined to situations in which there is ice cover or ice jams during the flood season. The presence of an ice cover essentially doubles the hydraulic radius and somewhat reduces the flow area. Ice cover or jam during a flood period can severely affect upstream flood heights. An ice cover is analyzed by adjusting for the increased wetted perimeter, decreased flow area, and density of the ice cover. An ice jam analysis is more complex and requires an iterative analysis of the energy and force balance equations at each cross section, adjusting the water surface elevation and the ice thickness until the energy and force balance solutions converge to specified tolerances on ice thicknesses and water surface elevations. Ice jam modeling is likely only performed where a stream has demonstrated a history of ice jam flooding.
Problems
491
Problems 12.1 A levee is to be added to the right bank of the existing channel geometry given in the file Prob12_1eng.g01 or Prob12_2si.g01 on the CD accompanying this text (see figure). The problem may be solved using either English or SI units.
The steady flow and boundary condition information for the 100-year flood is provided for both unit systems in the following tables. The flow regime is subcritical. Profile Name
Upstream Flow
100 yr
2000
Profile Name
Upstream Flow
100 yr
56.6
Rate, ft3/s
Rate, m3/s
Downstream Boundary Condition Known WS elevation = 162.8 ft
Downstream Boundary Condition Known WS elevation = 49.62 m
a. Compute the 100-year water surface profile for existing conditions. Check the summary of errors, warnings and notes for problems, and make any necessary adjustments to the model. When you are satisfied with the model output, record the water surface elevation at each cross-section in the results table provided. b. Define a levee on the right bank of the channel. For each cross section, locate the levee station 50 ft (15.2 m) from the right main channel bank station and, following the US Army Corps of Engineers’ standard, set the levee (crown)
492
Advanced Floodplain Modeling
Chapter 12
elevation 3 ft (0.9 m) above the computed water surface elevation at each location. Compute the profile and record the water surface elevations and increases in elevation in the results table.
Cross Section
100 Year WS Elevation from Pt. (a)
100 Year WS Elevation from Pt. (b)
Increase in WS Elevation
4 3 2 1
12.2 Starting with the existing condition geometry data for the river reach in Problem 12.1, develop a HEC-RAS steady-flow model for the reach with a flow diversion at cross section 2. Flow and boundary condition data for the 25-, 50-, and 100year events for the existing condition (no diversion) is provided in the following table. Profile Name
Upstream Flow
Upstream Flow
Rate, ft3/s
Rate, m3/s
25 yr
1000
28.32
Normal depth, S = 0.002
50 yr
1500
42.47
Normal depth, S = 0.002
100 yr
2000
56.63
Normal depth, S = 0.002
Downstream Boundary Condition
a. Compute the water surface profiles for the specified flows for the existing condition. Examine the plotted water surface profiles and the summary of errors, warnings and notes for problems and make any necessary adjustments to the model. Record the water surface elevations for each cross section in the results table provided. b. Using the Add a Flow Change Location feature, modify the flow data to include diversions at cross section 2 as given in the following tables for both English and SI units. Compute the water surface profiles and record the results in the table provided. How much did each of the diversions lower the water surface elevation at the bottom of the reach (cross section 1)? Profile Name
Upstream Flow
Diversion,
Rate, ft3/s
ft3/s
25 yr
1000
0.0
50 yr
1500
100
100 yr
2000
500
Profile Name
Upstream Flow
Diversion,
Rate, m3/s
m3/s
25 yr
28.32
0.0
50 yr
42.47
2.83
100 yr
56.63
14.16
Problems
25-Year WS Elevation from (a)
Cross Section
25-Year WS Elevation from (b)
50-Year WS Elevation from (a)
50-Year WS Elevation from (b)
100-Year WS Elevation from (a)
493
100-Year WS Elevation from (b)
4 3 2 1
12.3 Modify the existing channel geometry from the file Prob12_3eng.g01 or Prob12_3si.g01 to include two junctions and a branch channel as shown in the figure and determine the division of flow that occurs at the upstream junction.
a. Use the following steps to manually determine the 100-year flows in the Main and Branch reaches resulting from the flow split at Junction 1. Step 1: Create cross section 1.9 by copying cross section 2 and revise the downstream reach lengths for these cross sections using the data given in the first two rows of the following table. Similarly, create cross section 3.6 by duplicating cross section 3.7; again, revise the downstream reach lengths for cross sections 3.7 and 3.6 using the information provided for either English or SI units in the following tables. Rename the existing reach from Main to Upper. Downstream Reach Lengths
Cross Section
LOB, ft
Channel, ft
ROB, ft
1.9
200
200
200
2
50
50
50
200
50
50
50
360
600
600
600
494
Advanced Floodplain Modeling
Chapter 12
Downstream Reach Lengths
Cross Section
LOB, ft
Channel, ft
ROB, ft
3.6
300
300
300
3.7
50
50
50
Downstream Reach Lengths
Cross Section
LOB, m
Channel, m
ROB, m
1.9
61.0
61.0
61.0
2
15.2
15.2
15.2
200
15.2
15.2
15.2
360
182.9
182.9
182.9
3.6
91.4
91.4
91.4
3.7
15.2
15.2
15.2
Step 2: Draw the Branch reach starting between cross sections 3.7 and 3.6 and ending between cross sections 2 and 1.9. Assign junction and reach names as shown in the figure. The length across the junction for both Junction 1 and Junction 2 will be 50 ft (15.2 m). Step 3: Copy cross sections 2 and 3.7 to create new cross sections 200 and 360, respectively. Revise the downstream reach lengths for the new cross sections to be in accordance with the preceding table. Step 4: Enter the flow data for the reaches. From Problem 12.1, the 100-year discharge for the channel is 2000 ft3/s (56.63 m3/s) and the starting water surface elevation at cross section 1 is 162.8 ft (49.62 m). As an initial guess, assume that the flow is split equally at the diversion, yielding the flow change locations and discharges shown in the following table. Discharge,
Discharge,
River Station
ft3/s
m3/s
Upper
4
2000
56.63
Main
3.6
1000
28.32
Branch
360
1000
28.32
Lower
1.9
2000
56.63
Reach
Step 5: Run the model and adjust the discharges at river stations 3.6 and 360 until the energy grade elevations at these two cross sections are equal. What steady discharges are carried by each of the reaches, Main and Branch? b. Using the model developed in Steps 1 through 4 of part (a), repeat the flowsplit analysis using HEC-RAS’s built-in flow-split optimizer to find the flows in the Main and Branch reaches. What discharges are found? 12.4 Modify the existing channel geometry from Problem 12.1 to include a lateral weir as shown in the figures. Use the flow and boundary condition data from Problem 12.1. Determine the portion of flow that is diverted across the weir. The lateral weir is located at river station 2.6 and is 250 ft (76.2 m) long. The upstream end of the weir structure (station 0) is 80 ft (24.4 m) downstream of
Problems
495
river station 3, the width of the broad-crested weir has a width of 5 ft (1.5 m), and the weir coefficient is 3.0 (1.66 for SI units). The tables that follow provide the embankment elevations for the weir for English and SI units.
496
Advanced Floodplain Modeling
Chapter 12
.
Lateral weir geometry data for Problem 12.4. From XS Station, ft
To XS Station, ft
Weir Elevation, ft
0.0
20.0
166.0
20.0
20.0
163.0
250.0
250.0
162.8
250.0
280.0
166.0
From XS Station, m
To XS Station, m
Weir Elevation, m
0.0
6.10
50.60
6.10
6.10
49.68
76.20
76.20
49.62
76.20
85.34
50.60
Two sluice gates are located in the weir, and their characteristics are given in the tables that follow. Leave other coefficients set to their default values. Both gates are open 1 ft (0.3 m). Lateral weir gate location (centerline station) data for Problem 12.4. Gate1, ft
Gate 2, ft
200
210
Gate1, m
Gate 2, m
61.0
64.0
Lateral weir gate data for Problem 12.4. Gate Type
Gate Height, ft
Gate Width, ft
Discharge Coefficient
Invert Elevation, ft
Sluice
2
4
0.6
160.0
Gate Type
Gate Height, m
Gate Width, m
Discharge Coefficient
Invert Elevation, m
Sluice
0.61
1.22
0.6
48.8
a. Compute the subcritical water surface profile with the weir in place. Compare the water surface elevation profile with the weir to the original profile without it from problem 12.1. b. How much flow is diverted across the weir? c. How much does the presence of the weir lower the water surface elevation at the bottom of the reach (at cross section 1)? 12.5 Modify the existing channel geometry of Problem 12.1 to include an in-line weir at cross section 3 as shown below. Use the flow data from Problem 12.1 for the
Problems
497
model run and determine the portions of flow that pass over the weir and through the weir gates.
Insert new cross section 2.9 at a location 60 ft (18.3 m) downstream of river station 3 by copying the existing river station 3 cross section. Adjust the reach lengths for cross sections 2.9 and 3 accordingly. Add an inline weir with three gates at river station 2.95. The tables below provide the embankment and gate parameters for the weir. All three gates are open 3 ft (0.91 m).
498
Advanced Floodplain Modeling
Chapter 12
In-line weir geometry data for Problem 12.5. From XS Station, ft
To XS Station, ft
Weir Elevation, ft 165.0
0.0
150.0
150.0
350.0
162.3
350.0
500.0
165.0
From XS Station, m
To XS Station, m
Weir Elevation, m
45.72
50.29
45.72
106.68
49.47
106.68
152.40
50.29
0.0
In-line weir embankment data for Problem 12.5. Distance to U/S, ft (m)
Weir Width, ft (m)
30 (9.14)
4 (1.22)
U/S Embankment D/S Embankment Side Slope Side Slope 2
2
In-line weir gate location (centerline station) data for Problem 12.5. Gate 1, ft (m)
Gate 2, ft (m)
Gate 3, ft (m)
270.0 (82.3)
278.0 (84.7)
286.0 (87.2)
In-line weir gate data for Problem 12.5. Gate Type
Gate Height, ft (m)
Gate Width, ft (m)
Discharge Coefficient
Invert Elevation, ft (m)
Sluice
3 (0.91)
5 (1.52)
0.6
159.0 (48.46)
a. Compute the subcritical water surface profile with the weir in place. Compare the water surface elevation profile with the weir to the existing geometry profile from Problem 12.1. b. How much flow is diverted across the crest of the weir? How much flow passes through the gates? c. How much does the presence of the weir increase the water surface elevation at cross section 3? 12.6 Modify the channel geometry of Problem 12.1 to include ice cover between cross section 2 and cross section 3. Determine the increase in stage that occurs at cross section 3 due to the presence of the ice. Use the flow rate and boundary condition information in the following table to compute the subcritical profile. Flow data for Problem 12.6. Profile Name
Upstream Flow
PF1
600
Rate, ft3/s
Downstream Boundary Condition Known WS elevation = 161.0 ft
Problems
Profile Name
Upstream Flow
PF1
17.0
Rate, m3/s
499
Downstream Boundary Condition Known WS elevation = 49.07 m
a. Compute the water surface profile for the base flow condition (no ice cover) and plot the computed water surface profile. Examine the water surface profile and the Summary of Errors, Warnings and Notes for problems. Record the water surface elevation at each river station in the table at the end of the problem. b. Add ice cover to both the main channel and overbank areas for cross sections 2 and 3 based on the parameters specified in the following table. Compute the water surface profile with the ice cover in place and record the water surface elevations in the table provided. How much did the presence of ice cover increase the computed water surface elevation at cross section 3? Ice-cover data for Problem 12.6. Ice Cover Thickness (LOB, Chan, ROB), ft
Ice Cover Specific Gravity
Ice Cover Manning’s n (LOB, Chan, ROB)
0.5
0.916
0.02
Ice Cover Thickness (LOB, Chan, ROB), m
Ice Cover Specific Gravity
Ice Cover Manning’s n (LOB, Chan, ROB)
0.15
0.916
0.02
Cross Section
WS Elevation from (a)
WS Elevation from (b)
CHAPTER
13 Mobile Boundary Situations and Bridge Scour
Most steady or unsteady flow models assume a rigid or unchanging cross-section boundary at each river station during hydraulic computations; that is, the channel and floodplain geometry are assumed to not change over time. This assumption is obviously not correct, since natural systems do change over time; however, most geometry changes that would affect water surface profiles occur slowly. Thus, hydraulic analyses of flood events performed using rigid cross-section boundary assumptions are normally acceptable. There are many situations, however, in which the effects of scour and deposition on a design are significant enough that this unchanging boundary condition assumption must be reconsidered. Chapter 11 discusses the impacts of channel modification projects on sediment loads carried by a stream. These types of modifications often result in significant erosion and/or deposition within the channel. This chapter advances this subject by reviewing situations in which a rigid boundary assumption may not be appropriate, such as for bridge scour. The primary focus of this chapter is on the dynamic process of bridge scour analysis, a key example of mobile boundary conditions, through review of the application of the FHWA equations and procedures. HEC-RAS also includes the ability to compute sediment discharge, or sediment rating, relationships (water discharge versus sediment load in transit) along a reach of stream. Section 13.7 describes this capability of the program.
13.1
Mobile Boundary Analysis Sediment transport models that combine open channel hydraulic computations with scour and deposition analyses are essential modeling tools for a variety of design situ-
502
Mobile Boundary Situations and Bridge Scour
Chapter 13
ations, including major channelization and reservoir projects and estimation of channel maintenance requirements for the project. These models require geometry, discharge, and boundary condition data similar to that required by models such as HEC-RAS, as well as information regarding sediment characteristics. The materials comprising the channel bed and occasionally the floodplain are required, including the distribution of the bed material grain sizes. Often, the amount and distribution of grain sizes transported as suspended load (material carried in the water column) and as bed-material load (material that moves primarily in contact with the channel bottom) over a wide range of discharge rates is desirable. These terms, and other sediment transport data, are addressed in Chapters 3, 5, and 11. Chapter 5 describes the sediment data required for a sediment transport study and identifies sources for these data. Chapter 3 discusses the major sediment transport programs; the most widely used program in the United States is the USACE HEC-6 program, Scour and Deposition in Rivers and Reservoirs (USACE, 1993). This model is the next major computational feature to be added to the HEC-RAS umbrella of steady and unsteady flow programs, but it will not be available in HEC-RAS until later in this decade. However, HEC-RAS currently includes computations that are useful for designing erosion protection measures, such as riprap, and also allows the analysis of bridge scour potential, based on the Federal Highway Administrationʹs (FHWA) HEC-18 methodology, Evaluating Scour at Bridges (FHWA, 2001), following the calculation of steady flow profiles through a bridge constriction.
13.2
Types of Mobile Boundary Analyses Some projects have been rendered nearly useless or require excessive maintenance or countermeasures not long after construction due to the unforeseen effects of sedimentation and erosion. These problems can be avoided by performing a sediment transport analysis with software, such as HEC-6, to analyze deposition and erosion trends for a reach of river, and incorporating the findings into the design. Sedimentation and erosion studies often model 20 to 50 years of sediment and discharge data to determine long-term trends along the river and the effects on the design features. Sedimentation effects caused by a specific flood event can be estimated with a sediment transport model; however, the results are typically less reliable than analyses performed over longer periods, due to the long-term nature of sediment transport. Period-of-record sediment transport modeling may be appropriate for any of the projects discussed in the following sections, but are normally limited to major reservoir, channelization, or river diversion projects.
Base Conditions Although a rigid boundary assumption is typically used for preparing flood profiles for the vast majority of all rivers and streams, some streams undergo significant changes in channel geometry during specific flood events. The channel may be scoured during the rising limb and peak of the hydrograph, with deposition on the falling limb of the hydrograph. This phenomenon occurs most often in large sand-bed streams, such as the Colorado and Missouri Rivers in the United States. However, proof of such behavior should be obtained before making arbitrary adjustments in
Section 13.2
Types of Mobile Boundary Analyses
503
Mobile Boundary Effects Water surface profiles for different synthetic flood events, such as the 100-year flood, were completed and had been published for many years before the Great Flood of 1993 on the Missouri and Mississippi Rivers. These profiles were developed with geometric data taken from hydrographic surveys at different time periods before 1993. Hydrographic surveys taken in 1994 by the Kansas City District, USACE, following the flood were compared to similar surveys taken in 1987. A comparison showed some 8 to 10 ft (2.4 to 3.0 m) of scour had occurred along the entire river reach between St. Joseph and Herman, Missouri (a distance of about 400 mi or 640 km). At Kansas City, Missouri, soundings were made by the USGS throughout the course of the 1993 flood. These data showed that the channel invert elevation at the height of the flood on July 28, 1993, had been scoured nearly 15 ft (4.6 m) lower than that measured on July 12, 1993. By August 12, deposition had raised the invert to just over
6 ft (1.8 m) below the level of July 12 (USACE, 1994b). The high velocities experienced throughout the Missouri River channel during the 1993 flood caused considerable degradation of the river channel and, consequently, more cross-sectional area was available to pass the peak discharge. The calculated 100-year-flood peak discharge is generally about 65 to 75 percent of the peak discharge of the 1993 flood; however, the calculated 100-year elevation exceeded the measured 1993 stage at many points along the Missouri River. This incongruity may be due in large measure to the higher velocities experienced during the larger 1993 flood, which caused additional channel cross-sectional area to be available for conveyance, compared to that computed for the 100-year event using rigid channel boundary hydraulics. Where there are great changes in channel crosssection geometry during flood flows, these changes should be included in the floodplain hydraulic analysis for the highest accuracy in profile development.
channel geometry for flood events. Proof may be found in the form of cross sections taken at the same river station throughout the course of a flood event. A comparison of these cross sections would show the scour and deposition pattern at that location during the flood. If the base-conditions dataset cannot be calibrated to actual data for surveyed cross sections, for gaged discharge data, and for n values appropriate for the prevalent channel and land-use conditions, the problem may lie with the channel cross-sectional area. Channel scour during a flood may result in the surveyed cross sections (taken during a nonflood period) having too little channel area for correct conveyance at the peak discharge, while deposition could have the opposite result. This problem was experienced over much of the Missouri River during the 1993 flood.
Reservoir Projects Water impounded in a reservoir includes sediment that will settle in the pool. Over time, sediment accumulates and consolidates, removing space from the overall storage volume of the reservoir. Most federal reservoir designs incorporate a storage volume to retain up to 100 years of sediment inflows without seriously jeopardizing the design function of the reservoir. The volume of sediment deposition can be estimated from actual sediment gaging records, from sediment yield equations, or from a sediment transport model for a period-of-record routing. Detailed information on con-
504
Mobile Boundary Situations and Bridge Scour
Chapter 13
ducting sediment storage studies using these techniques is given in EM1110-2-4000, Sediment Investigation of Rivers and Reservoirs (USACE, 1995b). Although sediment is carried into a reservoir for all flows, many reservoirs experience the majority of deposition during major floods. During low flows, volumes and velocities of the water are typically low, so the river only carries a relatively small sediment volume. During floods, river velocities and water volume increase dramatically and the river can carry a sediment volume that may be an order of magnitude greater than that of normal flows. Figures 13.1a and 13.1b show major deposition that occurred in the reservoir delta of Lake Havasu during the 1985 flood on the Colorado River.
(a)
USBR
(b)
USBR
Figure 13.1 Lake Havasu Delta, (a) before and (b) after the 1985 flood.
Section 13.2
Types of Mobile Boundary Analyses
Hoover Dam and Channel Degradation Hoover Dam (originally called Boulder Dam) is located in the Black Canyon on the Colorado River, approximately 30 mi (48 km) southeast of Las Vegas, Nevada. It is the highest concretearch gravity dam in the world and rises over 726 ft (221 m) from the foundation rock to the roadway on the dam crest. The project was authorized by the U.S. Congress in 1928 to provide flood reduction, irrigation water, and hydropower to the southwestern United States.
26 mi (42 km) downstream of the dam and extended again to 43 mi (69 km) downstream in 1936. Each year found the degradation moving farther downstream, with additional survey ranges established. By 1940, the reach under study extended for 97 mi (156 km) downstream of Hoover Dam. At the end of 1940, an estimated 46.5 million yd3 (35.6 million m3) had been removed by scour action over the 97 mi (156 km) study reach.
Hoover Dam impounds Lake Mead, which covers 247 mi2 (639 km2) and extends about 110 mi (177 km) upstream of the dam on the Colorado River. From the beginning of lake impoundment in 1935 through 1963, sediment was deposited in Lake Mead at a rate of about 91,000 acre-ft (112 million m3) per year. In 1963, the Glen Canyon Dam was completed and began impounding water upstream of Hoover. Due to this construction, sediment inflow to Lake Mead is now a small fraction of the original value. However, with the impoundment of nearly all upstream sediment inflow, water released from Hoover Dam was nearly sediment free. This resulted in severe downstream channel degradation.
The complete length of channel was periodically surveyed and extended more than 100 mi (160 km) downstream of the Hoover Dam, to the headwaters of Lake Havasu (shown in Figure 13.1), formed by Parker Dam and constructed in the late 1930s. The last available observations of channel scour were taken in 1943 and noted that the channel of the Colorado River had become relatively stable for the first 77 mi (124 km) downstream of Hoover Dam. However, this only occurred after an estimated 80 million yd3 (61 million m3) of bed material was eroded from this stretch. Channel degradation ranged from about 10 ft (3 m) near the dam to about 1 ft (0.3 m) at the end of the reach. Downstream of this point to Lake Havasu, about 20 million yd3 (15 million m3) was estimated as having been deposited. Average channel aggradation through this reach was about 2 ft (0.6 m), with the remaining sediment passing into Lake Havasu.
The potential downstream channel degradation was recognized by the dam builders and the changes to the downstream channel of the Colorado River were monitored over the years following completion of the dam. Records maintained by the Bureau of Reclamation from 1935–1943 (USBR, 1935–43) show great changes to the Colorado River for some distance downstream of the dam. Seventeen ranges were initially established for the first 13 mi (21 km) downstream of the dam in January, 1935 with surveys to be taken bimonthly to trace changes in channel dimensions. The frequency of the surveys was decreased to biannual within a few years. Channel degradation was obvious after the first year of dam operation, with channel material removed down to bedrock over much of the reach. During the first year, the average channel degradation was 5.6 ft (1.7 m) in the initial reach. The surveyed reach was extended to
The character of the Colorado’s flow was also changed significantly by the Hoover Dam. Before the dam, the river carried large quantities of silt, with the water being highly colored. By 1943, however, the water throughout the downstream reach was observed to be nearly clear. Similarly, the bed material throughout the reach became increasingly coarser with time. Although the benefits of a reservoir typically far outweigh the adverse impacts, the changes to a stream’s sediment regime and channel configuration must be studied as part of the evaluation of a new dam and reservoir. All reservoirs do not have the same impact as Hoover Dam, but dams on major, sand-bed rivers can result in similar changes to the river system.
505
506
Mobile Boundary Situations and Bridge Scour
Chapter 13
Once the velocity in the reservoir slows enough to drop the sediment load, the water moves towards the release point of the reservoir and may be nearly sediment free. The water released from the reservoir is sometimes described as “hungry water” and is in a nonequilibrium condition, having more capacity to carry sediment than is available the reservoir outflow. In this situation, the reservoir outflow may increase its sediment load by scouring the streambed and banks for some distance downstream of the dam structure or reservoir outlet. Major dams on the Colorado and Missouri Rivers have resulted in downstream channel degradation of 10 ft (3 m) or more due to this phenomenon. This degradation may require that the design of energy dissipaters and downstream water withdrawals be compatible with a general lowering of the water levels. Further downstream, a dam may actually increase deposition because the reservoir decreases peak discharges that may have carried away sediment contributed by tributaries. Lane’s sediment balance analogy of Chapter 11 may be applied to a reservoir to demonstrate the sediment impact, both upstream and downstream of the dam. The larger the dam and upstream watershed, the more likely that a major sediment study will be required. Urban stormwater detention structures are unlikely candidates for such a sediment study.
Channel Modification Projects Major modifications resulting in significantly altered channel geometry and slope over a reach of stream should be analyzed for sediment transport and channel stability. Figure 13.2 shows a stream widened to pass a design flood discharge. In this case, the geometry of the larger channel is not in equilibrium with the normal flows and accompanying sediment transport. As described in Chapter 11, a stream that was in near-equilibrium is now in a state of aggradation for most normal flows. It has too much sediment entering the new channel for the larger cross-sectional area. Consequently, velocities decrease, followed by deposition in the channel. Figure 13.2 shows that these normal, within-banks discharges are depositing sufficient sediment to recreate a meandering low-flow channel within the widened channel. With the growth of vegetation on the sediment deposits encouraging additional deposition, this channel modification will quickly be unable to pass the design discharge. Chapter 11 covers channel modification projects in detail and Sediment Investigation of Rivers and Reservoirs (USACE, 1995b) presents detailed procedures for conducting sediment transport analyses for channel modification projects.
Levee Projects Major sediment transport analyses are seldom necessary for typical levee projects. Because the structure typically does not modify the main channel geometry, the impact on the sediment regime is minimal. The main exception is along flank or tieback levees that connect the levee along the main river to high ground. These different categories of levee are illustrated in Section 12.1. The flank levee is often located along a stream, tributary to the main river. Discharges from the tributary that carry significant quantities of sediment often result in deposition along the channel and overbank areas adjacent to the flank levee (because of the backwater effect from the main river). A sediment impact analysis could be necessary along the tributary to ensure that the
Section 13.2
Types of Mobile Boundary Analyses
507
USACE
Figure 13.2 A low-flow channel developing after channel widening.
deposition does not result in unacceptable, higher flood levels along the flank levee, thereby threatening the levee design. With HEC-RAS, engineers can model a fixed deposition amount at selected cross sections, as first presented in Section 11.6. A constant or varying sediment elevation may be specified at any or all cross sections for sensitivity tests on the impact of deposition on the flood elevation and required levee height. Figure 13.3 shows a profile computed with and without sediment deposition to determine if the levee can meet design standards after deposition has occurred over time. If the deposition rate can be estimated, this evaluation can determine the dredging volume and frequency required to maintain the design level of protection along the levee. For example, HECRAS output may show that sediment depths averaging 2 ft (0.6 m) in the channel would increase the design flood profile by 0.5 ft (0.15 m), resulting in inadequate freeboard. A sediment sensitivity study for deposition along the flank levee is typically satisfactory for levee projects; detailed sediment transport analysis is seldom necessary.
Diversion Projects Off-channel storage or diversions from the main channel of a river reach typically result in an uneven split of flow and sediment. Numerical or even physical modeling may be needed to address the scour and deposition problems usually encountered with a major diversion. Figure 13.4 illustrates pre- and postdiversion views, respectively, of sediment deposition in a man-made channel in Illinois, near St. Louis, Missouri. Figure 13.4a shows the man-made channel (Harding Ditch) constructed to carry outflow from a series of recreational lakes in an Illinois state park. Upstream urbanization increased both the water and sediment runoff to the lakes, causing large quantities of sediment to be deposited, making the lakes less useful for recreation. The inflow was diverted around the lakes and connected directly to the downstream channel. As shown in Figure 13.4b, the material formerly deposited in the lakes was now deposited in the low-sloped channel. The bridge in the background may be used as a
508
Mobile Boundary Situations and Bridge Scour
Chapter 13
reference point for a before- and after-diversion comparison. As for reservoirs, major diversions on large rivers require sediment studies, whereas diversions on small or intermittent streams likely would not. As part of a USACE evaluation, sediment transport studies were performed on Harding Ditch to determine the sediment trends and the approximate frequency of dredging required to maintain the desired channel capacity (Dyhouse, 1982). The Harding Ditch study is described in Chapter 3.
Figure 13.3 Sensitivity test of sediment deposition on water surface profile along a flank levee. There is essentially no change in water surface elevation for 2 ft of deposition.
(a)
(b)
Figure 13.4 Harding Ditch, Illinois (a) before and (b) after diversion.
Section 13.3
Bridge Scour
509
Channel Stability and Protection The preceding four project categories may feature channel protection against erosion and scour, often using riprap. The design of channel protection features is influenced by several hydraulic variables, including average channel velocity, maximum computed velocity, Froude number, maximum depth, hydraulic radius, shear stress, and hydraulic depth. These parameters are all available as part of the HEC-RAS output. In addition, channel stability tools (Copeland, Regime and Tractive Force Methods) have been added to HEC-RAS. Applying these channel stability procedures and designing for channel protection (outside of HEC-RAS) is addressed in Chapter 11.
13.3
Bridge Scour The most common mobile boundary analysis required of the engineer is likely to be the evaluation of scour impacts on existing or new bridges. In the United States, nearly 600,000 bridges carry the nation’s highways over obstacles. More than 80 percent of these obstacles are creeks, rivers, and streams. An evaluation of bridge safety against scour is necessary because the bridge location on the stream is fixed, but the stream may scour channel material through the bridge reach and move laterally in the floodplain. The economic life of a bridge is often taken as 50 years following construction, but the actual life could be much longer. Therefore, an adequate evaluation of scour potential is quite important. The analytical tools to address erosion and scour impacts at bridges were largely lacking until the 1960s. Early scour prediction equations and sediment transport models were available, but the analysis of a specific flood event to compute expected scour was seldom performed. This lack of analysis was mainly due to poor understanding of the physical process of bridge scour, the lack of adequate information for all the variables needed for such an analysis, and the inability to accurately model significant geometry changes for short-duration flood events. Two major bridge failures in 1987 and 1989 emphasized the need for improved scour analyses, especially for older bridge structures. Erosion and undermining of a spread footing supporting a bridge pier carrying I-90 (the New York State Thruway) over Schoharie Creek resulted in a bridge collapse and the loss of ten lives on April 5, 1987 (NTSB, 1988). On April 1, 1989, a section of the State Highway 51 Bridge over the Hatchie River in Tennessee was destroyed by lateral erosion during a moderate flood, resulting in eight deaths (NTSB, 1990). Both of these disasters are described in more detail later in this section. The need for better bridge inspections and improved evaluation of potential scour situations for both existing and new bridges were mandated soon after the Schoharie Bridge failure (FHWA, 1988). HEC-RAS has standard bridge scour analysis as a hydraulic design function within the program. In addition to designing the bridge opening using HEC-RAS, the engineer can now perform a scour analysis within HEC-RAS for the bridge design. The program does not yet provide a long-term sediment transport model and no hydraulic or sediment modeling is done in the scour analysis. Instead, HEC-RAS uses the equations and procedures developed by FHWA to estimate the maximum scour potential at the bridge. Hydraulic Engineering Circular (HEC) 18, Evaluating Scour at Bridges (FHWA, 2001), provides step-by-step details on these procedures and expressions. The modeler should note that although scour analysis can be performed with
510
Mobile Boundary Situations and Bridge Scour
Chapter 13
HEC-RAS, the program does not recompute water surface elevations after a scour analysis; the water surface elevations presented in the output represent the unscoured condition, since the scour calculations are performed separately from the flow calculations. Data for the scour equations are taken from the HEC-RAS hydraulic computations through the bridge reach and from sediment samples taken at the bridge site (cross sections 2 or 3 and at section 4, as defined in Chapter 6). The bridge scour equations used by the FHWA were developed primarily through flume studies using movablebed physical models. Model testing resulted in prediction equations for contraction scour into the bridge and the scour caused by local obstacles at the bridge—the abutments and piers. The equations used by the FHWA have been field tested and found to produce conservative estimates of scour depths (more scour than is expected to occur at the actual bridge). These results have been documented by several publications of the FHWA (FHWA, 2001 and FHWA, 1991). The publications described in the following paragraphs can be obtained through the U.S. Department of Commerce, National Technical Information Service.
Key References An engineer performing a bridge scour analysis should acquire the following key publications from the FHWA (described in the following sections) and become thoroughly familiar with the technical details of the analysis process. Although the procedures are described both in this chapter and in the HEC-RAS manuals, additional guidance and details are available in these FHWA publications. Bridge scour analysis is an evolving procedure, with periodic modifications and improvements to existing standards by the FHWA. The modeler should ensure that the latest versions of the FHWA guidelines have been reviewed for any pertinent changes. The bridge scour discussion in both this chapter and the HEC-RAS manuals is largely taken directly from the FHWA publications, primarily HEC-18 (FHWA, 2001). The following sections provide an overview of each of the key publications. HEC No. 18, Evaluating Scour at Bridges – This publication (FHWA, 2001) covers the state of knowledge and practice for the design, evaluation, and inspection of bridges for scour. Design procedures are presented in detail, along with step-by-step processes for computing contraction, pier, and abutment scour. Tidal scour and the use of unsteady flow models are addressed. Many detailed example problems are also included. HEC No. 20, Stream Stability at Highway Structures – This publication (FHWA, 1991) gives guidelines for identifying stream instability problems at highway stream crossings and for the selection and design of countermeasures to prevent potential damage to bridges. It covers geomorphic and hydraulic factors along with guidelines for evaluating stream instability problems. Proper selection of countermeasures is addressed, with three detailed design examples covering spurs, guide banks, and check dams. Channel Scour at Bridges in the United States – This publication (FHWA, 1996) describes methods to measure and interpret bridge scour data, presents an extensive pier scour measurement database, evaluates scour processes through an analysis of these data, and compares observed and predicted scour depths for several scour prediction equations.
Section 13.3
Bridge Scour
511
HEC No. 23, Bridge Scour and Stream Instability Countermeasures – This publication (Lagasse, Zevenbergen, Schall, Clopper, and FHWA, 2001) provides a range of resources to support bridge scour or stream instability countermeasure selection and design. A matrix presents countermeasures that have been used by State Departments of Transportation (DOTs) to control scour and stream instability at bridges. It identifies most countermeasures used and lists information on their functional applicability to a particular problem, their suitability to specific river environments, the general level of maintenance required, and which DOTs have experience with specific countermeasures. HEC 23 includes specific design guidelines for most countermeasures used by DOTs and provides references to sources of additional design guidance.
Types of Scour Scour at bridges can occur in a variety of ways, including long-term degradation throughout the river reach containing the bridge, general scour near and within the bridge structure, contraction scour, scour around bridge obstructions (abutments and piers), and scour from lateral movement of the stream channel. These sources of scour and the corresponding methods of analysis are presented in the following sections. Reach Aggradation or Degradation. The river passing through the bridge opening may not be in equilibrium. Upstream reservoirs, channel modifications, decreases in a stream’s sediment supply, and watershed urbanization can all result in overall degradation of the reach. Figure 13.5 is an example of long-term reach degradation on the Yuba River in central California and the exposure of a bridge footing (left center) that occurred before construction of a replacement bridge (in the background). Reach degradation can be identified by evaluating historic records of the river reach for changes in channel geometry. United States Geological Survey (USGS) or USACE channel surveys available for different times can be used to estimate an upward or downward trend in stream elevations and the average change per year. This yearly average change can be multiplied by the projected life of the bridge to estimate the long-term degradation. The engineer can also apply his or her judgment, supplemented with available information, to estimate the overall lowering of the stream invert over the projected life of the bridge.
Figure 13.5 Scour beneath bridge footing caused by reach degradation, Yuba River near Marysville, California.
512
Mobile Boundary Situations and Bridge Scour
Chapter 13
A great improvement over the simple judgmental estimate of scour would be the application of a sediment transport program such as HEC-6. A period-of-record simulation over 20 to 50 years allows an improved estimate of the overall aggradation or degradation trend of the system. If sediment data are available for such a model, and the study bridge crosses a major river, this type of analysis should be considered to evaluate degradation over the projected life. This analysis is currently performed outside of HEC-RAS, with the results and modified river geometry then incorporated into the bridge scour analysis computed with HEC-RAS. The USACE’s EM 1110-24000, Sediment Investigations in Rivers and Reservoirs (USACE, 1995b) has detailed guidance on long-term degradation analyses. Unlike degradation, long-term aggradation will likely not threaten the structural integrity of the bridge; however, it should be taken into consideration, if present. The design capacities of bridges in the backwater of a downstream river or reservoir, or of those that cross rivers carrying a high concentration of sediment, may be compromised by channel and overbank deposition in or near the bridge opening or support structures. This could, in turn, cause flooding problems upstream of the structure and could also cause overtopping of approach roads and the bridge itself. A sediment transport model can give insight into the magnitude of reach aggradation as well as degradation. General Scour. General scour includes scour from sources that often cannot be adequately quantified through analytical studies. This category includes scour caused by bend migration, fluctuating downstream water surface elevations that control backwater elevations through the bridge, and channel morphology characteristics, such as a scour hole at the junction of two streams. General scour also includes possible scour in the vicinity of the bridge due to the design flood. General scour is often estimated from field inspections, aerial mapping, and the projected worst case for general scour at a bridge. For more critical situations, one or more multidimensional numerical model(s) or a physical model of the bridge may be needed to best evaluate general scour. References that describe these phenomena in more detail include HEC-18, Evaluating Scour at Bridges (FHWA, 2001) and HEC 20, Stream Stability at Highway Structures (FHWA, 1991). Contraction Scour. Contraction scour occurs when the river’s flow area narrows from the full width of the channel and floodplain upstream of the bridge into the bridge opening. The velocity increases throughout this reach and the flow depth decreases near and through the bridge. Part, if not all, of the floodplain flow can return to the channel as it enters the bridge opening, resulting in increased erosion potential upstream and in the bridge. Figure 13.6 shows a schematic of a stream reach containing a bridge crossing with the locations of various types of scour indicated. Contraction scour can be classified as either clear water or live bed. Clear-water scour occurs when there is virtually no movement of the predominant streambed material upstream of the bridge crossing (at section 4), but the acceleration of the flow and vortices created by the water flowing past the piers or abutments cause the bed material in the bridge crossing to move. Conversely, live-bed scour occurs when the bed material at Section 4 is moving. Clear-water scour is mainly associated with streams containing coarser bed material, riprapped channels, armored streambeds, or well-vegetated overbank areas (if scour occurs in the overbank areas).
Section 13.3
Bridge Scour
Yuba River Aggradation and Degradation Changes to a stream’s sediment supply can result in a drastic response by the stream. There are many examples, but few are as dramatic as the situation in the Yuba River Basin in California over the last 150 years. Gold was discovered in sparsely settled California in 1848 and, by the following year, more than 100,000 gold miners were in the Sierra Nevada Mountains panning for the precious metal (Hart, 1906). Initially, the gold was found in shallow gravel beds of mountain streams. Sluice boxes were constructed to wash great quantities of gravel in the shortest possible time to extract the gold. Millions of cubic yards of gravel were washed downstream annually in the 1850s and began to be deposited in and along the streams and rivers of the Sacramento River Valley. The shallow gold deposits were soon exhausted and the miners turned to more sophisticated hydraulic placer methods to extract gold from stream banks and hillside deposits. Beginning in the early 1860s, high-pressure water jets were used to blast material from stream banks and hillsides to begin the gold extraction process. Even more sediment was added to the river systems and transported downstream. The Yuba River, with a 1350 mi2 (3495 km2) basin, received more sediment from hydraulic mining than all other nearby rivers combined (USACE, 1998) and correspondingly experienced the worst sediment accumulation along its stream system. In 1906, sediment depths along the Yuba varied from 7.5 ft (2.3 m) at Marysville, California (near the mouth of the Yuba), to 84 ft (26 m) at Smartsville, California (about 20– 25 mi, or 32–40 km, upstream). The lower portion of the Yuba, lying in the Sacramento River Valley, changed from a narrow stream in 1850, to one filled with sand and gravel with an average width of 2 mi (3.2 km) and flanked by levees to reduce flooding by the 1900s. Estimates of deposition volume over this reach ranged from 70 to 700 million yd3 (54 to 540 million m3). Significant deposition was experienced down the Sacramento River and into San Francisco Bay.
The deposition and resulting loss of channel capacity increased the magnitude and severity of floods throughout the Sacramento Valley, prompting lawsuits by valley farmers against mining interests. The successful lawsuits eventually resulted in limitations on hydraulic placer mining in 1884, and by 1890 washing of new mining material into the area rivers had largely ceased. To rectify the effects of the deposition as much as possible, the California Debris Commission was formed in 1893. Among the commission’s duties was the stabilization of the eroded material in the steeper regions and removal of much of the deposited material from the main river channels of the Sacramento Valley. A series of stabilization structures, debris dams, and reservoirs were constructed over the ensuing decades to stabilize or trap sediment and debris to prevent its entering the main stem rivers of the Sacramento Valley. Levees were built to prevent flooding from the aggraded rivers. The cutoff of the sediment and debris supply then resulted in the erosion and removal of much of the material deposited in the river channels. Surveys taken of the Yuba River channel at Marysville show a channel degradation of over 20 ft (6 m) between 1912 and 1992, with much of the degradation taking place from 1899–1929 (USACE, 1998). The loss of the sediment supply caused an increase in erosion and scour and resulted in a coarser bed material, as could be predicted using Lane’s expression. Over the past 150 years, the Yuba River system went from near-equilibrium to massive aggradation to massive degradation. The situation today is a return to quasi-stream stability, but the Yuba River system looks very different today than it did in 1850. Although such a severe aggradation/degradation example is not likely to again occur in the U.S. because of the regulations in place, a large change in the sediment supply (either an increase or decrease) can have far-reaching ramifications. Developing countries with land use changing from forest or jungle to farmland could encounter similar problems.
513
514
Mobile Boundary Situations and Bridge Scour
Chapter 13
Figure 13.6 Stream schematic showing locations of various scour
categories. A stream is considered armored when material from the stream bed has been removed down to a particle size that can no longer be transported. The armoring thickness is typically one particle diameter and this size varies, depending on stream and flow conditions. For some streams, the lower discharges may reflect clear-water scour conditions while the larger discharges or flood events may cause live-bed scour. Clear-water scour has more erosion potential than live bed and can result in a deeper scour at the bridge. Live-bed scour is typical during flood events for most alluvial streams that have channels consisting of clay, silt, and/or sand. Separate equations are used to determine clear-water and live-bed contraction scour. Note that if a sediment transport model reflects the hydraulic and sedimentation effects of the bridge, the contraction scour is then already calculated and an external analysis is not required. Although reach, general, and contraction scour are computed, the existing HEC-RAS geometry is not adjusted to reflect the scour conditions. This is consistent with HEC18 guidelines.
Section 13.3
Bridge Scour
515
Local Scour. Local scour occurs at and within the bridge opening itself and is influenced by a variety of parameters relating to the bridge piers and abutments. Scour at Piers. Piers cause the flow to pass around each pier and also move vertically down the pier face toward the channel bottom. Turbulence around piers results in vortex systems and excessive scour, especially during flood events. As flow approaches the pier, it decelerates, theoretically coming to rest at the face of the pier, causing a stagnation pressure. Stagnation pressures are greatest near the water surface, where velocities are higher than toward the channel bottom. The difference in stagnation pressure creates a downward pressure gradient along the face of the pier, forcing the direction of flow along the pier downward. This velocity down the pier, if great enough, begins to move particles from the bottom of the pier, causing scour at this location. These downward flows around the base of a pier create a “horseshoe vortex” that removes bed material near the pier and footing. Flow moving past the pier also creates a “wake vortex” that aids in transporting scoured bed material downstream. Figure 13.7 is a schematic display of possible erosion patterns around a circular pier.
FHWA, HEC-18
Figure 13.7 Pier scour patterns.
Velocities of sufficient duration and magnitude can expose and/or undermine the pier footings, which can ultimately reduce their bearing capacity. Large scour holes around individual piers can undermine the pier and result in a collapse of the pier foundation, leading to the loss of the support structure of a bridge. This situation was the cause of the Schoharie Bridge failure in New York State in 1987. Pier scour is affected by the number and shape of the piers, the angle of attack of the flow on the pier, the type of pier foundation, and the debris and ice carried by the stream. Figure 13.8 shows a scour hole reaching to the bottom of a pier footing at a bridge crossing along Cache Creek, California. Scour at Abutments. Contracting flow may break sharply into the bridge opening at the abutments, causing flow concentration and resulting in abutment scour. Figure 13.9 shows the components of abutment scour that create wake vortices similar to pier scour and Figure 13.6 shows the general location of abutment scour. Key factors in abutment scour include the abutment shape—vertical or spill through (further defined in the next section), the abutment location in relation to the channel banks,
516
Mobile Boundary Situations and Bridge Scour
Chapter 13
USACE
Figure 13.8 Scour to the bottom of a bridge footing, Cache Creek, California.
FHWA, HEC-18
Figure 13.9 Vortices formed at abutments.
Section 13.3
Bridge Scour
517
and the incorporation of upstream spur dikes or guidewalls. Figure 13.10 shows severe velocities and turbulence along the approach guidewall and abutment of the Old River Control Structure in Louisiana on the Mississippi River during the 1973 flood. Construction took place in the 1930s, with the design of that time not meeting today’s standards. There were no pilings under the guidewall and no riprap protection for the base of the wall. Scour of the sand along the base of the wall (reflected in the standing wave along the guidewall) caused the loss of the guidewall and the near loss of the diversion structure during that flood event.
USACE
Figure 13.10 High-velocity flow along a guidewall and abutment at the Old River Control Structure, during the 1973 flood on the Mississippi River, Louisiana. The entire guidewall collapsed into the scour hole less than 24 hours after this picture was taken.
Lateral Scour. This type of erosion is caused by the horizontal movement of the channel, without necessarily creating a deeper channel. Meandering streams shift laterally in the floodplain, with the meander loops moving slowly in the downstream direction, potentially causing problems at bridges. Bridges crossing wide floodplains often allow significant floodplain flow through the bridge opening, as well as flow from the channel. If the velocities in the channel cause erosion of the bankline, the main channel may shift laterally and relocate into a portion of the floodplain under the bridge superstructure. Because piers located in the floodplain may not be as substantial or as deeply based as piers in the channel, such a situation may result in the loss of one or more piers in the overbank area and potentially the loss of the bridge itself. This exact situation caused the Hatchie Bridge failure in 1989. Figure 13.11 shows a bridge cross section undergoing lateral scour. Lateral scour is not addressed by the FHWA equations, nor is it simulated in a program like HEC-6 or HEC-RAS. Lateral scour issues and concerns must be addressed separately by the engineer, as part of the general scour analysis mentioned earlier in this section, and should be based on the past history of the stream in realigning its channel. The presence of past stream cutoffs may indicate susceptibility of the stream to shifts in the floodplain. A bridge site crossing the river on a bend in the channel should be closely examined for lateral movement possibility. Figure 13.12 shows a bend eroding into a bridge abutment and embankment. The sharp angle at which the flow approaches the bridge would also be expected to have a significant impact on pier scour.
518
Mobile Boundary Situations and Bridge Scour
Chapter 13
Figure 13.11 Channel lateral movement in a bridge opening.
Figure 13.12 Lateral scour into a bridge embankment and abutment, Silver Creek, Illinois.
Lateral scour may be controlled by guide banks (spur dikes) on the upstream side of the bridge opening, usually constructed of large rock or earth armored with rock. Armoring with heavy rock on the outside of meander loops moving towards the bridge opening may also be successful. HEC 20, Stream Stability at Highway Structures (FHWA, 1991) and HEC 23, Bridge Scour and Stream Instability Countermeasures (FHWA, 1997), provide extensive discussion of various successful stream stabilization measures for limiting or preventing lateral movement.
Section 13.4
Bridge Scour Computational Procedures
519
Pier Scour—The Schoharie Bridge Failure Severe scour during an April 1987 flood on Schoharie Creek, in the state of New York, caused a pier to collapse, dropping two spans of Interstate 90 about 80 ft (24 m) into the creek. A tractor-trailer and four automobiles fell into the gap, resulting in ten deaths. About an hour and a half later, another pier collapsed and a third span fell into the creek. An investigation by the National Transportation and Safety Board (NTSB, 1988) determined that the probable cause of failure was the loss, during earlier floods, of rock revetment that protected the pier footings. The loss of the revetment allowed erosion and scour under the spread footings, until the piers failed. The bridge crosses Schoharie Creek on a prominent bend in the creek and increased velocities on the outside of the bend may have contributed to the scour severity at the pier footings.
13.4
The Schoharie Bridge failure received great media coverage and called to attention the need for improved and more frequent bridge inspections. The loss of riprap around the footings had been noted during a previous bridge inspection in 1979, but the riprap had not been replaced. The NTSB found that the loss of revetment was the direct cause of the failure, resulting from an inadequate state bridge inspection program and inadequate oversight by the New York DOT and the Federal Highway Administration. The Schoharie Bridge failure had the direct result of increasing the frequency and detail of bridge inspections by state highway departments throughout the United States, including underwater inspections by divers. The scour prediction equations used in HEC-RAS are an attempt to address bridge scour during flood events and recognize potential hazards.
Bridge Scour Computational Procedures Separate computational procedures, in the form of design equations for maximum scour depth, must be performed for contraction, pier, and abutment scour. Scour depths from each of the three methods may be summed, as appropriate, to obtain total scour at the bridge site.
Initial Preparation In preparation for computing scour at the bridge, the following steps should be taken: 1.
Select the hydraulic computer program for the analysis. In addition to HECRAS, the FHWA has other computer programs available, such as WSPRO.
2.
Obtain the geometry, discharge, sediment, and other data for the selected program and project. Develop the hydraulic model and calibrate it as necessary.
3.
Estimate or model the long-term effect of stream aggradation or degradation for the reach containing the bridge.
4.
If deemed necessary, adjust cross-section geometry for the bridge scour analysis to reflect any future reach degradation or aggradation.
5.
Recompute the profiles through the bridge including the long-term bed degradation.
520
Mobile Boundary Situations and Bridge Scour
Chapter 13
Lateral Scour—The Hatchie River Bridge Failure The Hatchie River Bridge for Route 51 over the Hatchie River in Tennessee was constructed as a two-lane highway in 1936. It was 4000 ft (1220 m) long, spanning most of the floodplain and the 300 ft (91 m) wide main channel. A second twolane bridge was built in 1974 to provide two lanes of traffic in both directions. However, the second bridge had an opening of about 1000 ft (305 m), centered on the main channel. The reduced opening width of the second bridge resulted in a significant concentration of flow through the two bridges. Each of the original bridge pile bents were founded on 20 ft (6.1 m) long wooden piles and the bottoms of the pile caps were 14 ft (4.3 m) higher in the floodplain than in the channel. The winter of 1988–89 was a particularly wet one, with the Hatchie River flowing at flood levels from November 1988 through April 1989. On April 1, 1989, an 85 ft (26 m) section of the northbound (original bridge) lanes collapsed after two pile bents failed and dropped three bridge spans more than 20 ft (6.1 m) into the river. Four automobiles and a tractor trailer fell into the gap and all eight vehicle occupants died. At that time, the flood flow in the Hatchie River was only a few feet out of banks with a peak flow of about 8600 ft3/s (244 m3/s). The
maximum discharge during the entire flood period was about 28,700 ft3/s (813 m3/s), a discharge frequency of about three years. However, the excessive flood duration allowed the channel to scour laterally and shift into the overbank area, scouring two support piers that were in the floodplain. The NTSB investigation (NTSB, 1990) found that the bridge had been inspected regularly (24–26 month intervals) and evidence of lateral migration of the channel into the pile bent that failed had been noted. However, the original bridge drawings were not used during the inspection, resulting in underestimation of the magnitude and potential hazard of the lateral migration. The most recent inspection in 1987 had not included an underwater examination, since criteria at that time did not require an underwater inspection where flow depths were less than 10 ft (3 m). The Tennessee DOT changed this criterion to one meter (3.3 ft) in 1990. Lateral scour cannot be addressed in HEC-RAS or in most sediment transport programs. On-site inspections, review of topographic maps, and current and historic aerial photo analysis should be performed to estimate a stream’s propensity for lateral movement.
General Bridge Scour Analysis Procedures When the reach has been properly modeled and the long-term trends in degradation have been analyzed, the bridge scour analysis may commence. The key steps in a bridge scour analysis are as follows: 1.
Determine the appropriate design conditions for the scour analysis. These factors include the design flood peak discharge and/or the flood causing the most scour at the bridge. The design flood is normally the 100-year event, unless a more frequent flood will cause greater scour. For example, smaller floods that are confined to the bridge opening may cause more scour than the 100-year event if the latter overtops the roadway embankment and results in significant weir flow bypassing the bridge opening. The impacts of a superflood, defined as the 500-year flood event by FHWA, should also be evaluated to ensure that the bridge foundation will not fail during such a flood. FHWA guidelines suggest the peak discharge of the 100-year event may be multiplied by 1.7 to approximate the 500-year event, but this factor will be different depending on geographic region. For instance, the factor is
Section 13.4
Bridge Scour Computational Procedures
2.
3.
4.
5.
6.
521
often about 1.2 to 1.4 for floods in the midwestern United States (based on the authorʹs experience). Some State DOTs require the 500-year analysis for bridge stability using a safety factor of one. Scour variables should also reflect long-term trends in the stream system and potential effects of upstream urbanization on the peak discharge as well as potential reduction in sediment delivery. Sediment and geomorphic information, scour data at nearby bridges, flood history, stream stability, channel mining activities, channel controls, and so on should all be addressed here. Profiles should reflect the possible range of downstream tailwater conditions. Determine the analysis method (either clear-water or live-bed) for contraction scour. The contraction method mainly depends on the critical velocity (discussed later in this section) required to move the river’s bed materials as well as the average particle size (D50) of the bed material. HEC-RAS by default determines whether the contraction scour is live-bed or clear-water, but the modeler can specify either condition for the computation. Select the values for the required parameters and compute the contraction scour and any other general scour. The modeler supplies the D50 particle size and water temperature. Contraction scour is dependent on the distribution of the flow, the top widths in the bridge, the top widths in the overbank and the channel at the beginning of the contraction (section 4, the approach section), and the channel/floodplain material grain size. General scour in the bridge reach (nonpermanent, but cyclical or seasonal) should also be considered here. The inclusion of potential lateral scour is also appropriate in this step. Determine the key parameters needed for scour at the piers and compute the pier scour, if the bridge has piers. Parameters include the flow characteristics (depth, velocity, angle of attack, energy or pressure flow), the pier geometry, the footing information, and the bed-material characteristics. If HEC-RAS is being used, it will pull the majority of this data from the steady flow hydraulic computations made before the scour analysis. Determine the key variables needed for scour at the abutments and compute the abutment scour. Key variables for abutment scour include the abutment shape and the location with respect to the channel bankline. HEC-RAS uses the detailed cross-section output to balance the values needed to compute abutment scour. Plot and evaluate the total scour depths at the bridge. Plot the resultant scour depths and widths for the piers and abutments and the contraction and overall degradation at the bridge cross section. This information should be evaluated to determine whether the depths are reasonable and consistent with the engineer’s experience and judgment and the site conditions. Determine whether the scour holes overlap, as the scour depths may be greater when overlapping occurs. HEC-RAS provides these plots with the scour projecting laterally from the lowest depth at a 2H:1V slope to the original bed surface. Other factors, such as lateral movement, velocity distribution, movement of the thalweg (lowest elevation in the channel) within the existing channel, changing angle of flow direction, and type of stream, must also be evaluated. Noncohesive materials (sand, gravel) can erode quickly, possibly reaching the ultimate scour depth during a single flood. Scour in cohesive soils (clay, silt) can be just as deep but take a longer time to reach the ultimate depth. Several flood events occurring over many years may be required to reach the ultimate scour depth for cohesive material.
522
Mobile Boundary Situations and Bridge Scour
Chapter 13
Contraction Scour Contraction scour is computed by different equations for clear-water or live-bed scour. For the flood flow to transport bed material at Cross Section 4 (live-bed conditions), the average channel velocity must be greater than the particle critical velocity. Note that this critical velocity term is different from the term used in earlier chapters. For scour analysis, the critical velocity is the value that just initiates representative bed material sediment movement. If the average velocity exceeds the critical velocity, then live-bed scour is expected. If the average velocity is less than the critical velocity, then clear-water scour should occur. Critical velocity is determined from Laursen’s work (Laursen, 1963) as
Vc = KU y
1⁄6
D
1⁄3
(13.1)
where Vc = critical velocity above which bed material of size D and smaller will be transported (ft/s, m/s) KU = a coefficient [6.19 for SI units and 11.17 for English units. The latter value was modified (FHWA, 2001) from an earlier value of 10.95.] y = upstream average overbank or channel depth of flow, at Section 4, start of contraction (ft, m) D = normally taken as D50 from the particle-size distribution, at Section 4, start of contraction, where 50 percent of the particles are smaller than this value (ft or m) Contraction scour is also dependent on the abutment and channel conditions, with four possible cases of contraction scour: • Case 1 – A majority, if not all, of the overbank flow is forced back to the main channel by the bridge embankment. Three subsets of this case are (a) abutments extend into the channel or the river channel at the bridge is narrower than that upstream, (b) abutments are at the channel bankline, and (c) abutments are located back from the channel bankline, allowing some overbank flow through the bridge opening. Bridge scour computations in HEC-RAS handle all subsets of Case 1. • Case 2 – No overbank flow and the channel width through the bridge is narrower than the upstream channel width. Bridge scour computations in HECRAS handle Case 2. • Case 3 – A relief opening in the overbank area with little or no bed material moving through it (clear-water). Bridge scour computations for Case 3 (or Case 4), both representing bridge scour through multiple bridge openings, cannot be simultaneously performed with the HEC-RAS bridge scour computations. However, the flow split through multiple bridge openings can be determined for rigid boundary conditions. Once the correct flow is determined through each opening, separate HEC-RAS models can be developed to simulate the flow path through each opening to analyze bridge scour. If using the multiple flow option in HEC-RAS, note that only one location of cross section 4 is input and its channel velocity is used in the abutment scour calculations for the bridge in the opening. Because of this, it is best to use the split flow option with a reach for each bridge.
Section 13.4
Bridge Scour Computational Procedures
523
• Case 4 – A relief opening over a secondary stream in the floodplain with bed material in transit through the opening (live-bed), similar to Case 1. HEC-RAS may be used for scour analysis with a similar procedure as in Case 3. For a complete discussion and illustration of these cases, refer to HEC-18 (FHWA, 2001). Live-Bed Contraction Scour. Scour from live-bed movement is determined through use of Laursen’s Live-Bed Equation (Laursen, 1960). It is applicable for scour analysis through a main bridge opening or for a secondary relief opening in the floodplain. For scour analysis in the main bridge opening, the width of effective flow for the channel and floodplain section at the start of contraction is used. For scour analysis at a relief opening, which may not have a defined channel through it, a floodplain section at the upstream approach, defining the main flow path to the relief opening, must be determined by the modeler to obtain the depth, discharge, and bottom width. Because the bottom width of a natural or irregular channel is sometimes difficult to estimate, FHWA guidance allows the top width of the active flow area to be substituted in this situation. This is the default method in HEC-RAS. Laursen’s equation is
Q 2 6 ⁄ 7 W1 k1 Y2 ------ = ------- -------- Q 1 W 2 Y1
(13.2)
524
Mobile Boundary Situations and Bridge Scour
Chapter 13
where Y2 = average depth, after contraction scour, in the bridge opening at the upstream end (in HEC-RAS, section BU) (ft, m) Y1 = average depth in the upstream main channel or floodplain (start of contraction), at Section 4 (ft, m) Q2 = flow in the main channel or floodplain at the contracted channel (section BU), which is transporting sediment (for Case 1c, scour should be calculated separately in each section—main channel and left and right overbank areas) (ft3/s, m3/s) Q1 = discharge in the main channel or floodplain (not including overbank flows) of the upstream approach section (Section 4), that is transporting sediment (ft3/s, m3/s) W1 = bottom width of the main channel or floodplain of the upstream approach section (Section 4) that is transporting bed material (ft, m) W2 = bottom width of the main channel in the bridge opening at BU minus projected pier widths (W1 and W2 can be defined as the top width instead as long as both are consistently measured at the same location) (ft, m) k1 = exponent determined from Table 13.1. Table 13.1 Values of k1 for Equation 13.2. V*/ω
k1
Type of Bed Material Movement
<0.5
0.59
Mostly contact bed material discharge
0.5–2.0
0.64
Some suspended bed material discharge
>2.0
0.69
Mostly suspended bed material discharge
In Table 13.1, the variables in the first column are defined as V* = shear velocity at the approach section, normally at section 4, (ft/s, m/s) ω = fall velocity of D50 bed material, normally at section 4, (ft/s, m/s) V* is computed with the equation
τ V* = --- ρ where
τ ρ g y1 S1
0.5
= ( gy 1 S 1 )
0.5
(13.3)
= shear stress on the bed (lb/ft2, N/m2) = density of water (1.94 slugs/ft3, 1000 kg/m3) = gravitational constant (32.2 ft/s2, 9.81 m/s2) = average depth at section 4 for the channel or floodplain = slope of the energy grade line of the main channel at start of contraction (channel invert slope may be used if the energy grade line slope is unavailable; HEC-RAS default uses the computed energy grade line slope at section 4.) (ft/ft, m/m)
The fall velocity, ω, is the speed at which a particle settles in a column of water with zero velocity. Water temperature and particle size, shape, and density affect the fall velocity of a particle. Figure 13.13 may be used to estimate ω for a given D50 and water temperature. The average contraction scour depth (Ys) is obtained from
Section 13.4
Bridge Scour Computational Procedures
525
Figure 13.13 Fall velocity of sand-size particles.
Ys = Y2 – Y0
(13.4)
where Y0 = the existing depth in the bridge section (in the channel or on the floodplain, if present, within the bridge) before scour analysis (ft, m) It should be noted that the hydraulic computations take place for the left and right overbank and the channel at section 4. If there is a portion of the floodplain within the bridge opening, the scour computations are performed for the channel scour and separately for the right and/or left overbank scour in the bridge opening. As bridge scour increases under the live-bed condition, it may expose larger material that can’t be moved by the flowing water, thereby armoring the material beneath it against further erosion. When channel borings show that significantly coarser materials exist below the surface, compute both clear-water and live-bed scour and use the smaller calculated value, because armoring will prevent reaching the full depth of computed scour.
Example 13.1 Live-bed contraction scour A design discharge of 30,000 ft3/s is confined to the upstream channel and is to be used to compute contraction scour through a bridge. The river has an invert slope of 0.003, which is assumed to be the slope of the energy grade line. The bed material is sand, with an average grain size of 0.20 mm (0.00066 ft) for the first 1 ft of depth and an average grain size of 0.35 mm (0.00115 ft) at depths more than 1 ft. The bridge has spillthrough abutments, no floodplain within the bridge opening, and a bridge opening width of 200 ft at the abutment toe. The bridge has three solid, square-nose piers, each 3 ft wide on 50 ft centerline intervals. The upstream approach channel cross section is 400 ft wide for the design flow with an average flow depth of 12 ft. Flow depth for the design discharge in the bridge opening is 10 ft (prior to scour). Compute the contraction scour for the bridge.
526
Mobile Boundary Situations and Bridge Scour
Chapter 13
Solution Assume the width of the channel bottom is equal to the active flow top width at both locations, with the channel being approximately rectangular. At the upstream (approach) section the velocity is 30,000 - = 6.25 ft/s V = Q ---- = -------------------A 12 × 400 Compute the critical velocity using Equation 13.1 for the 0.35 mm material (finer material will have a lower critical velocity): V c = 11.17 ( 12 )
1⁄6
( 0.00115 )
1⁄3
= 1.77 ft/s
Since Vc < V, live bed scour will occur and Equation 13.2 is used to estimate its depth. Next, determine k1. Equation 13.3 gives the shear velocity as V* =
32.2 × 12 × 0.003 = 1.08 ft/s
From Figure 13.12 for the 0.35 mm particle size, and assuming T = 40° C, gives ω = 0.06 m/s or 0.20 ft/s. Then the ratio of shear velocity to fall velocity is V* ------- = 1.08 ---------- = 5.4 ω 0.20 Table 13.1 gives k1 = 0.69 (mostly sediment bed material discharge). Applying Equation 13.2 and knowing that Q1 = Q2 gives 0.69 Y 400 -----2- = --------------------------- 200 – 3 × 3 12
From this result, Y2 = 19.98 ft. Since Y2 includes the original (prescour) depth, the contraction scour depth is found with Equation 13.4 to be ys= 19.98 – 10 = 9.98ft
Clear-Water Contraction Scour. For an average velocity less than the critical velocity, Laursen’s clear-water contraction scour equation is used: 2
Ku Q - Y 2 = --------------------- D 2m⁄ 3 W 2 2
3⁄7
(13.5)
where Ku = coefficient (0.025 in SI and 0.0077 in English units). HEC-18 (FHWA, 2001) recently adjusted the value for English units from an earlier value of 0.0083. Q = discharge through the bridge or on the overbank in the bridge associated with width W2 (ft3/s, m3/s) Dm = median diameter of the bed material. It is taken to be 1.25D50 (ft, m) W2 = bottom width of the contracted section (BU) less pier widths (ft, m). If the bridge section includes floodplain as well as channel, separate computations are needed for the channel and for the right and left floodplain within the bridge opening. These computations are performed automatically by HEC-RAS. The average clear-water contraction scour depth (Ys) is given by Ys = Y 2 – Y0 where Y0 = the average depth in the contracted section (BU) before scour (ft, m)
(13.6)
Section 13.4
Bridge Scour Computational Procedures
527
Example 13.2 Clear-water contraction scour For the situation of Example 13.1, compute the contraction scour assuming the bed material is now composed of small cobbles, 4 in. (0.33 ft) in diameter. Solution Equation 13.1 gives the critical velocity for the 0.33 ft material as V c = 11.17 ( 12 )
1⁄6
( 0.33 )
1⁄3
= 11.7 ft/s
The average velocity computed in Example 13.1 is 6.25 ft/s, less than critical velocity to initiate the movement of bed material. Since Vc > V, clear-water scour will occur and Equation 13.5 is used to estimate the depth of scour. For bed material median diameter, Dm = 1.25D50 = 12.5(0.33) = 0.41 ft The average depth in the contracted section is 2
0.0077 ( 30,000 ) Y 2 = --------------------------------------------------------2⁄3 2 ( 0.41 ) ( 200 – 3 × 3 )
3⁄7
= 12.22 ft
Since Y2 includes the original (prescour) depth, the contraction scour depth is found with Equation 13.6 to be Ys = 12.22 – 10 = 2.22 ft Since the material is much coarser and more difficult to move than that of Example 13.1, the scour depth is much less.
Pier Scour Pier scour is a function of many variables, including pier type, shape, location, and dimensions; depth of flow at the pier; velocity; pressure flow in the bridge; bed material size and angle of attack of the flow on the pier; and the presence of debris and ice in the flow. Many of these variables are represented by coefficients in the pier scour equations. Piers are also affected by clear-water or live-bed scour, with maximum clear-water scour about 10 percent more than the equilibrium local live-bed scour. Pier scour prediction equations have generally been developed in laboratory conditions, since prototype information is scarce and difficult to obtain during a flood event. Several scour equations have been developed for piers over the past few decades. HEC-RAS incorporates two equations to compute pier scour: the Colorado State University (CSU) and Froehlich equations. CSU Equation. Based on tests of all pier scour equations, the procedure recommended by the FHWA for pier scour for both clear-water and live-bed conditions is the CSU Equation, which has two forms (Jones, 1983). Either form may be selected for hand computations by the modeler and will supply the same estimate for pier scour:
Y a 0.65 0.43 -----s- = 2.0K 1 K 2 K 3 K 4 ----- Fr 1 y 1 Y1 or
(13.7)
528
Mobile Boundary Situations and Bridge Scour
Chapter 13
y 1 0.35 0.43 Ys ------ = 2.0K 1 K 2 K 3 K 4 ----- Fr 1 a a where ys y1 K1 K2 K3 K4 a Fr1 V1
(13.8)
= scour depth (ft, m) = average flow depth at section 3, directly upstream of the pier (ft, m) = pier shape correction from Figure 13.14 and Table 13.2 = correction for angle of attack of flow from Equation 13.9 or Table 13.3 = correction for bed condition from Table 13.4 = correction factor for armoring by bed material size from Equation 13.10 = pier width (ft, m) = Froude Number at section 3, directly upstream of the pier [V1/(gy1)0.5] = mean velocity at section 3, directly upstream of the pier (ft/s, m/s)
FHWA
Figure 13.14 Common pier shapes.
The values for y1, Fr1 and V1 are obtained using the flow distribution option in HECRAS, first presented in Chapter 10 and further described in Section 13.5. These values do not reflect average values for the full cross section 3, but only for the segments of section 3 directly upstream of each pier. The correction factor for pier nose shape, K1, given in Table 13.2 is only applicable for angles of attack of 5° or less. For greater angles, the correction factor for angle of attack, K2, dominates and K1 is set equal to 1.0. HEC-RAS does this by default. Figure 13.15 illustrates the angle of attack on a bridge pier. Table 13.2 Correction factor K1 for pier nose shape in Equations 13.7 and 13.8. Shape of Pier Nose
K1
Square nose
1.1
Round nose
1.0
Cylinder
1.0
Group of cylinders
1.0
Sharp nose
0.9
Section 13.4
Bridge Scour Computational Procedures
529
Figure 13.15 Angle of attack on a bridge pier.
In Table 13.3, the angle is the skew angle of flow, L is the length of the pier, and a is the width of the pier, as illustrated in Figure 13.15. The coefficient may also be computed directly with 0.65 L K 2 = cos θ + --- sin θ a
where
(13.9)
θ = angle between flow parallel to pier and the actual direction of flow (degrees) L = length of pier (ft, m) a = width of pier (ft, m)
If L/a > 12, use 12 as a maximum value in Equation 13.9 to solve for K2 or to select K2 from Table 13.3. The value of K2 should only be applied when the entire length of the pier is subjected to the angle of attack of the flow. This factor will overestimate scour if the abutment or another pier partially shields a pier from direct impingement of the flow. For these situations, judgment must be used by the engineer to reduce the value of K2 to represent only the effective pier length impacted by the angle of attack. If only 50 percent of the pier length is affected, then only this shortened length should be used in the equation or in Table 13.3 to determine K2. Table 13.3 Correction factor K2 for angle of attack of the flow (FHWA). Angle, deg
L/a = 4
L/a = 8
L/a = 12 1.0
0
1.0
1.0
15
1.5
2.0
2.5
30
2.0
2.75
3.5
45
2.3
3.3
4.3
90
2.5
3.9
5.0
530
Mobile Boundary Situations and Bridge Scour
Chapter 13
Table 13.4 Coefficient K3 for increase in equilibrium scour depths for bed conditions (FHWA). Bed Condition
Dune Height, m
K3
Clean-water scour
N/A
1.1
Plane bed and antidune flow
N/A
1.1
Small dunes
0.6–3
1.1
Medium dunes
3–9
1.1–1.2
Large dunes
>9
1.3
As shown in Table 13.4, the correction factor for different bed forms is nearly constant; only streams having dunes higher than 3 m (10 ft) during a flood event have K3 > 1.1. Figure 13.16 shows the different bed form configurations (Leopold et al., 1964). Dunes cause the pier scour to fluctuate about the equilibrium depth, but most rivers with sand beds typically go to small dunes or plane bed during a flood. Only major rivers like the Mississippi or the Columbia in the United States may have large dunes present during a flood event.
Leopold et al., 1964
Figure 13.16 Examples of channel bed forms.
Section 13.4
Bridge Scour Computational Procedures
531
The armoring correction factor, K4, decreases scour depths for armoring of the scour hole for bed material with D50 exceeding 2 mm (0.08 in.), which represents very coarse sand to very fine gravel, and/or a D95 exceeding 20 mm (0.8 in.), which represents coarse gravel. This sandy gravel material is mainly found in steeper terrain. The velocity required to remove the larger particles of the bed material, found to be the D95 size, is critical to determining armoring. When the average approach velocity is less than critical velocity (Vc95) and there is a gradation in sizes in the bed material, the D95 size will limit the depth of scour. The coefficient K4 has been improved from earlier estimates and the procedure to compute it has been modified since HEC-RAS V3.0. The current version of HEC-RAS (V3.1) includes the new procedure for computing K4, which is determined from Mueller and Jones, 1999:
1, D 50 < 2 mm or D 95 < 20 mm K4 = 0.4V 0.15 R , D 50 ≥ 2 m m or D 95 ≥ 20 mm
(13.10)
where VR = velocity ratio given by
V 1 – V icD 50 ->0 V R = --------------------------------V cD – V icD 50
(13.11)
95
where V1 = velocity just upstream of the pier at section 3 (ft/s, m/s) VicDx = approach velocity required to initiate scour at the pier for the grain size Dx (ft/s, m/s) VcDx = critical velocity for incipient motion for the grain size Dx (ft, m) The approach and critical velocities are further given by
D x 0.053 V cD V icD = 0.645 ------- a x x
(13.12)
and 1⁄6
1⁄3
V cD = K u y 1 D x x
where
(13.13)
a = pier width (ft, m) y1 = depth of flow just upstream of the pier at section 3, excluding local scour (ft, m) Ku = coefficient (6.19 in SI units and 11.17 in English units) Dx = grain size for which x percent of the bed material is finer (ft, m)
In applying the preceding equations, if D50 increases, then an increase in D95 is also necessary. The minimum value of K4 is 0.4.
Example 13.3 Pier scour For the situation in Example 13.1 for live-bed contraction scour, compute the pier scour for bed material having a D50 of 0.35 mm (0.0012 ft) and a D95 of 5 mm (0.016 ft). The length of each pier is 35 ft and the angle of attack is 0°. The stream has a plane-bed configuration.
532
Mobile Boundary Situations and Bridge Scour
Chapter 13
Solution From the earlier example, the pier width is 3 ft and the depth of flow in the bridge (prescour) is 10 ft. Examining the HEC-RAS output for the flow distribution calculations for section 3 just upstream of the bridge yields a maximum velocity (V1) of 14 ft/ s. Equation 13.7 is used to compute pier scour after first selecting or computing the input variables for the equation, as follows: 14 - = 0.78 Fr 1 = -------------------------32.2 × 10 From Table 13.2, K1 = 1.1 for a square-nose pier. L/a = 35/3 = 11.67, so Table 13.3 for an angle of 0° gives K2 = 1.0. Table 13.4 for a plane-bed stream gives K3 = 1.1. Since both D50 and D95 are much less than their threshold values (2 mm and 20 mm, respectively), K4 = 1.0 and there is no reduction in pier scour due to armoring. Substituting these values into Equation 13.7 gives Ys 3 0.65 0.43 ------ = 2.0 × 1.1 × 1.0 × 1.1 × 1.0 ------ 0.78 = 0.994 10 10 or Ys = 9.94 ft. The total scour at the pier is the sum of the pier scour and contraction scour, as well as any long-term and general scour. If the pier were near the abutment, abutment scour would also be included.
Example 13.4 Pier scour for angle of attack ≠ 0 For the information given in Example 13.3 for pier scour, compute the pier scour for an angle of attack of 15°. Solution For L/a = 11.67 and an angle of attack of 15°, Table 13.3 is used to interpolate K2 = 2.46. Alternately, Equation 13.9 can be used to compute K2 directly as 0.65 35 K 2 = cos 15° + ------ sin 15° = 2.456 3
Substituting this value of K2 into Equation 13.7 with the other coefficients found in Example 13.3 gives Y ------s = 0.994 × 2.46 = 2.445 10 or Ys = 24.45 ft. An angle of attack significantly greater than 0° obviously can have a huge effect on pier scour if L/a is significant. Good bridge design should make every attempt to guide flow through the bridge opening parallel to the piers. Note that round piers are the safest to use if the angle of attack is uncertain or varies from flood to flood.
Section 13.4
Bridge Scour Computational Procedures
533
Example 13.5 Computation of K4 Compute a value of K4 for use in pier scour. The pier has a diameter of 3 ft with a water depth of 10 ft and velocity immediately upstream of the pier of 14 ft/s. The bed material consists of particle sizes D50 = 4 mm (0.013 ft) and D95 = 25 mm (0.08 ft). Solution For the D50 material (0.013 ft), the critical velocity is determined with Equation 13.13 as V cD =11.17 × 10
1⁄6
50
× 0.013
1⁄3
= 3.86 ft/s
With this critical velocity, the approach velocity for initial scour is computed with Equation 13.12 as V icD
50
0.013 = 0.645 ------------- 3
0.053
( 3.86 ) = 1.87 ft/s
For the D95 material (0.08 ft), the two velocities are V cD
95
= 11.17 × 10
1⁄6
× 0.08
1⁄3
= 7.06 ft/s
and V icD
95
0.08 = 0.645 ---------- 3
0.053
( 7.06 ) = 3.76 ft/s
With the velocities for the two grain sizes known, Equation 13.11 is used to compute the velocity ratio as 14 – 1.87 V R = --------------------------- = 121.3 3.86 – 3.76 Substituting the velocity ratio into Equation 13.10 gives K 4 = 0.4 ( 121.3 )
0.15
= 0.82
The coarser bed materials result in armoring of the streambed and an 18 percent reduction in maximum scour depth.
Scour for Complex Pier Foundations – A complex pier foundation requires a special analysis for estimating depth of scour. These situations occur when the pier footing or pile cap is exposed to the water’s flow. Continued scour may eventually expose the pile structure supporting the cap or footing and pier. Figure 13.17 illustrates a bridge crossing with the cap and pilings exposed to scour action, representing a complex foundation scour situation. Scour is analyzed separately for the different components of the pier structure: the pier, the footing/cap, and the exposed piles below the footing/cap. Variations of Equation 13.7 are used to compute scour for each of the three components. Scour from each is then summed to obtain total pier scour. Different cases for complex pier foundations include when the bottom of the footing/ cap is below the channel invert with only partial exposure of the footing/pier (Figure 13.8 approximates this case), when the bottom of the footing or cap is above the invert with full exposure, and when the pile group below the footing/cap is exposed (Figure 13.17). For full exposure of the footing/cap, the footing scour is computed from an “equivalent” pier width. For partial exposure of the footing/cap, the local velocity component acting on the footing/cap is estimated from Equation 13.14
534
Mobile Boundary Situations and Bridge Scour
Chapter 13
or from Figure 13.18 and used to estimate footing/cap scour. When piling groups are exposed, alignment of the pilings and the height of exposure are important variables used to estimate piling scour. Refer to HEC-18 (FHWA, 2001) for a complete discussion of these scour component analyses.
Figure 13.17 Piling and footing exposure, Savage River at Denali National Park, Alaska.
FHWA
Figure 13.18 Local velocity and depth for an exposed footing.
10.93y ln ------------------f + 1 V ks ------f = -------------------------------------V2 10.93y 2 ln ------------------- + 1 k s
(13.14)
where Vf = average velocity in the flow zone below the top of the footing (ft/s, m/s) V2 = average adjusted velocity in the vertical direction of the flow approaching the pier (ft/s, m/s); see HEC-18 for a complete definition of V2 yf = distance from the bed after degradation, contraction, and pier stem scour to the top of the footing (ft/s, m/s)
Section 13.4
Bridge Scour Computational Procedures
535
Debris Impact – The Harrison Road Bridge Failure Late in the afternoon of May 26, 1989, a 140 ft (43 m) span of a temporary bridge carrying Harrison Road over the Great Miami River at Miamitown, Ohio collapsed suddenly, dropping about 40 ft (12 m) into the flooding river (NTSB, 1990a). Two vehicles fell into the opening and two lives were lost. Witnesses indicated that the river was carrying a large amount of debris, which was striking the pile bents supporting the temporary bridge. Investigations by the NTSB found that the design of the temporary bridge did not account for lateral loadings from debris or debris impact and that the county engineer failed to close the bridge when it was experiencing the debris impact. Most streams carry some amount of debris during flood conditions. Depending on the discharge and velocity, tractor-trailer trucks, large storage tanks, trees, and even buildings can be carried into the bridge structure by the current.
The situation becomes even more severe when water impinges on the superstructure of the bridge and the debris strikes the actual bridge rather than just the piers. Debris buildup and impact should be considered during most bridge designs. HEC-RAS can simulate the impact that debris buildup at bridge piers has on water surface profiles and can assist in evaluating the increased velocities through the bridge due to the debris. However, it is not appropriate for computing debris forces on the piers. Evaluating impact forces on permanent or temporary piers should be performed separately by the engineer and the piers should be designed accordingly. Where debris is expected, the upstream side of each pier should be streamlined as much as practical to deflect debris and not allow significant accumulation.
ks = grain roughness of the bed; normally taken as the D84 size of the bed material (ft, m) y2 = adjusted flow depth directly upstream of the pier, including degradation, contraction, and pier stem scour (ft, m) Complex pier foundations are not directly handled by HEC-RAS scour procedures, but are normally analyzed by the engineer outside of the program. An exception is the case in which the footing/cap is only partially exposed and an equivalent pier width is used to compute pier scour. The engineer can compute an equivalent pier width outside the program and then substitute this value in HEC-RAS to compute pier scour. For pier scour computations in which multiple support columns are used in lieu of a single solid pier, the scour depth between the columns depends on the column spacing. For multiple columns with less than five pier diameters spacing between each pier, the pier width a is the total projected width of all the columns in a single bent (the line of columns through the bridge), normal to the flow angle of attack. The correction factor for shape K1 is equal to 1, regardless of column shape, when the angle of attack exceeds 5°. The angle of attack correction factor is smaller for multiple piers. Engineering judgment should be used to estimate the appropriate reduction. Scour from Debris in Flow – When debris is present in the flow, consider the multiple columns and debris as a solid elongated pier. The appropriate L/a value and flow angle of attack are then used to determine K2. If debris is evaluated, consider the multiple columns and debris as a solid elongated pier. If the column spacing is more than five diameters and debris is not a problem, limit the scour depths to a maximum of 1.2 times the local scour of a single column. The scour problem is further complicated
536
Mobile Boundary Situations and Bridge Scour
Chapter 13
when multiple footing support piles are exposed to the flow. Consult HEC-18, Appendix D (FHWA, 2001) for further guidance when this situation is encountered. Figure 13.19 shows a bridge experiencing sufficient erosion from debris accumulation to fail a pier (angled in the picture) and the emergency replacement of the pier (concrete-encased I-beam).
Figure 13.19 Emergency pier replacement, Silver Creek, Illinois.
As presented in Chapter 6, debris accumulation on piers may be simulated by HECRAS for computation of water surface profiles. However, the procedures for scour from debris given in Appendix D (FHWA, 2001) are not incorporated in the HEC-RAS scour analysis engine. The modeler should address pier scour with significant debris accumulation on piers and bridge superstructure outside of HEC-RAS. Pressurized Bridge Openings – When the bridge opening is under pressure (sluice gate or orifice flow in HEC-RAS), scour depths can increase dramatically due to the additional downward component of velocity for flow forced under the bridge. This downward component of velocity plus the increased intensity of horseshoe vortices around bridge piers has resulted in a 200- to 300-percent increase in pier scour under laboratory conditions. If the bridge embankment is overtopped in pressure flow, the increases in scour may be less due to the increased backwater caused by the weir flow and the reduction in discharge through the bridge opening. For information on pressure flow situations, see Appendix B of HEC-18 (FHWA, 2001). Where significant debris or ice is present on the piers or projected below the bridge superstructure, the flow will again be directed downward, thus increasing potential scour. Ice or debris on the pier may be modeled by increasing the width of the pier to account for the additional blocked area. Engineering judgment is required to estimate the appropriate pier width to use for debris or ice conditions. Appendix G of HEC-18 (FHWA, 2001) gives an analysis procedure for this situation. As presented in Chapters 6 and 12, HEC-RAS does address pressurized bridge flow and ice cover/jam situations, respectively, to compute a water surface profile. How-
Section 13.4
Bridge Scour Computational Procedures
537
ever, the procedures given in Appendices B and G of HEC-18 (FHWA, 2001) are not incorporated in the HEC-RAS bridge scour procedures. Where these conditions exist, the engineer should perform pier scour analyses outside of HEC-RAS. Scour Hole Top Width – The width of the scour hole associated with each pier may be estimated from the following equation (Richardson and Abel, 1993):
W = y s ( K + cot θ )
(13.15)
where W = top width of the scour hole measured from each side of the pier or footing (ft, m) ys = scour depth (ft, m) K = bottom width of the scour hole as a fraction of the scour depth θ = angle of repose of the bed material (ranges from about 30° to 44°) The range in top width is normally from 1.0 to 2.8ys, with a top width of 2ys suggested for practical applications. Figure 13.20 shows the profile of a typical scour hole at a pier.
Figure 13.20 Typical top width of a pier scour hole.
Froehlich Pier Scour Equation. A second method to compute pier scour in HECRAS uses the Froehlich Equation (Froehlich, 1991). Although this equation is not included in HEC-18 (FHWA, 2001), it is available in HEC-RAS and has compared well against actual data (FHWA, 1996). The equation is
y s = 0.32φ ( a' ) where
0.62 0.47 0.22 – 0.09 y 1 Fr 1 D 50
+a
(13.16)
φ = correction factor for pier nose shape: 1.3 for square nose, 1.0 for rounded, and 0.7 for sharp-nose (triangular) shape aʹ = projected pier width with respect to the direction of the flow (ft, m)
538
Mobile Boundary Situations and Bridge Scour
Chapter 13
y1 = depth immediately upstream of the pier, at section 3, (ft, m) Fr1 = Froude Number for velocity and depth immediately upstream of the pier, at section 3 (dimensionless) D50 = bed-material grain size at which 50 percent is finer (ft, m) a = pier width (ft, m) Equation 13.16 is used for design purposes to estimate the maximum scour, with the +a term being a factor of safety. If the equation is used in an analysis situation, the +a term is dropped. However, HEC-RAS always includes this term in the computations. Maximum pier scour is limited to 2.4 times the pier width for Froude numbers of 0.8 or less and to 3 times the pier width for Froude numbers exceeding 0.8. These limitations also apply to the CSU equation.
Abutment Scour Abutment scour occurs along and at the toe of the abutment as flow moves around the abutment to pass under the bridge. At the upstream end of the abutment, scour is caused by horseshoe vortices, similar to those experienced at piers. At the downstream end of the abutment, another vortex can form as the abutment flow separates from the boundary, creating a wake vortex, as occurs on the downstream side of piers. This vortex can erode the downstream end of the abutment (refer to Figure 13.9). The depth and magnitude of abutment scour varies depending on the abutment shape and the abutment location with respect to the channel bank. Figure 13.21 shows the three main shapes for abutments: sloping or spill through, vertical, and vertical with wingwalls. Abutments may be in a portion of the channel, have the abutment toe at the channel bankline, or be set back from the bankline, allowing some floodplain flow through the bridge opening. Setback abutments normally have less scour than the first two types. As with piers, there have been a number of abutment scour equations developed
FHWA
Figure 13.21 Normal abutment shapes.
Section 13.4
Bridge Scour Computational Procedures
539
through laboratory modeling. Each of these many abutment equations has positive attributes; however, only two equations are recommended by the FHWA. These two methods, the Froehlich equation and the HIRE equation, are available in HEC-RAS to compute abutment scour. Froehlich’s Equation. Froehlich’s Abutment Live-Bed Scour Equation (Froehlich, 1989) was based on 170 live-bed scour measurements in laboratory flumes and is
y L' 0.43 0.61 -----s = 2.27K 1 K 2 ----- Fr +1 y a ya
(13.17)
where ys = abutment scour depth (ft, m) ya = average depth of flow on the floodplain (Ae/L) usually at the approach section, section 4 (ft, m) Ae = overbank flow area at section 4, the approach cross section, obstructed by the embankment (ft2, m2) L = length of embankment projecting into and normal to the flow (ft, m) K1 = coefficient for abutment shape from Table 13.5 K2 = coefficient for the angle of embankment to flow from Equation 13.18 Lʹ = length of active flow at the approach section, section 4, that is blocked by the abutment, or embankment at section 3, projected normal to flow (ft, m) Fr = Froude number of the approach floodplain flow at section 3 (dimensionless) The Lʹ term requires the modeler to estimate the length of embankment that is blocking the live flow—that is, the portion of the upstream approach section (section 4) carrying flow at a significant velocity, leading to a large conveyance concentrated in a relatively small floodplain segment of the cross section. The segments of the crosssection overbank having the most conveyance are usually located near the main channel. Other portions of the floodplain that are well removed from the channel may convey a large discharge but at a low velocity. This low-velocity portion of the approach section probably would not be considered as blocked by the embankment. A section plot of conveyance versus lateral distance is often used to estimate the length Lʹ. From the plot of conveyance versus distance, Lʹ is typically selected at the curve’s breakpoint, or significant slope change. When the modeler selects the flow distribution option, HEC-RAS computes conveyance at each subunit of the selected cross section, and these values can then be plotted. Figure 13.22 shows a plan view of a roadway embankment and the right floodplain at the approach section (section 4). In this example, the conveyance on the right floodplain, beginning at the projected location of the bridge abutment on section 4, is broken into thirds. As shown in the figure, two-thirds of the conveyance is carried near the channel. The remaining one-third occupies most of the right floodplain. For this example, Lʹ reflects the width of the live flow (concentrated conveyance), as shown in the figure. The remaining conveyance is characterized by low velocity with large cross-sectional area and should probably not be included in Lʹ. On a plot of conveyance versus distance, an obvious break in the slope of the line would be apparent at about the two-third conveyance point, yielding the estimate of Lʹ. HEC-18 (FHWA, 2001) recommends that if a significant portion of the floodplain flow is shallow, or at a low velocity, that portion likely should not be used in the effective length term Lʹ.
540
Mobile Boundary Situations and Bridge Scour
Chapter 13
FHWA
Figure 13.22 Determination of the length of embankment blocking live flow for abutment scour estimation. One-third of the right floodplain conveyance is carried in each of the three “stream tubes.” The low velocity of the rightmost tube represents more ponding than conveyance.
The (+1) term in Equation 13.17 is a safety factor that results in the equation’s predicting a larger depth than was measured in the laboratory experiments. It was added to the equation to envelop 98 percent of the measured data. If the equation is used in an analysis situation, the +1 term should be dropped. The equation is also not consistent in that, as Lʹ tends to zero, ys also tends to zero. Values of ys should still be significant even though Lʹ is very small. The value of K1 is estimated from Table 13.5. Table 13.5 Abutment shape coefficients, K1 K1
Type of Abutment Vertical
1.0
Vertical with wing walls
0.82
Spill through
0.55
The variable K2 is given by
θ 0.13 K 2 = ------ 90 where
(13.18)
θ < 90° if the embankment (on one side of the bridge opening) points downstream θ > 90° if the embankment (on the other side of the bridge opening) points upstream.
The angle θ is illustrated in Figure 13.23.
Section 13.4
Bridge Scour Computational Procedures
541
FHWA
Figure 13.23 Orientation of the angle of the embankment blocking the live flow.
Example 13.6 Abutment scour using the Froehlich equation. The bridge geometry for Example 13.1 will be used to compute abutment scour. The bridge has spill through abutments and the design discharge is 30,000 ft3/s. Flow moves through the bridge opening at a right angle to the embankment (θ = 90°). The bridge-opening width is 200 ft between the toe of each abutment and the prescour depth in the bridge opening is 10 ft. At the upstream approach section, the effective flow width is 400 ft, the channel width is 200 ft, and the depth is 12 ft. The bank elevations are 6 ft above the stream invert. The bridge embankment/abutment extends into the flow of the approach section by 80 ft on the right and 120 ft on the left. Compute the scour depth at each abutment. Assume the depth at both abutment toes (y1) is 10 ft. For the Right Abutment L = Lʹ = 80 ft Ya = 12 – 6 = 6 ft The length of embankment in the flow path divided by the depth at the abutment toe is L/y1 = 80/10 = 8 < 25. If the abutment toe were set back from the channel bank, a smaller depth at the abutment toe, representing overbank flow depth, would be appropriate. The various parameters for the Froehlich Equation are found as follows. K1 = 0.55 from Table 13.5 for a spill-through abutment. Equation 13.18 gives K2 = (90/90)0.13 = 1.0. The Froude Number for the portion of the approach section blocked by the right bridge embankment must be computed. The velocity for this portion is found by accessing the HEC-RAS output at the approach section (section 4) to determine the average velocity and depth. Assuming that the floodplain is level, the depth is 6 ft (depth of flow less the bank height), and the average velocity in the right overbank is 5 ft/s gives the Froude number as 5 - = 0.36 Fr = --------6g Equation 13.17 is now used to give
542
Mobile Boundary Situations and Bridge Scour
Chapter 13
Ys 80 0.43 0.61 ------ = 2.27 × 0.55 × 1.0 ------ 0.36 + 1 = 3.04 6 6 or Ys = 18.2 ft The depth of the abutment scour is 18.2 ft at the toe of the right abutment. Contraction scour would be added to obtain total scour. If a pier were present near the toe, the pier scour would also be included. For the Left Abutment L = Lʹ = 120 ft Ya = 6 ft Y1 = 10 ft The length of embankment in the flow path divided by the depth at the abutment toe is L/y1 = 12. From the HEC-RAS output for the left overbank portion blocked by the road embankment, the depth is 6 feet and the average velocity is 4.8 ft/s. The Froude number is 4.8- = 0.345 Fr = --------6g Equation 13.17 is again applied for the left abutment to give Ys 0.61 120 0.43 ------ = 2.27 × 0.55 × 1.0 --------- 0.345 + 1 = 3.37 6 6 or ys = 20.2 ft
HIRE Equation. The Highways in the River Environment program (Richardson et al., 2001), sponsored by FHWA, developed the HIRE equation, which is applicable when the ratio of the projected abutment (embankment) length (Lʹ) to flow depth (y1) exceeds 25. The HIRE equation was developed from USACE data for live-bed conditions at the end of spur dikes in the Mississippi River. Flow moving around the end of a dike head behaves similarly to flow moving around a bridge abutment. It is available in the HEC-RAS bridge scour routine for determining scour at bridge abutments and has the form
y 0.33 K 1 ----s- = 4Fr 1 ---------- K 2 0.55 y1
(13.19)
where ys = scour depth (ft, m) y1 = depth of flow in the bridge opening at the toe of the abutment on the overbank or in the main channel (ft, m) Fr1 = Froude Number based on the velocity and depth in the bridge opening adjacent to and upstream of the abutment K1 = abutment shape coefficient from Table 13.5 K2 = coefficient for skew angle of abutment, as found for the Froehlich Equation For abutments skewed to the direction of flow, Figure 13.23 may help determine the appropriate angle for which to compute the correction factor for skew in Equation
Section 13.4
Bridge Scour Computational Procedures
543
13.18. Equations 13.17 and 13.19 may be used for either live-bed or clear-water abutment-scour conditions. The equations give the maximum scour; thus engineering judgment should be applied when evaluating the results of the equations.
Example 13.7 Abutment scour using the HIRE equation. For the data in Example 13.6, assume the abutment toe is set back from the channel bank a short distance and that the flow depth at each abutment toe is 4 ft. Assume that the velocity at this location, found from HEC-RAS output, is 10.1 ft/s. Compute the scour depth at each abutment. For the Right Abutment L = Lʹ = 80 ft ya = 6 ft Assume that the depth at the abutment toe is y1 = 4 ft The length of embankment in the flow path divided by the depth at the abutment toe is L/y1 = 80/4 = 20 < 25. The Froehlich equation is still applicable and the right abutment scour (18.2 ft) is unchanged from the Froehlich example For the Left Abutment L = Lʹ = 120 ft ya = 6 ft y1 = 4 ft The length of embankment in the flow path divided by the depth at the abutment toe is L/y1 = 120/4 = 30 > 25. The HIRE equation is applicable and should be used. The values of K1 and K2 are the same as in the previous example for the left abutment. Fr is recomputed for the new location required for the HIRE equation, adjacent and just
544
Mobile Boundary Situations and Bridge Scour
Chapter 13
upstream of the abutment. Velocity values at this location on cross section 3 and BU should be examined and an appropriate velocity selected by the modeler. The Froude number is 10.1 Fr = ---------- = 0.89 4g Equation 13.19 gives y 0.33 0.55 -----s = 4 × 0.89 × ---------- × 1.0 = 3.85 0.55 4 or ys = 15.4 ft
Example 13.8 Abutment scour for flow not parallel to abutments. For the situation in Example 13.6, compute the abutment scour for the roadway embankment oriented as shown in Figure 13.23, where θ = 15°. For the Right Abutment The length of embankment must be reduced to reflect the angle of approach, giving Lʹ = 80 cos15° = 77.3 ft A new value for K2 is needed to reflect the angle of the embankment. From Figure 13.23, the left embankment is pointing upstream (θ = 90 + 15 = 105°) and the right abutment is pointing downstream (θ = 90 – 15 = 75°). Equation 13.18 gives 75 0.13 K 2 = ------ = 0.977 90 The balance of the variables in the previous example are unchanged. Therefore, Equation 13.17 gives ys 77.3 0.43 0.61 ----- = 2.27 × 0.55 × 0.977 ---------- 0.36 + 1 = 2.96 6 6 or ys = 17.8 ft For the Left Abutment Again, revised values of Lʹ and K2 are needed: Lʹ = 120 cos15° = 115.9 ft 105 0.15 = 1.023 K 2 = --------- 90 Equation 13.17 is again applied to give ys 0.61 115.9 0.43 ----- = 2.27 × 0.55 × 1.023 ------------- 0.34 + 1 = 3.36 6 6 or ys = 20.2 ft
Section 13.5
13.5
Computing Scour with HEC-RAS
545
Computing Scour with HEC-RAS Bridge scour analysis with HEC-RAS is highly automated; all the equations, techniques, and most informational needs are built into the program or automatically called from the appropriate cross-section output of the program. After calibration of the model and operation with the design flood and other events, little additional input is necessary to compute bridge scour. With the computation of the design flood event for scour, the flow distribution option must be used to determine velocity, depth, conveyance, and other necessary variables at the three cross sections used to define the scour computations. These sections are at the start of contraction, or the approach section (Section 4), the section just upstream of the bridge (Section 3), and the upstream bridge section (BU) developed by the program. The user can specify which upstream cross section is to be used for the approach section. These sections and their locations are discussed and illustrated in Chapter 6, and shown in Figure 13.6. The Flow Distribution option, presented in Section 10.4 and addressed in the next section, enables HEC-RAS to compute the key variables in a series of vertical slices across specified cross sections. The program determines the velocity and depth for each slice, including the variables at each pier. The modeler must supply sediment characteristics, such as D50 and D95, and the pier nose shape. While scour analysis procedures are automated, the modeler can still modify any default values selected by the program. The example problem used in this section to demonstrate the bridge scour analysis is the same as that shown in the HEC-RAS manual. This problem is used in HEC18 (FHWA, 2001) to show the step-by-step computation processes. The reader should refer to HEC-18 for additional details.
Applying the Flow Distribution Option The Flow Distribution Option is discussed in Chapter 10. This option is needed to specify how the cross section is to be subdivided for each of the three segments (left and right overbank, and the channel) of the section. The modeler may subdivide each of the three parts of the section into a maximum of 45 subunits. For the example in Figure 13.24, the modeler has chosen to subdivide the left and right floodplains into five subunits each and the channel into 20 subunits. The number of subunits is reflective of the modeler’s judgment and the channel, pier, and abutment geometry. More subunits are typically needed for the channel than for the overbank sections, and more are needed as the number of piers increases. Sensitivity tests that vary the number of subunits are normally performed to see if the computed scour is significantly affected. For each subunit, the program computes the percentage of flow carried, flow area, wetted perimeter, conveyance, hydraulic depth, and average velocity. The information for each subunit is stored for later access by the bridge scour analysis. Although all cross sections in the model could be included in the flow distribution option, HEC-RAS uses only the three cross sections previously cited for the bridge scour computations. An example of the output for a flow distribution analysis is shown in Figure 13.25. After profile computations are performed with the Flow Distribution Option, the results may be viewed from the Detailed Cross Section Output Table, by selecting Type, Flow Distribution.
546
Mobile Boundary Situations and Bridge Scour
Chapter 13
Figure 13.24 Flow distribution template.
Figure 13.25 Flow distribution output.
Bridge Scour Data After applying the Flow Distribution option and running the model for the design event, a bridge scour analysis is performed by selecting the Hydraulic Design icon (HD button) from the main window in HEC-RAS. The Hydraulic Design – Bridge Scour template appears, shown in Figure 13.26. There are three tabs on the template for the modeler to input additional data used for the scour analysis, one tab each for contraction, pier, and abutment scour. Contraction Scour. All the variables in Figure 13.26 were obtained automatically by the program from the appropriate cross sections in the bridge-reach model. For the program to compute contraction scour, the modeler simply specifies the D50 size for
Section 13.5
Computing Scour with HEC-RAS
547
Figure 13.26 Initial template for contraction scour.
the bed material and a water temperature for computing the K1 value. The modeler can select either the live-bed or clear-water scour equation or let HEC-RAS select one automatically, based on a critical-velocity computation and comparison to the average channel or floodplain velocity at Section 4, as described in Section 13.4. The program assumes that the approach cross section (start of contraction) is the second one upstream of section BU. If this is not the case, the modeler can specify the approach section. Pier Scour. HEC-RAS can compute pier scour using either the CSU equation (default method) or the Froehlich Pier Scour Equation, which is not included in HEC18. The modeler is required to enter the pier shape (K1), the angle of attack for flow impinging on the piers, the bed condition (K3), and the D95 size for the bed material. The D50 size is taken by the program from the data input for contraction scour. The program takes all the remaining necessary variables from the appropriate crosssection location. Figure 13.27 displays the pier scour template with user-specified values supplied. The maximum velocity is found for section 3, just upstream of the bridge. The modeler can direct the program to use the maximum velocity in the cross section for each pier or to use the velocity directly upstream from each pier (varying the velocity at each pier). Similarly, the actual depth or the maximum depth can be used at each pier. The φ and aʹ symbols on the template refer to the Froehlich equation, if that equation is selected for pier scour computations. Abutment Scour. HEC-RAS computes abutment scour using either the Froehlich or HIRE equations. The abutment scour template is shown in Figure 13.28. The modeler need only specify the abutment type and the program fills in all other variables needed, although any of these default selections can be overridden. The modeler
548
Mobile Boundary Situations and Bridge Scour
Chapter 13
Figure 13.27 HEC-RAS template for pier scour analysis.
should check the toe of embankment information extracted by HEC-RAS from the cross-section data. If the abutment is skewed with the flow, the actual value should replace the default value of zero. If this is done, the program automatically adjusts the Lʹ and L that the user has input. The modeler should also examine the values of embankment length (Lʹ and L) computed by the program to ensure that the values represent the portion of the embankment reflecting the active flow width. In Figure 13.28, both L and Lʹ have the same value, which may not represent the actual situation.
Total Scour Following the entry of all required data and the data checking automatically performed by the program, the bridge scour computations are performed and the results are plotted in the bridge cross section. The individual pier scour is added to the contraction scour, as is the abutment scour. Figure 13.29 shows a zoomed-in view of the computed bridge scour based on specifying the use of the cross-section maximum velocity at each pier. A table may also be displayed with a summary of the bridge scour computations. FHWA criteria recommend using the maximum single-pier scour depth at each pier. Because the cross section through the bridge may not be fixed, allowing the channel to shift, the maximum scour could conceivably occur at any pier. Figure 13.30 shows the resulting display. The shaded area on Figure 13.30 represents the contraction scour, with the individual scour holes representing the maximum pier or abutment scour. Because the scour computations use simple equations and are easily performed, the hydraulic design computations are never saved. Therefore, when the bridge scour template is reopened, the computations have to be rerun for viewing.
Section 13.5
Computing Scour with HEC-RAS
Figure 13.28 Abutment scour data editor.
Figure 13.29 Total scour plot.
549
550
Mobile Boundary Situations and Bridge Scour
Chapter 13
Contraction Scour
Abutment Scour Maximum Pier Scour
FHWA
Figure 13.30 Revised plot of total scour, showing the maximum depth of scour at each pier.
13.6
Cautions and Concerns for Bridge Scour The following items must be carefully considered during a bridge scour analysis: • Before performing scour computations, closely review the profiles and the contraction and expansion of the flood flow through and around the bridge opening. The hydraulic computations should be reasonable and defensible. The right or left ineffective flow area elevation constraints should be exceeded, (or not exceeded) both upstream and downstream of the bridge for each flood event, as discussed in detail in Section 6.5. The distribution of flow in the overbank areas upstream and downstream of the bridge should be similar. The reach lengths for the expansion and contraction should be appropriate, as discussed in Chapter 6. • A proper scour analysis cannot be performed without sediment data. Sediment samples from the main channel and overbank areas associated with the bridge (and also at section 4, if possible) should be obtained, with an analysis of the particle-size distribution. Estimated data do not give defensible answers and may be difficult to justify under litigation. • Do not neglect an evaluation of any long-term degradation changes before performing the bridge scour analysis. Many rivers and streams have been modified in the past and the effects of these changes are ongoing. • Perform the scour analysis using different subdivisions of the appropriate cross sections in the flow distribution option. In the example given in Section 13.5, the channel was broken into 20 subunits. In this case, recomputing the scour with the channel subdivided into 10 subunits resulted in no significant change in scour. The modeler should run a sensitivity test on the scour compu-
Section 13.7
Sediment Discharge Relationships
551
tations for two or three subdivision arrangements of the channel and/or the overbank portions of the cross section. • The data required for most of the equations is taken directly from cross-section output generated by HEC-RAS, along with the program default values. The modeler should review these data for appropriateness and make changes, as necessary. • The scour computations give conservative answers, generally yielding values for the maximum possible scour. Engineering judgment may be used to modify the computations, reflecting site-specific characteristics. • The bridge design should be reevaluated following scour computations. If the contraction scour is large for a proposed bridge, the bridge opening may be too small. Is there a need for relief openings to reduce flow and velocity through the main bridge opening? Are the abutments and piers properly aligned with the flow pattern? Are the piers too close together, allowing overlapping scour holes and deeper resulting scour? Is the bridge crossing location acceptable? Are river training works (such as dikes, riprap blankets, and channel and overbank paving through the bridge) needed to prevent lateral migration? Is the flood flow too complex to be addressed with a one-dimensional model? Are two-dimensional models or a physical model required?
13.7
Sediment Discharge Relationships To analyze sediment transport, scour, and deposition along a reach of stream, knowledge of the relationship between the water discharge (Q in ft3/s or m3/s) and the corresponding sediment discharge (Qs in tons/day) for that flow is necessary. The most accurate method of computing this relationship is from a discharge gage, where suspended sediment samples are also periodically taken. Over the sampling period, these gaged data may be accumulated and plotted to estimate an appropriate Q–Qs relationship, usually plotted as a straight line on logarithmic-scale plotting paper. Figure 13.31 shows a plotted sediment rating curve for actual river and sediment gage data. The measured data are typically not as linear as seen on Figure 13.31, often exhibiting a large scatter. However, actual sediment data are even rarer than discharge data. Where the Q–Qs relationship is needed at a cross section or along a stream reach, it is often computed from a selected sediment transport equation. To develop the sediment discharge relationship for a cross section or reach, the engineer should obtain sediment samples of the bed material and have a sediment gradation (particle size versus percent finer than, shown on Figure 13.32) prepared for the sample(s). If suspended sediment samples can be obtained, these data would also be useful. The sediment data are needed to select one or more of the sediment transport equations in HEC-RAS to compute a sediment rating curve. To solve for the sediment transport rate, these equations require one or more representative grain sizes (often a D50 diameter) and information on the bed material gradation. The sediment transport equations also require information concerning depth of flow, average velocity, energy slope, and effective channel width, which are obtained from the HEC-RAS output. Other data, such as water temperature, particle shape factor, and sediment density may be estimated by the modeler or the program default values may be accepted. The engineer should obtain the sediment data and prepare and operate the hydraulic simulation to compute all needed hydraulic parameters. The
552
Mobile Boundary Situations and Bridge Scour
Chapter 13
Figure 13.31 Example of a sediment rating curve from actual stream data, Elkhorn River at Waterloo, Nebraska.
Figure 13.32 Example of a gradation curve for channel bed material generated by HEC-RAS.
Section 13.7
Sediment Discharge Relationships
553
sediment transport calculations are performed only following a steady or unsteady flow analysis by HEC-RAS. Many sediment transport equations have been developed. However, the majority of these equations are appropriate for only certain gradation ranges of bed material. As first presented in Chapter 11, the sediment transported by a river may be subdivided into wash load, suspended bed material load, and bed load, as shown in Figure 13.33.
Figure 13.33 Subdivision of total sediment load.
The wash load represents fine grain particles (usually clays and silts) not found in the stream bed. For steeper streams having gravel beds, sand could also be included in the wash load. The wash load volume is a function of the upstream characteristics (sediment supply) of the drainage area, and it remains in suspension unless the stream velocity approaches zero (such as in a reservoir). Wash load is not included in the sediment transport equations, but may be added by the engineer. In many projects (and especially for channel modifications), the primary interest of the engineer is the suspended bed material and bed load transported because stream modifications often affect only these materials. Suspended bed material consists of the particles moving in the water column that are also found in the bed material. This material is maintained in suspension so long as stream velocities and the corresponding upward turbulence are sufficient to do so. Bed load refers to those heavier particles which cannot be held in suspension, but move in contact with the stream bed (by bouncing, rolling, and so on). Ranges of wash load, suspended bed load, and bed load cannot be generalized for all streams. However, large rivers such as the Mississippi or Missouri Rivers in the United States carry more than 50 percent of their total sediment load as wash load. Mountain streams may have little to no wash load. Bed load is often estimated as 5–15% of the total sediment load (USACE, 1990), which could result in a suspended bed material load comprising 20–30% of the total sediment load on many streams. These percentages can vary widely. Sediment transport equations normally focus on computing the water discharge versus sediment discharge for only the suspended bed material and/or bed load for those grain sizes found in the bed material, as these portions are most affected by stream modifications. Also, the various equations for sediment transport are appropriate only for certain ranges of sediment gradation. If the engineer has or can collect sediment samples along the reach of stream under study, an appropriate sediment transport equation may be used with the stream hydraulic parameters to compute an estimated sediment transport relationship. Table 13.6 (USACE, 1998a) summarizes the minimum range of parameters applicable for each of the sediment functions available
554
Mobile Boundary Situations and Bridge Scour
Chapter 13
for use in HEC-RAS. While the various functions were developed for a specific range of particle gradations, there have been successful applications of the transport equations for particle sizes outside of this range. The suitability of any selected function for accurately computing the sediment rating curve for particle sizes outside the derived function range would require actual sediment transport measurements for comparison to the computed transport rate. The sediment transport functions in HEC-RAS reflect the solution methods used at the USACE Waterways Experiment Station in the Sediment Analysis Methods (SAM) computer program (USACE, 1998a), a USACE library of separate programs to address various aspects of channel stability, design, and analysis. The normal depth and channel stability features described in Chapter 11 are also taken from the SAM procedures. Six sediment transport functions are available to compute a sediment rating curve at a desired cross section or for a selected study reach. Table 13.6 Parameter ranges for HEC-RAS sediment transport functions (USACE-WES).
Function
Particle Diameter Range, mma
Ackers-White (flume)
Median Particle Sediment Diameter, Specific mm Gravity
Average Channel Velocity, ft/s
Channel Depth, ft
Friction Slope
Channel Width, ft
Water Temp.,°F 46–89
0.04–7.0
N/A
1.0–2.7
0.07–7.1
0.01–1.4
0.00006–0.037
0.23–4.0
Engelund-Hansen (flume)
N/A
0.19–0.93
N/A
0.65–6.34
0.19–1.33
0.000055–0.019
N/A
45–93
Laursen (field)
N/A
0.08–0.7
N/A
0.068–7.8
0.67–54
0.000021–0.0018
63–3640
32–93
Laursen (flume)
N/A
0.011–29
N/A
0.7–9.4
0.03–3.6
0.00025–0.025
0.25–6.6
46–83
0.4–29
N/A
1.25–4.0
1.2–9.4
0.03–3.9
0.0004–0.02
0.5–6.6
0.062–4.0
0.093– 0.76
N/A
0.7–7.8
Meyer-Peter-Müller (flume) Toffaleti (field) Toffaleti (flume) Yang (field-sand) Yang (field-gravel)
0.07–56.7b 0.000002–0.0011 b
63–3640
32–93 40–93
0.062–4.0
0.45–0.91
N/A
0.7–6.3
0.07–1.1
0.00014–0.019
0.8–8
0.15–1.7
N/A
N/A
0.8–6.4
0.04–50
0.000043–0.028
0.44–1750
32–94
2.5–7.0
N/A
N/A
1.4–5.1
0.08–0.72
0.0012–0.029
0.44–1750
32–94
a. Material ranges: 0.002 < clay < 0.004 mm; 0.004 < silt < 0.0625 mm; 0.0625 < sands < 2 mm; 2 < gravels < 64 mm b. Hydraulic radius
Sediment Transport Equations The six equations available to compute the sediment transport relationship in HECRAS are the Ackers-White, Engelund-Hansen, Laursen, Meyer-Peter-Müller, Toffaleti, and Yang functions. Each function was developed from laboratory flume and/or field studies of sediment in motion. Each equation is generally applicable for a range of sands or gravels or both. The engineer should take care in applying any equation to gradations outside the ranges for which the equation was derived without understanding the potential inaccuracies in the results associated with this decision. Each sediment transport function and its applicability are briefly presented in the following paragraphs. Further information on each function and the actual equations associated with each function are given in the Hydraulics Reference Manual, in Manual No. 54 (ASCE, 1975) and in the references cited. Ackers-White Function. The Ackers-White sediment transport equation (Ackers and White, 1973) was developed from more than one thousand laboratory flume studies, primarily with sands. The transport function is applicable for noncohesive sands
Section 13.7
Sediment Discharge Relationships
555
and for bed form configurations including ripples, dunes and plane bed. Additional experiments following Ackers and White’s original publication extended the particle size range applicable for the equation to 7 mm (fine gravel). Engelund-Hansen Function. The Engelund-Hansen sediment transport equation (Engelund, 1966, Engelund and Hansen, 1967) was extensively based on flume data using four median (D50) sand particle diameters (0.19, 0.27, 0.45, and 0.93 mm). This transport function is most appropriate for sand-bed streams with a substantial suspended sediment load. The channel bed material should have a minimum particle diameter of 0.15 mm or greater and not have a wide variation of sand gradation about the median particle diameter. The appropriate bed form for the function is dunes. Laursen Function. The Laursen sediment transport equation (Laursen, 1958) was based on flume data and supplemented with field observations of sediment discharge. Laursen’s original work was for sand-bed streams and the flume experiments used median particle sizes ranging from 0.11–4.08 mm. Later work by Copeland (Copeland, 1989) extended Laursen’s equation to include gravels up to a median size of 29 mm (coarse gravel). Meyer-Peter-Müller Function. The Meyer-Peter-Müller sediment transport equation (Meyer-Peter and Müller, 1948) was based primarily on experimental flume data, but has been widely and successfully applied to rivers having coarse bed material. The data used in developing Meyer-Peter-Müller was from rivers with little to no suspended sediment, therefore the function probably should not be applied to rivers with appreciable suspended sediment. The equation has performed well for gravelbed streams and for sand-bed streams not carrying significant suspended load. Toffaleti Function. The Toffaleti sediment transport equation (Toffaleti, 1968) was developed for sand-bed streams from an extensive combination of flume and actual stream data. The actual river data was for gage sites on the Mississippi and Rio
556
Mobile Boundary Situations and Bridge Scour
Chapter 13
Grande Rivers, for the Middle Loup and Niobrara Rivers in Nebraska, and for three streams in the Lower Mississippi River Basin. The flume data used median particle diameters ranging from 0.3 to 0.93 mm. Toffaleti’s equation has been applied for sediment transport studies on many actual streams, including the Mississippi River, and has been found to give good results for median sand diameters as small as 0.095 mm. The upper limit for application of the Toffaleti function is very fine gravels (D < 4 mm) Yang Function. The Yang sediment transport equation (Yang, 1973), also referred to as the Yang Stream Power Function, was developed from both flume and actual stream data for sand-bed streams. Particle sizes ranged from very fine sand (0.062 mm) up to coarse sand (1.7 mm). Yang later extended his method to include gravelbed streams (Yang, 1984) up to a particle diameter of 7 mm (fine gravel).
Cautions in Applying Sediment Transport Equations There are many additional sediment transport equations available in sediment transport programs or in the literature besides the six currently in HEC-RAS. The engineer should evaluate all transport equations appropriate for the bed gradation of the study stream. Each equation can give widely different results, especially for streams having bed sediment outside of the appropriate range for which an equation was developed. Figure 13.34 shows a comparison of the sediment rating curves computed by several different transport functions, compared to actual stream sediment transport data. The engineer should be aware of the many factors influencing sediment transport capacity of a stream and address these through sensitivity tests and/or field investigations as much as practical. These factors and concerns include water temperature, sediment concentration, sediment specific gravity, particle shape, settling velocity, and bed forms. • A large difference in sediment transport capacity can result for even a few degrees change in the water temperature. Colder water has a higher viscosity and an increased ability to transport sediment. Colder temperatures can cause bed forms to change from dunes to plane bed. Estimates of water temperature should be representative of the time of year of most interest to the study objectives. For continuous period of record computations, water temperature should be adjusted at least monthly. Sensitivity tests are advised to estimate the impact of a varying water temperature on sediment transport for the design flood event or for a key time period of interest. • Sediment concentration can have a large impact on sediment transport of a stream. Fine sediment concentrations greater than 10,000 ppm start to significantly increase the water viscosity and thus increase the ability of a stream to transport sediment. This ability increases as the concentration increases (Colby, 1964). The majority of U.S. streams have concentrations well below the 10,000 ppm threshold, even during flood conditions, but any stream under study should be evaluated for the presence of potential high sediment concentrations. The sediment transport menu in HEC-RAS includes an option to incorporate specific sediment concentrations in the sediment transport computations, if such concentration data are available. • Sediment specific gravity can vary from near one to as high as four, with an average of about 2.6–2.8. Varying specific gravity can affect the settling velocity of the particle and in turn affect the sediment transport characteristics of
Section 13.7
Sediment Discharge Relationships
557
Figure 13.34 Sediment rating curves versus actual stream data.
the study stream. The default in HEC-RAS is 2.65, but this assumption must be checked by the engineer for the study stream’s sediments. • Particle size can vary from near spherical to very oblong in shape. Shape variations also affect the particle settling velocity. Particle shape is included in sediment transport equations as a shape factor and is most important for medium sands and larger (D > 0.25 mm). • Settling velocity affects the suspended sediment volume and has been addressed in separate studies by Toffaleti (Toffaleti, 1968), Van Rijn (Van Rijn, 1993) and Rubey (Rubey, 1933). All three methods of computing fall velocity are available in the HEC-RAS sediment capacity analysis, along with the default method which uses the technique applicable for each of the six sediment transport functions. • Some functions are only appropriate for certain bed forms, such as dunes. The stream under study should exhibit the bed form for which the selected transport function is applicable.
558
Mobile Boundary Situations and Bridge Scour
Chapter 13
Applying the Equations with HEC-RAS Each equation may be applied separately or simultaneously with any of the other equations to compute a sediment rating relationship in HEC-RAS. When the engineer determines that the hydraulic results of a steady or unsteady flow analysis are acceptable, he or she completes the design and may open the Sediment Transport Capacity window (shown in Figure 13.35).
Figure 13.35 Sediment Transport Capacity window in HEC-RAS.
In this window, the engineer defines a Sediment Reach (upstream and downstream cross-section boundaries) and inserts the gradation of the bed material. Gradations for the right/left overbank may also be inserted, if available. The gradation may be selected with either a graphical or tabular display. The gradation for the channel bed material in Figure 13.35 was previously shown in Figure 13.32. The profiles (flows) are selected, and the various sediment transport functions are selected to indicate that they will be used by HEC-RAS in developing a sediment rating curve for each function. The default values for water temperature and specific gravity may be accepted by the modeler or modified, if judged necessary. The sediment rating curves are computed by clicking the Compute button. The computed relationships may be viewed by clicking either of the two buttons immediately below the gradation table on Figure 13.35. Clicking the button with the single curve shown displays the sediment rating curve computed for the selected sediment reach (Figure 13.36). The button with multiple curves displays a profile of sediment transported for a single discharge (one profile) at each cross section in the sediment reach (Figure 13.37) for each function selected.
Section 13.7
Sediment Discharge Relationships
559
Figure 13.36 Sediment rating curve for sediment reach for six transport functions.
Figure 13.37 Profile of sediment transported versus stream distance for six transport functions with a single discharge value.
560
Mobile Boundary Situations and Bridge Scour
Chapter 13
For Figure 13.36, the data may be displayed in either the graphical form shown, or as a table. For Figure 13.37, the modeler may select different flows (profiles) and transport functions individually or display all on the same plot. The sediment transport profile computations may also be displayed as a table. Only the grain sizes that are in the range of gradations appropriate for each function will be used and computed for a total sediment load. The modeler has the option to extend the range of each function beyond the limits of that function by selecting Options and instructing the program to do so by selecting Yes. The modeler should also pay close attention to the information in the warning box at the bottom of both plots. The selected function(s) should be appropriate for the type of bed material found in the study reach of stream. As shown in Figures 13.34 and 13.36, wide variations in sediment load can occur, depending on which sediment transport function is used. Only a function applicable for the study stream’s bed material should be employed. At a minimum, Table 13.6 should be used as a guide to select the appropriate function(s) for the particle sizes of interest. Finally, the sediment rating curve computed with HEC-RAS could be coded to a sediment transport program, such as HEC-6. The modeler would need to determine if the relationship found with HEC-RAS is sufficient, or if it should be increased to include grain sizes (especially wash load) outside of the range appropriate for each function. For channel modification projects, a sediment rating curve reflecting only the suspended bed material and the bed load is normally sufficient. For reservoir deposition analysis, the full rating curve, including the wash load, should be formulated. Guidance on this operation is found in different publications, including the USACE EM Sedimentation Investigations in Rivers and Reservoirs (USACE, 1995b).
13.8
Chapter Summary The vast majority of all steady or unsteady, gradually varied flow analyses are successfully and satisfactorily completed using a rigid cross-section boundary assumption; that is, the channel and overbank elevations are assumed not to change with time. Elevation changes normally occur very slowly for many soil types, especially for cohesive materials such as clay and silt. However, these changes may be much more rapid if noncohesive materials such as sand and gravel are present. Major flood reduction measures, such as reservoirs and channel modifications, require sediment investigations to determine the rate of scour or deposition and to estimate the end of the useful life for a reservoir, or how frequently deposition in the modified channel must be removed. These types of flood reduction measures would not be expected to fail or be destroyed during a flood event. Bridge crossings, however, may be seriously threatened or destroyed by scour of the channel within the bridge opening during a major flood event. The 1987 loss of the I-90 Bridge over Schoharie Creek in New York, due to pier scour, resulted in the death of ten people. It was a driving force for implementing the current program of periodic bridge scour evaluations by state highway departments throughout the United States as well as development of many of the methods, procedures, and references used routinely today. Scour analysis at bridges is needed to ensure that the bridges’ integrity and safety are not compromised during a flood event. Consequently, HEC-RAS includes the necessary procedures to analyze bridge scour for an existing or proposed bridge, as well as the ability to assist in the design of the bridge itself.
Section 13.8
Chapter Summary
561
Scour from different potential sources must be evaluated, with the first source of erosion being reach scour. Reach scour includes the overall scour for the entire reach of stream containing a bridge. This scour could be caused by upstream urbanization or by upstream reservoirs. Reach scour may also result from a moving headcut caused by past downstream channelization activities. Reach scour is determined by comparing changes in measured cross-section geometry over time (lower elevations due to scour) and estimating the total reach scour at the bridge, or by an analysis with a sediment transport program such as HEC-6. If a sediment transport program is employed, sediment rating curves may be generated using HEC-RAS in the Hydraulic Design mode. Six different transport equations are available to compute a sediment rating curve at any selected cross section and/or to evaluate changes in the relationship over a sediment reach. If reach scour is a concern, the scour geometry resulting from this erosion over the life span of the bridge should be included in the hydraulic profiles generated from HEC-RAS before initiating the actual bridge scour analysis. After reach scour is evaluated, the actual bridge scour is determined as the sum of the scour resulting from contraction into the bridge opening, from pier scour, and from abutment scour. HEC-RAS uses different equations, mainly developed under laboratory studies, to directly compute total scour for each of the three scour sources. The engineer may specify which of the available equations is used. HEC-RAS obtains values for most of the variables in any of the equations by accessing the fixed-bed hydraulic computations from previous program operations for one or more floods under study. These hydraulic profile computations also require use of the HEC-RAS flow distribution option, so that the velocities at individual piers and other key cross-section locations may be obtained for the appropriate scour equation. HEC-RAS has three separate screens that are accessed under the Hydraulic Design icon, one each for contraction, pier, and abutment scour. The engineer only need supply one or two values of certain variables per screen for the program to perform the scour computations. The scour equations all generally result in conservative estimates of scour depth; the engineer should evaluate the results for reasonableness and make adjustments as necessary. A stream may move laterally in the floodplain and this lateral scour may also constitute a potential danger to the bridge. While HEC-RAS cannot simulate this type of lateral movement, the overall bridge scour pattern should be evaluated with the understanding that the deepest portion of the scour could occur at any location within the bridge opening. In addition to hydraulic computations with HEC-RAS, it is important to obtain actual sediment samples of the bed material at the bridge site and to determine how the sediment gradation changes with depth. A proper bridge scour analysis cannot be accurately made without actual sediment data at the bridge site. Very large scour depths often mean that the bridge is an excessive constriction to flood flows. This situation requires a close monitoring of the scour situation for an existing bridge and possibly remedial measures to ensure an existing bridge’s safety. For a proposed bridge, excessive scour may force a reexamination of the bridge design, possibly widening the main bridge opening and/or providing supplemental relief openings at some distance from the main bridge opening.
562
Mobile Boundary Situations and Bridge Scour
Chapter 13
Problems 13.1 A trapezoidal channel is to be constructed with bottom width of 40 ft, side slopes of 3 horizontal to 1 vertical, and a bed slope of 0.0015 ft/ft. The channel is 2000 ft long, and the water depth at the downstream end is 4.0 ft. The bed of the channel is composed of Coarse to Very Coarse Sand (D50 = 1.00 mm). Using both the permissible maximum velocity and allowable bed shear (tractive force) methods, evaluate whether scouring could be a problem for this channel if the design discharge is 1000 ft3/s. a. Develop a channel model using the basic geometry of the channel and at each end and interpolating cross sections at 100-ft increments. Print a User Design Summary Table with the discharge, depth, velocity, and bed shear values for each cross section. b. The Army Corps of Engineers recommends a maximum channel velocity for Coarse Sand of 4.0 ft/s and an allowable bed shear stress of 0.07 lb/ft2. (Army Corps of Engineers EM 1110-2-1601 30 June 94, Table 2-5). Is the proposed design acceptable under either criterion? 13.2 Perform a bridge scour analysis for the channel geometry and 100-year flow data provided in files Prob13_2.g01 and Prob13_2.f01 on the CD accompanying this text. Use the hydraulic design functions in HEC-RAS. a. Set up flow distributions in the cross sections in the vicinity of the bridge. Starting with river station 10.37 and ending with river station 10.48, divide the overbanks into 5 subsections each and the channel into 10 subsections. Compute the steady-flow profile. b. For contraction scour, use D50 = 2.01 mm and a water temperature of 60° F. Use the default scour equations. If the critical scour velocities computed outside the program are 2.58 ft/s for the left overbank and 2.94 ft/s for the main channel, which scour equation (the clear-water equation or live-bed equation) should be used in these areas? c. For pier scour, use the maximum V1 Y1 option and the CSU equation. Apply data to all piers. The pier shape is “round nose” with an angle of 0 degrees. The bed condition is “clear water scour,” and D90 is 7.92 mm. What is the pier scour depth (Ys) calculated by the program? d. For abutment scour, the abutment shape is a “spill through abutment,” the skew angle is 90 degrees, and the default equation should be used. Is the abutment scour greater on the left or the right? What equation did the program use to compute the abutment scour? e. Review the total scour computed for this bridge and print the summary table. Print the plot of the total bridge scour.
CHAPTER
14 Unsteady Flow Modeling
As discussed in Chapter 2, if flow conditions (such as depth and velocity) do not vary with time at a discrete location, the flow is classified as steady. When flow conditions do vary with time at a discrete location, the flow is classified as unsteady. Because the equations used to model unsteady flow are more complex than those associated with steady flow, reflecting the differing levels of complexity found in the systems themselves, engineers prefer to assume steady flow conditions when computing peak water surface elevations. However, engineers often encounter situations for which the assumption of gradually varied, steady flow is inappropriate and they must turn to unsteady flow modeling. These situations encompass such real-life modeling problems as channels or rivers with significant flow restrictions (such as an inadequately sized culvert), networks of channels (flow splits), floodplain attenuation of flows, or the introduction of flood-storage facilities. In all these cases, the peak water surface profile computed for a given unsteady flow event may be very different from that of a steady state simulation based on the peak flow rate, because of the effects of flow volume and/or the flow attenuations due to the dynamic effects. Typically, the St. Venant equations (a combination of both the continuity and momentum equations) are used to solve unsteady flow problems. HEC-RAS uses the solver component of the UNET program, developed by Dr. Robert Barkau. All other unsteady flow procedures in HEC-RAS are different from UNET. The first section of this chapter describes situations in which steady-state modeling may not be appropriate and where solutions based on unsteady flow modeling may be needed. This is followed by an introduction to the theory behind unsteady modeling, including both the St. Venant equations and various simplifications of these equations. The range of modeling options and the situations in which they are applicable are explained to help the reader make appropriate choices. Specific issues with the practical application of various approaches to unsteady flow modeling are then cov-
564
Unsteady Flow Modeling
Chapter 14
ered. The chapter concludes with an example of implementation of unsteady modeling using HEC-RAS.
14.1
Why Use an Unsteady Flow Model? Unsteady and quasi-unsteady flow models are computationally more sophisticated than steady flow models. They represent more closely the physical processes occurring in a river or natural environment and they afford a more detailed understanding of river behavior and simulation of real flow events. The steady flow approach is typically considered conservative in its determination of water levels in that, other things being equal, steady flow analysis tends to overestimate flow and thus stage. This overestimation is due to the assumption that flow is constant within a reach; thus, the effects of channel storage on the shape and peak of the flow hydrograph are ignored. To better understand the limitations of a steady flow model, consider that, during peak flow, an unsteady flow model would yield results similar to those of a steady flow model if the hydrograph being routed yielded sufficient volume prior to the time of peak flow to fill all of the available storage in the reach. In other words, the steady-state predictions are, in effect, those that would occur if the flow rate were held constant long enough to fill all available storage. Because attenuation effects and restrictions to flow must often be considered, steady flow assumptions will not always be reasonable. Storage within a reach, especially when the floodplain is large relative to the main channel, can be significant, and flow restrictions such as bridges, culverts, and other channel impediments also increase the volume of flow stored behind the restriction. Use of an unsteady flow model to account for these storage effects reduces the hydrograph peak and therefore results in a lower peak water surface than would be computed with a steady flow model. There are instances in which a steady flow model may not be conservative in its estimation of water levels. For cases in which reverse (bidirectional) flow may occur, the designer must be aware of the implications of his or her choice of flow modeling techniques. Examples of these situations include stream junctions where flow may reverse up a tributary and tidal rivers where the flood tide can generate a wave or setup as it moves upstream and the waterway narrows. Although steady flow modeling equations are significantly simpler and easier to use, their solutions are accurate only in those situations in which the channel and flow conditions do not vary greatly. When faced with more complex modeling problems, the unsteady flow equations provide more appropriate solutions. Following is a discussion of conditions that suggest the use of the unsteady flow equations. These conditions are present, to some extent, in most natural systems. The modeler must determine whether they are present at such a level to render the steady flow equations inappropriate and to suggest that unsteady flow modeling is required.
Attenuation The attenuation of flow refers to any means by which peak flows are reduced. Attenuation may also be seen as a delay of flows through some natural or man-made means. Attenuation occurs naturally in channels and may significantly reduce peak flows and prolong the hydrograph, especially when the channel contains wide floodplains
Section 14.1
Why Use an Unsteady Flow Model?
565
and lakes. Man-made structures such as dams and flood-detention basins store and thus attenuate flows, and are increasingly used as a best-management practice. Unless the modeler explicitly modifies flows based on external hydrologic model results, the steady-state model will use the constant flow specified at the reachʹs upstream boundary throughout the reach. This flow will differ increasingly from the actual flow as attenuation modifies the hydrograph. Figure 14.1 illustrates the process.
Figure 14.1 Attenuation of a flood wave in a river system.
Figure 14.2 shows an idealized river reach with a main channel and wide floodplains on either side. Except for the inflow hydrograph at the upstream end, there are no inflow or outflow locations along the reach. In Scenario 1, the storage is large compared to the volume of the flood hydrograph. Although the main channel fills quickly, once the stage of the river reaches the bankfull condition, the cross-sectional area available for storage increases dramatically due to the increased cross-sectional area provided by the floodplains. The time required to fill this part of the channel is more significant and, while it is filling, less flow passes downstream. As the hydrograph inflow decreases and the flood recedes, the opposite occurs. Flow passes back into the main channel and supplements the flow passing downstream. The net effect of the floodplain storage is that the speed of travel of the flood peak is reduced compared to
566
Unsteady Flow Modeling
Chapter 14
that for a channel with less storage. This is illustrated in Scenario 2 in Figure 14.2, where there is no floodplain storage. Here the peak flow observed at the downstream end of the reach is reduced but much less so than in Scenario 1. Additionally, a less pronounced lag (the difference between the time of the peaks of the inflow and outflow hydrographs) is seen in Scenario 2 than with Scenario 1. One method for assessing whether flow conditions require an unsteady flow model rather than a steady flow model is to consider the attenuation parameter (Samuels and Gray, 1982), γ (ft, m): χ γ = ---------------3 2BSc χ B S c
where
(14.1)
= curvature of the peak of the flood hydrograph = the mean surface width (ft, m) = the mean bed slope (ft/ft, m/m) = the mean propagation speed of the flood peak (ft/s, m/s)
χ can be estimated with the equation –
+
2Q p – Q – Q χ = -----------------------------------2 ( 3600 T )
(14.2)
where Qp = the peak flow (ft3/s, m3/s) –
= the discharge T hours before the peak (ft3/s, m3/s)
+
= the discharge T hours after the peak (ft3/s, m3/s)
Q Q
T is typically chosen to encompass at least two-thirds of the peak flow of the hydrograph. The constant 3600 is added to convert hours to seconds. The propagation speed, c, may be estimated using one of the following: • The time of travel between two water-level record sites • The local mean velocity V (ft/s, m/s), by setting c equal to 1.7V ∂Q 1 ∂Q • The slope of a rating curve, ------- , at the flood peak, where c = --- ------∂h B ∂h • The following approximate formula, with an estimate of Manning’s n: c = 1.7Q
0.4 0.3 – 0.6 – 0.4
S
n
B
(14.3)
This result was derived for SI units; for English units replace the multiplier 1.7 by 0.52. Guidelines given in Samuels and Gray (1982) suggest that if γ < 2 x 10⁻⁶ for SI units (6 x 10⁻⁷ for U.S. customary units), steady model equations can be used to represent attenuation with as much accuracy as an unsteady model. Table 14.1 shows an example of the calculation of the attenuation parameter for two river reaches in the United Kingdom.
Section 14.1
Why Use an Unsteady Flow Model?
Figure 14.2 Volume in a flood wave greater or less than river storage.
567
568
Unsteady Flow Modeling
Chapter 14
Table 14.1 Example illustrating choice of model (Samuels and Gray, 1982) River Parameter
Rhymney (Wales)
Severn (England)
Mean bedslope, S
2.85 x 10⁻³
10–4
500
1500
Mean flooded width, B (m) Mean propagation speed, c (m/s)
1.2
0.2
Discharge at peak, Qp (m3/s)
161
941.7
Discharge T hours before peak, (m3/s)
161
941.4
Discharge T hours after peak, (m3/s)
160
952.4
Time interval, T (hours)
8
12
Attenuation rate, γ (m)
1.5 x 10⁻⁸
1.5 x 10⁻⁵
Steady
Unsteady
Choice of model (for attenuation modeling)
Flow restrictions When flow is significantly restricted, such as by an undersized culvert, steady-state models estimate the energy grade required to drive the specified flow through the restriction, without regard to storage effects. In reality, however, the flow will back up behind the restriction as stored volume. Depending on the amount of runoff and the upstream storage capacity, the actual flow through the restriction and the corresponding energy grade may be considerably less than the values computed with the steadystate model. Figure 14.3 compares how steady and unsteady/quasi-unsteady flow models can represent a restriction to flow.
Looped ratings A further limitation of steady-state models and other, more simplified routing methods is their assumption that, along a reach, there is a single valued relationship
Figure 14.3 Comparison of how a restriction is represented in steady and unsteady flow models.
Section 14.1
Why Use an Unsteady Flow Model?
569
between stage and discharge. This assumption is contrary to observations of natural floods on rivers of very low slope. For low-gradient rivers such as the Mississippi, discharge at a particular stage when the flood level is increasing is larger than the discharge at the same stage when the flood level is decreasing. Storage is not a function of outflow alone because the water surface is not always parallel to the channel bed. When the flow is increasing, the water surface has a greater slope than the channel bottom, but the opposite is the case when the flow is decreasing. Thus, the relationship between outflow and storage for a given reach is not easily observed and will be different depending on whether the hydrograph is rising or falling. This phenomenon can be displayed graphically in the well-known looped rating curve, also known as hysteresis, as shown in Figure 14.4. Unsteady flow models, such as the unsteady flow module in HEC-RAS, are able to account for the looped rating effect.
Figure 14.4 Looped rating curve.
Flow Splits In a steady flow model, the modeler specifies flows at one or more model boundaries, and flow is assumed to remain constant as it moves downstream until a change is specified by the modeler. For a branched or dendritic stream system, the flow downstream of an incoming tributary or flow loss is deduced through simple addition or subtraction. For diverging flow situations (flow splits), basic steady-state models are unable to estimate the flow entering each branch, and the modeler must provide flow values or flow-versus-stage data for each divergent branch. In reality, however, the flow in a particular branch may depend on tailwater level, or the rating curve for the junction may be difficult to define. In these cases, the flow split is partly a function of the downstream water levels, which in turn are a function of the flow split, and the solution is not explicit. Versions of HEC-RAS from v3.0 onward adopt an iterative approach to develop solution of flow splits in steady state (see Chapter 11).
570
Unsteady Flow Modeling
Chapter 14
However, the geographical scale of the problem is important for flow splits. Flow around islands is typically addressed satisfactorily in steady state, as presented in Chapter 11. However, multiple flow paths, such as those through a long highway embankment crossing the floodplain at a major skew, or a system with many loops and branches, may demand an unsteady flow model.
Time-Based (Transient) Effects Another important advantage of unsteady flow modeling over steady-state approaches is the ability to simulate external system controls such as • The opening and closing of gates, sluices, and other control devices • Tidal effects • Abstractions or removal of flow Figure 14.5 shows an example of a time-based effect resulting from operation of a gate.
Figure 14.5 Example of a time-based effect on a river system requiring an unsteady modeling approach (tidal flap gate).
14.2
Unsteady Flow Theory This section explains the supporting theory of unsteady modeling. The basic equations are known as the St. Venant equations, and there are a number of assumptions inherent in these equations that must be understood. Further simplifications to the basic equations can provide the modeler with a greater range of choices for unsteady modeling. The range of modeling options and the situations in which they are applicable are explained.
Section 14.2
Unsteady Flow Theory
571
St. Venant Equations A consideration of the conceptual differences between steady and unsteady modeling, as discussed in Section 14.1, gives an idea of how the underlying theory and equations differ: • In steady-state modeling, the flows are prescribed by the user and the model calculates water levels at discrete cross sections. There is essentially one unknown variable (stage) and therefore one equation is needed—the energy equation (Equation 2.14 on page 30). • In unsteady modeling, two variables are calculated (stage and flow), so two equations are needed. Unsteady modeling is also concerned with how these parameters change with time and distance downstream. This is reflected in the partial differential terms in the equations. The required equations are derived by considering a small part of a river (length dx) over a small period of time (dt seconds). This is known as a control volume and is illustrated in Figure 14.6.
Figure 14.6 A control volume and the continuity equation.
First, consider how the amount of water in the control volume may change over time, dt: If the flow entering the control volume is greater than that leaving, the water level (and therefore flow area) will increase. Thus, the change in area over time is related to the change in flow over space. This is known as the continuity equation and, with flow given by velocity times area, can be written for unsteady flow as ∂A ( vA ) = q ------- + ∂--------------∂t ∂x where A t v x q
(14.4)
= flow area (ft2, m2) = time (s) = velocity (ft/s, m/s) = distance along the flow path (ft) = lateral inflow per unit length of channel (ft3/s/ft, m3/s/m)
The second required equation is derived by considering how the forces on the control volume affect the movement of water through the control volume. Newtonʹs second law states that if a net force is acting on a body, then this will lead to a change in
572
Unsteady Flow Modeling
Chapter 14
momentum of that body, where momentum is defined as mass times velocity. For example, it is intuitive that if the driving forces on the control volume (due to gravity and water surface slope) are greater than the resistive forces, then the flow will accelerate. The acceleration can be an increase in velocity at one point over time (local acceleration) or an increase in velocity over space (acceleration may occur as water moves along the control volume). An increase in velocity over space is known as a convective acceleration. These concepts lead to the second of the St. Venant equations, the momentum equation, which when written in its conservation form is ∂V ------∂t Local Acceleration Term
where
+
∂V V ------∂x
∂y g -----∂x
+
Convective Acceleration Term
Pressure Force Term
–
g ( so
–
Gravity Force Term
sf ) = 0
(14.5)
Friction Force Term
y = hydraulic depth (ft, m) g = acceleration due to gravity (32.2 ft/s2, 9.81 m/s2) so = bed slope (ft/ft, m/m) sf = friction slope (ft/ft, m/m)
The local and convective acceleration terms are sometimes called the inertial terms. The friction slope is generally defined using an empirical equation in the same way as the loss term in the energy equation of steady-state modeling. The Manning equation (Equation 2.26 on page 37) is commonly used, but other similar equations, such as Chézy or Colebrook-White can also be used. This loss term encompasses not just the effects of boundary friction, but all processes leading to flow resistance, notably turbulence and shear within the flow. Equations 14.4 and 14.5 are also known as the shallow water or dynamic wave equations. In defining the control volume used in deriving these equations, a number of implicit assumptions were made that are inherent in the St. Venant equations. For example, if it is assumed that the flow is one dimensional, then it is only necessary to consider velocities in the downstream direction (not cross-stream or vertical) and the cross-sectional properties are reduced to single parameters. This means that only cross-section-averaged flow properties such as flow area and average velocity are considered. These assumptions are true of all one-dimensional modeling, including steady-state modeling. Where they may not apply, workaround options are sometimes possible. For example, where velocity, water surface, or flow direction varies greatly across a valley section, it is possible to set up a model with flow on the floodplain treated as separate from that in the main channel. This is discussed further in the section on implementation of unsteady modeling. Other assumptions behind the St. Venant equations are listed in Table 14.2, along with typical exceptions and workaround options.
Section 14.2
Unsteady Flow Theory
573
Table 14.2 Assumptions behind the one-dimensional St. Venant equation
(after HEC, 1990) Assumption
Typical Exception
Workarounds
Velocity is uniform within the cross- • Inundation and draining of the • Split the river cross-section into section and the water level is horifloodplain. separate channels linked by latzontal at any channel section. • Flow on either side of a flood eral weirs (spills). levee (embankment). • For sharp river bends, estimate • Near a road embankment adjasuperelevation using one of the cent to a bridge where flow rapformulas in Chow (1959). idly contracts. • Superelevation due to sharp river bends. All flow is gradually varied, with hydrostatic pressure prevailing at all points in the flow. Thus, vertical accelerations can be neglected.
• Near bridges, sluices, and weirs where rapidly varying flow can occur. • Rapidly rising flood waves (for example, a dam break).
No lateral, secondary circulation occurs.
• The velocities computed by the • Usually not important for water model are not necessarily represurface profile computation. sentative for scour calculations • Use empirical factors to adjust or sediment transport models. the channel-averaged velocities for scour and sediment-transport problems.
Channel boundaries are fixed; erosion and deposition do not alter the shape of a channel cross section.
• Alluvial rivers. • Steep rivers.
• Manually alter the sections to reflect the likely changes.
Water has uniform density, and resistance to flow can be described by an empirical formula such as the Manning equation.
• Estuaries. • Sediment-laden rivers. • Dispersal of cooling water from power stations. • Reaches with air entrainment (“bulking”).
• Usually not important for water surface profile computations. Would be important for water quality and sediment transport calculations in which case additional terms are added.
Flow is generally subcritical.
• Steep rivers. • Dam spillways.
• Expect unsteady model stability problems. • Preference is to use a steadystate model or routing model combined with a steady model.
• Usually not important unless a detailed water surface profile is required at the structure. • Dam-break problems may be better studied using simpler routing models.
Although the St. Venant equations were derived in the early nineteenth century, they were not practically applied in their full hydrodynamic form until the 1950s. This was because exact analytical solution methods cannot be applied to nonlinear equations and the numerical methods required to solve them were not readily available before then. This difficulty in solving the full equations has led to a number of simplifications. Even with software to solve the full equations, other factors, such as data limitations, can lead to some of the simplified methods being more appropriate in particular situations. Consideration of the implications of the different simplifications can also lead to a better understanding of the full equations. The various simplifications are summarized in Table 14.3 and Figure 14.7.
574
Method Kinematic Wave
Theory/Equation
∂Q + c ∂Q ------- = 0 ------∂x ∂t
Assumptions
Information Needs/Parameters
Appropriate Applications
• No allowance for backwater effects • No allowance for varying conveyance between the main channel and overbank areas.
• • • •
• Channel slopes exceed 0.002. Nontidal rivers. • No significant restrictions along the channel • Ponce (1986) suggested that
Shape of cross section Length of reach Slope of the energy line Manning’s n
Tp So V ---------------- ≥ 171 for the kinematic yo
Unsteady Flow Modeling
Table 14.3 Summary of routing models.
wave equation to be used. Level-Pool (storage or Modified Puls)
Diffusion Wave
Muskingum
∂Q ∂A- = 0 ------- + -----∂x ∂t
2
Q ∂Q + bQ ∂Q ------- = a ∂---------------2 ∂x ∂t ∂ x
dSI – O = ----dt
• Lateral flow is insignificant. • Water surface in the storage area is horizontal to the channel bed.
• Length of reach (for rivers). • A functional relationship between storage and outflow is required to solve the finite-difference appoximation.
• Flood storage basins. • Areas of “dead” storage in floodplains. • Significant time-invariant backwater influence on the discharge hydrograph.
• Dynamic effect is insignificant. • No backwater from downstream.
• • • •
• Large flood-storage basins. • Nontidal rivers. • Should not be used for rapidly varying backwater (for example, tidal situations).
Shape of cross-section Length of reach Slope of energy grade line Manning’s n
• Situations with little or very crude channel geometic data but some calibration data (observed hydrographs at two or more points).
Chapter 14
• Storage in the reach is modeled as • K (travel time through the reach). the sum of prism storage and wedge • Weighting factor X (0.0 ≤ X ≤ 0.5). storage. • Prism storage is defined by a steadyflow water surface profile. • No allowance for backwater. • No allowance for varying conveyance between the main channel and overbank areas. Because K and X are fixed, the method tends to be calibrated for peak flow and needs recalibration for in-bank and out-ofbank events.
Theory/Equation
Muskingum-Cunge
2
Q∂A- + c ∂Q ------- = µ ∂-------------+ cq L 2 ∂x ∂t ∂x
Assumptions
Information Needs/Parameters Appropriate Applications
• No allowance for backwater. • As it omits the acceleration term of the momentum equation, it should not be used for rapidly rising hydrographs, such as a dam-break flood.
• • • •
Shape of cross section. Length of reach. Channel slope. Manning’s n
• Slow-rising flood waves through reaches with flat slopes. • Ponce (1986) suggested that
• • • •
Shape of cross section. Length of reach. Slope of the channel. Manning’s n
• Slow-rising flood waves through reaches with flat slopes.
Section 14.2
Method
g TS o ----- ≥ 30 for the Muskingumyo Cunge method to be used.
Variable Parameter MuskingumCunge
∂Q α ∂ Q ∂Q ------- + c ------- = --- Q ---------2- + cq L ∂x L ∂x ∂t
• No allowance for backwater.
Lag Method
Outflow hydrograph is simply the inflow hydrograph with ordinates translated (lagged in time) by a specified duration.
More a graphical method than a true routing model. Flows are not attenuated, so the shape of the hydrograph is not changed.
Estimate of lag/ wave speed.
• Urban drainage channel. • Very steep rivers.
Average-Lag Method
Similar to lag, except two or more inflow hydrograph ordinates are averaged and lagged by the estimated reach travel time.
More a graphical method than a true routing model. Unlike lag method, the hydrograph is changed.
Estimate of lag/ wave speed
• Urban drainage channel. • Steep rivers.
= hydrograph duration (s) = time to peak of hydrograph (s) = inflow (ft3/s, m3/s) = outflow (ft3/s, m3/s = storage (ft3, m3) = acceleration due to gravity (32.2 ft/s2, 9.81 m/s2) = unit flow in reach (ft2/s, m2/s)
c So Vo yo a, b, α, µ L
= wave speed (ft/s, m/s) = bed slope = average velocity of the flood peak (ft/s, m/s) = flow depth of the flood peak (ft, m) = coefficients = length of reach (ft, m)
Unsteady Flow Theory
where T Tp I O S g qL
2
575
576
Unsteady Flow Modeling
Chapter 14
Figure 14.7 Summary of the various solutions to the St.Venant Equations.
Steady-State Approximation When applying steady-state assumptions, variables are not changing with time, so terms with d/dt are equal to 0. If the time-dependent term in Equation 14.4 (continuity) is removed, then the continuity equation becomes redundant (it simply states that
Section 14.2
Unsteady Flow Theory
577
change in flow only occurs due to lateral inflow). The time-dependent term in the momentum equation (Equation 14.5) is the local acceleration term. If this is removed, then the steady-state momentum equation can be rewritten as dν ν dy ------------ + ------ – s o = s f dx dx
(14.6)
With suitable discretization (splitting into solvable time/distance intervals) and velocity distribution assumptions, this equation is equivalent to the energy equation used in steady-state (backwater) analysis (Equation 2.14). Losing the d/dt terms but retaining the d/dx terms means that this approximation assumes that the flow is steady but gradually varied over space.
Level-Pool Routing In level-pool or storage routing, only the continuity equation is used. This is a matter of balancing inflow, outflow, and volume of stored water in the routing reach with zero water surface slope. This requirement is only valid in lakes and reservoirs, so level-pool routing is commonly used to calculate attenuation in such water bodies.
578
Unsteady Flow Modeling
Chapter 14
Such applications also require an empirical relationship between outflow and storage (similar to Equation 14.8).
Kinematic Wave Approximation The kinematic wave approximation represents the change of flow with distance and time and ignores inertial and friction forces. Consequently the method can develop “shock fronts” or rapid propagation of changes downstream as there is no means of dissipating the wave. This is useful when looking at steep channels or where there are insignificant backwater (upstream) effects on the water profile. If the d/dx terms in Equation 14.4 (convective acceleration and pressure gradient) are neglected as well as the d/dt term (local acceleration), then the momentum equation is reduced to the simple expression sf = so
(14.7)
This states that the friction slope is equal to the bed slope—the assumption made in normal depth/uniform flow calculations (Chapter 2). On its own, this equation is a description of steady, uniform flow. The implication of Equation 14.7 is that there is a single-value relationship between storage (or stage) in the channel and flow. This relationship could take a number of forms (for example, it can be based on Manningʹs equation, where flow varies with area and hydraulic radius, with bed slope and Manning’s n as constants), so consider a functional relationship of the form: dQ Q = f ( A ) such that -------- = c dA where
(14.8)
c = wave celerity (ft/s, m/s)
If Equation 14.8 is combined with the continuity equation, Equation 14.4, then the kinematic wave equation is obtained, which is solved for a single variable, flow to give 2
∂Q ∂ Q ∂Q ------- + c ------- = a ---------2 ∂x ∂t ∂x
(14.9)
If lateral inflows are neglected, then the right-hand side of Equation 14.9 is set to 0. The kinematic wave equation describes the propagation of a flood wave along a river reach but doesn’t account for any backwater effects. This implies that water may only flow downstream.
Diffusion Wave Approximation In the kinematic wave approximation, the assumption that the water surface is parallel to the channel bed (uniform flow assumption) means that there is no way to represent backwater effects. The diffusion wave approximation therefore retains the dy/dx term from the St. Venant equations, which allows the water-surface slope to differ from the bed slope. In other words, both the local and convective flow-acceleration terms (that is, the inertial terms) are dropped from the momentum equation. The momentum equation then becomes
Section 14.2
Unsteady Flow Theory
dy ------ = s o – s f dx
579
(14.10)
This equation states that the water-surface slope is equal to the friction slope. Combining the simplified momentum Equation 14.10 with the continuity equation leads to the single equation known as the diffusion wave equation: 2
∂Q ∂ Q ∂Q ------- + b ( Q ) ------- = a ---------2 ∂x ∂t ∂x
(14.11)
where b(Q) is related to an attenuation parameter that can be derived. The coefficients a and b are functions of discharge and must be evaluated over a range of depths and discharges. Both analytical and numerical solutions to Equation 14.11 were derived by Hayami (1951). The diffusion wave approximation is also the basis for the more widely used Muskingum routing model and its variants, which are described in more detail in the following sections.
Theoretical Applicability of Various Approximations The assumptions behind the various approximations discussed in the preceding sections and in Table 14.3 give the best practical indication for deciding when a particular equation is appropriate. If the tabulated assumptions are not significantly violated, solutions with that equation can be sought. However, a more theoretical assessment of the range of applicability may also be attempted. Henderson (1996) derived the following expressions for the relative magnitude of the various terms in the momentum equation (Equation 14.5) that balance the friction slope (sf ). These were derived analytically for a wide rectangular channel, but it can be expected that similar relationships hold for more complex channel shapes: –2 ⁄ 3 ∂y ------ ∝ s o × (terms characteristic of the inflow hydrograph) ∂x
(14.12)
2 V ∂v ⁄ ∂x --- ---------------- = O ( Fr ) g ∂y ⁄ ∂x
(14.13)
1 ∂v v ∂v --- ------ = O --- ------ g ∂x g ∂t
(14.14)
and
where Fr = Froude number O = means “order of magnitude of” Equation 14.13 implies that the two acceleration terms are of similar orders of magnitude. In combination they suggest the following range of applicability for the various unsteady flow equations: • For high slopes (> 20–30 ft/mile or 3.8–5.7 m/km), Equation 14.12 indicates that δy/δx is small, and the other two equations (14.13 and 14.14) show that the acceleration terms are no larger (unless the Froude Number, Fr > 1). Therefore, for steep but largely subcritical streams, the so term is the only significant term
580
Unsteady Flow Modeling
Chapter 14
and the kinematic wave approximation is appropriate. The majority of natural streams can be considered subcritical (Jarrett, 1974). • For low slopes (< 1 ft/mile), δy/ δx becomes more significant, but if the slope is low enough that Fr is significantly less than 1, even during floods, then the acceleration terms will be small. In such a situation, the diffusion wave approximation is appropriate. • For intermediate slopes, all terms may be important and the full St. Venant equations would be required to provide an accurate calculation. However, depending on the accuracy of the data available and the answer required, it may still be appropriate to use one of the simpler approximations. Henderson (1966) provides an example of the relative magnitude of these terms for a steep (26 ft/mile or 1-in-200 slope) alluvial stream. The inflow hydrograph increased from 10,000 ft3/s (283 m3/s) to 150,000 ft3/s (4250 m3/s) and then decreased back to 10,000 ft3/s (283 m3/s) within 24 hours. Table 14.4 shows the terms of the momentum equation and their approximate relative magnitudes. Table 14.4 Relative magnitudes of momentum terms for a steep channel and rapidly rising hydrographs (from Henderson, 1966). Term
Description
Magnitude
so
Bottom slope
26 ft/mi (4.9 m/km)
∂y -----∂x
Pressure gradient
0.5 ft/mi (0.1 m/km)
V --- ∂V ------g ∂x
Convective acceleration
0.12–0.25
1--- ∂V ------g ∂t
Local acceleration
0.05
In this example, the bottom slope so is the largest of the terms that must balance the friction slope. If the other terms are omitted from the momentum equation, any error in solution is likely to be insignificant. Thus, as expected given the preceding discussion, the kinematic wave approximation is appropriate for this steep channel.
14.3
Solution of Equations As mentioned previously, it is not possible to solve the full St. Venant equations analytically—a numerical method is required. Most hydrological routing packages solve some form of the diffusion wave equation. This section describes the most common of these and then discusses the methods used by hydrodynamic modeling packages to solve the full St. Venant equations.
Solving the Diffusion Wave Equation A number of different practical methods have been developed for solution of the diffusion wave equation (Equation 14.11) or variations thereof. The most common are
Section 14.3
Solution of Equations
581
those described in the following sections: Muskingum Routing, Muskingum-Cunge Routing, and Variable Parameter Muskingum-Cunge Routing. Muskingum Method. As discussed previously, the basis of most flood-routing procedures is the continuity equation (Equation 14.4) with some form of empirical relationship between storage (or stage) and flow. The continuity equation is normally applied over the region between upstream and downstream points in a reach or storage unit. The inflow hydrograph flowing into the storage unit is known and the outflow is to be determined. The principal of continuity of flow provides the basic equation for solving the problem, expressed as (Inflow volume in time dt) – (outflow volume in time dt) = (change in volume of water stored)
In differential form, this is dS I – O = -----dt where
(14.15)
I = inflow to the reach (ft3/s, m3/s) O = outflow from the reach (ft3/s, m3/s) S = storage (ft3, m3)
To provide a form more convenient for computational purposes, average flows are used to obtain I1 + I2 O1 + O2 --------------- ∆t – -------------------∆t = S 2 – S 1 2 2
(14.16)
The subscripts 1 and 2 refer to the values at the start and end, respectively, of the time period ∆t. Because the hydrograph is assumed to be a straight line during ∆t, the time step must be chosen with care to ensure that the important features of the hydrograph (especially the peak) are retained. In particular, the routing period must be less than the travel time of the flood wave through the reach. To address the problem of looped rating curves, the available storage is split into two parts as illustrated in Figure 14.8. The first part is prism storage, the volume beneath a line parallel to the stream bed. The second is wedge storage, the volume of water between that line and the water surface profile. In reservoirs, the water surface slope can often be assumed to be horizontal (the assumption behind the level-pool routing approach). However, in rivers, the water surface is unlikely to be horizontal and a relationship for the wedge storage is required. This relationship can be derived by using a weighted difference between inflow and outflow, multiplied by the travel time, K, as follows: S t = KO t + KX ( I t – O t ) = K [ XI t + ( 1 – X )O t ] where K = travel time of the flood wave through the routing reach (s) X = a dimensionless weight (0.0 ≤ X ≤ 0.5) St = Storage at time t (ft3, m3)
(14.17)
582
Unsteady Flow Modeling
Chapter 14
Figure 14.8 Conceptualization of storage in a river channel.
The quantity [XIt + (1 – X)Ot) is a weighted discharge. If storage in the channel is controlled by downstream conditions such that storage and outflow are highly correlated, then X = 0.0 and Equation 14.17 reduces to S = KO The value X = 0.0 yields a result similar to that of a large reservoir producing significant attenuation, while X = 0.5 is representative of a prismatic channel with little or no attenuation. For most streams in which the Muskingum method is employed, the value of X is commonly between 0.05 and 0.2. For solution purposes, expressions for both S2 and S1 in Equation 14.17 are substituted into Equation 14.16 to provide an expression in terms of flows alone. This can be rearranged to give an equation for outflow at time t + ∆t that can be easily coded into a spreadsheet: I t + ∆t + I t O ------------------------ ∆t – ------t ∆t – XK ( I t + ∆t – I t ) + ( 1 – X )KO t 2 2 O t + ∆t = -------------------------------------------------------------------------------------------------------------------------------∆t ------ + ( 1 – K )X 2
(14.18)
In a spreadsheet, a minimum of two columns are needed, one for inflow and one for outflow, with rows representing different time steps, as shown in Example 14.1. Consecutive reaches can be simulated by noting that outflow from an upstream reach provides inflow to the downstream reach. If observed inflow and outflow hydrographs are available, the Muskingum model parameter K can be estimated as the interval between similar points on the inflow and outflow hydrographs. For ungaged watersheds, K and X can be estimated from channel characteristics by first estimating the velocity of the flood wave using the equation: 1 ∂Q V w = --- ------B ∂y
(14.19)
Section 14.3
Solution of Equations
583
where Vw = flood wave velocity (ft/s, m/s) B = top width of the water surface (ft, m) ∂Q/∂y = the slope of the discharge rating curve at the channel cross section (ft2/s, m2/s) As an alternative, HEC (2000) suggests estimating the flood wave velocity as 1.33 to 1.67 times the average velocity of the flow, which is estimated from the Manning equation and representative cross-section data. Once Vw has been computed, K can be estimated from Equation 8.3 on page 309 as L K = ------Vw where
(14.20)
L = reach length (ft, m)
As with other routing models, an accurate solution also requires selection of an appropriate time step (∆t). Two factors should be considered in initial selection of ∆t: the shape of the hydrograph and the travel time through the reach. A swiftly rising hydrograph or steeper reach requires smaller time steps. To capture adequate definition of the shape of the inflow hydrograph(s), a general rule of thumb (HEC, 1991) is t ∆t = -----r20
(14.21)
where ∆t = the time step (s) tr = the time of rise of the inflow hydrograph (s) However, for slow-rising hydrographs in steep reaches, this could result in K/∆t < 1. In this case, ∆t should be reduced, for example, so that K/∆t = 5. For mild channel slopes and overbank flow (which are indicative of large storage volumes), X approaches 0, and for steeper channels with flow-confining banks (indicative of minimal storage), X approaches 0.5. An initial value can be selected from a subjective assessment of the likely significance of storage in the reach. However, both K and X should be calibrated to an observed event. The calibrated values can then be used for routing of design events.
Example 14.1 Muskingum routing calculation Consider a 10-mi river reach in which the time to rise for the inflow hydrograph is 12 hours, and a rating curve shows that a flow increase of 900 ft3/s would result in a stage rise of 2.5 ft. The top width is 200 ft. Compute the outflows corresponding to X = 0, 0.2, 0.4, and 0.5. Solution Equation 14.19 gives 1 900 V w = --------- --------- = 1.8 ft/s 200 2.5 Equation 14.20 gives K = 52,800⁄1.8 = 29,333 s Equation 14.21 suggests that ∆t = 2160 s.
584
Unsteady Flow Modeling
Chapter 14
Thus, K/∆t = 13.6 (which is > 1 and therefore acceptable). The following table shows Muskingum routing calculations for this example using various values of X. The figure shows the sensitivity of the outflow hydrogaph to different values of X. The undershooting or initial dip in the outflow hydrographs with X = 0.4 and X = 0.5 is a typical side-effect of this method. It can be reduced, although not eliminated, by decreasing the time step.
Muskingum-Cunge Method. Although popular and easy to use, the Muskingum model includes parameters that are not physically based (that is, they do not relate to anything that can be directly observed or measured) and are therefore difficult to estimate. Further, the model is based on assumptions that are often violated in natural channels, such as uniform distribution of velocity and a fixed wave speed with depth and flow. An extension of the Muskingum method known as the Muskingum-Cunge model overcomes some of these limitations. The model is based on a solution of the continuity equation (Equation 14.4) and the diffusion form of the momentum equation (Equation 14.5) and hence looks not only at change in volume but also change in flow with distance and change in flow area with time. This leads to the diffusion wave equation in the form 2
∂ Q ∂Q ∂A ------- + c ------- = µ ---------- + cq L 2 ∂x ∂t ∂x where
c = wave celerity (speed) (ft/s, m/s) µ = hydraulic diffusivity (ft2/s, m2/s) qL = lateral inflow (ft3/s, m3/s)
(14.22)
Section 14.3
Solution of Equations
time (h)
Inflow
Outflow X=0
Outflow X=0.2
Outflow X=0.4
Outflow X=0.5 307
0.0
307
307
307
307
0.6
327
307
303
295
289
1.2
360
310
299
280
266
1.8
405
315
295
264
240
2.4
461
323
294
248
214
3.0
527
336
296
235
191
3.6
601
352
301
226
173
4.2
683
372
312
223
162
4.8
769
398
328
227
159
5.4
858
427
349
239
166
6.0
947
461
377
259
183 211
6.6
1036
499
409
288
7.2
1122
540
448
326
250
7.8
1203
584
491
372
300
8.4
1277
631
540
426
360
9.0
1342
679
592
487
429
9.6
1398
728
647
554
507
10.2
1442
777
704
626
591 680
10.8
1475
825
763
702
11.4
1494
872
822
781
772
12.0
1500
917
880
860
866
12.6
1492
958
936
938
959
13.2
1472
995
989
1014
1050
13.8
1438
1028
1038
1086
1137
14.4
1392
1055
1082
1153
1218
15.0
1336
1077
1120
1213
1291
15.6
1269
1093
1152
1265
1354
16.2
1194
1103
1177
1308
1407
16.8
1113
1107
1195
1341
1448
17.4
1026
1104
1204
1364
1477
18.0
937
1095
1206
1376
1492
18.6
848
1081
1200
1377
1493
19.2
759
1061
1186
1366
1481
19.8
673
1037
1165
1345
1456
20.4
593
1008
1138
1313
1418
21.0
519
976
1104
1271
1368
21.6
454
941
1065
1222
1308
22.2
399
905
1022
1164
1238
22.8
355
867
976
1101
1161
23.4
324
830
927
1032
1078
24.0
305
793
878
961
990
24.6
300
758
829
888
901
585
586
Unsteady Flow Modeling
Chapter 14
The wave celerity is expressed as ∂Q c = ------∂A
(14.23)
Q µ = -----------2Bs o
(14.24)
and the hydraulic diffusivity is
where B = top width of the water surface (ft, m) so = bed slope The finite-difference approximation of Equation 14.22 can be combined with Equations 14.23 and 14.24 to yield an expression for outflow that is a function of outflow, inflow, ∆x, and four coefficients. The coefficients are functions of K and X, for which Cunge (1969) and Ponce (1986) provided the physical definitions K = ∆x ------c
(14.25)
Qo 1 X = --- c∆t + ----------- Bs o c 2
(14.26)
and
The time step, ∆t, should be defined using the same considerations as Muskingum routing (Equation 14.21). The distance step, ∆x, should then be selected such that ∆x⁄∆t is approximately equal to c, the average wave speed over a distance ∆x. In practice, the Muskingum-Cunge model can take two forms. In the standard configuration, a representative channel cross section is provided as principal dimensions, channel roughness, energy slope, and length. In the eight-point cross-section configuration, the “average” section is described as eight pairs of distance and elevation values. Variable Parameter Muskingum-Cunge Method (VPMC). In the 1970s, a more advanced version of the Muskingum-Cunge method was developed based on a second-order derivation of Equation 14.22. This method is widely used in Europe. The equation is 2
∂Q α ∂ Q ∂Q ------- + c ------- = --- Q ---------- + cq L ∂x L ∂x 2 ∂t
(14.27)
where α = an attenuation parameter α and c = functions of the flow, Q Equation 14.27 is the Variable-Parameter Muskingum Cunge or VPMC method. Its key difference from Muskingum-Cunge routing is that the attenuation and wave celerity parameters (α and c) are functions of the flow rate. This allows for the fact that the degree of attenuation and wave celerity may vary during the passage of a hydrograph. For example, attenuation may be limited at low flows when the flow is contained within the channel and may then increase for flows above bankfull. Similarly, wave celerity generally increases with flow depth. These effects can be represented in the VPMC algorithm; further details can be found in Price (1973).
Section 14.3
Solution of Equations
587
Solving the Full St. Venant Equations As early as 1958, Isaacson et al. provided a numerical solution to the St. Venant equations. However, it was only in the 1980s and 1990s that simulation software became widely available as a result of the development of computer hardware and software technology. In the United States, there are two widely used dynamic models, FLDWAV and UNET. The FLDWAV model (its early versions were DAMBRK and DWOPER) was developed by Dr. Danny L. Fread and has been mainly applied to the national river forecast. The UNET model was developed by Dr. Bob Barkau (HEC, 1995) and has been incorporated into HEC-RAS since May 2001 (Version 3.0 and higher). This chapter focuses on the UNET model. The St. Venant equations (Equations 14.4 and 14.5) are partial differential equations. In order to get solutions for any practical engineering problem, a numerical method has to be used. The numerical schemes include explicit schemes and implicit schemes. The implicit schemes have become mainstream numerical techniques in solving the unsteady flow equations for river models because of their superior numerical stabilities and computational efficiencies. There are two main stages in the computational numerical solution for the St. Venant equations: discretization and iteration. Discretization. The differential terms, ∂⁄∂t and ∂⁄∂x, vary continuously, but numerical solutions evaluate them only at discrete points in space or moments in time. This is known as discretization. The most common software packages use the method of finite differences, which is similar to the principles described in the previous section for Muskingum Routing. The solution is obtained at a number of discrete points (with distance interval ∆x) and a number of discrete times (∆t) for which derivatives are approximated by their finite differences. The simplest form of finite difference is the forward-difference method, which uses only the discrete point and the one next to it to evaluate a differential; for example, y2 – y1 ∂y ------ ≈ ---------------∆x ∂x
(14.28)
However, a better approximation of the derivative can be obtained by considering more than just two points. Most commercial packages (including HEC-RAS), use implicit finite-difference schemes. In practical terms, this means that, at each time step, the new values of water level and discharge at a certain discrete point (model node) can only be determined from the equations at all discrete points and with at least two time steps solved simultaneously. Studies have shown that this type of difference scheme has better stability characteristics than its counterparts, the so-called explicit schemes, where the new value of the water level and discharge at a discrete point can be found only by solving the equations at a number of adjacent points. A calculation is considered stable if a small error, such as a numerical truncation (“rounding”) error, remains small during the whole simulation. Common implicit finite-difference schemes include the six-point Abbott-Ionescu scheme (see Abbott, 1979), and the four-point Priessmann scheme, which is used in HEC-RAS and DWOPER (Priessmann, 1960). Willems et al. (2000) present a comparison of the relative merits of the two schemes and show the practical differences to be minor. Further details of the solution schemes can be found in the manuals provided with the various hydrodynamic programs.
588
Unsteady Flow Modeling
Chapter 14
Iteration and Solution Convergence. Solution of the implicit discretized equations requires an iterative approach. This means that at a given time step, successive solutions of flow and stage are obtained until the difference of the value in the latest iteration from the previous iteration is small enough that the solution can be said to have converged on the correct value, as illustrated in Figure 14.9. In software packages, the definitions of how close the values have to be for convergence, called tolerances, are usually set by the user. For example, the default value in HEC-RAS is 0.02 ft (0.006 m) for water-level convergence.
Figure 14.9 Iterations and convergence in a hydrodynamic model.
In some cases, however, the values with each iteration change by large amounts (when the selected time step is too large, for example), and convergence can take a long time or be unachievable. Most software packages have a maximum number of iterations that is also a user-set parameter. For example, the default maximum number of iterations in HEC-RAS is 20. If convergence has not been achieved after 20 iterations, the solution with minimum error is used and nonconvergence is flagged. The user should look for such messages and be aware that if nonconvergence has occurred, the solution may not be correct. Time and Space Steps. In general, smaller time steps (the time between successive solutions of the unsteady flow equations) and space intervals (that is, the spacing of each calculation point between the cross sections) should lead to greater model accuracy and improved stability. The time and space intervals need not be constant; for example, a smaller ∆x is appropriate where the channel shape or slope is changing significantly, and a smaller ∆t is appropriate during the time that a hydrograph is rising steeply, or gates are opening and closing. An initial ∆t may be chosen by using Equation 14.21 (to ensure sufficient definition of the hydrograph); however, that time step may be too long for model stability. HECRAS displays messages during computation if instability or nonconvergence is occurring. Water-level oscillations over time and in space observed in the model results may also indicate instability. If necessary, the time-step length should be reduced until the model is stable. If stability is not achieved with very small time steps (less than 1 minute), however, there may be other problems (for example, poor geometric definition, such as mistyped elevations), and further investigation may be necessary.
Section 14.3
Solution of Equations
589
Although it is common practice to use the spacing between input cross sections as the value for ∆x, these sections have usually been defined to capture key features of the channel rather than for computational requirements. Thus a smaller ∆x will often improve model accuracy or stability. In most models, this can be achieved by defining interpolated cross sections between the active input sections as developed from mapping and surveying. In general, this is acceptable if the original surveyed sections are representative of the reach they lie in, and there are surveyed sections at all significant changes in geometry. Once a model is stable, it is a good idea to check the effect of using a smaller ∆x or ∆t on model results. When further reduction of interval size has no appreciable effect on the results, grid independence has been achieved. In practical terms, this may not be possible, but the effects of using a different interval should at least be quantified. It is also useful to consider the Courant number, defined as ∆x C n = ( c + V ) ------∆t where Cn c V ∆x g y
(14.29)
= Courant Number = dynamic wave celerity = gy (ft/s, m/s) = the local depth-averaged velocity (ft/s, m/s) = distance step (ft, m) = acceleration due to gravity (32.2 ft/s2, 9.81 m/s2) = local depth (ft, m)
The Courant number compares the distance traveled by the flow to the computational space interval. The implicit solution schemes used in most hydrodynamic models in use today (such as HEC-RAS) mean there is no prescribed limit for the Courant number, as is required for numerical stability by explicit methods. However, it does indicate that the time and space intervals are linked, and for computational accuracy a smaller ∆x may also require a smaller ∆t. As a general guide, the Courant number produced by Equation 14.29 should not be much more than 50. Therefore, if ∆x is reduced for any reason (for example, by adding interpolated sections), a smaller time step is probably also needed. The golden rule of hydrodynamic modeling is that there should be no large changes of channel geometry, water level, or flow over the defined ∆t and ∆x steps. Modeling Hydraulic Structures. Where a bridge, culvert, sluice, or weir controls or influences the water level, the hydrodynamic equation is either replaced or augmented to address the effects of the structure. The formulas used to represent the structures are generally derived from the analysis of laboratory experiments or field measurements, which, in turn, often derive from hydraulic measurement programs several decades old. Although the accuracy of the measurements need not be questioned, the form of analysis often reflects an era when hydraulic calculations were undertaken manually rather than with a computational model. Commercial hydrodynamic modeling packages vary considerably in the range of available structures and equations. It is also an area where changes and improvements can be expected in the future. The 1-D unsteady models generally handle the influence of a weir, gate, bridge, or culvert in a manner similar to that of steady flow models. The head-discharge rela-
590
Unsteady Flow Modeling
Chapter 14
tionship is introduced either by overwriting the partial differential momentum equation (Equation 14.5) for the flow dynamics with an algebraic equation for the structure rating (flow-level relationship), or by adding a slope term to the equation for the flow dynamics to provide the correct head difference. Another approach for modeling structures is to replace the momentum equation with an energy equation relating flow through the structure to the energy levels upstream and downstream, based on the structure geometry. This method differs from that of replacing the momentum equations with the structure rating in that it also allows a check on the state of flow (for example, general and algorithmic, critical or drowned) without requiring prior and separate development of rating curves describing the modular properties of the structure. Implementation of the traditional structure formulas may need interpretation for the specific model structure. Thus, it should not be assumed (as in the case of the Manning equation for flow resistance) that two model implementations of ostensibly the same method will deliver precisely the same answers in all situations. For instance, there may be small differences between steady and unsteady HEC-RAS computations at a bridge or culvert, even when looking at the same flow rate; however, any differences will be small and insignificant in terms of the overall water-level accuracy. The modeler should refer to the manuals for the particular simulation program to determine how the model represents structures.
14.4
Practical Choice of Unsteady Modeling Approach Software containing algorithms to solve the various forms of the unsteady equations is usually classified in two separate groups: • Routing models (kinematic wave, diffusive wave, various forms of Muskingum routing) solve equations in which flow is the primary variable. • Fully dynamic or hydrodynamic models use the full form of the St. Venant equations and solve for both flow and stage. When water levels as well as flows are required, but a full hydrodynamic solution is inappropriate, it is often practical to use a “hybrid” technique that combines simplified routing results with a steady hydraulic analysis (see Chapter 8). Figure 14.10 illustrates the differences between kinematic and dynamic routing. The choice of model should be based on a combination of an understanding of the important processes in the system, a consideration of the requirements of the study (that is, what questions are being asked), and the limitation of the data available. The theoretical assumptions behind the two main approaches (routing and hydrodynamic) have been discussed previously in this chapter; practical advice on the situations for which one approach is favored over another follows. The data requirements often form a strong limitation on the approach adopted, with hydrodynamic models requiring much more information on flow inputs and downstream boundaries for both model setup and calibration than the simpler routing models.
Routing Models Routing can be described as the process of determining changes in the shape of a hydrograph as it moves along a river system. Two types of routing models are hydro-
Section 14.4
Practical Choice of Unsteady Modeling Approach
591
Figure 14.10 Illustration of the differences between simple (kinematic) routing and dynamic hydrodynamic routing
logic routing and hydrodynamic routing. In hydrologic routing, only the shape of the discharge hydrograph is computed; stage is indirectly estimated and is therefore relatively crude. Kinematic and diffusion wave routing are common forms of hydrologic routing, as described previously in this chapter. In kinematic routing, mass is conserved, and in diffusive wave routing, the effects of backwater can be accommodated. As discussed earlier in this chapter, kinematic routing may be appropriate in steep, rough river reaches; where these conditions do not exist, diffusion wave routing is likely to be more appropriate. In hydrodynamic or dynamic wave routing where the full St. Venant equations are solved, both the stage and flow hydrogaphs are computed. Figure 14.11 summarizes the hydraulic conditions where the different approaches apply. Further information is provided in Table 14.3 and Figure 14.7. In simple terms, routing models can be seen as providing information on flow through a network. This approach takes into account inflows from subbasins, outflows from abstractions, and the effect that storage has on attenuating the hydrograph. Generally, they should not be used to estimate water surface profiles unless combined with a steady-state (backwater) model. Routing models are largely restricted to unidirectional, or dendritic, river networks in which the direction of flow can be deduced from the network gradient alone. For looped networks there is usually insufficient information for a routing model to compute the flow split, and the modeler has to apportion the flows. If any of these assumptions are not appropriate, then a hydrodynamic method should be considered. Each routing method omits or simplifies certain terms in the St. Venant equations. Routing methods should be selected by considering each methodʹs assumptions, and those that fail to account for the critical characteristics of the flow hydrograph and the channel should be rejected. Table 14.3 provides some advice and information on studies comparing routing models. In general, routing models should provide a reasonably accurate solution of the flow hydrograph for dendritic systems where there is no significant backwater. Supercritical flow can be accommodated if the flow reaches are short and are treated separately.
592
Unsteady Flow Modeling
Chapter 14
Vieira, 1983
Figure 14.11 Zones of applicability of kinematic and diffusion wave models.
If any of these assumptions are not appropriate, then a hydrodynamic method should be considered. Figure 14.7 on page 576 summarizes the main routing methods and how they are derived from the basic St. Venant equations, together with some information on their strengths and weaknesses. For more information, see HEC (2000) and NERC (1975). Data Requirements and Model Setup for Routing Models. The basic data required for a routing model are the inflow hydrograph, wave celerity, and attenuation parameters required by the particular method. However, many routing software packages are capable of deriving these parameters from channel characteristics such as channel geometry, reach lengths, channel slope, and roughness coefficients (usually specified as Manning’s n). Coarse geometric data such as channel sections derived from topographic maps and located fairly far apart along the reach can often be used successfully with simple routing techniques. For some routing methods, the channel cross-section geometry may not even be required if observed flow hydrographs are available to derive the key parameters. Alternatively, observed hydrographs can be used indirectly to calibrate the model parameters through a trial-and-error approach. If the software uses channel topography and Manning’s n to derive these parameters, calibration can be attempted by adjusting Manning’s n; however, it is generally more convenient to directly adjust the values of the wave celerity and attenuation parameters that the software initially calculated from the channel properties. More-detailed reach data can, of course, be applied to routing models, but its value will often be limited by the approximations used in the hydraulic calculations. Indeed, there may be a threshold for level of detail that, if exceeded, can actually decrease accuracy and lead to problems with model stability.
Section 14.4
Practical Choice of Unsteady Modeling Approach
593
Hydrodynamic Modeling The hydrodynamic approach accounts for all the processes mentioned in the preceding sections on routing models, and it also calculates stage. Knowledge of stage has advantages when considering lateral spills or flow splits and flow restrictions and is essential to reproduce backwater effects. A further benefit of hydrodynamic modeling over simpler routing models is that it will account for looped ratings and reverse waves. In the latter case, if the energy grade is negative, flow will move upstream. The ability to account for reverse flow is important in the analysis of tidal estuaries and situations in which the operation of hydraulic structures, such as gates, can cause transients. A limitation of hydrodynamic modeling (as in the UNET model and in extreme cases, unsteady HEC-RAS) as compared to hydrologic routing is its problematic use in steep channels. As a general guide, channels with bed slopes of more than 0.002 (1 ft in 500 ft or 10 feet per mile) are difficult to model hydrodynamically. The reason is the model’s difficulty in converging on a solution when Froude Numbers are very high (greater than 0.8). Any hydraulic jumps or changes between subcritical and supercritical flow regimes form a discontinuity in the water surface that violates the gradually varied assumptions of the differential terms in the momentum equations (Equation 14.5). Those simulation programs that cope best with steep channels actually revert to a simplified hydrologic routing calculation in this situation. This is generally achieved by reducing the magnitude of the acceleration terms in the momentum equation (Equation 14.5). Data Requirements and Model Setup. The type of data required for hydrodynamic modeling are similar to those used by routing models, but it is important to have a greater level of detail. Hydrodynamic modeling requires greater precision in the specification of the channel geometry, particularly for cross-section spacing. In contrast to routing models, more-detailed data can often result in much greater accuracy of hydrodynamic model results. It is also possible to include the effects of hydraulic structures in the model. Modeling of floodplains requires careful consideration, as there are a number of ways in which the model can be set up (or schematized), depending on the expected behavior of flow in the floodplain. As for all models, boundary conditions are required; these are usually inflow at the top of the reaches and some form of water-level information at the downstream end of the model. For unsteady modeling, unlike steady-state modeling, the initial condition of the river (that is, the depth of water in the river before the hydrograph commences) must also be defined. In some cases (for example, initial reservoir levels), this can have an important effect on the model results and, in all cases, poor definition of initial conditions can lead to model instability at the start of the calculations. Cross Sections. In routing and hydrodynamic models, the available volume of the channel or floodplain has a direct bearing on the calculated water surface; not just in terms of conveyance, but also in terms of attenuation. 1-D models use linear interpolation between cross-section data coupled with the specified reach lengths to estimate the available area. Due to the large amount of interpolation associated with this type of model, it is relatively easy to introduce errors into the calculations. The modeler should carefully check the inundated area assumed by the model against that estimated from topographic maps and other data. Digital elevation models can make this task much easier, but an equally effective technique is to plot the position of the model cross sections on a plan of the river and join the end points of each section
594
Unsteady Flow Modeling
Chapter 14
and the main channel to form a grid of polygons. The area covered by the resulting mesh is then compared to contour data, and the model cross-section positions and reach lengths altered to improve the fit. In hydrodynamic models, the variations in the channel width must be captured by the model, as these variations have a direct bearing on the mass balance. Because the continuity equation is linear, loss of storage due to inaccurate geometric data input can give rise to large errors. The interpolation required between sections is a direct result of the discretization process and smaller cross-section spacing will normally improve model accuracy. Most models also perform a type of discretization within each cross section: a preprocessing phase calculates the key hydraulic parameters of the cross section (area, conveyance, storage, top width) for a number of discrete water levels over the range of expected depths. This procedure forms a “look-up” table that the model can refer to during the simulation and, for any depth, quickly obtain the required value by interpolation between the nearest values in the look-up tables. This process speeds up the calculation phase, but it is important to ensure that the model is discretizing the cross section in an appropriate way. In HEC-RAS, this is achieved with the geometry preprocessor. It is strongly advised that the preliminary phase of hydrodynamic model building (that is, cross-section entry) be tested first with steady flows, ranging from the lowest to the highest flows of the design hydrograph. After stable solutions have been obtained, structures such as bridges and culverts can be added and the steady-state tests run again. Once the steady-state tests are complete, the model can be tested in unsteady-flow mode. Flood-storage units and lateral spills should be added last. Modeling Hydraulic Structures. Because modeling of hydraulic structures does not differ greatly from steady-state modeling, the information required to adequately represent the effects of the structure is the same as in steady-state modeling, as detailed in Chapters 6 and 7. Floodplain Modeling. Modeling floodplains in a hydrodynamic model is not straightforward and requires both good judgment and planning. The mechanics of how flow enters floodplains and what happens to the flow once there can be complicated to simulate. To simplify the process, the key questions to ask are: • How will flow leave the main channel and enter the floodplain (that is, will it spill over a levee or embankment)? • After the flow leaves the main channel and enters the floodplain, will it “pond” or will it be conveyed downstream? • If the flow will be conveyed after entering the floodplain, what is an appropriate Manning’s n value? • Will the water level in the out-of-bank area be the same as that in the main channel? Depending on the answers to these questions, the modeler may decide to represent the floodplain using one of the methods described in Figure 14.12 and Table 14.5. In practice, the choice of model setup or schematization is difficult and requires judgment. If the modeler is uncertain, more than one method can be tried and the results compared before making a final decision.
Section 14.4
Practical Choice of Unsteady Modeling Approach
595
Figure 14.12 Positioning of floodplain cross-sections in a 1-D model.
Table 14.5 Approaches to the representation of floodplains in unsteady models. Approach
Description
Extended cross sections
The main channel sections are extended to the full width of the floodplain. The sections must remain perpendicular to the direction of flow and hence may need to be “dog-legged.” (See Figure 14.12) The values of the roughness coefficient for the floodplains may need to be different than those used for the main channel in order to reflect the change in roughness. Implicit assumptions in this approach are that • The water level in all parts of the cross section is the same; that is, once the stage exceeds the ground level at any point in the section, it is instantaneously flooded. Programs such as HEC-RAS allow the specification of a levee to prevent flow from entering part of the channel until the stage reaches a specified level. • All of the cross-sectional area below the calculated water surface conveys flow.
Extended cross sections with ineffective flow
This is a variant of Approach A in which those areas of the channel that are considered to be storage rather than conveyance (that is, where the velocity is close to zero) are identified and excluded from the conveyance calculation. In HEC-RAS, this can be achieved with the “ineffective flow” option, which can be either permanent or nonpermanent (default). (See the HEC-RAS manual for more details.) The use of ineffective flow areas in unsteady flow simulations within HEC-RAS can have a different effect than in steady models. For steady models, ineffective flow areas tend to increase water levels by reducing conveyance. In unsteady mode in HEC-RAS, there could also be a reduction in water levels downstream due to attenuation.
Lateral spills with storage units
Where the overbank areas act as storage only, they should be modeled as storage or reservoir units. Flow is spilled into and out of these areas through a hydraulic connector, such as a lateral weir or culvert.
Lateral spills with parallel channel
Where the overbank areas are likely to provide active conveyance, the “spilled” flow can be transferred to a parallel river channel constructed from cross sections taken across the floodplain and up the main river banks.
596
Unsteady Flow Modeling
Chapter 14
Unsteady Modeling of Lateral Weirs The River Wansbeck has a long history of severely flooding the town of Morpeth in Northumbria, England, with over 500 properties flooded in 1963 (see the photograph). The seriousness of such flooding is largely attributed to the progressive development of the river floodplain during the nineteenth century together with an inadequate channel capacity adjacent to the town center. Flood protection works were constructed for most of the areas at risk with the exception of an area upstream of the main town road bridge. Beyond this point the onset of flooding to the town center primarily occurs along a section of stone wall stretching the left bank of the watercourse.
For the purposes of hydrodynamic modeling, a hydrograph profile was selected to represent the response of the catchment to rainfall. A flooding event which occurred in 1982 was chosen over others due to the sharp rate at which the rising limb rises. The shape of such an event was scaled to a 100-year design peak (1.0% annual probability) to produce the final design hydrograph. This “design” hydrograph represents the worst-case scenario with respect to its rapid rise and therefore was deemed a suitable choice for establishing flood-warning triggers. HEC-RAS requires start and end times for the input hydrograph and subsequently uses them when displaying results. The design hydrograph is 30 hours long. The arbitrary start was set to 06:00 hrs, January 1, 2002. The end was 12:00 hrs, January 2, 2002.
Photo of the main road bridge in Morpeth during the 1963 flood. Bridge has since been replaced. A model of the River Wansbeck at Morpeth was constructed using HEC-RAS in unsteady flow mode (hydrodynamic). The advantage of an unsteady model for this project was its capability to estimate relative timings of flood peaks/levels in different parts of a river. Ultimately, the results of this model, together with acceptable lead times to the onset of flooding, were used to establish flood warning triggers at gauging stations located further upstream. Such warnings are designed to provide local authorities and property occupiers adequate forewarning (1 to 2 hours) of an impending flood.
100-year return design hydrograph, Morpeth, England. A broad-crested lateral weir was added to the model to best represent the crest levels of the stone wall or the levels at which the wall overtops. For the purpose of HEC-RAS modeling, this weir was connected to a large, but arbitrary pond with an initial water level set much lower than the levels of the wall crest. This was to ensure that the lateral weir did not drown out and to prevent any spill back into the river. (continued)
Section 14.4
Practical Choice of Unsteady Modeling Approach
The results suggest that spillage first occurs along a shorter section of wall located immediately upstream of the bridge approximately 5.5 hours into the 100-year storm. Nearly three hours later the maximum spillage occurs over the entire wall; at which time, the shorter section in which the initial spill first occurred represents less than 10% of the total spillage. The following figure shows a HEC-RAS-generated schematic of the stone wall at various 15-minute time increments (between 1115 and 1200) leading up to the onset of flooding and including the maximum water profile. According to the “flow leaving” hydrograph, flow begins leaving the river 4.5 hours into the storm at 1030. This is
597
nearly one hour before the “reservoir” behind begins filling. This difference is attributed to the effects of attenuation along the River Wansbeck adjacent to the wall. HEC-RAS accounts for these effects in the flow leaving hydrograph and this therefore should not be confused with the actual time of spillage, which is illustrated in the tailwater stage hydrograph, titled Stage-TW-Hyb-Y-100rev. The model results were used to correlate flood timings and levels at the stone wall to existing gauging stations further upstream. This correlation enabled the hydraulic modeler to establish and recommend trigger levels designed to set off flood warnings.
100 year profile at 15 minute increments, River Wansbeck at Stone Wall.
Stage/flow hydrographs, River Wansbeck at Stone Wall.
598
Unsteady Flow Modeling
Chapter 14
The choice and location of cross sections for rivers with floodplains requires careful thought. The flow pattern may not be clear or, worse, more than one flow pattern may be deduced. The cross sections of the floodplain must be perpendicular to the flow directions. This requirement implies that the cross sections may be “dog-legged,” but one cross section cannot intersect another. Figure 14.12 illustrates how sections should be presented in a 1-D model. If part or all of the cross section will contain ponded water (that is, zero velocity) during some or all of the simulation, ineffective areas can be used to control this. The water level is still assumed to be horizontal across the section. Note that there are two options for ineffective flow areas: permanent and nonpermanent (default). Nonpermanent ineffective areas have no effect on water surface elevations above the designated top of the ineffective area. They are useful on floodplains because they prevent conveyance until the floodplain area is filled but then allow the whole area to convey. Permanent ineffective flow areas remain ineffective below the designated level for all water levels: conveyance can only occur in the depth of water above the designated level. This is appropriate for confined hollows in a floodplain, or behind an embankment. As with all choices in floodplain modeling, it is important when defining an ineffective area to consider which type of ineffective area and levee combination is most appropriate. If the water is permanently ponded on the floodplain, and there is a possibility that the water level is significantly different from that in the channel (for instance the main river levels are higher than in the floodplain), then the floodplain should be modeled as a storage area with some form of lateral connection between the river and the floodplain storage area. This is normally achieved through the use of some form of lateral structure (for example, modeling exchange flow over banks as a lateral weir). If the water level in the floodplain is likely to be different from that in the river, but the floodplain will still be conveying water (perhaps no longer parallel to the river, as is common in urban areas), the dominant flow path on the floodplain can be modeled as a separate channel, with cross sections that represent the floodplain topography. Again, the connection to the river is likely to be some form of lateral structure rather than an open channel junction. In any schematization, it is important to also consider how and when flow may return to the channel. Another lateral structure may need to be defined at such locations. Because hydrodynamic models allow flow in either direction, if an appropriate hydraulic gradient exists, flow can pass both in and out of the floodplain by way of such lateral structures. If the floodplain is conveying water, it is usually moving slower than that in the channel, due to lower depths and a higher roughness. The land use within the floodplain is often nonuniform, containing areas of trees, grass, and roads. Obstructions such as fences, hedgerows, and buildings, as well as topographical irregularities such as hollows and ridges, all contribute to an increased apparent roughness. Definition of Manning’s n values on the floodplain is therefore not usually obvious and the guidelines are generally less well established than for river channels. Table 14.6 lists some typical values for Manning’s n on a floodplain. In most models, it is possible to vary Manning’s n across the floodplain if different land use is identified. This normally requires a separate calculation of the conveyance for each area with different roughness. However, due to the inherent uncertainty in specification of floodplain roughness values, the modeler is advised against attempting to provide excessive detail.
Section 14.4
Practical Choice of Unsteady Modeling Approach
599
Table 14.6 Guideline values for Manning’s n on floodplains. Description
Min
Normal
Max
Pasture, no brush: short grass
0.025
0.030
0.035
Pasture, no brush: high grass
0.030
0.035
0.050
Cultivated areas: no crop
0.020
0.030
0.040 0.045
Cultivated areas: mature row crops
0.025
0.035
Cultivated areas: mature field crops
0.030
0.040
0.050
Brush: scattered with heavy weeds
0.035
0.050
0.070
Brush: light with trees, in winter
0.035
0.050
0.060
Brush: light with trees, in summer
0.040
0.060
0.080
Brush: medium to dense, in winter
0.045
0.070
0.110
Brush: medium to dense, in summer
0.070
0.100
0.160
Trees: cleared land with stumps, no sprouts
0.030
0.040
0.050 0.080
Trees: cleared, with heavy sprouts
0.050
0.060
Trees: heavy stand, little undergrowth – no flow in branches
0.080
0.100
0.120
Trees, heavy stand, little undergrowth – flow into branches
0.100
0.120
0.160
Trees: dense willows, summer
0.110
0.150
0.200
As with steady-state modeling, Manning’s n is often a calibration parameter, whose values can be adjusted to improve correspondence between observed and predicted water levels for a particular event. With unsteady modeling, it is important to undertake calibration over a whole hydrograph and not just for the peak flows. Adjustment of in-bank Manning’s n should be undertaken first in order to reproduce water levels at lower flows, followed by adjustments to the floodplain to improve predictions at overbank flows. However, it is not just adjustments to Manning’s n that should be considered: the choice of floodplain modeling options may also need reviewing. As with steady-state modeling, do not forget that observed water levels near a structure (for example, a stage recorder upstream of a weir) are likely to be more influenced by the shape of the structure opening than by the roughness of the river channel at that location. Boundary Conditions. Boundary conditions are required at external boundaries to the model and they must be defined for all time steps. Thus, boundary conditions in unsteady models are often specified as time-series data rather than as the fixed values used in steady-state models. Inflow hydrographs (describing inflow over time) are often defined at upstream boundaries. At downstream boundaries, some form of water level is usually defined. This may be a time series of water level (for example, observed record tidal level) but could also be a rating curve or normal depth (in which case the model will generate the water level at each time step depending on the flow at that time step). The time-series data for multiple boundaries must share the same start time and time interval, and be consistent with other model input. For instance, specifying a downstream water-level boundary that has no feasible solution for the flow input provided can cause the computation to fail. Additionally, lateral inflows and outflows along a reach must be specified. If they are ignored and attenuation is significant, the model results will be based on an unrealistic flow rate.
600
Unsteady Flow Modeling
Chapter 14
Floodplain Mapping River Calder, Lancashire, England The River Calder catchment in Lancashire (UK), illustrated below, is exposed to westerly rainbearing weather systems and drains the high ground of the Pennine hills and then flows through steep valleys containing the urban and industrial areas of east Lancashire. These urban areas both exacerbate runoff and increase the potential for flooding. Urban areas in the catchment have a history of flooding stretching back to eighteenth century.
A series of particularly damaging floods in recent decades have prompted the construction of a number of flood alleviation schemes that have improved but not eliminated flooding to property in the catchment. It is in recognition of the continuing flood risk to urban areas on the River Calder corridor that the UK Environment Agency commissioned a modeling study of the major watercourses in the catchment. The objective of the study was to quantify and map the spatial extents of flood events with annual probabilities of occurrence in the range 50–1% (2 to 100 year recurrence). Although a steady-state computational hydraulic model would have sufficed for purposes of mapping flood extents, the outcome would have been conservative flood outlines, given the inability of such models to simulate attenuation/storage effects and other time-variant hydraulic behavior. A hydrodynamic model with time-stamping and volume-tracking capability was more appropri-
ate. With an eye to the future for applications other than flood mapping (such as flood forecasting), the client specified a hydrodynamic model. Nevertheless, hydraulic modeling commenced with a steady-state model, the view being that this type of model is much quicker to construct than the hydrodynamic equivalent and would provide channel capacity and preliminary mapping information that would form a basis for discussion early on in the project. It would also point to potential problem areas (such as steep reaches or stretches of river with a rapidly varied cross section profile) before the more intricate hydrodynamic model was developed. The steady-state model was subsequently superseded by a hydrodynamic version. Like its steady-state counterpart, the hydrodynamic model was constructed by rearranging topographic survey data to form an interconnected river network. In the process, channel cross-section data was restructured into spatially separated river cross sections, river centerlines and river reaches. Although represented in the steady-state model simply as extensions of the inbank cross sections, floodplains were modeled as separate entities (flood cells) in the hydrodynamic model, with the cells hydraulically-linked to the river channel via lateral weirs. The spatial location of the flood cells, the bathymetry of which was derived from a Digital Elevation Model of the catchment, is illustrated in the figure at the top of the next page. Completion of hydrodynamic model construction was followed by calibration, with the objective of fine tuning such empirical hydraulic parameters as channel roughness and weir coefficients. Calibration inflows consisted of rainfall runoff boundaries, driven by spatially averaged rainfall from intensity rain gauges within the Calder and nearby catchments. The process itself involved variation of the empirical parameters until a match was obtained between modeled and observed flow and water level time series at river gauges. In all, recorded hydrometric data associated with four flood events in the early to mid 1990s was employed in the calibration. (continued)
Next Page
Section 14.4
Practical Choice of Unsteady Modeling Approach
The calibrated model was then verified by retaining the empirical coefficients obtained during the calibration stage and comparing predicted flow and level time series at river gauging stations with those recorded during three further flood events in the late 1990s. As with calibration, verification inflows were generated by rainfall runoff boundaries fed by recorded precipitation. The indication from the calibration and verification process was of good agreement between hydrodynamic model simulations and observations. It was therefore concluded that the model represented an acceptable characterization of
601
the hydraulic regime in the watercourses within the River Calder catchment. The calibrated and verified model was used to delineate flood outlines in the River Calder catchment in a process that involved transposition of predicted water levels (of given probability of occurrence) and the topographic survey data using geographical information system (GIS) techniques. The outline obtained for a flood event with a 1% probability of occurring in any one year is illustrated in the following figure where its spatial spread, relative to the modeled flood cells, is apparent.
Previous Page
602
Unsteady Flow Modeling
Chapter 14
Initial Conditions and Warm-Up. To solve the unsteady flow equations, the software needs values of discharge and stage at all cross sections at the time corresponding to the beginning of the simulation; these values are called the initial conditions. Many unsteady flow models assume a steady, nonuniform initial flow and calculate the initial water surface profile using a standard-step backwater technique. The modeler need only provide the initial discharge in the river. Another consideration is warm-up, which is the time required for initial conditions to stabilize over the entire model. This is a result of differences between the steady-state calculations undertaken for the initial conditions and the results of the unsteady calculations at the first time step. The warm-up time is longer if there are features within the model that are not well represented by the steady-state calculations used for the initial conditions, such as lateral structures. Before a solution using time-series boundary conditions is attempted, each hydrodynamic model run should be computed using constant boundary conditions for a sufficient duration to produce a balanced, steady-state condition. In many models this is a built-in process, but one over which the user can exert control. For example, the default setting in HEC-RAS is for one warm-up time step using the same time step, ∆t, specified for the main computation. If initial instabilities cause model instability then, as well as checking initial conditions, the modeler may want to consider forcing a longer warm-up time, possibly with a shorter time step. Another alternative is to force additional warm-up time by defining an initial period of constant flow in the inflow boundary conditions before the hydrograph begins to increase. Although the warm-up is used to achieve stable initial conditions, some simulations start in the middle of an unsteady flow process. For example, results at some point during a previous unsteady run may be used to hot-start a second unsteady run. This allows smaller time steps to be used during the first run, for example, without having to run the whole simulation at such time steps. This approach can also be used to start with an initial flow for which the model is known to be stable, then ramp the flow up or down to the starting flow of the hydrograph. This is particularly useful for obtaining initial conditions for low flows when stability issues can be more of a problem, due to the high Froude numbers and the greater difference between steady-state and unsteady calculations.
Hybrid Approach For steep rivers, a hybrid approach can be more suitable than hydrodynamic routing. The unsteadiness of the flow (or, more precisely, the effects of attenuation and lateral inflows and outflows) is accounted for with hydrologic routing, and the water surface profile calculations are undertaken with a steady, nonuniform flow model. Examples using HEC-HMS or HEC-1 for routing and HEC-RAS or HEC-2 for profile computation are documented in the HEC-HMS Technical Reference Manual (USACE, 2000) and are discussed in Chapter 8. Hybrid modeling is also a useful stepping stone for those familiar with steady-state models who want to learn more about unsteady approaches and for preliminary and investigatory work. As this chapter shows, unsteady (especially hydrodynamic) models are not always straightforward and, despite the impressive software available, the analysis takes longer than a steady-state approach. Hybrid modeling should therefore not be overlooked as a valid alternative to hydrodynamic modeling.
Section 14.4
Practical Choice of Unsteady Modeling Approach
603
Troubleshooting Models Some of the more common problems and suggested solutions that occur with unsteady flow models are summarized in Table 14.7. Many of these problems are associated with hydrodynamic modeling rather than the simpler routing approaches. Table 14.7 Common problems with unsteady models and suggested solutions. Problem
Cause
Solution
Undershooting (reporting) of flow in advance of the rising limb of the hydrograph.
Feature of the Muskingum method.
The time step should never be greater than the K parameter.
Model instability, especially at the start of the simulation.
• Noisy or erroneous boundary data. • Poor initial conditions.
• Graphically check the boundary data for noise and smooth the data, if necessary. • Check that initial conditions are consistent with the first values in the boundary conditions. • “Hotstart” from a previous stable simulation.
Model will not run at low flows.
The profile of the river bed as deduced from the cross-section data is “saw-toothed.” At low flows, there is insufficient energy or flow volume to create a positive hydraulic gradient, or the flow becomes supercritical. The basic St. Venant equations cannot handle supercritical flow.
• Modify cross sections to remove “steps” in the longitudinal section. • Add a “pilot” or low-flow channel (some programs have a utility to do this or will do so automatically). • Add weirs where steep bed steps occur. • Start the simulation at a higher flow rate. • Add small lateral inflows (for example, 1 ft3/s) that can be extracted further downstream to avoid massbalance errors. • Most commercial packages cope with high Froude numbers in the solution by progressively removing the acceleration term in the momentum equation (Equation 14.5).
Model fails
• • • •
• If the flow is only locally supercritical (for example, at bridges and culverts), consider entering a rating curve. • If the flow is supercritical for significant reaches, then consider a steadystate model using flows routed with a simple routing model. • Decrease the time step. • Add interpolated cross sections. • If supercritical, increase n. • Adjust shock losses such as the expansion and contraction coefficients.
Flow in the main channel reduces and/or too much flow spills from the main channel.
Lateral connection between the river and floodplain is unrealistic.
The flow is supercritical. The time step is too large. Cross-section spacing is too large. Cross-section geometry is changing too quickly.
Adjust the lateral-spill weir lengths or weir equation coefficients to achieve a more realistic flow split.
604
Unsteady Flow Modeling
14.5
Chapter 14
Unsteady Flow Modeling Using HEC-RAS The preceding sections of this chapter examine the theoretical background of various modeling approaches and explain when an unsteady flow solution is appropriate. The capability to model unsteady flows is present in HEC-RAS for version 3.0 and higher. The following sections provide an introduction to hydrodynamic simulations with HEC-RAS. The program does not include any of the hydrological routing techniques that have been described; most of them are provided within the HEC-HMS software. However, level-pool-type routing can be achieved using an online storage area, which is illustrated at the end of this section. The key stages in building an unsteady model in HEC-RAS can be illustrated using a single bridge modeling example. This section uses the Beaver Creek model (supplied as steady-state Example 2 in HEC-RAS v3.1) and explains the steps involved in converting it into an unsteady model with a flood storage area. The reader can open this model (Single Bridge – Example 2, file BEAVCREK.prj in Steady Flow Examples) to follow the discussion. It uses the basic geometry file (BEAVCREK.g01 – Beaver Cr. + Bridge – P/W). An exercise with simple channel geometry is included at the end of this chapter; it does not require access to the Beaver Creek model.
Geometric Data Entry and Preprocessor The basic geometry of the river channel system (reaches, junctions, cross sections, and structures) is entered in the same way for both unsteady and steady flow models. Running the model under steady-state conditions over the desired range of flows prior to simulating unsteady conditions is recommended. The preliminary runs help the modeler to see potential problems at particular flows (for example, high Froude numbers). Before undertaking an unsteady flow simulation, parameters for the Hydraulic Property Tables (HTabs) must be set at each cross section and bridge/culvert cross-
Section 14.5
Unsteady Flow Modeling Using HEC-RAS
605
ing. These tables are generated during the geometry preprocessing stage of the simulation. For cross sections, the tables provide values of various hydraulic properties (for example, flow area) over a range of possible water levels. For bridges and culverts, a headwater-versus-discharge relationship is calculated for a range of possible tailwater elevations. As the water level changes during an unsteady simulation, the program obtains the values for relevant properties from the Hydraulic Property Tables. The geometry preprocessor is run from the Unsteady Simulation Editor. It can be run independently of the unsteady flow simulation and postprocessor, and it does not require a flow file or time window. The functions of the preprocessor are to • Reduce simulation time (although this is less of a priority with todayʹs faster computers). • Help with model troubleshooting by providing a way for the modeler to check hydraulic tables. No preprocessing is undertaken for weirs because weirs may contain gates whose opening heights change during the simulation. Thus the hydraulic behavior of the structure may not be a property of only the geometric data. As with steady-state simulations, the gate openings are defined in the flow file. As discussed in Table 14.5, unsteady modeling provides a number of choices for floodplain representation. The geometric data requirements for each option are outlined below. An example is given in which a lateral spill into a flood-storage area is added. Cross-Section Preprocessing. The parameters for cross-section preprocessing are set in the table shown in Figure 14.13, in which the starting elevation, increment, and number of points at each cross section can be set. (The table is accessed from the Geometry Editor.) Hydraulic properties will be calculated at the starting water elevation and at a number of other higher water levels. The maximum water level elevation considered is given by (Maximum Water Level) = (Starting Elevation) + [(Number of Points) × (Increment)] At each water level shown in Figure 14.13, the geometry preprocessor calculates the flow area and conveyance within the main channel as well as the left and right overbank areas. Nonconveying storage (that is, ineffective flow area) is also calculated. The results can be viewed in graphical (Figure 14.14) or tabular form (Figure 14.15). The default values for the cross-section table parameters are • Starting Elevation: Channel minimum plus 1 ft (U.S. Customary units) or 1 m (SI units). • Increment and Number of Points: Default increment is 1 ft or 0.3 m and the corresponding number of points is that required to yield a maximum water level at or above the elevation of the highest point defined for the cross section. However, the minimum number of points is 20, so if fewer than 20 points are required to reach the highest cross-section point using the default increment, the number is set to 20 and the increment reduced accordingly.
606
Unsteady Flow Modeling
Chapter 14
Figure 14.13 Parameter editor with data for cross section 5.99 in the Beaver Creek model.
Figure 14.14 Graphical results for model entered in Figure 14.13.
Section 14.5
Unsteady Flow Modeling Using HEC-RAS
607
Figure 14.15 Tabular results for model entered in Figure 14.13.
Default values are often appropriate and may not require alteration. However, the modeler should consider the implications of the default values and, after first running the geometry preprocessor, examine the resulting Hydraulic Property Tables (Figures 14.14 and 14.15). These checks should ensure the following: • Starting elevation is at or below expected minimum water levels (for very small streams analyzed in SI units, 1 m above the channel bed may be too high). • Maximum water level is above the expected maximum water level. • The numbers of points and increments allow adequate resolution of area and conveyance changes with depth. • In general, the increase in area and conveyance with depth is smooth. The reason for any sudden changes should be checked (for example, depth corresponds to top of levee or ineffective flow area). For example, if the Beaver Creek geometry model is preprocessed using default HTab settings, the results for cross section 5.99 are as shown in Figures 14.14 and 14.15. The following can be seen from the figure: • The channel flow area increases smoothly with depth. • The valley and combined-flow areas increase rapidly above the top of the levee. • The conveyances cannot be seen clearly due to the scale of the graph. HECRAS allows the conveyances to be viewed separately, as well.
608
Unsteady Flow Modeling
Chapter 14
Bridge and Culvert Preprocessing. The Hydraulic Table parameters for bridges and culverts are set from within the bridge and culvert data editor. The water level elevation range is taken from the cross sections adjacent to the bridge or culvert, but the user must specify the following (see Figure 14.16): • The number of points on the free-flow curve (more points results in a more detailed curve but longer preprocessing time). The free-flow curve applies when tailwater has no effect and there is a single value relationship between headwater and flow, which is when critical depth occurs either inside the bridge or over the deck (if pressure/weir flow is selected as the high-flow method). • The number of submerged curves (that is, the number of different tailwater levels considered). • The number of points on the submerged curves (more points result in a more detailed curve but longer preprocessing time). • The maximum expected headwater elevation. The default is the maximum elevation defined in the upstream cross section. A number of optional settings can be used to confine the range of water levels and flows to be considered to the expected maximum values. Defining the range in this way can help to reduce processing time and improve resolution of the curves by concentrating points in the range of interest. As with cross sections, the graphical and tabular results should be reviewed to check the following: • Headwater generally increases smoothly with flow. Although rapid changes may occur at the switch between low- and high-flow calculations, vertical or crossing lines could cause problems during an unsteady simulation. Setting the bridge pressure flow criteria to water surface rather than energy grade may also be appropriate. The ineffective flow settings on adjacent cross sections also affect the bridge curves. • The maximum headwater level is above the maximum expected water level at the bridge (there may be no need to calculate up to the maximum elevation in the channel if it is well above the maximum flood level).
Figure 14.16 Default settings for bridge 5.4 in the Beaver Creek model.
Section 14.5
Unsteady Flow Modeling Using HEC-RAS
609
• The number of points and curves allows adequate resolution of the way headwater changes with flow and tailwater level. For example, for the bridge at Station 5.4 in the Beaver Creek Model, the graphical HTab results using the default settings are shown in Figure 14.17. Between the bridge soffit (low chord) and bridge deck (high chord) is a zone in which headwater increases rapidly as the bridge flow is forced under pressure. Weir flow occurs over the bridge deck. However, the curves are calculated for an unrealistically large range of flow values.
Figure 14.17 Graphical results for the default settings for bridge 5.4 in the Beaver Creek model.
If the optional settings are used to limit the maximum headwater and flow to realistic values (Figure 14.18), then the curves show more detail in the important region between soffit and deck (Figure 14.19). The pressure flow criterion for the bridge was also set to water surface (rather than energy grade) for this example. This prevents the computations switching to pressure flow too soon as the hydrograph is rising. Weirs and Gates. There is no preprocessing with weirs since they may contain gates whose opening heights change during the simulation. An additional consideration for weirs in unsteady flow models is that it may be possible for the water level to be below the weir crest with all gates closed at some point in the simulation. This condition would result in zero flow downstream of the weir, which would cause the model to fail. The weir data editor provides an option to specify a pilot discharge that will be used to keep the downstream channel wet in such situations.
610
Unsteady Flow Modeling
Chapter 14
Figure 14.18 Optional settings for bridge 5.4 in the Beaver Creek model.
Bridge Deck Level
Bridge Soffit Level
Figure 14.19 Graphical results for the optional settings for bridge 5.4 in the Beaver Creek model.
Modeling Floodplain Geometry As described in Table 14.5, there are four main options for modeling floodplain flow in unsteady flow simulations: • Extended cross sections • Extended cross sections with ineffective flow • Lateral spills with storage units • Lateral spills with parallel channels
Section 14.5
Unsteady Flow Modeling Using HEC-RAS
611
The methods to model each of these within HEC-RAS are described in the following sections. Extended Cross Sections and Ineffective Flow. The simplest option for modeling floodplain flow is to use extended cross sections with ineffective flow areas. The geometry data requirements for this approach are the same as those for steady-state simulations. The floodplain areas that will not actively convey flow are designated as ineffective flow areas, and, in unsteady modeling, the filling of such areas with water may lead to some attenuation of the flow (steady-state models do not account for flow attenuation). The storage provided by these areas is shown in the Cross-Section HTab parameters. For example, in the Beaver Creek Model, if the left overbank area below the levee is designated as permanent ineffective flow, the resulting HTab graphs are as shown in Figure 14.20. For elevations above the levee, the permanent ineffective flow area provides a fixed amount of storage and the rapid increase in valley flow area shown in Figure 14.14 is no longer apparent. It should be noted that if the ineffective flow area had been defined as nonpermanent, then, because of the presence of the levee that prevents flow into this section until the water level is above the level of the ineffective area, the ineffective area would have no effect at all. Lateral Spills with Storage Units. Flood storage areas are added to an unsteady HEC-RAS model by drawing a polygon, as shown in Figure 14.21. Topographic data can be added to the storage area, as well. If the storage area can be approximated by a flat area with vertical walls, the user need only give the bed level and plan area. For a more detailed representation of the storage volume available, the user can define a curve of volume versus elevation.
Figure 14.20 Ineffective flow area as storage in HTab parameters.
612
Unsteady Flow Modeling
Chapter 14
Figure 14.21 Adding a storage editor in the Geometry Editor.
The storage area is normally connected to the river by a lateral structure (see Chapter 12). This can incorporate culverts (which may be flapped), gates, or a lateral rating curve. For online storage areas, the river can be connected directly. For the Beaver Creek Example, a lateral structure was defined at station 5.6. The weir is 380 ft (116 m) long with a crest elevation of 215 ft (66 m) at the upstream end and 214 ft (65 m) at the downstream end. Six, 2 ft (0.6 m) high, 6 ft (1.8 m) wide gates, all having an invert elevation of 211.5 ft (64.5 m), were added to allow outflow from the storage area (see Figure 14.22). The weir discharge coefficient was set to 3.0 and the gate discharge coefficient to 0.6. Defaults were used for the other coefficients. For very large floodplains, multiple storage areas can be defined and linked by hydraulic connections. This allows some time delay in the modeled movement of water across the floodplain. Hydraulic connections consist of a high-level weir and optional culverts or gates. If a culvert is defined, then geometric preprocessing is undertaken as for bridges and culverts and HTab parameters should be set. If only a weir is defined, the program can optionally compute HTab curves; but if gates are defined, this is not an option and gate settings must instead be provided in the flow file.
Unsteady Flow Data Editor The Unsteady Flow Data Editor in HEC-RAS is separate from the Steady Flow Data Editor; however, the principles are similar. At a minimum, data must be provided at the upstream boundary of all reaches and at the downstream boundary of the lowest reach. A time-series of flow or stage is, in general, needed for unsteady flow
Section 14.5
Unsteady Flow Modeling Using HEC-RAS
613
Figure 14.22 Lateral structure between the river and storage area.
modeling. Lateral boundary conditions may also be used to represent inflow from unmodeled tributaries or other sources. In addition, the model requires initial conditions to calculate the water level within the river system at the start of the simulation. Upstream Boundary Conditions. Three options are available for modeling the upstream boundary conditions: • Flow hydrograph – This is the most common choice and may be an observed flow at a gauging station or a synthetic hydrograph calculated from rainfallrunoff modeling or another hydrologic method. • Stage hydrograph – This is a time-series of water levels. It may be appropriate if the upstream boundary is affected by the tide, or if a rating curve at a gauging station is not available or is dubious. In the latter case, the observed stage record can be used and HEC-RAS will calculate the flow required to maintain this stage. • A combination of the stage and flow hydrographs – A combination can be used for real-time modeling in which observed stages are used for as long as they are available, after which predicted flows can be entered. The data entry for all these hydrographs is similar, in that they can be read from HEC-DSS or entered directly. For the Beaver Creek Example, a flow hydrograph is defined as shown in Figure 14.23. Data entry should be checked by plotting the data.
614
Unsteady Flow Modeling
Chapter 14
Figure 14.23 Flow hydrograph for the Beaver Creek Example.
Downstream Boundary Conditions. Five options are available for modeling the downstream boundary conditions: • Flow hydrograph – This is only likely to be used for observed events when the downstream boundary is at a flow gauging station. It can also be used to set a no-flow boundary. • Stage hydrograph – This is a common choice and may consist of observed levels at a gauging station or a tidal-level hydrograph. • Stage and flow – This hydrograph combination can also be selected and is most likely to be useful for real-time modeling applications. • Rating curve – This is the most common choice if the downstream boundary is located at a gauging station with a rating curve. • Normal depth – This is the most common choice if the downstream boundary is at an open channel section well upstream of any control section. For the Beaver Creek Example, a rating curve was defined as shown in Figure 14.24.
Section 14.5
Unsteady Flow Modeling Using HEC-RAS
615
Figure 14.24 Rating curve for the Beaver Creek Example.
Other Boundary Conditions. Three other boundary condition types can be applied at any cross section within the model to allow flow in or out (negative inflow) of the river system at an intermediate location: • Lateral inflow – Lateral inflow enters immediately downstream of the cross section to which it is attached and is most appropriate for point inflow from an unmodeled tributary channel or stormwater overflow. • Uniform lateral inflow – This type of inflow is distributed evenly along a reach between two cross sections. It is most appropriate for distributed point inflows (for example, a number of stormwater overflows) or overland flow. • Groundwater inflow – Groundwater inflow is based on Darcy’s Law and requires a time series of groundwater stage. The transfer of flow between the river and the groundwater reservoir is assumed to not affect the groundwater stage. Any structures (inline, lateral, or hydraulic connections) with gates require boundary conditions to define the gate openings: • Time-series of gate openings – This option may be used for an observed event when the gate position changes over time and these data are known. It is also commonly used when gate openings are fixed. • Elevation-controlled gates – This option automatically calculates gate openings based on the upstream water level, according to rules set by the modeler. • Navigation dams – For inline structures only, this option provides greater flexibility than the elevation-controlled gates option for automatic gate control. The modeler specifies stage and flow monitoring locations as well as a range of stage and flow control factors. This information is used by the soft-
616
Unsteady Flow Modeling
Chapter 14
ware to make decisions about gate operations to maintain water levels at the monitor locations. • Internal observed stage/flow hydrograph – This can only be used upstream of an inline structure. If only stage is given, the observed water levels (for example, from a gaging station) must be provided throughout the whole simulation time. The dual mode is primarily used in real-time operations. If the observed stage is available, this will be used to define water levels at this location within the model; otherwise, the forecast flow will be used. For the Beaver Creek Example, a time series of gate openings was used for the lateral structure (see Figure 14.25). The gates were set to be closed from 0 to 22 hours into the flow hydrograph and to open to a height of 2 ft (0.6 m) from 24 hours to 48 hours (once the flood has passed). Missing values were interpolated automatically using the software to reduce the amount of data-entry.
Figure 14.25 Boundary condition settings for the Beaver Creek Example.
Initial Conditions. The modeler must define the initial flow in each reach in the initial conditions tab of the boundary condition editor. This initial flow should be equal to the starting flow in the upstream hydrograph, with flow-change locations where any lateral inflow hydrographs have been specified to account for the addition of the initial flow at these locations. The discussion on initial conditions and warm-up time earlier in this chapter explains why it is important that the flows set in the Initial Conditions tab match the initial flows in the inflow hydrographs. If storage areas have been designated in the Geometry Editor, the starting water level should be set within the storage area. This may be the bed level if the storage areas are dry.
Section 14.5
Unsteady Flow Modeling Using HEC-RAS
617
It is also possible to “hot-start” the simulation using the results of a previous unsteady flow simulation. However, it is only possible to do this if a file, known as a restart file, containing the results of the previous simulation, was requested during that simulation. This feature may be particularly useful for long simulations. As discussed earlier, it may also be used if there is poor convergence at low flows. A low-flow solution may be obtained by slowly decreasing flows or by using a very small time step. The results of this can then be used to hot start the main simulation with a larger time step. For the Beaver Creek Example, the initial conditions are the starting flow of the hydrograph and the bed level of the storage cell.
Unsteady Flow Analysis The unsteady flow analysis window is separate from the steady flow simulation. In addition to selecting the geometry and unsteady flow files to be used, the modeler must choose which of three simulation stages to run as well as define the simulation period and time step (Figure 14.26). As the unsteady simulation progresses, run-time information, errors, and messages are written to a run-time window and a log file.
Figure 14.26 Unsteady flow simulation editor.
Simulation Stages. There are three major aspects to unsteady flow simulation with HEC-RAS, as illustrated in Figure 14.27: • Geometry preprocessor – The geometry preprocessor produces the HTab files, as discussed previously. • Unsteady flow simulation – The three parts to the unsteady flow simulation are – Formulating boundary conditions (Program RDSS.EXE) – Performing unsteady flow simulation (Program UNET.EXE) – Writing results to DSS (Program TABLE.EXE)
618
Unsteady Flow Modeling
Chapter 14
Figure 14.27 Schematic diagram of the HEC-RAS unsteady flow simulation.
• Postprocessor – The postprocessor extracts results from the DSS file at selected time intervals and runs SNET (the steady flow solver) for these snapshots in time. This process allows all standard HEC-RAS output to be obtained at these time intervals. Each time interval becomes one “profile.” An additional profile giving the maximum water level at all locations is always produced. Graphical animation of the simulation is achieved by stepping through these profiles. Simulation Period and Time Step. The simulation period is defined by the starting and ending times set in the simulation editor (see Figure 14.26). Boundary condition data in the flow file must be available for the whole of the simulation period; however, the simulation period can be shorter than the time period covered by the data. Three time-interval settings must be made: • Computation Interval – This interval is the time step, ∆t, discussed earlier in this chapter in the section “Time and Space Steps” (page 588). Where boundary conditions (inflows, tidal levels, gate heights) are changing rapidly, cross sections are close together. If velocities are high, the computational interval may need to be reduced in order to achieve model convergence. Smaller time steps will increase the overall calculation time. • Hydrograph Output Interval – This is the interval at which flow and stage values are written to the DSS file. A smaller interval will produce smoother curves, but more disk storage space is required. This value will not usually significantly affect the overall calculation time.
Section 14.5
Unsteady Flow Modeling Using HEC-RAS
619
• Detailed Output Interval – The postprocessor computes detailed information at this interval. A smaller interval produces smoother animation, but more disk storage space is required. The postprocessor stage of the simulation will also take longer. Even if none is selected, the postprocessor will run to produce the maximum water level profile. Simulation Messages and Errors. During the unsteady flow simulation, messages are written to the run-time window shown in Figure 14.28. One of the key messages to watch for is “Maximum iterations occurred” followed by the time, river, reach, cross section, water surface value, and estimate of error. If the error is very large, the message is ***. This message may be repeated for many stations or time steps. If this occurs, the model solution has not converged. The other message is !!WARNING MATRIX SOLUTION WENT COMPLETELY UNSTABLE!!. The simulation may then appear to finish very quickly, and this message may be missed—it is worth using the scroll bars on the run-time window to check that nothing has been missed. The results when this warning has occurred will be meaningless. For model troubleshooting, it is important to assess when and where problems first occur in the computation. For example, poor convergence right at the start of the computations, during the UNET stage, may indicate a mismatch between the initial conditions and the starting flow of the hydrograph. If a model error occurs during the postprocessor stage, the cause may be poor convergence during the UNET stage, resulting in unrealistic values in the DSS database.
Figure 14.28 Runtime window for HEC-RAS unsteady simulation.
620
Unsteady Flow Modeling
Chapter 14
Basic solution output is written to a log file with the suffix BCO. Additional information for debugging can be requested under “Options, Output Options:” from the Unsteady Flow Analysis Menu. Common messages and suggested solutions are listed in Table 14.8. See also the section on Troubleshooting (page 603). Table 14.8 Common messages in HEC-RAS computation log file. Message
Solution
NOTE: Discrepancies exist between the water surface and flow. Computed by the initial backwater and the water surface and flow after the first time step.
Check the initial conditions
WARNING! Extrapolated above the top of the property table at XSEC(S):
Check the HTab curves and parameters.
!WARNING, USED COMPUTED CHANGES IN FLOW AND STAGE AT MINIMUM ERROR. MINIMUM ERROR OCCURED DURING ITERATION **
Try a smaller time step.
WARNING! Water surface during matrix solution returned lower than cross invert at XSEC(S): (Adding a pilot channel or increasing the minimum flow might help)
Try increasing the initial flow or adding a pilot channel (slot).
Unsteady Flow Simulation Results Results of an unsteady simulation may be viewed in two ways: • Time-series plots of data from the DSS file – These data are the flow and stage values calculated by UNET. Velocities can also be obtained if they were selected in the Unsteady Simulation Editor.
Section 14.5
Unsteady Flow Modeling Using HEC-RAS
621
• Graphical and tabular data from the postprocessor – These data include all standard HEC-RAS output options and have been calculated by applying SNET (the steady flow editor) at a number of snapshots in time to produce a profile giving the instantaneous maximum water level at all locations. Time-Series Plots. To reduce disk-space demands, the default setting is for flow and stage hydrographs to be written to DSS at external and internal boundaries only (that is, upstream and downstream of each reach and at structures). To view other output locations, the modeler must select these before the simulation in the Unsteady Simulation Editor. Additionally, the modeler can ask for velocity time series to be written to the DSS file. Time-series plots of the data in the DSS file can be accessed in two ways. • Flow and stage hydrograph plots for different types of units (such as cross sections, bridges, and storage areas) can be accessed from the HEC-RAS interface. This allows different plans to be compared on the same plot but not at different locations. HEC-RAS provides standard plots for various structures, as well. • The data in the DSS can be accessed directly using the DSS viewer. The viewer allows plots of any compatible data to be compared and also allows access to other variables (for example, gate opening heights). Longitudinal plots of data can also be obtained. Figure 14.29 shows the standard flow and stage hydrograph plot for the storage area in the Beaver Creek Example. When the net inflow into the storage area is positive, the water level in the storage area rises. When the level in the storage area is higher than that in the river, outflow occurs over the weir (negative net inflow) and the storagearea level decreases. After 24 hours, the gates are opened and continue to drain the storage area. Flow and hydrograph plots can also be obtained for cross sections and any structures that exist in the model: bridges (show both headwater and tailwater stages), inline and lateral structures, storage area connections, and pumps. Rating curves from unsteady model simulations should be viewed from the tab in the hydrograph viewer, as illustrated in Figure 14.30. These will show looped rating curves where appropriate (rating curves in the usual location for steady-state simulations will not plot correctly). For bridges, there is also a plot of the headwater rating superimposed on the internal boundary curves generated by the geometry preprocessor, as illustrated in Figure 14.31. This can be useful in assessing the hydraulic performance of the bridge during the flow simulation. Flow hydrographs from different plans can be compared using these plots, but the DSS viewer must be used to compare hydrographs at different locations. Figure 14.32 shows flow hydrographs at the upstream and downstream ends of the model obtained from the DSS viewer. This comparison shows the overall flow reduction due to storage in the model.
622
Unsteady Flow Modeling
Chapter 14
Figure 14.29 Unsteady flow and stage hydrograph plot for storage area of the example.
Figure 14.30 Rating curves for the cross section.
Section 14.5
Unsteady Flow Modeling Using HEC-RAS
Figure 14.31 Internal boundary curves for the bridge.
Figure 14.32 Flow hydrograph upstream and downstream of the reach.
623
624
Unsteady Flow Modeling
Chapter 14
Graphical and Tabular Output. The postprocessor extracts flow and stage data from the DSS file at various times, as well as the maximum water level at each location. The steady flow solver (SNET) is then run for each of these profiles to allow the standard graphical and tabular outputs to be used to view unsteady simulation results. The profiles to view can be selected in the usual way, and different plans can be compared. Graphical animation is achieved by stepping through the instantaneous profiles. For a smoother animation, the detailed output interval should be decreased in the Unsteady Simulation Editor. When viewing the maximum water level profile, it is important to remember the following: • The maximum water level profile is always produced (even if no profile output is requested). • The profile shows the instantaneous maximum water level at each point in the simulation. • In reality, the maximum water level may occur at different times at each location (that is, the plot is not a snapshot of any actual situation). Therefore, some of the SNET calculations may fail to converge (particularly at drowned structures). This failure does not necessarily imply a problem with the UNET calculations data in the DSS file. If this does occur, then the maximum water level itself can be relied on, but for information about performance of structures, it is recommended to use the profile for the time when the stage was a maximum at that particular section. • The time at which the maximum water level occurs may fall between other outputs (for example, highest water level in profile output may occur at 12:00, but the maximum water level actually occurred at 12:29). Thus, the fact that the model provides the maximum water level profile ensures that the peak is not missed if it occurs during the interval between two instantaneous profiles. • The maximum water level does not necessarily relate to a maximum of another parameter (for example, flow or energy grade). The hydrographs can be checked to see whether maximum flow and water surface coincide. Figure 14.33 shows the standard summary output table for the lateral structure of the Beaver Creek example. All profiles have been selected, and it can be seen that the maximum water level profile also contains the highest flow over the weir, which probably occurs shortly after the profile generated at 12:00. Figure 14.34 shows the standard profile plot. Only the maximum water surface profile has been selected, but it has been compared with an unsteady simulation without the storage area. The flow attenuation caused by the storage pond can be seen to have prevented roadway flow over the bridge. Animation. The program automatically steps through all the profile outputs to animate the graphical output. Thus, a smaller detailed output interval results in a smoother animation. After the animation is initialized, simultaneous animation occurs in all open graphical windows. The speed of the animation can be controlled, as well.
Section 14.5
Unsteady Flow Modeling Using HEC-RAS
Figure 14.33 Standard summary output table for the lateral structure.
Figure 14.34 Unsteady flow profile plot for the Beaver Creek example.
625
626
Unsteady Flow Modeling
Chapter 14
Other Features in HEC-RAS Unsteady Flow Simulation Since Version 3.1, HEC-RAS has several advanced features that can be used when modeling complex or unusual unsteady flow situations. These features include pumps, mixed flow regime capabilities (subcritical, supercritical, hydraulic jumps, and drawdowns); the ability to perform dam break analysis; levee overtopping and breaching; and maintenance of minimum water levels for navigation dams. Some of these features are described in the following sections. Further details can be found in Chapter 16 of the HEC-RAS User Manual (USACE, 2002). Pumps. Pumps are used in unsteady modeling as they are in steady-state modeling. The pump location is first drawn in the geometry window. The pump data window is then edited to set the pump connections, pump rates, and trigger levels, as illustrated in Figure 14.35. The program automatically determines at each time step whether the pumps are on or off, depending on the calculated water levels. The hydrograph output shown in Figure 14.36 was obtained for the pump set in Figure 14.35, pumping from the Beaver Creek storage area described previously back to the river downstream of the bridge. The total pump flow rate decreases as the water level in the storage area falls and the pumps are progressively switched off. Mixed Flow Analysis. As mentioned in Table 14.7, most unsteady flow solution algorithms for the full St.Venant equations are unstable at high Froude numbers (Fr > 0.8) and hence modeling mixed flow regimes is not straightforward with an unsteady model. In order to improve stability, HEC-RAS employs the Local Partial Inertia Technique (LPIT) developed by Fread et al. (1986) as a user-selectable option under the Options menu of the Unsteady Flow Analysis dialog box. The method applies a reduction factor to the two inertia terms in the momentum equation as the Froude number approaches 1.0. Above Fr = 1, the two inertia terms are ignored. By default this option is turned off and the modeler should turn it on only if significant lengths of the river are critical or supercritical. Before using this option it is worth checking to see if the stability problems have arisen from factors such as local drops in the bed. These are better fixed by converting the drop to an inline weir or introducing a pilot channel rather than using the LPIT option.
Figure 14.35 Pump data entry in unsteady modeling.
Section 14.5
Unsteady Flow Modeling Using HEC-RAS
627
Figure 14.36 Pump hydrograph output for data entered in Figure 14.35.
The default values for the reduction factor computation are threshold Fr = 1 and shape factor m = 10. Lower values of a threshold Froude number of shape factor exponent cause the magnitude of the inertia terms to be reduced more quickly and thus increase stability, but decrease accuracy. This may be required to achieve convergence in a mixed flow analysis. Conversely, if the mixed flow solution is stable with the default values, the modeler should try increasing the exponent and evaluating its significance for the solution. In general, the effect of reducing the flow acceleration terms for unsteady mixed flow analysis is to spread sharp changes in the water surface over a number of nodes and thus smooth the water surface profile in regions of high Froude numbers. Figure 14.37 illustrates this concept by comparing the water surface profile from a mixed flow unsteady run with a constant flow rate to that from a steady-state backwater analysis. Online Storage Areas and Lakes. The Beaver Creek Example shows how storage areas can be used to represent offline floodplain storage. It is also possible to use storage areas to represent online lakes, as illustrated in Figure 14.38. The storage area should be drawn first in the geometry data window. The river reaches should then be drawn with one end connecting directly into the storage area. This method can be used within a larger model or to quickly set up a level-pool routing simulation of the type described in the theoretical section of this chapter. The cross-section data in the river reaches is not critical, if the details of an inline structure to control the outflow are known. (Note that two cross sections are required between the storage area and the inline structure). Figure 14.39 shows the attenuation effect of such a lake.
628
Unsteady Flow Modeling
Figure 14.37 Graphical output for mixed flow analysis.
Figure 14.38 Online storage area geometry.
Chapter 14
Section 14.5
Unsteady Flow Modeling Using HEC-RAS
629
Figure 14.39 Online storage area attenuation.
Rapid Failure of Structures. Data can be provided in the Unsteady Flow Analysis Editor to simulate breaches in both lateral structures (Levee Breach) and inline weirs (Dam-Break Analysis). The basic data window is the same in both cases and is illustrated in Figure 14.40 for the lateral structure in the Beaver Creek example. The final geometry of the breach must be described, along with the method of failure (overtopping or piping), the trigger water levels, and the formation time and progression. Figure 14.41 illustrates a profile plot from the levee-breach simulation for Beaver Creek, showing a stage during the formation of the breach. Inundation mapping based on the results from unsteady HEC-RAS simulations of dam or levee failure can be carried out using the HEC-GeoRAS program where GIS digital terrain data is available. Dam-Break Analysis. Simulating the effects of dam failure is an important tool in developing risk management strategies and emergency planning. Dam-break studies are now routinely carried out by dam owners and other interested parties. The DAMBRK program developed by the U.S. National Weather Service has been widely used. HEC-RAS also has the capability to model overtopping and piping failure breaches for earth dams. The more rapid failure modes of concrete dams can be modeled, as well. For a dam-break analysis with HEC-RAS, the first step is to represent the embankment, spillway, and any gates or other control structures using the Inline Weir option. The next stage is to enter details of the maximum extent of the breach or pipe and the time over which it is expected to occur. This is done in a separate dialog box accessed through the Breach (plan data) button on the Inline Weir Data Editor.
630
Unsteady Flow Modeling
Figure 14.40 Lateral weir breach data entry.
Figure 14.41 Lateral weir breach profile plot.
Chapter 14
Section 14.5
Unsteady Flow Modeling Using HEC-RAS
631
Levee Breaching. A breach of levees or earth embankment defenses is most likely to occur where the levee or defense is structurally weaker (for instance in older, less well consolidated banks), or more likely to be overtopped by water levels. There are three common mechanisms for levee breach initiation. The first is overtopping of the levee by high water levels and subsequent downward erosion, the second is seepage or piping through the bank (exacerbated, for instance, by rodent holes), and the third is mass wasting by slumping or sliding (see Morris and Hassan, 2003 and Chen and Anderson, 1987). These mechanisms have very different characteristics. An overtopping breach is likely to happen quickly, as the result of a high, peaked flood hydrograph, whereas a seepage or mass wasting failure is likely to take a long time to develop, occurring during a longer, less peaky flood hydrograph. Any particular failure event could consist of a combination of these mechanisms. The time that elapses between the initiation of a breach, its detection, and the full breach formation has implications for breach prevention measures and flood warning. A seepage failure, although slower to develop, is more difficult to observe in its early stages, and even if detected, it is more difficult to stop the full breach from developing (Wahl, 2001). In the case of a breach initiated by seepage/mass wasting failure, the breach will develop through slumping and sliding mechanisms to a point at which it can be overtopped. Once overtopped, the breach will continue to develop by progressive headcutting by supercritical flow from the toe of the embankment backwards. Physical modeling studies suggest that erosion is mainly vertical until it reaches the base of the embankment, with subsequent lateral erosion if a sufficient reservoir remains (Wahl, 1998). In reality, the process does not tend to be linear, as it is made up of a combination of continuous erosion and instantaneous failures (Mohamed et al., 2000). This results in an irregular outflow hydrograph shape. The rate of formation may depend on several factors, all of which vary along the banks of the river, including: • Initial crest level (which in turn affects initial discharge and erosional capacity) • Embankment design • Soil/material properties • Hydraulic loading Figure 14.42 illustrates the key parameters for a breach analysis. The final shape of a breach tends to be approximately parabolic or trapezoidal, with slopes equal to the angle of repose of the soil, although this is a simplification of reality, particularly for river embankment breaches, where physical modeling has shown that the downstream side may erode at a faster rate (Leconte, 1998). Levee overtopping and breaching can be analyzed within HEC-RAS by using the lateral structure option. The area behind the levee should not be included in the crosssection data of the main river and the lateral structure should be connected to either a storage area or another river reach. Once the physical levee information is entered, the modeler then uses the Breach button on the Lateral Structure dialog box to bring up the levee breach editor. Data entry is similar to that for dam-break analysis with the user entering the fully developed dimensions of the breach and the start time. After all the data are entered and the model simulation complete, the modeler should use the profile plot, lateral structure hydrographs, and storage area hydrographs to understand the results of the levee overtopping or breach.
632
Unsteady Flow Modeling
Chapter 14
Figure 14.42 Main parameters for breach modeling.
14.6
Chapter Summary This chapter reviews situations for which unsteady modeling may be required to accurately simulate a watercourse or provide answers relating to time-dependent effects. This discussion covers the effects of attenuation due to floodplain storage and flow restrictions and the resulting looped rating curves. Other situations, such as flow splits, controlled structures, tidal effects, levee breaching, dam breaks, and abstractions or pumping may often (but not always) require the use of unsteady modeling. This chapter reviews the theoretical differences between various types of unsteady flow simulation methods and provides guidelines for appropriate selection of a method. The most detailed unsteady flow simulation is based on the hydrodynamic flow equations, known as the St. Venant equations for one-dimensional analysis. HEC-RAS offers the modeler the option to undertake unsteady computations based on the St. Venant equations. However, unsteady modeling is rarely as simple or straightforward as adding a flow hydrograph in place of fixed flow rates. Unsteady models are inherently complex and require care in the choice of run-time parameters and often a review of the model setup and survey cross sections. Tips on how to review data and troubleshoot unsteady modeling have been provided, and perseverance is encouraged so that experience may be gained. The chapter presents an introduction to unsteady flow analysis. This process is illustrated by converting a steady-state example file provided with the HEC-RAS software to an unsteady model incorporating an off-line storage area. Further examples are provided as accompanying problems to this chapter.
Problems
633
Problems 14.1 Using HEC-RAS, enter the geometry data for the reach described in this problem. Perform a subcritical steady flow analysis for flows of 400, 600, 800, and 1000 ft3/s. The downstream boundary condition for all profiles will be normal depth for a channel slope of 0.0001. Answer the following questions. Create a river reach and add a cross section at river station 10 with the characteristics described in the following table. This is the most upstream cross section and has downstream reach lengths of 10,000 ft. After entering the data, copy this cross section to the downstream end of the reach (river station 0) and reduce all elevations by 1 ft at this location. Add interpolated cross section every 1000 ft between river stations 10 and 0. Upstream-most Cross Section (River Station 10) Station, ft
Elevation, ft
0
20
1
13
600
10
640
6
660
6
700
10
999
13
1000
20
Bank Stations
Manning’s n 0.08
L Bank Station
0.03
R Bank Station
0.08
a. What is the typical Froude Number for the profile with a flow of 1000 ft3/s? b. What is the top width for the 1000 ft3/s profile? c. What is the approximate slope of the rating curve in ft2/s at the upstream section? d. Using Equation 14.19 with the slope from Part (c), along with the top width from Part (b), what is the approximate flood wave velocity through the reach? e. Using Equations 14.12, 14.13, and 14.14, what is the relative magnitude of terms in the unsteady momentum equation likely to be for a flow of 1000 ft3/s? Which approximations to terms in the full unsteady flow equations might be appropriate? f. For the Muskingum Routing method, what is the value of K [use the flood wave velocity from the answer to (d)]? For a hydrograph rise of 5 hours, what is a suitable value for ∆t? 14.2 Using the geometry data from problem 14.1, add an inflow hydrograph starting at 300 ft3/s, increasing to 1000 ft3/s after 5 hours, decreasing back to 300 ft3/s at hour 11, and then remaining constant until hour 20. Use normal depth with a slope of 0.0001 as the downstream boundary condition. Perform an unsteady analysis. Use a starting time = 0000 and an end time = 2000 (i.e., 4:00 P.M.) to cover the hydrograph. Use a computational interval of 15 minutes, hydrograph output interval of 30 minutes, and a detailed output interval of 1 hour. Answer the following questions.
634
Unsteady Flow Modeling
Chapter 14
a. What is the travel time for the flood wave through the reach (difference in timing of the hydrograph peak at the upstream and downstream ends of the river)? b. How does this travel time compare to K calculated in 14.1(f) above? c. How much has the peak flow been reduced? 14.3 For the HEC-RAS files set-up for Problems 14.1 and 14.2, restrict the flow to only the channel portion (either adjust the cross-section data or use high levees or blocked areas). Repeat the steady and unsteady analyses. a. What effect does this have on the travel time for the floodwave? b. What effect does this have on the peak outflow? 14.4 Similar to Example 14.1, use the Muskingum Routing method to calculate outflows within a spreadsheet. Use the same inflows as Problem 14.1 and use the value of K from Problem 14.1(f). Use different values of X to best reproduce the outflow hydrograph simulated by HEC-RAS in Problems 14.1 and 14.2. What changes will need to be made to the Muskingum calculations to represent the channel-only routing in HEC-RAS from Problem 14.3? 14.5 Comment on what Problem 14.4 indicates about the use of these two different methods: full hydrodynamic modeling (HEC-RAS) and Muskingum Routing. 14.6 Within HEC-RAS, create a new project with a storage area of 62 acres and a bed level of –3 ft. The initial water level in the storage area is 0.3 ft. Create a reach that is upstream of and enters the storage area and another reach that discharges water out of the storage area. Each river reach will have two rectangular cross sections that are 30 ft wide and 10 ft deep, Manning’s n = 0.03, and bed levels and downstream reach lengths as listed in the following table. (Hint: Create the furthest upstream cross section first and use the Copy Current Cross Section command to create the subsequent cross sections). River Station
Downstream Reach Length, ft
Elevation of the Channel Bed, ft
900
300
0.3
600
0
0
300
300
0
0
0
–0.3
Create an upstream hydrograph starting at 30 ft3/s, increasing to 1500 ft3/s after 5 hours, decreasing to 30 ft3/s at hour 11, and remaining constant until hour 23. The initial flow downstream of the storage area is 30 ft3/s. Add a lateral inflow hydrograph to the storage area that is constant at 35 ft3/s over 23 hours. Use normal depth as the downstream boundary condition (slope = 0.001). Run the unsteady simulation over 23 hours with a time step of 1 hour and answer the following questions. a. What is the peak outflow? b. What is the peak stage in the lake?
Problems
635
14.7 Make two copies of River Station 300 from Problem 14.6: one 20 ft downstream of the lake and the second 40 ft downstream. Put an inline structure between the two copied sections, with an embankment height of 8 ft and four 5 ft x 5 ft gates with an invert level of 0 ft. Save as a new geometric data file. In the flow data editor add a boundary condition for the gates. First try Elevation – Controlled gates (use an initial and minimum elevation of 0.1 ft). Find an upstream water level to open the gates that just prevents overtopping of the embankment as the flood comes through. a. What is the peak outflow? b. What is the peak stage in the lake? 14.8 Construct a HEC-RAS model for the data given below. River stations 8 through 0 are based on the data of River Station 10. Perform a steady state flow simulation for a flow rate of 1000 ft3/s and normal depth as the downstream boundary condition (slope = 0.00056). In addition, run only the Geometry Preprocessor part of the unsteady flow simulation. Furthest Upstream Cross Section (River Station 10) Station, ft
Elevation, ft
–1482
15.0
–783
14.0
–617
13.6
–434
13.0
–252
12.5
0
12.0
6
9.1
9
7.0
13
6.0
27
6.0
32
6.0
38
7.0
40
10.0
44
12.0
219
12.0
306
12.0
425
12.4
481
13.0
743
14.0
1005
14.0
1355
15.0
1460
15.6
River Station
Elevation Offset from River Station 10, ft
Bank Station
Manning’s n 0.05
L Bank Station
0.035
R Bank Station
0.05
Downstream Reach Lengths, ft
10
0.0
8
–0.5
900 900
6
–1.0
450
636
Unsteady Flow Modeling
River Station
Chapter 14
Elevation Offset from River Station 10, ft
Downstream Reach Lengths, ft
5
–1.25
4
–1.5
450 900
2
–2.0
900
0
–2.5
0
a. View the hydraulic property tables for the cross sections. What happens to the values for conveyance area and top width as the water level rises past the top of the bank elevations at each cross section? b. What are the HTab parameters used (these will be defaults unless they have been changed by the user)? Do the curves have adequate resolution with these parameters? 14.9 Using the data of Problem 14.8, enter the following hydrograph as an unsteady boundary condition, set normal depth as the downstream boundary condition (slope = 0.00056), and initial flow as the first flow in the hydrograph. Run the unsteady flow simulation and postprocessor. Hours
Flow, ft3/s
0
309
1
588
2
809
3
951
4
1000
5
951
6
809
7
588
8
309
9
200
10
100
11
80
12
80
a. What is the largest computational interval for which no instability messages are given during the simulation? b. Does the maximum water level profile differ from the steady state profile from step 1? Why? c. Are all hydrographs smooth? What is the difference in peak flow at the crosssections 10 (upstream) and 0 (downstream)? What is the difference in the timing of the peak of the hydrograph at these sections? How has the hydrograph shape changed? d. Look at the rating curves; what do they show in terms of how water levels respond to increasing flow. Is there evidence of hysteresis (looped rating curves)? 14.10 Using the data from Problem 14.9, add a bridge 100 ft downstream of River Station 5, with soffit elevation of 9.0 ft, deck (high chord) elevation of 12.5 ft, and width of 100 ft. Set the low-flow bridge modeling method to energy only and
Problems
637
the high-flow method to pressure/weir. In the bridge HTab parameters, set the maximum headwater to 13.50 ft. Run steady-state and unsteady simulations using the same flow files as before (you may have to reduce the computational interval for the unsteady run compared to that used previously to avoid instability). a. Viewing the HTab curves for the bridge, what happens to the curves when the headwater level reaches the soffit? When it reaches the bridge deck? How could the ranges of water levels and flows covered by the curves be reduced to a more realistic range? b. Is the bridge overtopped during the simulation? c. How does the water level at cross-section 5 compare to the water level here from the steady-state solution with the bridge? If they are different, explain why. d. What is the difference in peak flow at cross-sections 10 (upstream) and 0 (downstream) now? Why is it different from the results in Problem 14.9(c)? 14.11 To alleviate the roadway overtopping in Problem 14.10, an embankment is proposed for the right bank upstream of the bridge. The area behind the embankment will act as storage for flow above the critical level for bridge overtopping. To model this in HEC-RAS: • Block off (using a blocked obstruction) the right-bank areas of River Station 6 and 5 (if this area is included in both the cross-section overbank and in a storage area, then there will be twice as much potential storage in the model than in reality). • Add a storage area on the right bank upstream of the bridge. Assume a constant area of 3 acres with a minimum elevation of 10.75 ft. (Donʹt forget to set an initial elevation in the flow file.) • Add a lateral structure to extend from River Station 6 to 5. Its position should be next to the bank station and it should be connected to the storage area. The embankment should start 0 ft downstream of RS6. Set the embankment of the weir at 12.25 ft at the upstream end, sloping to 12 ft at the downstream end (1350 ft long). After running the model, answer the following questions: a. Does the storage prevent overtopping of the bridge deck? b. What is the maximum volume of water in the storage area? c. What is the maximum flow into the storage area? d. What is the difference in peak flow at the cross-section 10 (upstream) and 0 (downstream)? e. Lower the weir crest by 0.25 ft at each end. What happens to the bridge? Why? f. Raise the weir crest by 0.25 ft at each end compared to original levels. What happens to the bridge? Why?
CHAPTER
15 Importing and Exporting Files with HEC-RAS
Many sources of data, in various formats, may be available to the modeler during a floodplain study. For example, cross-sectional data may be available in GIS or CADD format, digital photos of the site may have been taken, and a portion of the stream may have been previously modeled with HEC-2. Rather than re-enter this information into HEC-RAS, it is desirable to have a means to import this data directly into the program. After the hydraulic analysis is complete, it may also be useful to export the results back to the GIS or CADD program to develop floodplain maps. Fortunately, HEC-RAS allows the modeler to exchange data with a large variety of applications. This chapter discusses the various importing and exporting capabilities of HEC-RAS while concentrating on the exchange most often made by the modeler—importing HEC-2 files for use in HEC-RAS.
15.1
Imported File Types HEC-RAS was developed to supersede the DOS-based HEC-2 program, which is no longer maintained or distributed by USACE. However, tens of thousands of HEC-2 files were prepared over the past few decades and, in many cases, still provide the most up-to-date data on existing stream conditions. In addition, current FEMA guidelines dictate the use of HEC-RAS for river system modeling, which means that many HEC-2 models must be converted into HEC-RAS format. Due to the sheer number of HEC-2 models available, HEC-2 files will normally be the most common file type imported into HEC-RAS; however, a variety of data from different programs and formats may be utilized by HEC-RAS, including files containing only geometry and discharge data. This section discusses the types of files and data that may be imported, including HEC-2, HEC-RAS, UNET, Corps of Engineers survey data, GIS, DSS, and spreadsheet and text files.
640
Importing and Exporting Files with HEC-RAS
Chapter 15
HEC-2 Files HEC-2 has been in use since the late 1960s. In fact, HEC-2 data sets have been developed for rivers and streams throughout the world. It is rare to find an urban stream or major river in the United States that has not been previously modeled using HEC-2. HEC-2 data sets are available from federal agencies; consulting firms; or local, state, or provincial governments. These data sets can be imported into HEC-RAS as either new project files or as reach-specific geometric and flow data to be used with other HECRAS input. Importing HEC-2 data into HEC-RAS is discussed in detail in Section 15.4.
HEC-RAS Files HEC-RAS geometry, flow, and plan files can be imported from one HEC-RAS project to another. For example, say a tributary was developed in HEC-RAS separately from the main stem and the modeler wishes to combine these two models into one working model. In this case, the tributary data can simply be imported into the adjacent reach model.
UNET Files The UNET program has been widely used as the Corps of Engineersʹ unsteady flow modeling program since the early 1990s. Many UNET data sets are available, although these models are primarily for large rivers on mild slopes where unsteady flow methods are more appropriate than steady flow methods. HEC-RAS Version 3.0 and higher includes unsteady flow analysis, and UNET geometry files (CSECT files) can be imported into the unsteady flow module. Although the data, including the geometric information, are imported correctly, the HEC-RAS basin schematic is not updated because the HEC-RAS importer has insufficient information to perform this function. The hydraulic connections will be located correctly during the importing of
Section 15.1
Imported File Types
641
the UNET data, but the modeler must define the stream layout of the imported data on the schematic by hand. As stated in earlier chapters, the HEC-RAS basin schematic does not affect the hydraulic calculations; it is used for a visualization of the watershed layout only.
Corps Survey Data Files The U.S. Army Corps of Engineers has developed a standard file format for survey data. EM1110-1-1005 (USACE, 1994c) can be used to obtain specific information on this format. HEC-RAS Version 3.0 can only read the cross-section data from the survey data file; all non-cross section data are not used. Examples of this standard file format for survey data are available in Appendix B of the HEC-RAS User’s Manual (USACE, 2002). Use of this format with HEC-RAS has been limited to a few USACE Districts. Most survey data are more easily recorded in GIS or text file format.
GIS/CADD Files Geometric data is often stored in the form of a database, such as within a Geographic Information System (GIS) or within Computer Automated Drafting and Design (CADD) files. The modeler can import geometric data from these systems; however, the procedure is complex and specific GIS and CADD programs must be used. HEC-GeoRAS. If GIS files are to be utilized, the modeler can use the HEC-GeoRAS program (USACE, 2000b) to automate the data transfer. HEC-GeoRAS is an ArcView (ESRI) GIS extension that provides the user with procedures, tools, and utilities for preparing GIS data for import into HEC-RAS and for subsequently generating GIS data from HEC-RAS output. An import file containing the pertinent data is prepared from an existing digital terrain model (DTM)—HEC-GeoRAS version 3.0 requires the DTM to be in a triangulated irregular network (TIN) format. The cross-section data can then be imported to a HEC-RAS model, profiles computed, and the output exported back to the GIS data store to plot the water surface profiles and create flood maps for an area. Because HEC-GeoRAS is an ArcView GIS extension, the modeler must have a license to ESRI’s ArcView GIS version 3.1, or higher, with the 3D Analyst extension. (The Spatial Analyst extension is recommended to decrease the post-processing time.) Although the user does not need to have extensive experience using a GIS, knowledge of ArcView GIS is very helpful. HEC-RAS geometry data for valley cross sections can be imported from a GIS database and can include elevation-station data for each cross section, bank stations, reach lengths, and Manningʹs n values being imported. The graphical editor is a useful tool for adjusting imported data. The Cross Section Points Filter will likely have to be employed, as cross sections developed with GIS tools often exceed the 500-point maximum in HEC-RAS. The imported bank stations, reach lengths, and Manningʹs n values should be reviewed by the engineer to ensure that they represent field conditions. Following the data import, the engineer will need to add expansion and contraction coefficients, bridge and culvert geometry, levees, ineffective flow constraints, discharges, and boundary conditions. For detailed guidance on importing GIS data, refer to the HEC-GeoRAS Userʹs Manual (USACE, 2000b) and the HEC-RAS User’s Manual, Chapter 14 and Appendix B (USACE, 2002).
642
Importing and Exporting Files with HEC-RAS
Chapter 15
DSS Files HEC’s Data Storage System, HEC-DSS (USACE, 1994), was developed in the 1980s for use in USACE studies and projects that utilized several different hydrologic and hydraulic programs during the analysis. HEC-DSS is a database system that is designed to store, manipulate, modify, and retrieve data which can be displayed through various utilities or programs. Prior to the development of DSS, hydrology, hydraulics, and frequency analysis for an existing watershed were often performed with separate programs and the output was then utilized by still other programs to evaluate the impacts of reservoirs or other flood reduction components. The time-series data generated could be voluminous. Manually taking the output data from one program and transferring it to the next program often required lengthy and painstaking information exchanges and often resulted in input errors. Automatically reading and writing data from one program to another through a DSS database greatly reduces the manpower and time required for these activities as well as reducing the potential for data input errors. DSS can be used to store time series data (such as a stage or discharge hydrograph), paired data (such as stage-discharge or discharge-frequency data), or text data. Using a DSS database simply requires assigning a unique name to reference the data needed or generated for use by another program and establishing links between programs. When using HEC-RAS in steady flow mode, DSS files are seldom needed. However, DSS is a must in an unsteady flow analysis to facilitate the transfer of data. For example, data could be read from a discharge hydrograph computed by HEC-HMS and transferred into a HEC-RAS unsteady flow run as a boundary condition. DSS Pathname. DSS records require a unique pathname of up to 80 characters to organize and store the data. The pathname is separated into six parts assigned as A/B/ C/D/E/F, where A = river name, B = point name (in HEC-RAS, a River Station), C = data type, D = start date, E = time increment, and F = optional name (in HEC-RAS, usually a Plan Name). HEC-RAS can automatically write the A and B names while the modeler assigns the remaining identifiers. The data type (C) is shown as Flow, Stage, TW, Peak Flow, Volume-Flow, and so on. The time increment (E) is the output interval for unsteady flow (five-minute, one hour, and so on). A name for F may be assigned or left blank by the modeler. An example of an assigned pathname for use by HEC-RAS to extract the flow data for an unsteady flow analysis is MISSISSIPPI RIVER/MEMPHIS/FLOW/01JAN1900/6HOUR/OBS. This pathname would define recorded (observed) period of record discharge data beginning on January 1, 1900, with flow data every six hours for the Memphis gage on the Mississippi River. Following the unsteady flow computations, HEC-RAS may store the computed stage data at (say) River Station 600.85 to DSS under the file name MISSISSIPPI RIVER/600.85/STAGE/01JAN1900/6-HOUR/BASE. This file would contain the computed river elevations for base conditions at River Station 600.85 at 6 hr intervals for the period since 1900. Time-series data for observed flow and stage for many rivers and streams are generally available through the USACE’s DSS database at each Corps District office. The DSS program also allows other data formats, facilitating the use of data from the USGS, National Weather Service, and other agencies. DSS Programs. The data in a DSS file can be accessed, viewed, and manipulated with individual programs available under the overall DSS umbrella. These programs
Section 15.1
Imported File Types
643
include a variety of data-entry programs for different data formats, a utility program for editing data, a mathematical program for performing many different computations on the stored data, and graphics and report format programs for viewing and outputting the data in table form. USACE publishes a document with a detailed discussion on the procedures for using these programs (USACE, 1994). Importing DSS Files. To import files into HEC-RAS using DSS, the modeler establishes the connection between the two programs and then imports the data. DSS files used for computations are specified in the Steady or Unsteady Flow Editor on the main (project) menu. The modeler specifies the discharge and/or boundary data from this menu. For example, if DSS data are to be used from a HEC-HMS run, the modeler selects File, Set Location for DSS Connections to indicate how to link the flow data from HEC-HMS to the HEC-RAS model. Figure 15.1 shows the Set Locations for DSS Connections window. When the template on Figure 15.1 first appears, the modeler will accept or modify the “River Name,” “Reach,” and “River Station” values shown near the top of the dialog box. A river station to link the discharge to is established by clicking the Add Selected Location to Table button, which in the example shown in Figure 15.1 displays the upstream-most location for Bald Eagle Creek, Reach 1 on row 1. If this is not correct, the modeler enters the river station desired for linking with the flow file. The modeler then enters the name of the DSS file containing the flow data in the box labeled DSS File, or clicks on the open file icon to the right of the box to find the filename. When the name of the file is entered, as shown in the DSS file name box, all the available DSS records from the file are displayed in the lower part of the dialog. In this example, several hundred DSS records exist for the chosen file. Although these records are for an unsteady flow analysis, a particular discharge hydrograph can be selected from which to compute a profile for the peak flow for use in a steady flow analysis. Highlighting the desired data file (Bald Eagle, RS99452.75 in Figure 15.1) and double-clicking on this record links this data path (discharge hydrograph) with the river, reach, and river
Entering name brings up DSS records
Adds selected record to upper section
Double-click on desired entry or select and press
Figure 15.1 Establishing connections for flow data using HEC-DSS.
644
Importing and Exporting Files with HEC-RAS
Chapter 15
station of row 1 and the DSS data file name will be added to row 1 following the stream name, reach, and river station (not shown). With the DSS record highlighted, the modeler can also choose Select DSS Pathname to link this data with the selected river station. This process is repeated for other river stations where discharge information is needed. Once all river stations in HEC-RAS are correctly linked with the corresponding DSS records, the modeler can instruct the program to use the peak discharge, for a steady flow run, or the flow for any selected time period, as illustrated in Figure 15.2. This menu is called from the Steady Flow Editor, by selecting File, DSS Import. The modeler can check the box to specify the use of peak discharge to compute the maximum water surface profile, as shown. Similarly, the modeler can request profiles at any selected time during the course of the runoff event. For unsteady flow analysis, a similar but more detailed template is called from the Unsteady Flow Editor to direct the program to the appropriate unsteady DSS files to use.
Figure 15.2 Menu in HEC-RAS for importing DSS data for steady flow computations using a peak discharge.
DSS Usage. The use of DSS files will usually be extensive when an unsteady flow analysis is performed. Long time series of discharge and stage data are often used as model boundary conditions, and time series of the same data are then computed for each cross section of the model and stored. In steady flow analysis, only the peak discharge is normally used. Typically, the modeler inputs the peak discharge directly into the flow file without using DSS files. However, if a program such as HEC-1 or HEC-HMS is used to compute the flow hydrograph and the modeler chooses to use the DSS system for data transfers, the flow files at each flow computation location can be accessed by HEC-RAS to directly extract the peak discharge data. As shown in Figure 15.2, flow data at specific time periods (non-peak) can also be obtained and used to compute a profile with HECRAS.
Spreadsheet and Text Files Data can also be imported from standard spreadsheet and text files using the Copy and Paste features in HEC-RAS. This information should be saved as an ASCII or text file, not as a binary file (such as a .doc file). The data could be separated by a comma,
Section 15.2
Exporting Files
645
space, or tab. A spreadsheet program should be used to open and paste the text file into the spreadsheet. The data are highlighted in the spreadsheet and copied to the Windows Clipboard. The HEC-RAS Cross Section Data Window is opened in order to paste the data into the appropriate cross section (Figure 15.3). The same number of rows (or more) on the Cross Section Data Window should be highlighted as there are in the spreadsheet file. Data will be lost in the transfer if an inadequate number of rows in the window are highlighted. The modeler must exercise caution when transferring data in this fashion, making sure station data are pasted to the station column on the HEC-RAS geometry template (Figure 15.3) and elevation data to the elevation column. The HEC-2 data input format is elevation followed by station, which is the opposite of HEC-RAS. Elevation and station data could be inserted incorrectly if the modeler is not careful. 0,450 50,425 300,424 310,412 325,410 350,415 375,429 700,427 750,445
Text File
Spreadsheet
Figure 15.3 Importing geometry data from a text file to HEC-RAS.
15.2
Exporting Files HEC-RAS output can be exported directly to DSS files or to GIS/CADD files.
DSS Files Following the profile computations, HEC-RAS can export water surface profiles, rating curves, and storage-outflow data to DSS for use by other HEC programs. From the main project (opening) window, select File, Export Data to HEC-DSS. The export screen in Figure 15.4 appears, with the tab for exporting water surface profiles displayed (HEC-RAS default). The template has separate tabs for the other two options (rating curves and storage outflow). After making the profile selection, the modeler clicks the Export Profile Data button to send the information to DSS. The modeler can view the created DSS files using the DSS Viewer in HEC-RAS. From the main (opening) window, select the DSS icon, which opens the DSS Viewer dis-
646
Importing and Exporting Files with HEC-RAS
Chapter 15
Figure 15.4 Exporting HEC-RAS profile output to DSS.
played in Figure 15.5. In Figure 15.5, each line of DSS output data displayed represents a computed water surface profile (river elevations versus distance) at the specific time shown in Part E. In this example, computations in an unsteady flow model were performed at two-minute intervals, but the results were only requested at two-hour intervals to avoid a massive amount of output. The first line of data has been selected and is shown in the window in the bottom third of the figure. The format (A/B/C/D/E/F), or pathname, of this data was discussed in the previous section, “DSS Pathname.” For this example, the river name (corresponding to Part A) is shown, but the double slashes behind the river name indicate that no location name, corresponding to Part B, was requested. The data name for Part C is “Location: Elevation” and Part D has also been left blank (seen as double slashes). The profile data in Part E is for the time shown and Part F is the optional name. For this example, F represents a specific plan filename. Because unsteady flow computations were performed, profiles at selected time intervals were prepared and stored for later display. The output can thus show a complete stage or flow hydrograph at any cross section. HEC-RAS v.3.0 and higher has an animation feature that can be used to display the flood wave moving through the reach over time. In the example shown in Figure 15.5, the animation feature would step through the entire length of record, displaying a complete profile for each 2 hr interval, thus simulating the flood wave moving through the study reach. For the unsteady flow example of Figure 15.5, there are 598 separate DSS records, storing such information as water surface profile, hydrograph, tailwater, and gate setting data. The value of using the DSS option for unsteady flow analysis is readily apparent in these types of situations. When a large number of DSS records is included in the database, the row labeled Filter may be used to tell the program to show only those files carrying the name(s) added to the filter. The data can be viewed either graphically or in a tabular form. Figure 15.6 shows the highlighted record from Figure 15.5 as a graph and Figure 15.7 shows the same data as a table.
Section 15.2
Exporting Files
Figure 15.5 DSS output viewer in HEC-RAS.
Figure 15.6 DSS output viewer in HEC-RAS displaying data as a graph.
647
648
Importing and Exporting Files with HEC-RAS
Chapter 15
Figure 15.7 DSS output viewer in HEC-RAS displaying data as a table.
GIS/CADD Files After completing the hydraulic analysis, the modeler can export the final, calculated, water surface profiles to GIS or CADD programs for preparation of the floodplain maps. From the main (opening) window, select File, Export GIS Data, which will display the dialog box illustrated in Figure 15.8 for exporting data to GIS software. Geometric data can also be exported, along with velocity distribution data.
Figure 15.8 HEC-RAS template to export GIS data.
Section 15.3
15.3
Using HEC-2 Files with HEC-RAS
649
Using HEC-2 Files with HEC-RAS As indicated earlier in this chapter, the majority of data that is imported to HEC-RAS will generally come from HEC-2 files. HEC-2 files can be imported as new projects where all of the data is imported, or just the geometry data to supplement an existing HEC-RAS file. In addition to checking the technical effort that resulted in the HEC-2 model before importing it, the engineer must be aware of the numerous differences in computational procedures between the HEC-2 and the HEC-RAS programs. For a variety of reasons, flood profiles computed with HEC-RAS may well be different (usually these differences are quite small) than those computed with HEC-2 using the same data. These differences are discussed in Section 15.4.
Importing HEC-2 Files HEC-2 files can be imported into HEC-RAS in two ways: as a new project, where all the data is imported; or as a geometry file, where only geometric data are used and flow and plan data are not imported. Prior to importing a HEC-2 file, the filename must be appended with a .dat suffix, normally through Windows Explorer. The import feature in HEC-RAS will allow only HEC-2 data with this suffix to be imported. As a New Project. To import HEC-2 data as a new project, open HEC-RAS and specify a project name and prefix for a new project. From the main (opening) window, select File, Import HEC-2 Data. A title and filename (with a .dat extension) must be selected from which to import the data from. After selecting the HEC-2 data file to import, a pop-up window will ask if the HEC-2 section IDs are to be used, or if the sections will be read sequentially (1, 2, 3, and so on). Section IDs are taken from the first field of the X1 record for each cross section in the HEC-2 file and typically identify the river station of the cross section in feet or miles from the starting reach reference point (usually the mouth). If the HEC-2 file has duplicate section numbers, the import process defaults to a sequential reading of the data. Generally, the modeler would import the HEC-2 file using the section IDs if they represent distances from a landmark. An exception would be when importing HEC-2 data into an existing HECRAS data set which has river station IDs greater than those of the HEC-2 data set. If the imported HEC-2 data is to be inserted downstream of the HEC-RAS data, sequential values would be selected, with the IDs of the HEC-2 data adjusted by the modeler after importing. After the decision regarding IDs, the data is imported into HEC-RAS, with a warning message that the imported data should be closely checked. The discussion in Section 15.4 addresses the items that should be checked when importing data. As a Geometry File. When a portion of river has been modeled as a HEC-2 file and the balance of the study stream has been done in HEC-RAS (including the flow and boundary condition data), the HEC-2 geometry file is the only file that can be imported. To import a HEC-2 geometry file, open the Geometry Editor in HEC-RAS, which will display the stream schematic. From this dialog box, select File, Import Geometry Data, and then HEC-2 Format, as shown in Figure 15.9. To import HEC-2 data, the same river name should be used in both files. The section IDs in the HEC-2 file should not be duplicated in the HEC-RAS file. Normally, the HEC-2 section IDs will be different from those in the HEC-RAS file. If the imported geometry file
650
Importing and Exporting Files with HEC-RAS
Chapter 15
Figure 15.9 Importing HEC-2 geometry data.
includes section IDs that are also within the HEC-RAS data, a sequential import should be done; otherwise, HEC-RAS cross-section data may be overwritten by the HEC-2 data import. Importing HEC-2 data as a geometry file does not import the HEC-2 discharge or plan data.
Data Not Imported Although HEC-RAS is the successor of HEC-2, a few HEC-2 capabilities are not yet incorporated in the HEC-RAS program. As of Version 3.1 of HEC-RAS, options not included are Archive records (AC), Comment records (C), and Free Format records (FR). These options deal more with documentation and donʹt impact any computations. In addition, some of the options in HEC-RAS do not use the data imported from HEC-2. Data related to the following options in HEC-2 are ignored during the import process: • Vertical variation in Manning’s n (NV record) • Compute Manning’s n from highwater marks (J1 record) • Split flow analysis (SF record) • Storage-outflow data for HEC-1 (J4 record) • Ice modeling (IC record)
Section 15.4
15.4
Program Differences and Review of Imported Data
651
Program Differences and Review of Imported Data When using imported HEC-2 data, the modeler should closely review the input and output before accepting the newly compiled model as valid since there are several differences between the two programs. In addition, when one modeler picks up the work of another, often items are identified that are not modeled to the new userʹs satisfaction. It is seldom reasonable to assume that earlier work was perfect and needs no additional review. Additional cross sections and better definition of ineffective area stations/elevations are often required.
Program Differences One of the differences between HEC-RAS and HEC-2 is in the ways that HEC-RAS applies improved and more modern computational procedures that were not available when HEC-2 was developed. The following sections provide a brief overview of the key differences between these programs; Appendix C of the HEC-RAS Hydraulic Reference Manual (USACE, 2002) further discusses the topic. Conveyance. An important difference between the two programs is found in the application of conveyance. As discussed in earlier chapters, conveyance is used to calculate a water surface elevation at each cross section. In HEC-2, conveyance at a cross section was computed between every pair of station-elevation points that defined the cross section, except within the main channel. For example, if the left floodplain portion of a cross section was comprised of 50 data points, 49 values of incremental conveyance were computed and then summed to obtain the total left overbank conveyance. If the same section geometry were modeled with 25 elevation-station pairs of data, the conveyance would be different, simply because the number of points is less. This method of conveyance computation would not seem as logical as the default method used in HEC-RAS. HEC-RAS computes conveyance only at locations where changes in Manning’s n value occur. For the example of a left overbank area with 50 data points and a single value of Manning’s n, only one value of conveyance would be computed by HEC-RAS for the left overbank. Figures 15.10 and 15.11 demonstrate the differences in the two conveyance calculation procedures. Due to the use of differing conveyance methods, a discrepancy of 10 percent or more for total conveyance at a cross section, between HEC-RAS and HEC-2, is not unusual. HEC-RAS normally computes a lower conveyance which ultimately results in a higher computed water surface elevation as compared with HEC-2 values. The default method of conveyance calculation in HEC-RAS is more compatible with the Manning equation and the assumption of separable flow elements (flow paths based only on geometry and roughness values). Conveyance should be a function of the channel and overbank geometry (as in HEC-RAS) and not a function of the number of data points defining this geometry (as in HEC-2). (However, neither method can be judged right or wrong.) In tests performed by the HEC, over 2,000 cross sections were studied to compare the results between the two conveyance methods. Nearly 50 percent of the sections had differences of less than 0.1 ft. (0.03 m), 71 percent were within 0.2 ft (0.06 m), 94 percent were within 0.4 ft (0.12 m), and more than 99 percent were within 1.0 ft (0.3 m). This information is discussed further in the Hydraulic Reference Manual, Appendix C (USACE, 2002).
652
Importing and Exporting Files with HEC-RAS
Chapter 15
Figure 15.10 HEC-2 method of conveyance calculation (between every pair of data points in the floodplain). A single value of conveyance is computed for the channel.
Figure 15.11 HEC-RAS method of conveyance calculation (at changes in n value in the floodplain). A single value of conveyance is normally computed for the channel.
Conveyance Comparisons. As discussed above, the HEC-RAS default method of computing conveyance results in different values for water surface elevations than the method used in HEC-2. When importing HEC-2 data into HEC-RAS, a multi-step comparison should be done in order to ensure proper calibration of the model. Initially, the existing HEC-2 model will have results for water surface profile elevations. Once the HEC-2 data are imported into HEC-RAS, the model should be run using the HEC-2 calculation method for conveyance—HEC-RAS supports conveyance calculations in either method. If the HEC-2 method of conveyance calculation is desired, the modeler specifies this through the Steady Flow Analysis window, selecting Options, Conveyance Calculations.
Section 15.4
Program Differences and Review of Imported Data
653
The resulting water surface profile calculations at a given discharge should then be compared to the original HEC-2 results. If the differences between the two profiles are very small (the normal case except at some bridges and culverts), then HEC-RAS may be considered to have reproduced the original HEC-2 results. If the differences between the two profiles are significant at every cross section, the modeler should check for critical depth assumptions at one or more cross sections to see if this explains the difference. Also, recall that if bridges or culverts are in the data, these computations in HEC-RAS are very different than in HEC-2. These variations will also cause a difference in profiles between the two programs. When differences exist between old and new profiles and this work will result in modifications to FEMA profiles and mapping, the new profile must be continued upstream until differences between the two profiles are no more than 0.1 ft (0.03 m). In tests described in the Hydraulic Reference Manual, Appendix C (USACE, 2002), HEC-2 and HEC-RAS operations of the same data sets with both using the same conveyance computation procedures resulted in over 95 percent of all cross sections having computed elevations within 0.02 ft (0.006 m) of each other. Once the model is considered calibrated, the HEC-RAS default method of conveyance can be used to recalculate the profile and used for future runs. An exception to the preceding statement would include revision of existing flood insurance studies, where the same conveyance method may be required to maintain consistency with existing flood insurance profiles. The guidance of Chapter 9 and from Guidelines and Specifications for Flood Hazard Mapping Partners (FEMA, 2002) should be reviewed in this instance. Bridges. Bridge computations performed by HEC-RAS vary greatly from those used by HEC-2. HEC-2 uses the normal and special bridge routines, with the normal bridge routine applicable for energy computations through bridges and the special bridge routine applicable for all other situations, including weir flow, pressure flow, the occurrence of critical depth within the bridge, and so on. Several bridge analysis techniques are available in HEC-RAS, including the methods required by the FHWA to analyze or design bridge openings for selected flood events. When the engineer imports HEC-2 geometry containing bridges, significant data checking and modifications are normally required. Imported bridge geometry should be examined for the following items: • In the special bridge routine, all the piers were lumped together to obtain a total width of piers. The imported piers will be shown (in HEC-RAS) as one pier with a width equal to the combined widths of all the piers. The geometry of the imported piers must be deleted by the modeler and the correct pier geometry entered into the Pier Editor to properly model the piers in the bridge opening. • For HEC-2 models, the engineer would compute a total net bridge opening area, outside of the HEC-2 model, as part of the data required for the special bridge routine. Now, HEC-RAS develops the internal bridge sections (BU and BD) from the bridge superstructure data and the adjacent cross sections (2 and 3) and calculates the bridge area directly. Because the program performs the calculations for net bridge opening area internally, a more accurate answer is likely with HEC-RAS. If differences in water surface elevation between the two programs occur under pressure flow, or pressure and weir flow, it may be due to differences in the net bridge opening area.
654
Importing and Exporting Files with HEC-RAS
Chapter 15
• For submerged entrance conditions, HEC-2 applies only a pressure flow equation, whereas HEC-RAS has both a submerged pressure flow and a sluice gate pressure flow equation, depending on whether the tailwater elevation at section 2 exceeds the maximum downstream low chord elevation at section BD. Chapter 6 discusses pressure flow in greater detail. • In HEC-2, a floodplain elevation must be specified for every roadway elevation on the BT (bridge table) records. Corresponding floodplain elevations are not required in HEC-RAS when entering the roadway elevation data. When importing the bridge data from HEC-2, however, these floodplain elevations are carried in as well. If one or more of these floodplain elevations from the BT input is higher than the adjacent floodplain elevations for sections 2 or 3, one or more gaps will exist and be interpreted, by the program, as openings under the embankment. To check for this situation, plot the bridge geometry in the Bridge Editor, use the View, Highlight Weir, Opening and Ground option to employ color coding to highlight the embankment. The zoom-in feature is used to inspect the embankment geometry. • In HEC-2, the normal bridge routine also requires that the station for a roadway elevation match a station for a floodplain elevation. HEC-RAS does not need this definition and will interpolate any floodplain elevations needed to define the bridge embankment. • In the special bridge routine in HEC-2, low chord information was not required on the BT input record since only the maximum low chord elevation was used to determine the flow category (low flow or pressure flow). Therefore, the modeler must enter the low chord data into the HEC-RAS bridge section after importing special bridge data from HEC-2. • When a bridge had piers and the normal bridge routine was used in HEC-2, piers were coded in as ground points on the valley cross section or as low chord data on the BT record. If this is the situation for imported bridge data using the normal bridge routine, the geometry points defining the piers must be eliminated and the piers recoded using the Pier Geometry Editor in HECRAS. • The normal bridge technique in HEC-2 uses six cross sections to model a bridge, including two that are located just inside the bridge limits. Usually, the floodplain elevations for the section just inside of the bridge in HEC-2 are a duplicate of the section immediately outside of the bridge. HEC-RAS develops these two internal cross sections (BD and BU) automatically. Thus, when normal bridge geometry is imported, HEC-RAS does not import the two sections inside the bridge, but formulates sections BD and BU from the bridge geometry data from HEC-2 and from the two cross sections adjacent to the bridge. However, when the HEC-2 sections within the bridge are not duplicates but contain different geometry than the sections adjacent to the bridge, HEC-RAS does import the sections within the bridge and also formulates sections BD and BU, making eight cross sections to perform the computations. The modeler may want to delete the two imported internal sections from HEC-2, if he so chooses, leaving the two (BD and BU) formulated by HEC-RAS. If not removed, the two imported bridge sections are placed just outside the bridge face, but at a zero distance from the bridge. HEC-RAS will not run without a positive distance between the bridge face and the next upstream and downstream cross sections. Therefore, if the two extra sections are not eliminated,
Section 15.4
Program Differences and Review of Imported Data
655
the modeler will have to insert a positive distance between these sections and sections BD or BU. This can be done within the Deck/Roadway Editor and adjusting the distance at the cross section just upstream of the bridge (Section 3). • In the special bridge routine, there are no internal sections located within the bridge for HEC-2 computations. When special bridges are imported into HECRAS, the distance between the sections immediately upstream and downstream of the bridge is read as the bridge width and inserted in the Deck/ Roadway Editor. However, in HEC-RAS, the distance on the Deck/Roadway Editor must be less than the actual distance between sections immediately outside the bridge (sections 2 and 3). If the distance on the Deck/Roadway Editor is not modified, HEC-RAS will read the distance between the section (BD or BU) inside the bridge and the section immediately outside of the bridge as zero, preventing the program from running. • Ineffective flow elevations and stations should be closely reviewed for each imported set of bridge geometry. In HEC-2, ineffective flow area stations are often located at the bridge abutment in lieu of an appropriate distance outside the abutment in order to reflect the contraction and expansion ratios, a common mistake. • Inexperienced engineers may have used the special bridge routine in HEC-2 to avoid having to code numerous piers in a bridge opening as is required if the normal bridge routine was used. After eliminating the imported piers from the cross section geometry and recoding the piers with the Pier Editor, check the method of bridge computations in HEC-RAS at each imported bridge for correctness. If pressure and weir, or low flow and weir, are specified for the bridge based on the imported data for the special bridge routine, review the upstream and downstream water surface elevations. If the difference is small and the approach roadway embankment height is low or negligible when compared to the depth over the roadway, the energy method is probably more appropriate. Culverts. Culverts are modeled in HEC-2 in a similar manner as bridges—either with cross-section geometry for energy loss computations under low flow (energy computations) or with the special culvert option for either low or high flow conditions. The engineer should carefully review imported culvert geometry, with many of the same data checks as discussed in the previous section on bridges. Much of the information dealing with bridges is equally applicable to culverts. Key items to check for culverts include: • Only circular or rectangular culverts can be modeled with HEC-2, whereas HEC-RAS includes nine different culvert shapes. Check to make sure that the actual culvert shape is being modeled and wasnʹt modified due to HEC-2 limitations. • In HEC-2, where the culvert did not flow full for one or more discharges, the culvert geometry was often coded as ground points for the lower half of the culvert and as low chord data for the upper half. If the imported culvert data includes ground points and low chord points, these data points need to be deleted, and the culvert needs to be remodeled with the Culvert Editor in HEC-RAS.
656
Importing and Exporting Files with HEC-RAS
Chapter 15
• As it is difficult to model a circular shape in HEC-2 with a series of ground and low chord points, some engineers used an approximation by converting the circular shape into a roughly equivalent rectangular shape. If present in the imported data, this approximation should be deleted and correctly modeled with the Culvert Editor. • Similarly, HEC-2 allows multiple barrels at road crossings only if each barrel is the same size and shape. These culverts should be field verified to ensure that multiple sizes and shapes are not actually present. • As mentioned previously, imported embankment data should be checked to ensure no “gaps” exist that allow flow to pass under the embankment, due to data errors. • Redundant sections inside the culvert should be deleted from the imported culvert files if the culvert was modeled as a normal bridge using the energy method. Floodways. When HEC-2 floodway geometry is imported into HEC-RAS, the floodway widths and encroachment station locations should be comparable. However, the floodway computation routines in HEC-RAS are considered much improved over
Section 15.4
Program Differences and Review of Imported Data
657
those of HEC-2 and a slightly different floodway could result. Similarly, bridge encroachment widths calculated by HEC-RAS may be somewhat different. When HEC-2 floodway geometry is imported into HEC-RAS, the following items should be reviewed: • The floodway computations for HEC-RAS are held to a tighter tolerance (0.01 ft or 0.003 m) than that for HEC-2 (parabolic interpolation). Therefore, the encroachment stations computed using Method 4 (Equal Conveyance Method with target increase in water surface elevation) in HEC-RAS may be different from those computed with Method 4 in HEC-2. • In HEC-2, the default is not to perform encroachments at bridges, whereas in HEC-RAS the default is to perform the encroachment. However, the encroachment may be turned on or off through a bridge with either program. Encroachments should be considered through bridges for FEMA floodway studies. • Where the energy method is used to compute bridge losses, HEC-RAS encroaches at each of the six sections defining the bridge expansion and contraction. This feature could result in significantly different floodway widths at sections 2, BD, BU and 3, all of which are placed closely together. HEC-2 uses only the encroachment computed at section 2, just downstream of the bridge, and adopts the same floodway width through the bridge for sections BD, BU and 3. • If an X3 record was used to set floodway encroachment stations in HEC-2, this information is imported into HEC-RAS as a blocked obstruction. When X3 records are used, additional floodway information found on ET records is ignored by the HEC-2 computations. However, an additional (undesired) encroachment may be performed in HEC-RAS from the imported ET data, in addition to the encroachment already in place from the blocked obstruction data (X3 record) from the HEC-2 import. Critical Depth. In HEC-2, critical depth was computed only by a parabolic search method and multiple critical depths could not be recognized. HEC-RAS also uses the parabolic search method, but it provides a second technique (secant method) for critical depth computation as well. The secant method divides the cross section into a series of horizontal slices to compute total energy and can locate up to three local minimum energy values. In addition, the calculation tolerance is tighter for HEC-RAS (0.01 ft or 0.003 m) than for HEC-2 (2.5 percent of the flow depth). Small differences in critical depth between the two programs may exist due to these differing tolerances. Larger differences could exist from the use of the secant method. The critical depth computation methods in HEC-RAS are considered more accurate than those used by HEC-2.
Comparing HEC-RAS and HEC-2 Output If the HEC-RAS profile must exactly reproduce the HEC-2 profile, the main option remaining is to adjust the Manning’s n values and possibly modify the expansion-contraction coefficients. This option is not recommended, although there is some leeway in assigning values to these variables, as discussed in Chapter 5. Any such changes in n must be within the range of possible values for the associated channel and valley conditions encountered. Do not select unrealistic or indefensible values of n just to reproduce an earlier profile. Older HEC-2 runs may have technical errors that should
658
Importing and Exporting Files with HEC-RAS
Chapter 15
not be retained in HEC-RAS runs. Similarly, more recent computations with HECRAS may reflect much improved geometry data than what was available for the HEC2 computations. Changed conditions (upstream urbanization, new road crossings, channelization, and so on) between the two hydraulic studies will also lead to different profiles. If the differences between the output of the two programs can be traced directly to errors in the HEC-2 modeling or improved survey data with the HEC-RAS model, the HEC-RAS results should be acceptable to a rational reviewer. Again, an exact match of HEC-RAS and old HEC-2 profiles is not necessary for FEMA approval of flood insurance studies. As was stressed, any change in variables to better match an old profile must be reasonable. It is the rule, rather than the exception, that changes will be made in n values and other parameters by the modeler, when using HEC-2 data in RAS. Presumably, the changes will better reflect todayʹs situation, rather than that of many years ago when the HEC-2 model was prepared. Some changes in profiles are to be expected when redoing older work. Still, the modeler may be directed to exactly reproduce old profiles, and the methods briefly discussed here are all he can reasonably do.
15.5
Chapter Summary This chapter concentrates on importing and exporting files with HEC-RAS, especially on importing HEC-2 files. While DSS, GIS, and other files may be transferred, the majority of importation activities feature bringing old HEC-2 files into HEC-RAS for use in a new project. The chapter describes the mechanics of this transfer procedure and itemizes various technical concerns for the imported data, including the need for close inspection of bridge and culvert data imported into HEC-RAS. When importing such data, the modeler should spend sufficient time and effort to ensure the imported data is properly modeled in HEC-RAS. HEC-DSS is very useful when applying HEC-RAS in the unsteady flow analysis mode. Unsteady flow computations result in voluminous files that must be stored and recalled for manipulation and use. HEC-RAS is also capable of importing and exporting files through a GIS. Cross section geometry data may be brought directly into HEC-RAS from GIS files as cross sections, hydraulic computations performed, and then the results exported back to the GIS for preparation of flood maps.
About the Software
The CD in the back of this book contains an academic version of HEC-Pack. HEC-Pack includes HEC-RAS, HEC-HMS, and HEC-GeoRAS from the U.S. Army Corps of Engineers Hydrologic Engineering Center (HEC) and Graphical HEC-1 from Bentley Systems. The following provides a brief summary of the individual software packages. For detailed information on the software and how to apply it to solve floodplain modeling problems, see the help systems included on the CD.
HEC-RAS • Lay out your river networks graphically. • Calculate water surface profiles based on steady and unsteady, gradually varied flow for channel networks, dendritic systems, or a single river reach. • Predict energy losses based on Manningʹs friction coefficients, and expansion and contraction losses. • Evaluate floodway encroachments for floodplain management and insurance studies. • Determine changes in water surface profile due to levees, bridges, and culverts. • Handle rapidly varied flow conditions automatically, such as hydraulic jumps and bridge contractions. • Modify a range of cross sections using the channel improvement options (and obtain the cut and fill volumes). • Include in-line weirs and gated spillways in the river system. • Compute bridge scour based on the routines outlined in HEC-18 (Hydraulic Engineering Circular 18, from the Federal Highway Administration). • Follow the methods for low-flow computations laid out by the Federal Highway Administration using the WSPRO bridge routines. • Analyze culverts under supercritical and mixed flow regimes, and adverse slopes. • View the results three-dimensionally with X-Y-Z perspective plots.
xx
About the Software
• Conduct stable channel design, levee breach and dam break analysis, ice jam analysis, and other specialized modeling tasks.
HEC-HMS • Schematically build your hydrologic network, including such elements as sub-basins and routing reaches. • Model hypothetical storm events based on frequency. • Consider historical storm events through cell-based precipitation data. • Import precipitation data from other sources. • Specify gages and a method of weighting the gages, including userdefined and inverse distance-squared weighting. • Compute sub-basin runoff in either a lumped or linearly distributed fashion. • Determine losses based on several methods, including Green and Ampt, SCS Curve Number, gridded SCS Curve Number, and the Initial/Constant method. • Transform precipitation to runoff through either unit hydrograph methods (Clark, Snyder, or SCS) or Kinematic Wave methods. • Route hydrographs using Kinematic Wave, Modified Puls, Muskingum, or Muskingum-Cunge. • Divert flow, either ʺlosingʺ the diverted hydrograph or adding it back in further downstream.
Graphical HEC-1 • Build your hydrologic network graphically, by dragging and dropping elements (such as sub-basins, routing reaches, reservoirs, etc.) into your schematic. • Use gauged rainfall data, standard design rainfall distributions, or synthetic rainfall patterns. • Enter rainfall distributions, basin areas, infiltration losses, and routing methods. • Convert rainfall to direct runoff using any combination of five different loss methods, including SCS Curve Number, HEC Exponential, Initial and Uniform, Green and Ampt, and Holtan. • Generate runoff hydrographs using SCS, Clark, Snyder, or a userdefined unit hydrograph method. • Divert and route hydrographs through natural and man-made reaches and reservoirs. • View hydrographs at any point in the network, in tabular form or graphically.
xxii
• Work with hydrographs on-screen, print them out, or export them to other software programs (spreadsheets, word processors, etc.) via the Windows Clipboard.
HEC-GeoRAS • Use GIS to create HEC-RAS import files including river, reach, and station identifiers; cross-sectional cut lines; downstream reach lengths for the left and right overbanks and main channel; and cross-sectional roughness coefficients. • Automate the creation of additional geometric data from your GIS including information for defining levee alignments, ineffective flow areas, and storage areas. • Export water surface profile and velocity data from HEC-RAS to your GIS in order to perform additional spatial analyses and mappings.
Authors and Contributing Authors
Bentley Systems The Bentley Systems Engineering Staff is an extremely diverse group of professionals from six continents with experience ranging from software development and engineering consulting, to public works and academia. This broad cross section of expertise contributes to the development of the most comprehensive software and educational materials in the civil engineering industry. In addition to the specific authors credited in this section, many at Bentley Systems contributed to the success of this book.
Gary R. Dyhouse, M.S., P.E. Gary R. Dyhouse, principal author of Floodplain Modeling Using HEC-RAS, is an engineering consultant, specializing in hydrology and hydraulics. During his recent consulting career, he has served as an expert witness for the State of California, worked as a levee expert for a large project proposed in the southeastern United States, performed and reviewed water surface profile analyses for private engineering firms, and conducted several workshops on the use of the HEC-RAS program. Prior to consulting, Mr. Dyhouse’s career spanned 32 years with the U.S. Army Corps of Engineers, primarily with the St. Louis District and one year with the Hydrologic Engineering Center, Davis, California. For most of his career with the Corps, he was Chief of Hydrologic Engineering for the St. Louis District, overseeing all District work in computer modeling dealing with flood hydrology, open channel hydraulics, and frequency analysis. He has performed or overseen the completion of dozens of flood insurance studies, as well as many channel modification, levee, and reservoir analyses and designs. During the Great Flood of 1993 in the Midwestern United States, he was the chief technical spokesman for the St. Louis District Corps of Engineers, dealing with national and international press, radio, and TV media. Following the flood, Mr. Dyhouse was a much sought after expert, speaking on the flood and the impacts of levees and reservoirs on flood damage reduction around the United States. He appeared in several films on the Great Flood of 1993,
including videos prepared by the PBS Nova series and the British Broadcasting Company. Prior to his retirement from the Corps of Engineers, Mr. Dyhouse served as project manager for the St. Louis Districtʹs portion of the UMRSFFS (Upper Mississippi River System Flood Frequency Study). This multi-year, multi-Corps District, multimillion dollar project has a goal of updating the stage-frequency relationships for about 2,000 mi (3,200 km) of the Missouri and Mississippi Rivers using period of record unsteady flow modeling, incorporating the impacts of the 1993 flood. Mr. Dyhouse is on the Civil Engineering faculty of Washington University at St. Louis and the University of Missouri-Rolla Graduate Engineering Center, where he has taught graduate and undergraduate courses since the mid1980s. He has lectured at numerous training courses and workshops sponsored by the Corps’ Hydrologic Engineering Center and the Waterways Experiment Station. Mr. Dyhouse has also taught hundreds of engineers for Bentley Systems training courses on HEC-RAS and PondPack. He has authored more than 30 professional publications and technical documents while with the Corps, including portions of Corps manuals dealing with river hydraulics and sedimentation in rivers and reservoirs. He is a member of ASCE and has served as Associate Editor for the Hydraulic Engineering Journal. Mr. Dyhouse is a registered professional engineer in Missouri.
Jennifer Hatchett, P.E. Jennifer Hatchett, engineering training specialist at Bentley Systems, holds a B.S. and M.S. in Civil Engineering from Clemson University. Prior to joining Bentley Systems, Mrs. Hatchett worked as a Water Resources engineer at an ENR Ranked Top 50 Design Firm. She performed and managed several floodplain and floodwater studies for FEMA and was the project engineer responsible for performing steady-state backwater calculations for existing and proposed conditions for bridge replacements and widenings using HEC-RAS. Mrs. Hatchett also served as Technical Evaluation Contractor for the Federal Emergency Management Agency (FEMA) in Fairfax, VA. She has created and reviewed hydrologic and hydraulic computer models for use in Flood Insurance Studies (FIS), evaluated scientific and technical accuracy of requests to revise existing FISs and Flood Insurance Rate Maps (FIRMs) and ensured compliance with federal regulations. She served as a project manager in the processing of FISs while coordinating with representatives of the National Flood Insurance Program to ensure that the FISs were produced accurately, within budget, and on schedule. Jennifer served as a technical liaison between FEMA and other governmental agencies, communities, and private engineering firms, including drafting official FEMA correspondence.
Jeremy Benn, CEng, FICE, FCIWEM Jeremy Benn is a graduate of the University of Cambridge, England, and holds a Masters degree in Engineering Hydrology from the University of Newcastle, England. He has over 20 years experience in river engineering in the UK and overseas gained from both research and commercial consultancy. He is familiar with a wide range of river modeling software, including HEC-RAS, ISIS, HEC-HMS, MIKE-11, and 2-d and 3-d models. Mr. Benn has lectured widely on the use of computer models in catchment management, flood control, and the estimation of scour. He has been a representative on several technical committees including the Flood Risk Mapping Framework in England and Wales and the railways panel on bridge scour. Mr. Benn is a Fellow of the Institution of Civil Engineers and a Fellow of the Chartered Institution of Water and Environmental Management.
David Ford Consulting Engineers David Ford Consulting Engineers in Sacramento, California, specializes in hydrologic engineering, floodplain management, flood-damage-reduction planning, reservoir-system analysis, decision-support system development, and technology transfer. The firm is recognized for its innovative work in flood warning systems, including real-time forecasting and inundation mapping, flood response planning, and flood warning decision support system development. Clients worldwide range from city and local government agencies to international agencies.
Houjung Rhee, P.E. Houjung Rhee holds a B.S. in Civil Engineering from the University of Alaska, Anchorage, and a M.S. in Civil Engineering from the University of South Carolina. Houjung has been a member of ASCE, APWA, and AWWA and served on the Engineering Computer Applications Committee of AWWA as well as the Environmental Engineering subcommittee of ASCE.
“An ounce of action is worth a ton of theory.” -Friedrich Engels
“The consulting engineering community and government agencies are in great need of a book that explains the proper use of HEC-RAS in easy-to-read language and that shares the knowledge of subject matter experts. . . . this book provides both.” Johannes Gessler Colorado State University (USA)
“I have been involved for many years in the numerical simulation of river and floodplain flows and have conducted many short courses for practicing engineers in this field using HEC-2 and HEC-RAS. This book is, without a doubt, the best that I have read on this topic. . . . The book is timely and invaluable. It will prove of enormous benefit to experienced engineers as well as to young engineers entering the field.” Robert J. Keller Monash University (Australia)
Acknowledgments
Floodplain Modeling Using HEC-RAS represents the results of a successful team effort to produce a textbook that is unlike any other available to civil engineers and engineering students today. The bookʹs primary author, Gary Dyhouse, drew on his vast experience working with the U.S. Army Corps of Engineers to create a comprehensive and practical volume about using HEC-RAS to model floodplains. As a teacher for Haestad Methods’ Continuing Education department, Gary is known for his ability to make difficult concepts easy to understand. That ability is evident throughout the text. Jennifer Hatchett wrote Chapter 9, “Flood Insurance Studies,” and contributed to Chapter 10, “Floodways.” In addition, she lent her expertise to refining the text of the book as a whole, bringing a level of cohesion to the text that otherwise would not have been possible. Jeremy Benn wrote Chapter 14, “Unsteady Flow,” and in so doing, brought its extremely complex theory and practical applications into sharp focus. Although the subject matter can be difficult, Jeremy’s presentation is accessible to even the novice reader. David Ford Consulting and Houjung Rhee wrote the end-of-chapter problems, which can be used in the classroom or completed and returned to Haestad Methods for grading to earn Continuing Education Units (CEUs). In addition to an outstanding author team, Floodplain Modeling Using HEC-RAS benefited from a remarkable panel of peer reviewers who scrutinized the book’s technical content from every possible angle. Gary Brunner, Donald Chase, Jack Cook, Paul Debarry, Johannes Gessler, Robert Keller, Robert Moore, Ezio Todini, Thomas Walski, and Michael Glazner all helped us achieve our goal of creating a book that meets the high standards set before it by other books in the Bentley Institute Press series. David Klotz, Adam Strafaci, Annaleis Hogan, and Kristen Dietrich edited the manuscript for accuracy, completeness of content, and readability. In addition, David and Adam designed the book’s interior to give it a fresh new look. Several in-house engineers reviewed the book in its final stages to ensure accuracy of definitions, equations, and example problems. These include Samuel Coran, Keith Hodsden, Pranam Joshi, Michael Rosh, and Mal Sharkey.
The illustrations and graphs throughout the book were created and assembled by Peter Martin, Christopher Dahlgren, Caleb Brownell, and John Slate (Roald Haestad, Inc.). Several people were involved in the final production and delivery of the book. Lissa Jennings managed the printing logistics; Rick Brainard and Jim O’Brien provided the cover design; Sean Brierly created the online version of the book files; Wes Cogswell and Kristen Dietrich managed the CD and software installation efforts; and Jeanne and David Moody of Beaver Wood Associates developed the book’s index. Finally, Niclas Ingemarsson, whoprovided the human resources and management guidance to complete the project, and John Haestad who provided the vision and motivation to make the book series a reality.
Colleen Totz Managing Editor
Bibliography
Abbott, M. B. 1979. Computational Hydraulics: Elements of the Theory of Free Surface Flows. London: Pitman. Ackers, P. and W. R. White. 1973. “Sediment Transport: New Approach and Analysis.” Journal of the Hydraulics Division, ASCE 99, no. HY11. American Society of Civil Engineers (ASCE). 1975. Sedimentation Engineering Manual. No. 54, ASCE Task Committee for the Preparation of the Manual on Sedimentation of the Sedimentation Committee of the Hydraulics Division. Apelt, C. J. 1983. “Hydraulics of Minimum Energy Culverts and Bridge Waterways.” Australian Civil Engineering Transactions, CE25(2). Barkau, R. 1992. UNET, One-Dimensional Unsteady Flow through a Full Network of Open Channels Computer Program. St. Louis, Missouri. Barnes, H. H. Jr. 1987. Roughness Characteristics of Natural Channels. Denver: U.S. Geological Survey, Water Supply Paper 1849. Barry, J. M. 1997. Rising Tide: The Great Mississippi Flood of 1927 and How It Changed America. New York: Simon and Schuster. Bradley, J. N. 1978. Hydraulics of Bridge Waterways. Second Edition. Federal Highway Administration, U.S. Department of Transportation, Hydraulic Design Series No. 1. Brookes, A. 1988. Channelized Rivers, Perspectives for Environmental Management. Chichester, Great Britain: John Wiley & Sons. Brookes, A. and F. D. Shields. 1996. River Channel Restoration: Guiding Principles for Sustainable Projects. New York: John Wiley & Sons. Brunner, Gary W. 2002. Personal conversation. Burkham, D. E. 1976. “Hydraulic Effects of Changes in Bottom-land Vegetation on 3 Major Floods, Gila River in Southeastern Arizona.” U. S. Geological Survey, Professional Paper 655-1. Chang, F. F. M. and J. M. Norman. 1976. Design Considerations and Calculations for Fishways Through Box Culverts. Unpublished text. Washington, D.C.: Federal Highway Administration, Hydraulics Branch, Bridge Division. Chanson, H. 1999. The Hydraulics of Open Channel Flow. Great Britain: Arnold and John Wiley & Sons. Chen, Y. H. and B. A. Anderson. 1987. Development of a Methodology for Estimating Embankment Damage Due to Flood Overtopping. Simons, Li and Associates, Inc., for FHWA, RD-86-126. Chow, V. T. 1959. Open Channel Hydraulics. New York: McGraw-Hill, Inc.
660
Bibliography
Code of Federal Regulations. 1999. Title 44—Emergency Management and Assistance, Chapter I. Federal Emergency Management Agency, Paragraph 65. U.S. Government Printing Office. Colby, B. 1964. “Practical Computations of Bed Material Discharge.” Journal of Hydraulic Engineering, Vol. 90, No. HY2. Coleman, D. 2001. Personal communication. U.S. Army Corps of Engineers, St. Louis District, Missouri. Copeland, R. R. and W. A. Thomas. 1989. “Corte Madera Creek Numerical Sedimentation Study.” Technical Report HL-89. Vicksburg, Mississippi: U.S. Army Corps of Engineers, Waterways Experiment Station. Copeland, R. R., D. N. McComas, C. R. Thorne, P. J. Soar, M. M. Jonas, and J. B. Fripp. 2001. “Hydraulic Design of Stream Restoration Projects.” Technical Report ERDC/CHL TR-01-28. Vicksburg, MS: U.S. Army Corps of Engineers: Engineer Research and Development Center. Corry, M. L., P. L. Thompson, F. J. Watts, J. S. Jones, and D. I. Richards. 1983. Hydraulic Design of Energy Dissipators for Culverts and Channels. Federal Highway Administration, HEC No. 14. Cowan, W. L. 1956. “Estimating Hydraulic Roughness Coefficients.” Agricultural Engineering 37, no. 7. Cunge, J. A. 1969. “On the Subject of a Flood Propagation Computation Method (Muskingum Method).” Journal of Hydraulic Research 7, no. 2: 205-230. Cunge, J. A., F. M. Holley, and A. Verwey. 1980. Practical Aspects of Computational River Hydraulics. Pitman. DeVries, M. 1975. “A Morphological Time Scale for Rivers.” Delft Hydraulics Laboratory Publication 147. Dieckmann, R. F. and G. R. Dyhouse. 1998. “Changing History at St. Louis—Adjusting Historical Flows for Frequency Analysis.” Las Vegas, Nevada: First Federal Inter-Agency Hydrologic Modeling Conference, Sub-Committee on Hydrology, Interagency Advisory Committee on Water Data. Dyhouse, G. R. 1982. “Sediment Analyses for Urbanizing Watersheds.” Journal of the Hydraulics Division, ASCE 108, no. HY3: 399–418. Dyhouse, G. R. 1985. “Comparing Flood Stage-Discharge Data—Be Careful!” Orlando, Florida: ASCE Hydraulics Division Specialty Conference. Engelund, F. 1966. “Hydraulic Resistance of Alluvial Streams.” Journal of the Hydraulics Division, ASCE 92, no. HY2, Proceedings paper 4739. Engelund, F. and E. Hansen. 1967. A Monograph on Sediment Transport in Alluvial Streams. Teknish Vorlag. Copenhagen, Denmark. Fasken, G. B. 1963. Guide for Selecting Roughness Coefficients n Values for Channels. Soil Conservation Service, U.S. Department of Agriculture. Federal Emergency Management Agency (FEMA) Map Service Center. Telephone: (800) 358-9616; facsimile: (800) 358-9620. Web site http://msc.fema.gov/MSC. Federal Emergency Management Agency (FEMA). 1985. Flood Insurance Study Guidelines and Specifications for Study Contractors. FEMA 37. Federal Emergency Management Agency (FEMA). 1995. The Zone A Manual: Managing Floodplain Development in Approximate Zone A Areas. Federal Emergency Management Agency (FEMA). 1999. Quick-2 Computer Program, Computation of Water Surface Elevations in Open Channels, Version 2.0.
661
Federal Emergency Management Agency (FEMA). 2002. Guidelines and Specifications for Flood Hazard Mapping Partners. Federal Highway Administration (FHWA). 1988. Revisions to the National Bridge Inspection Standards (NBIS). T5140.21, U.S. Department of Transportation. Federal Interagency Stream Corridor Restoration Working Group. 2001. Stream Corridor Restoration: Principles, Processes & Practices. GPO 0120-A (http://www.usda.gov/stream_restoration/). Foster, J. E. 1971. “History and Description of the Mississippi Basin Model.” MBM Report 1-6, U.S. Army Corps of Engineers Waterways Experiment Station. Franz, D.D., and C. S. Melching. 1997. “Full Equations (FEQ) model for the solution of the full, dynamic equations of motion for one-dimensional unsteady flow in open channels and through control structures.” U.S. Geological Survey Water-Resources Investigations Report 96-4240. Fread, D. L. 1982. National Weather Service Operational Dynamic Wave Model. National Oceanic and Atmospheric Agency, National Weather Service. Fread, D. L. 1984. DAMBRK: The NWS Dam-Break Flood Forecasting Model. National Oceanic and Atmospheric Agency, National Weather Service. Fread, D. L. 1992. “Flow Routing”, Chapter 10 in Handbook of Hydrology. Edited by David R. Maidment, McGraw-Hill, Inc. New York, New York. Fread, D. L. 1996. “An LPI Numerical Solution for Unsteady Mixed Flow Simulation.” ASCE North American Water Congress. Anaheim, CA. Freeman, G. E., W. Rahmeyer, and R. R. Copeland. 2000. Determination of Resistance Due to Shrubs and Woody Vegetation. Technical Report TA7 E8, Stock Number AD A383 997 DTIC, U. S. Army Corps of Engineers, Waterways Experiment Station. Vicksburg, Mississippi. Froehlich, D. C. 1989. “Abutment Scour Prediction.” Presentation to the Transportation Research Board. Washington, D.C. Froehlich, D. C. 1991. “Analysis of Onsite Measurements of Scour at Piers.” Proceedings of the ASCE National Hydraulic Engineering Conference. ASCE. Colorado Springs, Colorado. Haestad Methods. 2003. PondPack User’s Manual. Waterbury, Connecticut: Haestad Methods. Hart, William W. 1906. “The Control of Hydraulic Mining in California By the Federal Government.” American Society of Civil Engineers Transactions. Paper No. 1026. Hayami, S. 1951. “On the Propagation of Flood Waves.” Bulletin No. 1. Kyoto University, Japan: Disaster Prevention Research Institute. Hayes, D. F. (Ed.) 2001. “Wetlands Engineering and River Restoration.” ASCE Conference Proceedings. Healy, R. W. 1979. River Mileages and Drainage Areas for Illinois Streams. USGS WRI 79-110, 11. Henderson, F. M. 1966. Open Channel Flow. London: MacMillan. Herschel, C. 1913. The Two Books on the Water Supply of the City of Rome. 2nd ed. New York: Longmans, Green. Hicks, D. M. and P. D. Mason. 1991. “Roughness Characteristics of New Zealand Rivers.” Water Resources Survey, DSIR Marine and Freshwater, New Zealand. Isaacson, E., J. J. Stokre, and A. Troeschi. 1958. “Numerical Solution of Flow Problems in Rivers.” Journal of the American Society of Civil Engineers, Hydraulic Division. Jarrett, R. D. 1984. “Hydraulics of High Gradient Streams.” Journal of Hydraulic Engineering, ASCE 110, no. 11: 1519–1539.
662
Bibliography
Jones, J. S. 1983. “Comparison of Prediction Equations for Bridge Pier and Abutment Scour.” Transportation Research Record 950. Second Bridge Engineering Conference, Vol. 2, Transportation Research Board. Kennedy, E. J. 1983. “Computation of Continuous Records of Streamflow.” U. S. Geological Survey, Techniques of Water-Resources Investigations, TWI 3-A13. Khine, M. 2002. Personal communication. Fairfax, Virginia: Dewberry and Davis. Kim, K. W., B. H. Johnson, and R. E. Heath. 1990. “Long-Term Numerical Simulation of ThreeDimensional Hydrodynamics of Chesapeake Bay.” Proceedings of the ASCE National Conference on Hydraulic Engineering and the International Symposium on the Hydraulics/Hydrology of Arid Lands. San Diego, CA: ASCE. Kindswater, Carter, and Tracy 1953. Computation of Peak Discharge at Contractions. U.S. Geological Survey, Geological Survey Circular No. 284. King and Brater. 1963. Handbook of Hydraulics. McGraw-Hill, Inc. New York, New York. Knighton, D. 1998. Fluvial Forms and Processes, Arnold. Lagasse, P. F., L. W. Zevenbergen, J. D. Schall, and P. E. Clopper. 2001. Bridge Scour and Stream Instability Countermeasures—Experience, Selection and Design Guidelines. Hydraulic Engineering Circular No. 23, Second Edition, Federal Highway Administration Publication No. NHI 01-003. Lane, E. W. 1955. “The Importance of Fluvial Morphology in Hydraulic Engineering.” Proceedings of the American Society of Civil Engineers 81. Laursen, E. M. 1958. “Total Sediment Load of Streams.” Journal of the Hydraulics Division, ASCE 84, no. HY1. Laursen, E. M. 1960. “Scour at Bridge Crossings.” Journal of the Hydraulic Division, ASCE 86, no. HY2. Laursen, E. M. 1963. “An Analysis of Relief Bridge Scour.” Journal of the Hydraulic Division, ASCE 89, no. HY3. Lecointe, G. 1998. “Breaching mechanisms of embankments: An overview of previous studies and the models produced.” CADAM Meeting, Munich, Germany. Leopold, L. B., Wolman, M. G., and Miller, J. P. 1964. Fluvial Processes in Geomorphology. W. H. Freeman and Company. Reprinted by Dover Press, Mineola, New York. Limerinos, J. T. 1970. Determination of the Manning Coefficient from Measured Bed Roughness in Natural Channels. U.S. Geological Survey, Water Supply Paper 1898-B. Linder, W. M. 1976. “Designing for Sediment Transport.” Water Spectrum. Spring-Summer 36-43. Linsley, R. K., J. B. Franzini, D. L. Freyberg, and G. Tchobanoglous. 1992. Water Resources Engineering. New York: McGraw-Hill. Manning, R. 1890. “Flow of Water in Open Channels and Pipes.” Transactions of the Institution of Civil Engineers of Ireland 20. Masters, R. D. 1999. Leonardo Da Vinci & Niccolo Machiavelli’s Magnificent Dream to Change the Course of Florentine History. Plume Books. Matthai, H. F. 1968. Measurement of Peak Discharge at Width Contractions By Indirect Methods. U.S. Geological Survey, Water Resources Investigation, Book 3, Chapter A4. Meyer-Peter, E. and R. Muller. 1948. “Formulas for Bed-Load Transport.” Report on Second Meeting of International Association for Hydraulic Research.
663
Mohamed, M. A. A., P. G. Samuels, M. W. Morris, and G. S. Ghataora. 2000. “Modelling Breach Formation Through Embankments.” International Seminar and Workshop on the RESCDAM project. Seinajoki, Finland. Morris, H. M., and J. M. Wiggert. 1972. Applied Hydraulics in Engineering. New York: John Wiley and Sons. Morris, M. W. and M. A. A. M. Hassan. 2002. “Breach formation through embankment dams and flood defence embankments: a state of the art review”. IMPACT Project Workshop, HR Wallingford. United Kingdom. Mueller, D. S. and Jones, J. S. 1999. “Evaluation of Recent Field and Laboratory Research on Scour at Bridge Piers in Coarse Bed Materials.” Stream Stability and Scour at Highway Bridges, ASCE Compendium, ed. Richardson and Lagasse. National Environmental Research Council (NERC). 1975. Flood Studies Report, Volume III—Flood Routing Studies. Swindon, United Kingdom. National Oceanic and Atmospheric Administration (NOAA). 1973. “Precipitation Frequency Atlas of the Western United States.” Atlas 2, vol. 1-13. National Oceanic and Atmospheric Administration (NOAA). 1977. “Five- to 60-Minute Precipitation Frequency for the Eastern and Central United States.” NOAA Technical Memorandum NWS HYDRO-35. National Oceanic and Atmospheric Administration (NOAA). 2000. FLDWAV Computer Program Version 2-0-0. Silver Spring, Maryland: National Weather Service, Hydrologic Research Laboratory. National Resources Conservation Agency (NRCS). 1992. TR-20, Computer Program for Project Formulation Hydrology, Soil Conservation Service. National Transportation Safety Board (NTSB). 1988. Collapse of the New York Thruway (I-90) Bridge over the Schoharie Creek, Near Amsterdam, New York, April 5, 1987. NTSB/HAR-88/02, NTSB. National Transportation Safety Board (NTSB). 1990. Collapse of the Northbound U. S. Route 51 Bridge Spans over the Hatchie River near Covington, Tennessee. April 1, 1989. NTSB/HAS-90/01, NTSB. National Transportation Safety Board (NTSB) 1990a. HAR-90/03, Collapse of the Harrison Road Bridge Spans, Miamitown, Ohio, May 26, 1989. NTSB/HAR-90/03, NTSB. Nunnally, N. R. 1978. “Stream Renovation: An Alternative to Channelization.” Environmental Management 2, no. 5: 403. Petersen, M. S. 1986. River Engineering. Prentice Hall Publ. Englewood Cliffs, New Jersey. Pickles, G. W. 1931. “Run-off Investigations in Central Illinois.” University of Illinois Bulletin 29, no. 3. Ponce, V. M. 1986. “Diffusion Wave Modeling of Catchment Dynamics.” Journal of the Hydraulics Division, ASCE 112, no. 8: 716–727. Preissman, A. 1960. “Propagation des Intumescenes dans les Canaue et Rivieres.” First Congress de L’Association Francaise de Calcul, Grenoble, France. Price R. K. 1973. “A Comparison of Four Numerical Methods for Flood Routing.” Journal of the Hydraulics Division, ASCE 100, no. 7: 879–899. Reed, J. R. and A. J. Wolfkill. 1976. Evaluation of Friction Slope Models, Rivers 76, Symposium on Inland Waterways for Navigation, Flood Control, and water Diversions, Colorado State University. ASCE II: 1159–1178
664
Bibliography
Reihsen, G. and L. J. Harrison. 1971. Debris Control Structures. HEC 9. Washington, D.C.: Federal Highway Administration, Hydraulics Branch. Richards, K. 1982. Rivers: Form and Processes in Alluvial Channels. New York: Metheun. Richardson, E. V. and L. Abed. 1993. “Top Width of Pier Scour Holes in Free and Pressure Flow.” Hydraulic Engineering Proceedings of the 1993 National Conference. San Francisco, California: ASCE. Richardson, E. V., D. B. Simons, and P. F. Lagasse. 2001. Highways in the River Environment. FHWA NHI 01-004, Federal Highway Administration, Hydraulic Series No. 6. Robinson, M. C. 1984. “Rivers in Miniature: The Mississippi Basin Model,” presented at the Annual Meeting, Society for the History of Technology, Cambridge, Massachusetts. Rouse, H. S. and S. Ince. 1963. History of Hydraulics. New York: Dover Publications. Rubey, W. W. 1933. “Settling Velocities of Gravel, Sand and Silt Particles,” American Journal of Science, 5th Series 25, no. 148. Samuels, P. G. and M. P. Gray. 1982. The ʹFLUCOMPʹ River Model Package, an Engineerʹs Guide. Report EX999. Wallingford, UK: Hydraulics Research Limited. Shearman, J. O. 1990. HY-7 - Userʹs Manual for WSPRO - A Computer Model for Water Surface Profile Computations. U.S. Federal Highway Administration, Publication No. FHWA-IP-89-027. Shields, F. D., R. R. Copeland, P. C. Klingeman, M. W. Doyle, and A. Simon. 2003. “Design for Stream Restoration.” Accepted for ASCE Journal of Hydraulic Engineering. Shukry, A. 1950. “Flow Around Bends in an Open Flume.” Transactions of the American Society of Civil Engineers 115. State of Texas Department of Highways and Public Transportation. “Bridge Replacement Solution,” Technology Transfer, Innovations No. 8. Austin, Texas: Research Section. Stonestreet, S. E., R. R. Copeland, and D. C. McVan. 1991. “Bed Load Roughness in Supercritical Flow, Hydraulic Engineering.” Proceedings of the 1991 National Conference, American Society of Civil Engineers, Nashville, Tennessee. Taverner, G. F. 1973. “Stability and Reach Length in Water Surface Profile Determination.” Water Resources Bulletin, American Water Resources Association 9, no 5: 950–962. Toffaleti, F. B. 1968. “A Procedure for Computation of Total River Sand Discharge and Detail Distribution, Bed to Surface,” Technical Report No. 5, Committee on Channel Stabilization, U.S. Army Corps of Engineers. U.S. Army Corps of Engineers (USACE). 1965. Standard Project Flood Determinations. (ENG BUL 528.) EM 1110-2-1411. Washington, D.C. U.S. Army Corps of Engineers (USACE). 1980. Hydraulic Design of Reservoir Outlet Works. EM 11102-1602. Washington, D.C. U.S. Army Corps of Engineers (USACE). 1983. Streambank Protection Guidelines for Landowners and Local Governments. Vicksburg, MS: Waterways Experiment Station. U.S. Army Corps of Engineers (USACE). 1985. Open Channel Flow and Sedimentation, TABS2 User’s Manual. Vicksburg, MS: Waterways Experiment Station. U.S. Army Corps of Engineers (USACE). 1985a. Sediment Transport in Unsteady, 2-Dimensional Flow, Horizontal Plane, TABS-2 User’s Manual. Vicksburg, MS: Waterways Experiment Station. U.S. Army Corps of Engineers (USACE). 1986. Accuracy of Computed Water Surface Profiles. Research Document 26. Davis, CA.: Hydrologic Engineering Center.
665
U.S. Army Corps of Engineers (USACE). 1986a. Overtopping of Flood Control Levees and Floodwalls. ETL 1110-2-299. Washington, D.C. U.S. Army Corps of Engineers (USACE). 1987. Hydrologic Analysis of Leveed Interior Areas, EM 11102-1413. Washington, D.C. U.S. Army Corps of Engineers (USACE). 1989. Environmental Engineering for Flood Control Channels. EM 1110-2-1205. Washington, D.C. U.S. Army Corps of Engineers (USACE). 1990. HEC-1 Flood Hydrograph Package User’s Manual. CPD-1A. Davis, CA: Hydrologic Engineering Center. U.S. Army Corps of Engineers (USACE). 1990a. River Routing with HEC-1 and HEC-2. Training Document No.30c. Hydrologic Engineering Center. U.S. Army Corps of Engineers (USACE). 1990b. HEC-2 Water Surface Profiles User’s Manual. CPD2A. Davis, CA: Hydrologic Engineering Center. U.S. Army Corps of Engineers (USACE). 1991. Environmental Restoration of the Kissimmee River, Final Integrated Feasibility Report and Environmental Impact Statement. Jacksonville, Florida: Jacksonville District, Central and Southern Florida Project. U.S. Army Corps of Engineers (USACE). 1991. Flood Runoff Analysis Engineering Manual. Davis, CA: Hydrologic Engineering Center. U.S. Army Corps of Engineers (USACE). 1992. Reconnaissance Report, Alexander and Pulaski Counties, Illinois. St. Louis, Missouri: St. Louis District. U.S. Army Corps of Engineers (USACE). 1993. HEC-6 Scour and Deposition in Rivers and Reservoirs User’s Manual. Davis, CA: Hydrologic Engineering Center. U.S. Army Corps of Engineers (USACE). 1993a. Hydrologic Frequency Analysis. EM 1110-2-1415. Washington, D.C. U.S. Army Corps of Engineers (USACE). 1993b. River Hydraulics. EM 1110-2-1416. Washington, D.C. U.S. Army Corps of Engineers (USACE). 1994. HEC-DSS, User’s Guide and Utility Programs Manual. Davis, CA: Hydrologic Engineering Center. U.S. Army Corps of Engineers (USACE). 1994a. Hydrologic Engineering Studies Design. EP 1110-2-9. Washington, D.C. U.S. Army Corps of Engineers (USACE). 1994b. The Great Flood of 1993, Post-Flood Report, Lower Missouri River Basin. Appendix E. Kansas City, Missouri: Kansas City District. U.S. Army Corps of Engineers (USACE). 1994c. Topographic Mapping. EM 1110-1-1005. Washington, D.C. U.S. Army Corps of Engineers (USACE). 1994d. Flood-Runoff Analysis. EM 1110-2-1417. Washington, D.C. U.S. Army Corps of Engineers (USACE). 1994e. Hydraulic Design of Flood Control Channels (1991 and Change 1, 1994). EM 1110-2-1601. Washington, D.C. U.S. Army Corps of Engineers (USACE). 1994f. Channel Stability Assessment of Flood Control Projects. EM 1110-2-1418. Washington, D.C. U.S. Army Corps of Engineers (USACE). 1994g. The Great Flood of 1993, Post-Flood Report, Lower Mississippi River, Appendix E. St. Louis, Missouri: St. Louis District. U.S. Army Corps of Engineers (USACE). 1994h. General Design for Replacement of or Modifications to the Lower Santa Ana River Drop Structures. Orange County, California: Waterways Experiment Station.
666
Bibliography
U.S. Army Corps of Engineers (USACE). 1995. Flow Transitions in Bridge Backwater Analysis. RD-42. Davis, CA: Hydrologic Engineering Center. U.S. Army Corps of Engineers (USACE). 1995a. HEC-FFA (Flood Frequency Analysis) User’s Manual. Davis, CA: Hydrologic Engineering Center. U.S. Army Corps of Engineers (USACE). 1995b. Sediment Investigations in Rivers and Reservoirs. EM 1110-2-4000. Washington, D.C. U.S. Army Corps of Engineers (USACE). 1995c. A Comparison of the One-Dimensional Bridge Hydraulic Routines from: HEC-RAS, HEC-2 and WSPRO. RD-41. Davis, CA: Hydrologic Engineering Center. U.S. Army Corps of Engineers (USACE). 1996. Risk-Based Analysis for Flood Damage Reduction Studies. EM 1110-2-1619. Washington, D.C. U.S. Army Corps of Engineers (USACE). 1996a. EM 1110-2-1612, Ice Engineering. Washington, D.C. U.S. Army Corps of Engineers (USACE). 1997. UNET One-Dimensional Unsteady Flow Through A Full Network of Open Channels User’s Manual. CPD-66. Davis, CA: Hydrologic Engineering Center. U.S. Army Corps of Engineers (USACE). 1998. Final Feasibility Report and Appendixes, Yuba River Basin Investigation, California. Sacramento, California: Sacramento District. U.S. Army Corps of Engineers (USACE). 1998a. SAM Hydraulic Design Package for Channels User’s Manual. Waterways Experiment Station. U.S. Army Corps of Engineers (USACE). 2000. HEC-HMS Hydrologic Modeling System User’s Manual. CPD-74. Davis, CA: Hydrologic Engineering Center. U.S. Army Corps of Engineers (USACE). 2000a. User’s Guide to SED2D WES. Vicksburg, MS: Waterways Experiment Station, Coastal and Hydraulics Laboratory. U.S. Army Corps of Engineers (USACE). 2000b. GeoRAS User’s Manual. Washington, D.C. U.S. Army Corps of Engineers (USACE). 2001. Users Guide to RMA2 WES. Vicksburg, MS: Waterways Experiment Station, Coastal and Hydraulic Laboratory. U.S. Army Corps of Engineers (USACE). 2001a. User’s Guide to RMA10. Vicksburg, MS: Waterways Experiment Station, Coastal and Hydraulics Laboratory. U.S. Army Corps of Engineers (USACE). 2002. HEC-RAS, River Analysis System User’s Manual (CPD-68), Hydraulic Reference Manual (CPD-69), and Applications Guide. Davis, CA: Hydrologic Engineering Center. U.S. Bureau of Reclamation (USBR). 1935-43. Project History, Boulder Canyon Project, Hoover Dam, Volume 6 (1936) through Volume 13 (1943), Annual Summary, Retrogression below Boulder Dam. U.S. Bureau of Reclamation (USBR), Department of Interior. 1963. Linings for Irrigation Canals. Washington, D.C.: U.S. Government Printing Office. U.S. Bureau of Reclamation (USBR). 1977. Design of Small Dams. Water Resources Technical Publication Washington, D.C.: USBR. U. S. Bureau of Reclamation (USBR). 2002. Hoover Dam web site (www.hooverdam.usbr.gov). U.S. Department of Agriculture (USDA). 1993. “WSP-2, Computer Program for Water Surface Profiles,” National Engineering Handbook, Part 630. Natural Resource Conservation Service. U.S. Department of Commerce (USDC). 1978. PMP East of the 105th Meridian. Hydrometeorological Report No. 51. Silver Springs, MD: National Oceanic and Atmospheric Administration, Office of Hydrology, National Weather Service.
667
U.S. Department of Commerce, National Weather Service (NWS). 1961. Technical Paper No. 40, Rainfall Frequency Atlas of the United States for Durations from 30 minutes to 24 hours and Return Periods from 1 to 100 Years. U.S. Department of Commerce, National Weather Service (NWS). 1964. Technical Paper No. 49, Twoto Ten-Day Precipitation for Return Periods of 2 to 100 Years in the Contiguous United States. U.S. Department of Transportation (USDOT). 1979. Restoration of Fish Habitat in Relocated Streams. FHWA-IP-79-3. Washington, D.C.: Federal Highway Administration. U.S. Department of Transportation, Federal Highway Administration (FHWA). 1979. Design of Urban Highway Drainage – The State of the Art. FHWA-TS-79-225. Washington, D.C.: Hydraulics Branch, Bridge Division, Office of Engineering. U.S. Department of Transportation, Federal Highway Administration (FHWA). 1984. Guide for Selecting Manning’s Roughness Coefficients for Natural Channels and Floodplains. Report No. FHWA-TS-84-204. U.S. Department of Transportation, Federal Highway Administration (FHWA). 1985. Hydraulic Design of Highway Culverts. Hydraulic Design Series No. 5. Washington, D.C.: FHWA. U.S. Department of Transportation, Federal Highway Administration (FHWA). 1988. Revisions to the National Bridge Inspection Standards (NBIS). T5140.21. Washington, D.C.: FHWA. U.S. Department of Transportation, Federal Highway Administration (FHWA). 1989. Finite Element Surface-Water Modeling System: Two-Dimensional Flow in a Horizontal Plane. Publication No. FHWA-RD-88-177, FESWMS-2DH. McLean, Virginia: Turner-Fairbank Highway Research Center. U.S. Department of Transportation, Federal Highway Administration (FHWA). 1990. User’s Manual for WSPRO – A Computer Model for Water Surface Profile Computations. Publication No. FHWA-IP-89-027. U.S. Department of Transportation, Federal Highway Administration (FHWA). 1991. Stream Stability at Highway Structures. Hydraulic Engineering Circular No. 20, Publication No. FHWA-IP90-014. Washington, D.C.: FHWA. U.S. Department of Transportation, Federal Highway Administration (FHWA). 1996. Channel Scour at Bridges in the United States. Publication No. FHWA-RD-95-184. Washington, D.C.: FHWA. U.S. Department of Transportation, Federal Highway Administration (FHWA). 2001. Evaluating Scour at Bridges. Fourth Edition. Hydraulic Engineering Circular No. 18, Publication No. FHWA-NHI 01-001. Washington, D.C.: FHWA. U.S. Environmental Protection Agency (USEPA). 2002. Storm Water Management Model User’s Manual. Athens, Georgia: Office of Research and Development. U.S. Geological Survey (USGS). 1992. Determination of Errors in Individual Discharge Measurements. Open File Report 92-144. Norcross, Georgia.: USGS Van Rijn. 1993. “Sediment Transport, Part I: Bed Load Transport.” Journal of Hydraulic Engineering, ASCE 110, no. 10: 1984. Vanoni, V. A. 1975. Sedimentation Engineering. Manuals and Reports on Engineering Practice, No. 54, American Society of Civil Engineers. Vieira, J. H. D. 1983. “Conditions Governing the Use of Approximations for the St.-Venant Equations for Shallow Surface-Water Flow.” Journal of Hydrology 60: 43–58. Wahl, T. L. 1998. “Prediction of Embankment Dam Breach Parameters: A Literature Review and Needs Assessment.” U.S. Department of the Interior Dam Safety Office.
668
Bibliography
Wahl, T. L. 2001. “The Uncertainty of Embankment Dam Breach Parameter Predictions Based on Dam Failure Case Studies.” USDA/FEMA Workshop on Issues, Resolutions and Research Needs Related to Dam Failure Analysis. Oklahoma City, Oklahoma. Wallingford Software. 2001. ISIS Flow User Manual. Wallingford, U.K.: Wallingford Software Limited. Washington Department of Fish and Wildlife. 1999. Fish Passage Design at Road Culverts. Habitat and Lands Program, Environmental Engineering Division. Water Resources Council (WRC). 1982. Guidelines for Determining Flood Flow Frequency. Bulletin 17B. Hydrology Committee. Reston, Virginia: Inter-Agency Advisory Committee, U.S. Department of the Interior, USGS. Watson, C. C., D. S. Biedenharn and S. H. Scott. 1999. Channel Rehabilitation: Processes, Design and Implementation. Vicksburg, MS: U.S. Army Corps of Engineers, Waterways Experiment Station, Engineer Research and Development Center. Willems, P., R. Van Looveren, M. Sas, C. Bogliotti, and J. Berlamont. 2000. “Practical Comparison of the Modeling Systems MIKE-11 and ISIS for Hydrodynamic Modeling in the Flemish River Dijle Catchment.” Proceeedings of the International Hydroinformatics Conference. Iowa. Williams, P. B. 1990. “Rethinking Flood-Control Channel Design,” Civil Engineering 60, no. 1: 57– 59. Wilson, K. V. 1973. “Changes in Flood-Flow Characteristics of a Rectified Channel Caused by Vegetation, Jackson, Mississippi.” USGS Journal of Research, 1: 621–625. Yang, C. T. 1976. “Minimum Unit Stream Power and Fluvial Hydraulics.” Journal of Hydraulic Engineering 105, no. HY7: 769. Yarnell, D. L. 1934. “Bridge Piers as Channel Obstructions.” Technical Bulletin 442. Washington D.C.: U. S. Department of Agriculture. Zheleznyakov, G. V. 1971. “Interaction of Channel and Flood Plain Systems.” Proceedings, 14th Conference of the International Association of Hydraulic Research: 145–184.
INDEX
Index Terms
Links
A Abbott-Ionescu implicit finite-difference scheme
587
abutment scour
515
516f
vortices and
516f
538
538
540
517f
See also bridge scour modeling; scour abutment scour equations angle of embankment to flow Froehlich abutment live-bed scour equation calculation (example) for flow not parallel to abutment (example) HIRE live-bed scour equation calculation (example)
538–542 541–542 544 542–544 543
in HEC-RAS
547
549f
length of active flow in approach section
539
540f
shape coefficients
538
540t
See also bridge scour computation abutments setback
538
shape coefficients
538
540t
shapes of
538
539f
sloping
211
212f
Ackers-White sediment transport equation
554
actual depth HEC-RAS output
429
aerial photographs
113–114
121–122
512
513
aggradation of reaches air entrainment in high velocity flow alternate depths
401–402 39–40
This page has been reformatted by Knovel to provide easier navigation.
541f
538–544
Index Terms
Links
angle of attack flow on bridge pier
528
529f
538
540
541f
564–566
567f
568t
attenuation parameter
566
586
Average-Log routing method
575t
angle of embankment to flow approach velocity minimum for pier scour
531
arch bridges modeling of
222
attenuation of peak flow
B backwater analysis
83
backwater curves
47f
48
barrel losses of culverts. See friction losses base flood
349
base flood elevation (BFE)
319
floodway revisions and
337
LOMRs for revising on Flood Insurance Rate Map
353
335–336 324
bed form roughness factor
419
bed load
378
553
See also sediment load bend losses in culverts
269
calculation (example)
270
coefficients
270
Bernoulli equation
270t
29–30
See also energy equation Bernoulli, Daniel
29
BFE. See base flood elevation Bleokon-Sabaneev composite roughness equation
485
bottom slopes. See channel invert boundaries. See floodway boundaries; hydraulic boundaries; sediment boundaries braided streams
380 This page has been reformatted by Knovel to provide easier navigation.
553f
Index Terms
Links
bridge abutments. See abutments bridge cross sections
168f
adjustment of Manning’s n expansion cross sections location of
169–170
199 195–198 168f
169–170
211–212
213f
167
228–229
183–194
See also contraction coefficients; contraction cross-section locations; contraction reaches; cross sections; expansion reaches Bridge Design Editor (HEC-RAS) bridge flow modeling arch bridges
222
bridge superstructures bridges on skew
208–209 220
bridges operating as dams
221–223
bridges’ effects on flow
167–170
combination flow at bridges computation method selection cross-section locations
221f
182 213–215 169
HEC-RAS and HEC-2 compared
653–655
low-water bridges
218–220
multiple bridge openings
215–217
183
parallel bridges
217
219
perched bridges
217
218f
structures
206–215
WSPRO for
223f–227
See also bridge cross sections; high-flow analysis of bridges; ineffective flow areas around bridges; low-flow analysis of bridges Bridge Modeling Approach Editor (HEC-RAS)
213–215
bridge piers. See piers bridge scour analysis
509–518
failures from scour key references
509 510–511
See also mobile boundary analysis; scour bridge scour computation preparation for
519–544 519
This page has been reformatted by Knovel to provide easier navigation.
184f
Index Terms
Links
bridge scour computation (Cont.) procedure
520–521
See also abutment scour equations; contraction scour; lateral scour; pier scour computation bridge scour modeling (HEC-RAS) abutment scour analysis cautions and concerns
545–551 547
549f
550–551
computation of channel data for the design flood event
546f
546
contraction scour analysis
546
547f
cross sections to define scour computations
194
514f
pier scour analysis
547
548f
545
546f
548
549f
545
subdivision of cross section Flood Distribution option for total scour analysis
550f
See also bridge scour analysis; sediment transport modeling Bridge Waterway Analysis Model. See WSPRO Bridge/Culvert Data Editor (HEC-RAS) to model bridge structures
206–215
to plot culvert data
258
259f
to set Hydraulic Table parameters
608
608f
See also Culvert Data Editor bridges arch modeling of
222
as orifices
178
as sluice gates
179f
177–178
length
168
low chord of
169
on skew modeling of
220
221f
221–223
223f
operating as dams modeling of overflow
179–182
railroad trestle
173–174 This page has been reformatted by Knovel to provide easier navigation.
181
Index Terms
Links
bridges (Cont.) replaced by culverts
276
replacing piers with culverts
277f
width
168 See also tabular review of HEC-RAS outputs
broad-crested weirs
460
460f
Brownlie roughness equation
419
420f
bulking of flow in supercritical regime
401–402
C Cache River channel modifications
397
channel curves minimum radii
410
See also superelevations on channel curves channel degradation downstream of dams channel design
505 400–413
air entrainment
417–431
401–402
bridge piers
413
413f
channel stabilizer
411
411f
Copeland method
422–425
debris basins
398
development guidelines
384–385
drop structures
410–411
HEC-RAS for
429
junctions
405–406
linings
402–403
low-flow channel
408
mixed flow analysis
400–401
protection from scour
406–408
Regime method
425
technical reports about
388
tractive force method
412
412f
409f
426f
426–428
This page has been reformatted by Knovel to provide easier navigation.
Index Terms
Links
channel design... (Cont.) See also channel modification results analysis; channel transitions; freeboard; uniform flow analysis channel enlargement. See channel modification channel geometry
13
data entry
604
flood deposition effects on
503
flood scour effects on
503
channel invert
22
adverse slopes
49
critical slopes
49
horizontal slopes
49
14f
16–23
22f
mild slopes
46–48
steep slopes
49
50f
405–406
407f
See also channels; slopes channel junctions channel linings. See channel design; specific types of linings channel maintenance requirements
433
channel modification
10
377
cutoffs in realignment
394
395f
397
downstream effects
382
enlargement
391
392f
393
380f
398
guidelines for developing a stable channel
384–385
input data for HEC-RAS
414–417
of Corte Madera Creek permit requirements
398 399–400
sediment load effects on
380
shortening the length
397
upstream effects
381–382
See also channel design; design parameters Channel Modification Data Editor (HEC-RAS)
414–417
channel modification methods clearing
390
392f
enlargement by clearing one side
393
393f
This page has been reformatted by Knovel to provide easier navigation.
393f
Index Terms
Links
channel modification methods (Cont.) enlargement by upper channel widening
393f
enlargement of compound channels
391
high-cutoff with diversion channel high-flow cutoff with diversion channel high-flow diversion channel with weir
392f
389–390 391f 387–389
390f
levees
387
387f
new channel construction
394
396f
paving
394
396f
realignment
394
395f
396–397
399
390
392f
rehabilitation snagging channel modification results analysis
429–431
average velocity
430
channel effects outside of modified reach
431
channel top width
430
comparison of channel plans
431
effects on hydrographs
431
energy grade line slope
430
sensitivity of Manning’s n
430
sensitivity of scour on channel design profile
430
sensitivity of sediment deposition on channel design profile
430
432f
See also channel design channel paving
394
channel protection
396f
406–408
channel realignment channel rehabilitation
394
395f
396–397
399
channel restoration. See channel rehabilitation channel slopes. See channel invert channel stability
377–386
aggradation
380
channelization impact on
381–383
Copeland method for evaluating
422–425
degradation
380
factors
377
425t
This page has been reformatted by Knovel to provide easier navigation.
402–403
Index Terms
Links
channel stability (Cont.) guidelines for achieving
384–385
Lane’s sediment balance
380
380f
Regime method for evaluating
425
426f
stream equilibrium concept
378–380
tractive force method for evaluating
426–428
urbanization impact on channel stabilizer
381 411
411f
channel top width analyzing HEC-RAS channel modification results
430
of floodway flow
363
channel transitions contraction coefficients for
404
405t
expansion coefficients for
404
405t
types of
404
405f
channelization Cache River
397
effects of
385–386
history of
378
Kissimmee River
399
channels area
18f
18
bank stations
16
16f
bed forms
530
530f
crossings of flow in
378
curved
410
depth of flow
16–17
irrigation design curves
403
nonprismatic
13
slope of
14f
22
open
13
14f
prismatic
13
14f
standard step method with (example)
59–61
properties
15
shapes
14f
19t
This page has been reformatted by Knovel to provide easier navigation.
19t
Index Terms
Links
channels (Cont.) slopes
22–23
top width
14f
velocity distribution
20f
17
See also channel invert; circular channels; cross sections; rectangular channels; trapezoidal channels; triangular channels CHECK-2 for HEC-2
302
345
302
345–346
2
35–36
CHECK-RAS for HEC-RAS Chézy equation for uniform flow analysis
36
for velocity
36
Chézy, Antoine
2
35–36
Chézy’s C units of
36
values for
36
Chézy’s roughness coefficient. See Chézy’s C circular channels
14f
velocity distribution in
19t
20f
clearing channel modification by clear-water scour
390
392f
512–514
Laursen’s clear-water contraction scour equation
526
See also contraction scour; scour CLOMR. See Conditional Letter of Map Revision (CLOMR) closed-conduit flow
13–15
coefficient of contraction. See contraction coefficients coefficient of expansion. See expansion coefficients coefficient of roughness. See roughness coefficients Cold Regions Research and Engineering Laboratory (CRREL) ice jam database for the U.S. Colorado State University (CSU) pier scour equation combination flow at bridges
488 527–531 182
This page has been reformatted by Knovel to provide easier navigation.
18f
19t
Index Terms
Links
compound channels channel modifications methods
391
392f
computer automated drafting and design files (CADD) importing data files into HEC-RAS
641
Conditional Letter of Map Revision (CLOMR) need for (example) requirements
344–345 340t
submittal procedure
341–344
See also Flood Insurance Rate Maps conjugate depths. See sequent depths Conspan Arch as default shape for culvert flow modeling continuity equation
259f
260
3
29
571
contraction coefficients for bridge reaches
194–195
typical values
194
for channels
194t
57–58
transitions
404
for cross-section modeling for culverts
156–157 255
for floodplain modeling
156–157
for supercritical flows
198–199
in WSPRO
405t
255f
226
See also bridge cross sections; bridge flow modeling; culvert cross sections contraction cross-section locations (bridges)
183
184f
contraction reaches
168
168f
contraction ratio
184f
185
See also bridge cross sections; cross sections; culvert cross sections
calculation (example) length
188–189 183–190
calculation (example)
186–187
See also bridge cross sections; bridge flow modeling; reaches
This page has been reformatted by Knovel to provide easier navigation.
185t
187–190
Index Terms
Links
contraction scour
512–514
clear-water contraction scour
526
calculation (example)
527
Laursen’s clear-water contraction scour equation
526
critical velocity for bed-sediment movement
522
See also bridge scour computation; clear-water scour; live-bed scour; scour control structures high-flow diversion channel with weir conveyance
387–389 61
equation for
61
HEC-RAS and HEC-2 compared in calculating velocity distribution coefficient in standard step method modeling landward side of levees to calculate friction slope at cross sections Copeland method
651–653 62 61–67 447–449 62 422–425
425t
Corte Madera Creek channel modifications of Courant number
398 589
Cowan’s equation coefficient values for various channel conditions
152t
to estimate Manning’s n
150
calculation (example) critical depth
152t
153–154 40–41
calculation (example)
41
general equation for
40
in water profile classification
46–51
location for stream discharge measurements
41
rectangular channel equation for
41
using weirs to obtain
41
critical depths HEC-RAS and HEC-2 compared
657
HEC-RAS output
429
in water profile classification
47f
50f
See also depths This page has been reformatted by Knovel to provide easier navigation.
153f
Index Terms
Links
critical shear stress. See shear stress critical velocity for incipient motion for grain size
522
531
487
487f
Cross Section Data Editor (HEC-RAS) ice cover data entry for levees data entry for
445
cross section locations for lateral weir modeling
477
for split flow modeling
473f
476
Cross Section Points Filter (HEC-RAS) to reduce points in imported GIS data
641
Cross Section Table (HEC-RAS) data entry
605–607
cross sections geometry
16
18f
identification by river mileage
122
123t
interpolation of
124
296–297
needed at specific locations
19t
123–124
of floodplain on Flood Insurance Rate Map
324
of floodplains
16f
spacing of
124–125
surveys of
16
velocity distributions in
20f
122
See also bridge cross sections; channels; culvert cross sections; graphical review of HEC-RAS; tabular review of HEC-RAS outputs crossings of flow in channels
378
cross-section locations
122–126
135
for bridge flow modeling
169
183
for culvert flow modeling
234f
253–254
for levee modeling
444–445
cross-section modeling information contraction coefficients
156–157
expansion coefficients
156–157
This page has been reformatted by Knovel to provide easier navigation.
184f
Index Terms
Links
cross-section surveys
16
CRREL. See Cold Regions Research and Engineering Laboratory culvert hydraulic effects
236
culvert barrel
238f
234
culvert cross sections
253–254
contraction ratios
253
254f
expansion ratios
253
254f
for hydrograph routing location of
262–264 234f
with energy dissipaters
253–254
254
See also contraction coefficients culvert cross-sectional shapes
235–236
Culvert Data Editor (HEC-RAS)
258–260
inlet control data entry
260
inlet geometry data entry
260
outlet control data entry
261
See also Bridge/Culvert Data Editor culvert energy dissipaters
254
culvert entrance
234
241f
culvert entrances drop inlet
274
culvert exit
234
culvert flow modeling attenuation of peak flows
261–264
boundary cross-section adjustments
256–257
cross-section locations
234f
culvert shape changes
271
debris
267–268
development of storage-outflow relationships
261–264
fish passage
274–276
geometry adjustments HEC-RAS for
253–254
257 257–261
HEC-RAS procedures
243
ineffective flow areas
256–257
Manning’s n adjustments
244f
257
This page has been reformatted by Knovel to provide easier navigation.
Index Terms
Links
culvert flow modeling (Cont.) material changes within culverts
273
replacement of bridges with culverts
276
277f
routing of hydrographs to account for flood storage of embankments scour at outlets
261–264 269–270
sedimentation in culvert barrels upstream of entrance
266 265–266
selecting tailwater elevations without downstream profile data culvert head loss
260 235
culvert hydraulics
237–257
bend loss coefficients
270
bend losses
269
calculation (example) composite roughness coefficient calculation (example)
270 273 273
horizontal bends
269–270
inlet control
237–240
analysis of flow (example)
247–248
coefficients describing inlet conditions
245–247
flow conditions
238–240
submerged inlet – orifice flow equation
245
unsubmerged inlet – weir flow equations
245
junction losses
272
outlet control
248–251
analysis of flow (example)
251–253
coefficients describing inlet conditions
249–250
friction losses
250–251
head losses
250t
251
See also entrance losses of culverts; exit losses of culverts terminology vertical bends culvert invert
233–236 270
271f
234 This page has been reformatted by Knovel to provide easier navigation.
Index Terms
Links
culvert shapes. See culvert cross-sectional shapes CulvertMaster
243
culverts drop inlets
274
entrances debris barriers
267
268f
HEC-RAS and HEC-2 compared
655–656
HEC-RAS vs. HEC-2
655–656
minimum energy loss
264
265f
replacing bridges with
276
277f
sump inlets
274
See also tabular review of HEC-RAS outputs
D dam operations
83
dam-break floods
28
DAMBRK (Dam-Break Forecasting Model)
85
dams
10
channel degradation downstream from
505
historical projects
1–2
81
data cross sections
105–106
digital elevation models (DEMs)
106
digital terrain models (DTMs)
641
discharge
104–105
for floodplain modeling
104–106
geometry
105–106
topographic maps
111–112
106
data accuracy elevations
131–133
133t
flood discharges
137
143
floodplain maps
121
historical flood data
143
historical gauge data
138
recorded gauge data
136–137
survey data
143
138 This page has been reformatted by Knovel to provide easier navigation.
85
Index Terms
Links
data accuracy (Cont.) topographic maps
131–133
133t
water surface profiles
133–134
134t
See also geometric data data entry from levee models
445
gate settings for inline flow control structures
468
469f
ice modeling
487
487f
644–645
645f
in sediment transport modeling
558f
558
of basic channel geometry
604
importing text files to HEC-RAS
of cross-section data
605–607
spillway structures
466–467
468f
480
480f
structures in lateral weir models See also input data data files. See exporting HEC-RAS data; importing data data review. See elevations; graphical review of HEC-RAS outputs; input data review; model calibration procedures; tabular review of HEC-RAS outputs data sources
111–114
aerial photographs
113–114
field interviews
160
flood insurance map
113
for model calibration
159–162
highwater marks
323f
159
hydrologic comparisons ice jam database
161–162 488
newspaper records
160–161
orthophoto maps
113
stream gauge records
105
111–112
topographic maps
106
113–114
See also information resources debris pier scour and
536 This page has been reformatted by Knovel to provide easier navigation.
159
Index Terms
Links
debris barriers for culvert entrances
267
268f
channel design considerations
398
412
for culverts
267
debris basins
debris obstructing flow in culverts Deck/Roadway Data Editor (HEC-RAS) for culvert embankment side slopes
267–268 208
209f
258f
258
to model bridge superstructure
208–209
to model roadways
258–260
Deck/Roadway Editor (HEC-RAS) for culvert embankment side slopes
258f
degradation of channels
380f
of reaches
511–512
513
depths actual output from HEC-RAS alternate
429 39–40
of flow
14f
16–17
See also critical depths; normal depths; sequent depths design parameters (computed by HEC-RAS)
428–429
actual depth
429
average channel velocity
428
critical depth
429
freeboard
429
Froude number
428
hydraulic radius
428
See also channel modification; graphical review of HEC-RAS outputs; HEC-RAS output analysis shear stress
429
stream power
429
detention ponds
10
diffusion wave equation numerical solutions
574t
575t
580–586
This page has been reformatted by Knovel to provide easier navigation.
576f
578–579
Index Terms
Links
diffusion wave equation (Cont.) zones of applicability
591
592f
106
330
See also hydrologic routing models; Muskingum routing method; Muskingum-Cunge routing method; Variable Parameter MuskingumCunge routing method digital elevation maps. See digital elevation models digital elevation models (DEMs) See also elevations Digital Flood Insurance Rate Maps (DFIRMs) See Flood Insurance Rate Maps digital terrain models (DTMs) importing data into HEC-RAS direct step method
641 52–56
application in a trapezoidal channel (example) discharge
53–56 18
variation of stage with
140
discharge coefficients for pressure flow
177–178
for submerged pressure flow
178
typical values
178
discharge data
104–105
135–144
accuracy of historic data
138
143
estimated by watershed models
142
144f
for model calibration
159
peak discharge calculation from regression equation (example)
141–142
previous studies
112–113
regional analyses
139–142
sources on Web
136
105
statistical analyses
138–139
stream gauge data
111–112
136–138
142
144f
See also geometric data discharge frequency curves estimated by watershed models diverging flow. See split flows This page has been reformatted by Knovel to provide easier navigation.
Index Terms
Links
diversions
10
drag coefficient of bridge piers in momentum equation drawdown curve
172–173
173t
48
drop culverts. See drop inlets of culverts drop inlets of culverts drop structure
274 470–473
channel design considerations hydraulic jumps in
410–411
412f
470
473
modeling as an inline weir
471
using cross sections
471
water surface profiles through drop
472
DTMs. See digital terrain models dunes
530
DWOPER (Dynamic Wave Operation Network Model) See FLDWAV dynamic wave equations
571–572
576f
E E431/J635 flow profile software earth-lined channels
3 403
economic benefits of projects maximum net benefits
100–101 101
eddy losses. See contraction coefficients; expansion coefficients EGL. See energy grade line (EGL) elevations data review
358
variations on floodway
364
359f
water surface ice cover effects
483
ice jams and
484f
486
See also digital elevation models emergency spillways. See spillways encroachment analysis methodology HEC-RAS
350–365 354–365
This page has been reformatted by Knovel to provide easier navigation.
363f
Index Terms
Links
Encroachment Data Editor (HEC-RAS) defining floodway limits with encroachment stations
356
357f
349
See also floodway boundaries encroachment studies
9
energy concepts
37–44
alternate depths
39–40
normal depth
42–43
specific energy
38–40
See also critical depths; hydraulic jumps energy dissipaters. See culvert energy dissipaters energy equation
3
applied to low-flow analysis at bridges
170–171
for calculating water surface elevations
30
for steady, gradually varying flow analysis
30
for steady, uniform flow analysis
30
29–30
energy grade line (EGL) of channel cross section of culvert flow of open channel flow
19–20 233
234f
19–20
22
23
57–58
See also friction slope energy grade line slope. See friction slope energy losses in open channels See also contraction coefficients; expansion coefficients; friction losses Engelund-Hansen sediment transport equation
554
entrance control of culvert flow. See inlet control of culvert flow entrance loss of culvert
235
coefficient
249
250t
types of entrances
249f
249
Environmental Assessments for channel modifications
399–400
environmental effects of channel enlargement of channel paving
391–393 394
This page has been reformatted by Knovel to provide easier navigation.
22f
Index Terms
Links
environmental effects (Cont.) of channelization
385–386
386f
of clearing and snagging
390
392f
of Kissimmee River channelization
399
Environmental Impact Statements for channel modifications
399–400
erosion of channel
120
error messages from HEC-RAS program
285–288
errors. See data accuracy ESRI ArcView
641
Euler’s equations of motion
29
exit control of culvert flow. See outlet control of culvert flow exit loss of culvert
235
coefficient
249
249
expansion coefficients for bridge reaches
195–198
maximum values
198
minimum values
198
for channels
57–58
transitions
404
for cross-section modeling for culverts
405t
156–157 255
for floodplain modeling
156–157
for supercritical flow
198–199
in WSPRO
226
See also bridge flow modeling expansion cross sections. See bridge cross sections; culvert cross sections expansion reaches
168f
expansion ratio
190–194
expansion ratio calculation (example) length
169
192 190–194
See also bridge cross sections; bridge flow modeling; reaches This page has been reformatted by Knovel to provide easier navigation.
Index Terms
Links
exporting HEC-RAS data to CADD programs
648
to GIS
648
to HEC-DSS files
648f
645–646
F fall velocity of sediment particles Federal Emergency Management Agency (FEMA)
524
525f
6
318
freeboard requirements
446
ice modeling assistance from
488
Map Service Center
324
source of maps
330
web site address
341
Mapping Coordination Contractors (MCC)
341
regions
341
requirements for levee certification Review Software
365–367 345
CHECK-2 for use with HEC-2 (Water Surface Profiles program) CHECK-RAS for use with HEC-RAS
345 345–346
FEMA. See Federal Emergency Management Agency FEQ (Full Equations Program)
87
FESWMS-2DH (Finite Element Surface-Water Modeling System) for two-dimensional gradually varied unsteady flow analysis
90
FHBMs. See Flood Hazard Boundary Maps field interviews to get model calibration data
160
FIRMs. See Flood Insurance Rate Maps FIS. See Flood Insurance Studies fish passage through culverts
274–276
flank levees
441–443
This page has been reformatted by Knovel to provide easier navigation.
Index Terms
Links
FLDWAV (Flood Wave Program)
85
one-dimensional gradually varied unsteady flow and
85
flood attenuation of culverts
261
261f
flood bore. See flood wave Flood Control Act of 1928
5
flood control methods. See channel modification; levees Flood Disaster Protection Act of 1973
318
flood forecasting
82
flood hazard area
323f
324
330–331
319
325
331
322–325
332
Special Flood Hazard Area Flood Hazard Boundary Map (FHBM) Flood Insurance Rate Map (FIRM) base flood elevation on Conditional Letter of Map Revision (CLOMR)
322 8f 324 339–341
coverage
324
cross sections of floodplain
324
Digital Flood Insurance Rate Map
330
floodplain boundary
324
floodway boundaries
324
hazard area designation
323f
324
hazard zones
325
330–331
Letter of Map Amendment Letter of Map Change
333–334 332
Letter of Map Revision
335–337
submittal procedure
341–344
Letter of Map Revision Based on Fill
334–335
map modernization plan
330
map panel cover
325
need for Conditional Letter of Map Revision (example)
344–345
revision of
331–341
revision submittal steps
341–344
right to request changes on
332
source of
330
325f
This page has been reformatted by Knovel to provide easier navigation.
333
Index Terms
Links
Flood Insurance Rate Map (FIRM) (Cont.) stream centerline
325
See also Conditional Letter of Map Revision; National Flood Insurance Program Flood Insurance Studies (FIS) data requests
341
source of
330
water surface profiles for
302
Flood Insurance Study (FIS)
326–330
flood profile
327
floodway data table
329
hydraulic analyses
327
hydrologic analyses
327
341t
328f
flood insurance. See National Flood Insurance Program flood profiles in Flood Insurance Study
327
328f
319–320
321f
flood surcharge defined state limits
321t
values for 100-year flood
349
flood wave propagation described by kinematic wave approximation
578
flood wave travel time hydrologic routing data adjustments for calculating actual velocity from equation for
308–309 308–309 309
estimated from HEC-RAS Profile Output Table flood waves
308–309 27f
floodplain geometry modeling (HEC-RAS)
28
610–612
adding lateral structures
612
extended cross section option
611
613f
extended cross section with ineffective flow option
611
lateral spills with storage units storage areas
611f
611–612 612f
612
This page has been reformatted by Knovel to provide easier navigation.
342f
Index Terms
Links
floodplain management history of
1–5
floodplain mapping
600–601
requirements
121
floodplain modeling
349
analyzing HEC-RAS output
285–295
field reconnaissance
101–103
hydraulic structures in
589–590
input data
107
review checks by HEC-RAS program review checks by modelers methods
283–285
284–285 284 6
model calibration
107
model runs
107
model selection
103
objectives
103t–104t
99–100
phases of study
100–101
planning for
97
109
procedures
98
106
project evaluations report preparation
107–108 108
representation in hydrodynamic models
594–599
See also data sources; ice modeling; inline gates modeling; inline weirs modeling; levee modeling; obstruction modeling; stream junction modeling; unsteady flow modeling software selection
103
103t–104t
floodplain modeling data needs
104–106
111
contraction coefficients
156–157
expansion coefficients
156–157
future changes in watershed model calibration data model verification data routing data
158 159–162 162 158–159
sediment boundaries
120
sediment data
157 This page has been reformatted by Knovel to provide easier navigation.
163
Index Terms
Links
floodplain modeling data needs (Cont.) study limits
114–121
See also data sources; discharge data; geometric data floodplain studies
7–11
comprehensive studies
7–9
encroachment studies
9
floodway studies
9
structural measure impacts on hydraulics transportation facilities
349
10 9
floodplain wetlands Kissimmee River Restoration Project floodplains
399 16
16f
boundaries on Flood Insurance Rate Map (FIRM) hazard zone designations
324 330–331
floods Great Flood of 1927
3
5
Great Flood of 1993
143
318
439
439f
444
320f
349
floodwall typical cross section
317
439f
See also levees floodway
319
data table
329–330
developing boundaries to assist enforcement
371
future modifications of
372–373
HEC-RAS and HEC-2 compared
656–657
in relation to levees
368
Mississippi River
368
371f
satisfying future community development needs
369
floodway boundaries defining
356
on Flood Insurance Rate Map (FIRM)
324
357f
See also encroachment stations floodway encroachment analysis encroachment station specification
350–354 351
351f
This page has been reformatted by Knovel to provide easier navigation.
359
Index Terms
Links
floodway encroachment analysis (Cont.) floodway top width specification
351
percent conveyance reduction specification
352
353f
353
354f
use when concerned about increase in velocity
353
354
use when supercritical flow regime exists
354
target surcharge for water surface and maximum energy specifications
target surcharge to reduce conveyance equally use to develop initial floodway
353
354f
target surcharge with equal conveyance specification
353
See also floodway modeling floodway fringe new development restricted to
320f
321f
332
369
321–322
floodway maps base maps and
369
location of boundaries to assist enforcement
371
Standard Encroachment Table data (HEC-RAS)
371f
370–371
See also Flood Hazard Boundary Maps; Flood Insurance Rate Maps floodway modeling 3D plot to visualize floodway
349
354–365
360
360f
computed encroachment stations modifying for additional model runs
363–365
reviewing
362
363f
data file creation
355
356f
data review and modification
358
359f
362
elevation data review
358
359f
363f
entering flow data for floodway profiles
355
flood profile creation
355
357f
359
floodway boundaries defining
356
floodway plan computation
358
graphical tools for floodway review
363
HEC-RAS for
354–358
levee requirements
365–367
363f
368
This page has been reformatted by Knovel to provide easier navigation.
Index Terms
Links
floodway modeling (Cont.) steps in development of floodway work map creation
354 369–371
See also floodway encroachment analysis; floodway profiles review floodway profiles review
358–362
correcting excessive surcharges
362
correcting negative surcharges
361
discrepancies between target floodway elevations and computed profiles visualization using 3D plot feature
358–359 360
360f
337–338
373
See also floodway modeling floodway revisions Letters of Map Revision floodway studies
337–338 9
flow classification
349
23–28
Froude number use in
26–27
gradually varied flow
25–26
rapidly varied flow
25–26
26f
23
24f
steady flow subcritical flow
26–27
supercritical flow
26–27
27f
uniform flow
23
24f
unsteady flow
23
24f
varied flow
24f
24
14f
16–17
flow depths flow distribution for floodway analysis at critical depth cross sections
364
flow splits. See split flows flow velocity. See velocity FlowMaster
331
421
fluvial geomorphology application to channel design
385
force on obstructions calculation (example) equation for
34–35 34
This page has been reformatted by Knovel to provide easier navigation.
Index Terms
Links
frazil ice
485
freeboard
403–404
channel design considerations
403–404
concept replaced by risk and uncertainty studies
404
design for levees
443
factors in determining amount of
403
for waves
403
HEC-RAS output
429
U.S. Army Corps of Engineers standards for
403
U.S. Bureau of Reclamation design curves for irrigation channels
403
friction losses
57
at bridges
170–171
average
63
in standard step method for floodplains
63
for open channels
57
using conveyance
63
of culvert
63
235
under outlet control
250–251
See also head losses friction slope
22f
22–23
24
analysis of HEC-RAS results of channel modifications at cross sections
429 62
averaging
135
calculation using conveyance
62
in direct step method
53
in standard step method
57
in water surface profile analysis
45
47–48
31–32
172
See also energy grade line; slopes frictional resistance in momentum equation Froehlich abutment live-bed scour equation Froehlich pier scour equation
538–542 537
This page has been reformatted by Knovel to provide easier navigation.
572
Index Terms
Links
Froude number
26–27
calculation (example)
28
equation for
27
for contraction lengths and ratios
185–187
for expansion lengths and ratios
190–193
for sequent depths
44
HEC-RAS output
428
of water surface profiles
48
G gabion-lined channels
406
gaging station
137f
gates
407f
459–469
inline
459–469
radial
460
representation in HEC-RAS
609
types of
460
460f
vertical lift
460
460f
460f
See also inline flow control structures gauge data for model calibration to estimate Manning’s n
159 154–155
geographic information systems (GIS) digitized base maps
106
exporting HEC-RAS data files to
648
importing data files into HEC-RAS
641
integration with HEC-RAS geometric data
648f
4 121–135
from aerial photographs
121–122
from topographic maps
121
reach length information
132f
See also cross sections; cross-section modeling information; data accuracy; discharge data; roughness data
This page has been reformatted by Knovel to provide easier navigation.
Index Terms
Links
Geometric Data Editor (HEC-RAS) adding storage areas in floodplain models cross-section data entry
611
612f
605–607
ice data
487
levee model data entry
445
GeoRAS. See HEC-GeoRAS GIS export data template (HEC-RAS) to export files to Geographic Information Systems (GIS)
648
648f
GIS. See geographic information systems gradually varied flow
25–26
gradually varied steady flow modeling criteria for model application
77
HEC-2
77–78
HEC-RAS
78–79
of hydraulic features
103t–104t
WSP-2
79
WSPRO (HY-7)
80
gradually varied unsteady flow modeling of hydraulic features one-dimensional models applications
103t–104t 81–87 81–83
FEQ
87
HEC-RAS
84–85
HEC-UNET
83–84
velocity vectors three-dimensional models RMA10
89f 90 90
two-dimensional models
87–90
applications
88
FESWMS-2DH
90
RMA2
88–89
velocity vectors
89f
See also unsteady flow modeling Graphical Data Editor (HEC-RAS) adjusting imported data with
641
This page has been reformatted by Knovel to provide easier navigation.
Index Terms
Links
graphical review of HEC-RAS outputs
288–289
channel profiles
289
290f
cross sections
288
289f
three-dimensional plots
289
290f
See also design parameters grass cover equations for Manning’s n
419
grass-lined channels
402
Great Flood of 1927
3
5
317
Great Flood of 1993
86
143
318
scour and deposition effects on channel geometry
503
H Haestad Methods
81
CulvertMaster
243
FlowMaster applied to calculate water surface elevations in floodways FlowMaster applied uniform flow analysis
331 421
PondPack applied to quasi-unsteady flow analysis
81
applied to routing floods through culverts
262
routing hydrographs
303
Harding Ditch HEC-6 applied to sediment transport
93
Hatchie River Bridge failure due to lateral scour hazard area designation
520 324
hazard area zones definitions of
330–331
on Flood Insurance Rate Map (FIRM)
325
head losses equation for
57
in standard step method
57
head. See culvert head loss headwater control of culvert flow. See inlet control of culvert flow headwater depth at culvert entrance
234
This page has been reformatted by Knovel to provide easier navigation.
503
Index Terms
Links
headwater elevation at culvert entrance
233
HEC. See Hydrologic Engineering Center HEC-1 (Flood Hydrograph Package)
23
quasi-unsteady flow analysis with
80
80–81
See also HEC-HMS HEC-2 (Water Surface Profiles program)
3–4
comparison of water surface profiles with HECRAS outputs data files that cannot be imported to HEC-RAS gradually varied steady flow modeling with HEC-RAS compared
657–658 650 77–78 651–658
importing data files into new projects in HEC-RAS
640
649
importing geometry files into HEC-RAS
640
649–650
Mississippi River application Mississippi River floodway computation with
86 368
replaced by HEC-RAS in U.S. National Flood Insurance Program HEC-6 (Scour and Deposition in Rivers and Reservoirs)
338 78
92
HEC-DSS (Data Storage System) data processing programs
642–643
exporting HEC-RAS data files to
645–646
importing data into HEC-RAS
642–644
path name assignment conventions
642
to import data for unsteady flow analysis
642
644
to import peak flow data for steady flow
644
644f
HEC-GeoRAS
641
ArcView GIS extension
641
for importing GIS data into HEC-RAS
641
inundation mapping
629
HEC-HMS (Hydrologic Modeling System) hydrologic routing in unsteady flow models
23 604
See also HEC-1 HEC-RAS culvert analysis procedures for levee analysis
243
244f
365–367
for U.S. National Flood Insurance Program (NFIP) use
338
This page has been reformatted by Knovel to provide easier navigation.
Index Terms
Links
HEC-RAS (Cont.) input data checks
284
program performance notes
286
water surface profiles HEC-2 compared HEC-RAS (River Analysis System)
657–658 4–5
78–79
84–85
animation feature to display a flood wave applications
646 78–79
digital image capability discharge-weighted reach length equation
102 63
HEC-2 compared
651–658
HEC-2 Data files and
649–650
incorporating WSPRO in
223–227
228f
integration with geographic information systems (GIS)
4
quasi-unsteady flow analysis
23
selection of bridge modeling computational method in
213–215
standard step method use in
68
steady flow analysis mode
23
to model bridge openings
9f
velocity distribution coefficient equation
62
206–215
See also specific applications, components, and functions of HEC-RAS HEC-RAS DSS Viewer to view and plot HEC-DSS data files
645
647f
HEC-RAS files. See exporting HEC-RAS data; importing data HEC-RAS graphical options. See graphical review of HEC-RAS outputs HEC-RAS input data. See input data HEC-RAS model verification HEC-RAS output analysis program checks
300 285–295 285–288
warning messages
286–288
See also design parameters; error messages from HEC-RAS program; graphical review of This page has been reformatted by Knovel to provide easier navigation.
648f
Index Terms
Links
HEC-RAS output analysis... (Cont.) HEC-RAS outputs HEC-RAS output parameters for channel modification See design parameters HEC-RAS production runs
301–303
CHECK-2 to supplement review of
302
CHECK-RAS to supplement review of
302
review of constraint elevation performance
302
review of ineffective flow area performance
302
review of outputs
302
water-surface profile computations for Flood Insurance Studies HEC-UNET (Unsteady Flow Network program) applied to Mississippi River data export into HEC-RAS
302 78 86 640–641
for gradually varied unsteady flow one-dimensional analysis
83–84
See also HEC-RAS HGL. See hydraulic grade line high-cutback channels. See compound channels high-flow analysis of bridges bridge overflow
176–182
214–215
179–182
orifice flow
178
sluice gate flow
177–178
weir flow
179–182
example
179f
181–182
See also bridge flow modeling; discharge coefficients; weir coefficient high-flow cutoff with diversion channel
389–390
high-flow diversion channel with weir
387–389
Morganza Diversion Structure
389
391f
390f
highwater marks for model calibration HIRE (Highways in the River Environment) program abutment live-bed scour equation
159 542 542–544
This page has been reformatted by Knovel to provide easier navigation.
181
Index Terms
Links
history floodplain hydraulic analysis
3–5
of floodplain management
1–5
of HEC-RAS
4–5
of Mississippi River basin model development
5
Hoover Dam impacts on channel erosion downstream
505
hundred-year flood See base flood HY-7. See WSPRO (Water Surface Profile software) hydraulic boundaries
114–120
downstream reaches
114–118
calculation (examples)
117–118
critical depth criterion
115
116f
normal depth criterion
115–116
117f
upstream reaches
118–120
calculation of effects (examples) limits of project effects under subcritical flow limits of project effects under supercritical flow
120 118–120 120
See also project effects hydraulic depth
18
calculation (example)
28
equation for
18
19t
hydraulic grade line (HGL) in culvert flow in open channel flow hydraulic jumps energy concepts of
234f
235
22f
235
25–26
26f
43–44
momentum balance to calculate sequent depths
33
momentum equation to evaluate
34
sequent depths
43f
43–44
calculation (example)
44
equations for
44
hydraulic jumps in drop structures hydraulic modeling tools criteria for selecting a model FLDWAV for gradually-varied unsteady flow (one-dimensional)
470
473
75–76
95
94–95 85
This page has been reformatted by Knovel to provide easier navigation.
44
Index Terms
Links
hydraulic modeling tools (Cont.) gradually varied steady flow
77
analysis of
76–77
HEC-2
77–78
HEC-RAS
78–79
WSP-2
79
WSPRO
80
gradually varied unsteady flow (one-dimensional) FEQ
87
HEC-RAS
84–85
HEC-UNET
83–84
gradually varied unsteady flow (three-dimensional) RMA10
90 90
gradually varied unsteady flow (two-dimensional) FESWMS-2DH
90
RMA2 Finite Element Model for TwoDimensional Depth-Averaged Flow Program
88–89
physical models
93–94
quasi-unsteady flow analysis
80
HEC-1
80–81
HEC-HMS
80–81
PondPack
81
TR20
81
sediment transport
90–92
HEC-6
92
SED2D
92
uniform flow HEC-1
76
HEC-HMS
76
HEC-RAS
76
use of spreadsheets
76
Hydraulic Properties Table (HEC-RAS) geometry preprocessing for parameter checks
605–607 607
This page has been reformatted by Knovel to provide easier navigation.
Index Terms
Links
hydraulic radius
18
equation for
18
19t
hydraulic variables calculation (examples)
28
hydraulics. See open channel hydraulics hydrodynamic models applied to floodplain modeling boundary conditions
590
592f
594–599 599
cross sections on floodplains orientation of
595f
data requirements
593
598
floodplain representation approaches to
594–599
for steep channels limitations
593
hydraulic structure representations similarity to steady-state flow modeling
594
initial conditions defining
593
warm-up time needed for stabilizing
602
interpolation to improve model accuracy
594
602
inundated areas map data comparisons to refine volume estimates
593
Manning’s n for floodplains choosing values for steady flows for model testing
598
599t
594
structure shapes water levels affected by time-series data used as boundary conditions
599 599
use of lateral connection to river to simulate floodplain as a storage area
598
See also FLDWAV; HEC-RAS; HEC-UNET; Saint Venant equations; unsteady flow modeling hydrograph travel time. See flood wave travel time
This page has been reformatted by Knovel to provide easier navigation.
593–602
Index Terms
Links
hydrographs analysis of effects of channel modifications in HEC-RAS
431
Hydrologic Engineering Center (HEC) method of defining bridge cross section locations
183–194
hydrologic modeling procedures
106
steady flow modeling
106
unsteady flow modeling
106
hydrologic routing effects of new or higher levees on floodplain storage
367
hydrologic routing data flood wave travel time
303–310 308–309
adjustments to calculate wave velocity from average velocity equation for
308–309 309
number of steps in reach routing peak discharges
310 304–307
revision needed due to channel modifications
310
routing reaches
303
storage-outflow values entering data from HEC-RAS into HEC-HMS hydrologic routing methods
304–307 310 303
conversion of subarea rainfall to runoff
303
translation of hydrograph downstream
303
hydrologic routing models
305f
304f
590
See also diffusion wave equation; kinematic wave equation; Muskingum routing method; Muskingum-Cunge routing method; Variable Parameter Muskingum-Cunge routing method hydrostatic pressure hysteresis
15
30
569
This page has been reformatted by Knovel to provide easier navigation.
Index Terms
Links
I ice frazil
485
pier scour and
536
sheet
485
ice analysis. See ice modeling ice cover
483
sediment transport and water surface elevations and ice jams
484 483–484 483
database for U.S.
488
water surface elevations and
484f
ice modeling
486
483–489
assistance from government agencies
488
composite manning’s n calculating
485
data entry
487
data requirements
484–487
HEC-RAS procedures
487
historical data
484
ice cover effects
483–484
ice jam effects
486–487
ice profiles review of
488
488f
489f
488
488f
489f
implicit finite-difference method
576f
587–589
achieving grid independence
589
Courant number
589
four-point Priessman scheme
587
in HEC-RAS
587
iterations needed for solution convergence
588
ice thickness data needed
484
Manning’s n for ice cover
485t
Manning’s n for ice jams
486t
surface water profiles review of
588f
This page has been reformatted by Knovel to provide easier navigation.
Index Terms
Links
implicit finite-difference method (Cont.) numerical stability of model
587
six-point Abbott-Ionescu scheme
587
solution convergence tolerance
588
time steps effect on model stability
588
See also Saint Venant equations importing data (to HEC-RAS)
639–645
computer automated drafting and design files (CADD)
641
digital terrain models
641
geographic information system files
641
HEC-2 files
640
HEC-DSS
649–650
642–644
HEC-RAS files
640
HEC-UNET files
640–641
need to review
651
spreadsheets
644–645
text files
644–645
U.S. Army Corps of Engineers’ cross-section data files
641
Indian Fork Creek (Ohio) ineffective flow area
151f 199–205
for inline flow control structures ineffective flow areas around bridges constraint elevations of floodplain flow distribution at bridges
465
466f
199–205 202–204 207
location of sections for constraint elevations
204–205
representation in HEC-RAS
200–202
206f
See also bridge flow modeling; low-flow analysis of bridges information resources channel design manuals for managing floodplain development
388 330–331
ice modeling
488
Natural Resources Conservation Service
114
on scour
510–512 This page has been reformatted by Knovel to provide easier navigation.
Index Terms
Links
information resources (Cont.) on stream stabilization measures
518
sediment investigations
560
U.S. Army Corps of Engineers
97
388
235
237–240
See also data sources inlet control of culvert flow analysis of flow (example)
247–248
coefficients describing inlet conditions
245–247
comparison with outlet control
241
242t
equations submerged-orifice flow
245
unsubmerged-weir flow
245
flow conditions
238–240
See also culvert hydraulics inline flow control structure modeling
465–469
calculation of peak flow exiting structure
468
cross section location
465
discharge data
468
gate setting data entry
468
469f
output analysis with Inline Weir/Spillway Table
469
469f
procedures
465–469
structure data entry
466–467
468f
See also lift gates; radial gates; weir flow inline flow control structures
459–469
See also gates; inline flow control structure modeling; weirs inline flow structure cross section locations inline gates modeling
465 459–469
See also floodplain modeling Inline Weir and/or Gated Spillway Data Editor (HEC-RAS) inline weir modeling
466–467
468f
459–473
See also floodplain modeling inline weir option (HEC-RAS)
459
This page has been reformatted by Knovel to provide easier navigation.
Index Terms
Links
input data (channel modification models)
414–417
adjustment of upstream and downstream boundaries Channel Modification Data Editor
414 414–417
for evaluating alternatives
414
HEC-RAS’s key features for
414
See also data entry input data adjustments changing station identification interpolate between cross sections
295–297 295 296–297
reverse cross section stationing
296
use of cross-section points filter
296
input data review
283–285
CHECK-RAS checks
298
HEC-RAS checks
284–285
modelers’ checks
284
Insurance Studies
345–346
330
insurance. See National Flood Insurance Program interior flood reduction measures for levees
443
irrigation channels design curves for
403
junction losses in culverts
272
J
junctions of channels
405–406
407f
K Keulegan equation to estimate Chézy’s C
417
Manning’s n
417
kinematic wave equation
574t
576f
zones of applicability
591
592f
See also hydrologic routing models
This page has been reformatted by Knovel to provide easier navigation.
578
590
Index Terms
Links
kinetic energy of channel flow
19
Kissimmee River Restoration Project
30
399
L Lake Havasu delta impact of sediment inflow from flood of 1985
504f
Lane method for critical shear stress Lane’s sediment balance lateral scour
426 380
380f
517–518
Hatchie River Bridge failure
520
See also bridge scour computation Lateral Structure Editor (HEC-RAS) in floodplain modeling
612
613f
473
473f
480
480f
lateral weir as a split flow diversion Lateral Weir and/or Gated Spillway Data Editor (HEC-RAS) lateral weir modeling
477–483
cross section locations
477
discharge estimates
478
flow optimization
480–481
HEC-RAS and HEC-2 compared output analysis
480 481–483
structure data entry structure representation
480
480f
478–480
See also inline flow control structure modeling; split flow modeling; split flows Laursen sediment transport equation
554
Law of Conservation of Energy. See energy equation Law of Conservation of Mass. See continuity equation Letter of Map Amendment (LOMA) Letter of Map Change (LOMC) Letter of Map Revision (LOMR)
333–334 332 335–337
restudy of hydrologic analyses
336–337
submittal procedure
341–344
This page has been reformatted by Knovel to provide easier navigation.
478f
Index Terms
Links
Letter of Map Revision (LOMR) (Cont.) to revise basic flood elevations
335–336
Letter of Map Revision based on Fill (LOMR-F)
334–335
levee modeling
444–451
analysis using HEC-RAS
365–367
breech analysis key parameters
631
conveyance on landward sides of levees
447–449
cross-section locations
444–445
data entry in HEC-RAS
445–447
HEC-RAS defaults
445–446
HEC-RAS procedures for
444–449
levees
632f
11
11f
breeching during floods
441
441f
channel modification by
387
387f
characteristics
437–449
437–444
closure design for openings
438f
effects on flood levels
437
environmental effects of
440–441
flank levees
441–443
floodplain storage and
367
interior flood reduction analysis
437
interior flood reduction measures
437
440f
443
limitations on elevation increases of 100-year flood
440
location of initial overtopping
440–443
mass wasting of
631
Mississippi River
368
piping
631
riverfront
442
seepage
631
slide slopes of
438
typical cross section
438f
443
450
576f
577
See also floodwalls Level-Pool routing method
574t
LIDAR (Light Detection and Ranging)
114
This page has been reformatted by Knovel to provide easier navigation.
Index Terms
Links
lift gates
460
flow equations for
460f
461–462
See also weir flow Limerinos’s equation to estimate Manning’s n live-bed scour
419 512–514
average contraction scour depth
524
calculation of contraction scour for a bridge (example)
525–526
HIRE abutment scour equation
542–544
Laursen’s Live-Bed Equation
523–526
523
See also contraction scour; scour Log routing method
575t
LOMA. See Letter of Map Amendment LOMC. See Letter of Map Change LOMR. See Letter of Map Revision LOMR-F. See Letter of Map Revision Based on Fill looped rating curves
568–569
loss coefficients. See contraction coefficients; expansion coefficients; friction losses low-flow analysis of bridges energy method
170–176
213–214
170–171
flow classification
170
171f
Class A
174f
175
Class B
175–176
Class C
176
momentum method
171–173
Yarnell equation
173–174
176f
low-water bridges modeling of
218–220
M maintenance requirements frequency of clearing and snagging operations
390
of compound channels
391
of modified channels
433
of realigned channels
394
This page has been reformatted by Knovel to provide easier navigation.
Index Terms
Links
Manning equation
2–3
for discharge
37
for velocity
37
to compute normal depth (example) Manning, Robert Manning’s n adjustment at bridge cross sections
35–37
42–43 2–3
36
36
37
37
199
adjustment to make HEC-RAS water surface profiles match HEC-2 outputs
657–658
analysis of sensitivity to channel modifications in HEC-RAS
430
calculation of composite roughness for ice cover and ice jams
485–486
calibration from gauge data
154–155
effect of sediment deposition on flow regime in channels
400–401
effect on contraction ratio ranges in bridge reaches
185–187
effect on expansion ratio ranges in bridge reaches
190
effects of clearing and snagging
390
estimates based on Cowan’s equation
150
estimates based on judgment
145
estimates based on picture comparison
190t
152t
149–150
151f–152f
descriptions
145–146
146t
factors affecting values of
144–145
estimates based on standard channel
for mix of linings
273
calculation (example)
273
for vegetation types
390
in floodplain modeling
144
uncertainty of
146f
units of
36
values for natural channels
37
values in Flood Insurance Studies
146t–149t
327
This page has been reformatted by Knovel to provide easier navigation.
153f
Index Terms
Links
Manning’s n (Cont.) vertical variation in compound channels
391
See also roughness coefficients Manning’s roughness coefficient. See Manning’s n Marib Dam (Yemen)
2
mass wasting of levees
631
MBM. See Mississippi Basin Physical Model meanders
378
membrane lined channel
402
Meyer-Peter-Müller sediment transport equation
554
minimum energy loss culverts
264
265f
3
4f
channel realignment of
394
395f
Class A flow
175
175f
flood of 1927
3
5
flood of 1973
86
flood of 1993
175
Mississippi Basin Physical Model Mississippi River
hydraulic model applications
175f
86
levees
368
Morganza Diversion Structure
389
390f
83
86
444
444f
Mississippi River flood of 1993 protection of St. Louis by levees Missouri River flood of 1993 scour and deposition effects on channel areas mixed flow analysis
503 294–295
criteria for conducting analysis HEC-RAS for
294 294–295
mobile boundary analysis
501–502
channel geometry changes from scour and deposition during floods channel modifications impacts on sediment transport channel scour downstream of dams
503 506
507f
506
507f
505
506
flow diversions
This page has been reformatted by Knovel to provide easier navigation.
5
86
Index Terms
Links
mobile boundary analysis... (Cont.) impacts on sedimentation
507
508f
506–507
508f
impacts on flood levels of channel deposition in tributaries along flank levees reservoir sedimentation scour and deposition in sand-bed streams
503–506 502
See also bridge scour analysis model calibration data sources. See data sources; information resources model calibration procedures (HEC-RAS)
297–301
calibration tolerance
300
301f
checking input data with CHECK-RAS
298
345–346
comparison of output with actual data
298
parameter adjustments
298–300
backwater from other streams
300
changes since historical flood event
299
conveyance
299
debris at bridges
300
discharge
299
geometry
299
looped rating curve
300
Manning’s n
298
superelevations
299
wave setup
300
model production runs. See HEC-RAS production runs model sensitivity tests
301
model verification
300
data needs
162
Modified Puls Routing method momentum coefficient
303
574t
31
32
calculation (example)
33
in momentum equation
31
172
3
30–35
momentum equation applied to low-flow analysis of bridges
171–173
drag coefficient of bridge piers in
172–173
for rapidly varied flow analysis
173t
34
This page has been reformatted by Knovel to provide easier navigation.
576f
Index Terms
Links
momentum equation (Cont.) for unsteady flow analysis frictional resistance in
34
572
31–32
172
specific force
34
to calculate force on flow obstructions
34
to evaluate hydraulic jumps
34
use for calculation of force on obstructions to flow (example) Morganza Diversion Structure
34–35 389
390f
multiple bridge openings modeling of
215–217
Multiple Opening Analysis Editor (HEC-RAS) Muskingum routing method conceptualization of channel storage routing calculation (example)
215–217 574t
581–584
581
582f
583–584
See also hydrologic routing models; Saint Venant equations Muskingum-Cunge routing method
575t
eight-point cross-section configuration
586
standard configuration
586
584–586
See also hydrologic routing models; Saint Venant equations
N National Flood Insurance Act of 1968 National Flood Insurance Program (NFIP)
318 317–319
base flood elevation (BFE) defined
319
CLOMR requirements for floodways
339–340
community responsibilities
330
Flood Hazard Boundary Map
322
flood surcharge
340t
319–321
floodway
319
320f
floodway fringe
320f
321–322
floodway revisions LOMRs for
337–338 This page has been reformatted by Knovel to provide easier navigation.
572
Index Terms
Links
National Flood Insurance Program (NFIP) (Cont.) hazard zone designations HEC-RAS use by
330–331 338
land management criteria
330–331
land use criteria
330–331
levee regulations
365
MT-1 forms
333
new data right to submit
332
new technical data requirement to submit
332
physical map revision
341
publications and maps
322–325
Special Flood Hazard Area (SFHA)
319
submitting new data
332
325
See also Flood Insurance Rate Maps National Flood Insurance Program Regulations for levee analysis
446
National Flood Insurance Reform Act of 1994 National Geodetic Vertical Datum (NGVD) Natural Resources Conservation Service (NRCS)
318 16 3
aerial photographs
114
soil maps
114
WSP2
3
navigation
83
new channel construction
105
394
79
396f
newspaper records as model calibration data source
160–161
NFIP. See National Flood Insurance Program NGVD. See National Geodetic Vertical Datum Nikaradse equivalent sand grain roughness
417
Nile River historic irrigation project nonprismatic channels slope of
1–2 13
14f
22
This page has been reformatted by Knovel to provide easier navigation.
331
333
Index Terms
Links
normal depth
42–43
calculation (example)
42–43
in water profile classification
46–51
See also depths NRCS. See Natural Resources Conservation Service NWS. See U.S. National Weather Service
O obstructions effects on floodways ogee weirs
365 460
open channel flow
460f
13–16
broad-crested weirs
460f
comparison with pressure flow
13–16
empirical relationships
15–16
hydraulic analysis of
13–16
ogee weir
460f
pressure flow compared open channel hydraulics calculation of velocity distribution coefficient channel top width
464
13–16 13
69
20–22 14f
Chézy equation
464
17
35–36
continuity equation
29
discharge
18
energy concepts
37–44
energy equation
29–30
flow depth
14f
Froude number
26–27
fundamental equations
29–37
16–17
hydraulic depth
18
19t
hydraulic radius
18
19t
introduction
13
Manning equation
35–37
momentum concepts
37–44
terminology
13–23
velocity
19–22 This page has been reformatted by Knovel to provide easier navigation.
18f
Index Terms
Links
open channel hydraulics (Cont.) velocity distribution coefficient wetted perimeter
20–22 17
18f
13
14f
178
179f
19t
See also flow classification; momentum open channels orifice flow at bridges HEC-2 for modeling
181
orthophoto maps
113
outlet control of culvert flow
234
analysis of flow (example)
240–241
251–253
coefficients entrance loss comparison with inlet control
248f
250t
241
242t
entrance loss
248–249
exit loss
249–250
flow conditions
240–241
friction loss
250–251
head loss
242f
251
See also culvert hydraulics overbank flow center of flow mass for
131f
overbank flow paths geometric data
131f
overbank. See floodplains low-flow analysis of bridges See bridge flow modeling; standard step method
P parallel bridges modeling of
217
219
394
396f
parameters computed by HEC-RAS See design parameters paved channel linings
This page has been reformatted by Knovel to provide easier navigation.
402–403
Index Terms
Links
peak discharges calculation from regression equation (example)
141–142
for model calibration
159–160
in watershed models
303
305
peak flow attenuation
564–566
perched bridges modeling of
217
218f
permit requirements for channel modifications
399–400
physical models applications
93–94
See also Mississippi Basin Physical Model Pier Geometry Data Editor (HEC-RAS) pier scour
209–211 515
debris and
536
emergency pier replacement
536f
ice and
536
515f
519
529t
See also scour pier scour computation
527–537
angle of attack correction factor
528
529
angle of attack of flow on bridge pier
528
529f
bed condition correction factor
528
530
bed material armoring correction factor
528
531
calculation of correction factor for armoring (example)
533
calculation of pier scour for a given angle of attack of flow (example)
532
calculation of pier scour for bed material of a given size (example)
531–532
Colorado State University (CSU) pier scour equation
527–531
depth of scour for complex foundations
533–535
Froehlich pier scour equation
537
in bridge openings under pressure flow
536
in HEC-RAS
547
pier nose shape correction factor
528
548f
This page has been reformatted by Knovel to provide easier navigation.
530t
534f
Index Terms
Links
pier scour computation (Cont.) pier shapes
528f
scour from debris in flow
535
536f
top width of scour hole
537
537f
channel design considerations
413
413f
effect of shape on drag
173
173t
splitter extensions on
176
176f
536
See also bridge scour computation piers
173
piping of levees
631
plane bed
530
point bars
378
PondPack
81
application to quasi-unsteady flow analysis
81
described
81
potential energy of channel flow
262
30
pressure flow open channel flow compared under bridges
13–16 178
180f
See also closed-conduit flow Price current meter
143
Priessman implicit finite-difference scheme
587
prismatic channels
13
standard step method applied to (example) profile convergence
14f
59–61 170
profiles. See graphical review of HEC-RAS outputs; tabular review of HEC-RAS outputs project economic benefits
100–101
project effects
118–120
See also hydraulic boundaries; sediment boundaries project evaluation
100
project feasibility
100
project hydraulic boundaries See hydraulic boundaries This page has been reformatted by Knovel to provide easier navigation.
283
303
Index Terms
Links
project sediment boundaries
120
Provo River (Utah)
152f
Pump Station Data Editor (HEC-RAS)
616f
626
626f
77
80–81
Q Quality Assurance/Quality Control (QA/QC) of model output quasi-unsteady flow modeling criteria for modeling
107–108 23 80
HEC-1 Flood Hydrograph Package
80–81
HEC-HMS Hydrologic Modeling System
80–81
PondPack
81
TR20
81
radial gates
460
R
flow equations for
460f
462–463
See also weir flow railroad trestles Yarnell equation for modeling flow rapidly varied flow
173–174 25–26
26f
momentum equation for open channel flow analysis
34
rating curves looped
82
variation of stage with discharge
82f
140
reaches aggradation
512
513
length geometric data for
132f
See also contraction reaches; expansion reaches rectangular channels equation for critical depth of
41
equation for unit discharge of
40
geometric parameters
14f
velocity distribution in See also channels
20f
19t
This page has been reformatted by Knovel to provide easier navigation.
Index Terms
Links
Regime method
425
regional flood-frequency equations
141t
report preparation
108
reservoir sedimentation reservoirs
503–506 10
riprap analysis
428
riprap channel linings
402
design for channel protection
426f
92
402f
408
risk and uncertainly studies for levee design
404
river forecasts
83
river hydraulics models
3–5
See also names of specific models river mileage
122
riverfront levees
125f
441–442
RMA10 (Finite Element Model) to analyze three-dimensional gradually varied unsteady flow
90
RMA2 (Finite Element Model for Two-Dimensional Depth-Averaged Flow program)
88–89
roadways as weirs
179
Roman aqueducts
2
2f
roughness coefficients Brownlie equation Chézy’s C
419 36
estimates of
144–156
Keulegan equation
417
Limerinos equation
419
SCS grass cover equations
419
Strickler equation
418
See also Manning’s n roughness data
144–156
See also Chézy’s C; geometric data; Manning’s n
This page has been reformatted by Knovel to provide easier navigation.
407f
408
Index Terms
Links
routing models
590–592
data requirements
158–159
592
See also hydrodynamic models; hydrologic routing models routing reaches
303
S Saint Venant equations
571–573
application on gradually varied unsteady flow (one-dimensional) analysis
83
approximations criteria for choosing
574t
579–580
kinematic wave equation
574t
576f
578
Level-Pool Routing method
574t
576f
577
steady-state approximation
576f
576
to help solve full equations
574t–575t
576f
assumptions for one-dimensional equations
572
573t
continuity equation
571f
571
discretization
587
hydraulic structures and
589–590
iteration
588
momentum equation
572
numerical solutions
588f
587–589
solution convergence
588
588f
solving full equations
574t–575t
576f
space steps
589
steep streams criteria for applying to time steps
579
580
588
See also diffusion wave equation; hydrodynamic models; implicit finite-difference method; Muskingum routing method; MuskingumCunge routing method SAM (Sediment Analysis Methods) program
554
San Luis Canal (California)
25f
This page has been reformatted by Knovel to provide easier navigation.
587–590
Index Terms
Links
Schoharie Bridge (New York) failure due to pier scour
519
scour aggradation of a reach
512
513
analysis of sensitivity to channel modifications in HEC-RAS at culvert outlets
430 269–270
average depth
524
contraction scour
512–514
degradation of reaches
511–512
lateral scour
517–518
locations of
514f
513
total in HEC-RAS
548
types of
549f
511–518
See also abutment scour; bridge scour modeling; clear-water scour; contraction scour; live-bed scour; pier scour SCS grass cover equations for Manning’s n
419
SCS. See Natural Resources Conservation Service Second Law of Motion
30–31
sections. See cross sections SED2D (Sediment Transport in Unsteady TwoDimensional Flow Horizontal Plane Program)
92
sediment boundaries for floodplain modeling
120
See also project effects sediment data for floodplain modeling
157
sediment deposition analysis of sensitivity to channel modifications sediment loads
430 378–380
suspended
553
553f
See also suspended loads
This page has been reformatted by Knovel to provide easier navigation.
Index Terms
Links
sediment models
90–92
HEC-6
92
SED2D
92
sediment rating curves
554
93
557f
collecting gauged data
551
collecting sediment analyses
551
552f
defining rating curves from data
551
552f
558–560
extending curves for particle sizes outside of derived equation ranges sediment load sediment transport equations for developing
554 553
553f
551–554
554t
See also sediment transport equations sediment reach
558
sediment regime effect on project performance
398
effects of projects on
120
sediment storage in reservoirs
503–506
sediment transport HEC-6 for
93
Sediment Transport Capacity window (HEC-RAS) parameter entry
558
sediment transport equations Ackers-White function cautions in applying
558f
554–560 554 556–557
Engelund-Hansen function
555
Laursen function
555
Meyer-Peter-Müller function
555
parameter range for
554t
Toffaleti function
555
Yang function
556
sediment transport modeling (HEC-RAS) applying sediment transport equations cautions in
558–560 556–557
computing sediment rating curves
557f
558–560
parameter entry
558f
558
sediment rating curves
554
557f
This page has been reformatted by Knovel to provide easier navigation.
558–560
Index Terms
Links
sediment transport modeling (HEC-RAS) (Cont.) sediment reach definition
558
selecting sediment transport equations for
554t
558
558
559f
sediment transport profiles sedimentation in culvert barrels
266
upstream of culvert entrance
265–266
sediment-discharge relationships. See sediment rating curves seepage of levees
631
sequent depths
43
calculation (example)
44
equations for
44
43f
See also depths; hydraulic jumps SFHA. See Special Flood Hazard Areas shallow water equations
571–572
shear stress critical
426
HEC-RAS output
429
Lane method
426
Shields method
426
shear velocity
524
sheet ice
485 See also ice modeling
Shields method for critical shear stress
426
simplified unsteady flow analysis See quasi-unsteady flow modeling Slopes culvert embankment side slopes
258f
258
258f
258
211
212f
See also channel invert; friction slope Sloping Abutment Data Editor (HEC-RAS) sluice gates flow at bridges
177–178
sluice gates. See lift gates
This page has been reformatted by Knovel to provide easier navigation.
Index Terms
Links
snagging channel modification by
390
392f
Soil Conservation Service (SCS) See Natural Resources Conservation Service soil maps
114
Special Flood Hazard Area (SFHA)
319
identification of
325
333
331
See also Letter of Map Amendment specific energy
38–40
application to analysis of flow obstruction (example)
38–39
at various depths
39–40
equation for
38
specific energy curves
40f
specific force
34
calculation (example) of force on object equation for
34–35 34
Spillway Gate Opening Editor (HEC-RAS)
468
469f
broad-crested shape
460
460f
emergency
465
465f
ogee-shape
460
460f
uncontrolled flow at
465
465f
ungated
465
465f
spillways
split flow diversions
473–476
effects of
474
474f
lateral weir
473
473f
split flow modeling
476–483
computations
476
cross section locations
473f
discharge estimates
476
optimization of flows
477
procedures for separate channel splits
476
476
See also inline flow control structure modeling; lateral weir modeling; split flow diversions split flows
10
569
This page has been reformatted by Knovel to provide easier navigation.
464
464
Index Terms
Links
spreadsheets importing data to HEC-RAS
644–645
stable channel design See channel design; HEC-RAS; input data stage data for model calibration
159–160
Standard Encroachment Tables (HEC-RAS) data review and modification
358
359f
362
elevation data review
358
359f
363f
370–371
371f
floodway map standard step method
56–68
application
58–59
applied to analysis of gradually varied steady flow
56
equation for
56
for complex cross sections using conveyance (example)
63–67
for prismatic channels (example)
59–61
head losses in
57
HEC-RAS for
68
using conveyance
61–67
variables used
52f
57f
See also low-flow analysis of bridges statistical analysis of discharge data steady flow
138–139 23
Steady Flow Analysis Editor (HEC-RAS) floodway plan computation
358
Steady Flow Data Editor (HEC-RAS) for base flood elevations
355
for flood profiles
355
steady gradually varied flow. See gradually varied steady flow steady-state flows as preliminary runs in unsteady flow models
604
for model testing
594
hydraulic structure representations and
594
model limitations
564
Saint Venant equations for approximating
576
568–570
See also unsteady flow modeling This page has been reformatted by Knovel to provide easier navigation.
Index Terms
Links
storage routing. See level-pool routing method storage-outflow relationships culvert flow modeling stream centerline on Flood Insurance Rate Map (FIRM) stream discharge measurements
261–264 325 41
stream equilibrium
378–380
stream gauge data
111–112
stream junction modeling methods of computing losses through junctions momentum method
458
stream power HEC-RAS output
429
Strickler equation to estimate Manning’s n structural flood control measures
418 10
structural measures dams, reservoirs, and detention ponds
10
diversions
10
levees
11
split flows
10
structures
11f
206–215
study limits. See hydraulic boundaries; sediment boundaries subcritical flow analysis in mixed flow analysis subcritical flows
294 26–28
in Class A flows at bridges
171f
submergence value of lift gate flow
462
175
sump inlets for culverts
274
supercritical flows
26–28
in Class C flows at bridges
171f
mixed flow analysis and
294
superelevations on channel curves
408
equation coefficients
409t
equation for
409
superstructure
176
409f
208–209 This page has been reformatted by Knovel to provide easier navigation.
176f
Index Terms
Links
suspended loads
378
553
553f
See also sediment loads swellhead
169
T tables. See tabular review of HEC-RAS outputs tabular review of HEC-RAS outputs
291–294
bridges
292
293f
cross sections
291
291f
culverts
294
profiles
291
292f
tailwater control of culvert flow. See outlet control of culvert flow tailwater depth at culvert exit
234
tailwater elevation at culvert exit
234
selection without downstream profile data
260
tainter gates. See radial gates Tennessee Valley Authority (TVA) use of physical models
94
text files importing into HEC-RAS
644–645
645f
tie-back levees
441
442f
Toffaleti sediment transport equation
555
topographic maps
106
113–114
30
45
total energy head equation for total energy loss of culvert
235
under outlet control
251
total momentum. See specific force total sediment load
553
TR20 (software)
553f
81
tractive force method
426–428
transportation facilities floodplain studies
9
trapezoidal channels
14f
velocity distribution in
19t
20f
See also channels This page has been reformatted by Knovel to provide easier navigation.
121
Index Terms
Links
triangular channels
14f
19t
See also channels velocity distribution in
20f
tributaries. See stream junction modeling TVA. See Tennessee Valley Authority
U U.S. Army Corps of Engineers (USACE) channel design manual
3
5
388
Cold Regions Research and Engineering Laboratory (CRREL) ice jam database for the U.S.
488
ice modeling assistance from
488
cross-section data importing into HEC-RAS
641
Hydrologic Engineering Center (HEC)
3–4
St. Louis District
368
Waterways Experiment Station
3
5
See also names of specific models and software U.S. Bureau of Reclamation (USBR) use of physical models U.S. Geological Survey (USGS)
94 3
digital elevation models
106
discharge data on Web
105
gauge data
136
regional equations
113
stream gauge data
111–112
topographic maps
106
114
See also names of specific models and software U.S. National Weather Service (NWS)
85
See also names of specific models and software U.S. Soil and Conservation Service (SCS) See Natural Resources Conservation Service UNET. See HEC-UNET Uniform Analysis Tool (HEC-RAS) to compute channel bottom width
420–421 420
421f
This page has been reformatted by Knovel to provide easier navigation.
90
94
Index Terms
Links
Uniform Analysis Tool (HEC-RAS) (Cont.) to compute water surface elevation and discharge
420
421f
uniform flow
23
24f
uniform flow analysis
76
417–421
applications
76
calculation of roughness Brownlie equation
419
Keulegan equation
417–418
Limerinos equation
419
Manning’s n
417
SCS grass cover equations
419
Strickler equation
418
FlowMaster
420f
421
HEC-1
76
HEC-HMS
76
spreadsheets for
76
use to approximate parameters in Manning’s equation
417
See also channel design Uniform Flow Analysis Tool (HEC-RAS)
76
420–421
unit discharge for rectangular channels equation for
40
Unsteady Flow Data Editor (HEC-RAS) unsteady flow modeling attenuation of peak flows
612–617 23
617–631
564–566
567f
attenuation parameter to assess flow conditions
566
boundary conditions
599
615–616
608
609f
610f
608
609f
610f
dam break simulation
629
630f
detecting potential problems at given flows
604
bridge preprocessor results checking of channel geometry data entry criteria for use of
604 564–570
culvert preprocessor results checking of
This page has been reformatted by Knovel to provide easier navigation.
Index Terms
Links
unsteady flow modeling (Cont.) downstream boundary condition option
614
effects of channel storage on attenuation
567f
effects of flow restrictions
568
568f
external control systems simulation
570
570f
geometry preprocessor and
605
guidelines for choosing an unsteady flow model
566
HEC-HMS for hydrologic routing
604
hybrid approach for steep rivers
602
hydrodynamic model approach inundation mapping using HEC-GeoRAS
615f
568t
593–602 629
levee breeches mechanisms for initiating
631
simulation
631
looped rating curves
568–569
mixed flow analysis
626–627
modeling lateral weirs
596–597
preliminary steady-state runs
604
pump representations in
616f
routing model approach
590–592
run time messages and errors
619
632f
628f
626
627f
619f
620t
simulation period selection of
618
simulation stages
617
flow modeling
617
geometry preprocessor
617
postprocessor to create standard HEC-RAS output
618f
specifying initial conditions
618f
618
616–617
split flows
569
storage areas to represent online lakes
627
628f
time steps for simulation selecting
618
transient effects
570
570f
troubleshooting
603
603t
upstream boundary condition options
613
614f
This page has been reformatted by Knovel to provide easier navigation.
Index Terms
Links
unsteady flow modeling (Cont.) using HEC-RAS
604–631
See also floodplain modeling; gradually varied unsteady flow modeling; hydrodynamic models; Saint Venant equations; steady-state flows unsteady flow modeling results animation of profiles displaying
624 620–624
graphical plots of profiles
624
625f
tabular outputs
624
625f
621
622f
23
24f
viewed as time-series plots from the HEC-DDS file unsteady flows urbanization impacts on stream equilibrium
381
See also stream equilibrium USACE. See U.S. Army Corps of Engineers USBR. See U.S. Bureau of Reclamation USGS. See U.S. Geological Survey
V Variable Parameter Muskingum-Cunge routing method (VPMC)
575t
586
24f
24
See also diffusion wave equation; hydrologic routing models varied flow velocity
19–22
air entrainment at high velocity
401–402
analyzing HEC-RAS results for channel modification
430
approach minimum for pier scour
531
average HEC-RAS output in channel in reaches
428 19 308t
309
This page has been reformatted by Knovel to provide easier navigation.
623f
Index Terms
Links
velocity (Cont.) calculation (examples) falling sediment particles
28 524
525f
limits in floodway analysis for channels and floodplains velocity distribution coefficient calculation (example) equation for
364 20–22 21–22 20
using conveyance in equation
62
velocity head
19–21
for culvert flow
234f
for open channel flow
235
19
velocity vectors one-dimensional flow
89f
two-dimensional flow
89f
vertical lift gates. See lift gates vortices abutment scour and
516f
538
W warning messages from HEC-RAS program
286–288
about conveyance ratios
286
about critical depths
287
about cross-section endpoints
287
about divided flows
288
about energy losses
287
about velocity head changes
286
wash load
378
553
See also sediment load water stage recorder
137f
water surface profile programs (software)
3–5
E431/J635
3
HEC-2
3–4
HEC-RAS
4–5
WSP2
3 This page has been reformatted by Knovel to provide easier navigation.
553f
Index Terms
Links
water surface profiles
45–51
automated computation of backwater curve
3 48
classification
46–51
classification (example)
49
drawdown curve
48
equations for
45
46f
errors
133t
134t
for Flood Insurance Studies
302
for horizontal slopes
49
50f
for mild slopes
46–49
50f
for steep slopes
49
50f
friction slope in
45
47–48
Froude number
48
water-level convergence tolerance values HEC-RAS defaults
588
watershed models estimate of discharge data
142
144f
3
5
watershed subareas. See routing reaches Waterways Experiment Station (WES) Sediment Analysis Methods (SAM) program use of physical models wave celerity
554 94 586
wave travel time. See flood wave travel time waves at channel junctions
405
at channel transitions
404
weir coefficient
180–181
typical values
464
180
weir flow at bridges
179–182
(example)
181–182
low flow under gates
463–464
See also lift gates
This page has been reformatted by Knovel to provide easier navigation.
90
Index Terms
Links
weirs
459–469
broad-crested
460
HEC-RAS treatment of
609
inline weirs modeling
460f
464
460f
464
459–469
lateral weirs in unsteady flow modeling
596–597
ogee-shape
460
roadways as
179
to obtain critical depth types of
41 460
WES TABS-MD (software)
460f
92
WES. See Waterways Experiment Station wetlands Kissimmee River Restoration Project
399
wetted perimeter
17
18f
19t
width of flow
14f
17
18f
Windows (software) importing data to HEC-RAS via the clipboard WSP2 (Water Surface Profile Program)
644–645 3
79
3–4
80
WSPRO (HY-7) Bridge Waterway Analysis Program See WSPRO (Water Surface Profile software) WSPRO (Water Surface Profile software) computation procedures contraction and expansion coefficients in
226–227 226
cross sections selecting
223–225
incorporation in HEC-RAS
227
modeling procedures
223–226
to model bridge flow
223–227
Y Yang sediment transport equation
556
Yarnell equation
173–174
Yarnell pier-shape coefficients
173–174
174t
This page has been reformatted by Knovel to provide easier navigation.
223–227
19t
Related Documents

Floodplain Modeling Using Hec-ras
March 2021 0
Modeling Of Masonry Structures Using Etabs
January 2021 0
Robot Modeling And Control
February 2021 0
Modeling With Nlp
January 2021 1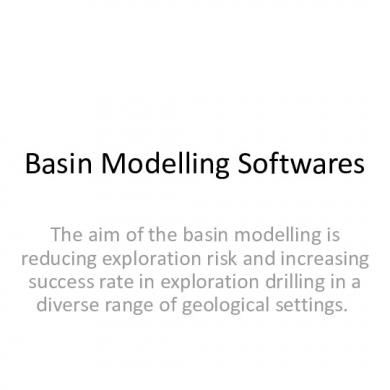
Basin Modeling Softwares.pptx
January 2021 3
Optimization Modeling In Lingo
January 2021 13More Documents from "Harry Dawns"
Floodplain Modeling Using Hec-ras
March 2021 0

